WordPress not sending email?
If your WordPress site stops sending emails, it can result in a direct loss to your business. You could end up losing valuable leads and potential customers. Or you could end up completely breaking the experience for your existing customers.
But what’s the problem, really? Why isn’t your WordPress site sending emails?
And more importantly, how do you fix it?
In this article, we’ll answer all these questions and give you an easy way to fix the issue.
Давайте приступим.
Why is WordPress Not Sending Email Notifications?
It’s a common issue among WordPress users and chances are high that it has nothing to do with your installed themes or plugins.
Your WordPress site can’t send emails because your hosting provider isn’t properly configured to send emails. And you may not even get notified of contact form submissions.
Just imagine the number of leads and potential customers you could lose in a matter of hours. For an online store, you may end up in a scenario where people buy from you, but none of your automated emails are sent. That can lead to a lot of confusion and even a loss of trust in your customers.
Let’s take a closer look at the technical end of the problem.
WordPress handles user registration emails using built-in PHP code called the wp_mail() function:

This is a big problem because not all WordPress hosts are configured properly to use PHP mail.
And even if the servers are configured properly, Gmail and other email service providers use strict spam filters. These spam filters try to verify automatically that your email is coming from your business and not a fraudulent third party. That’s where most of your emails get blocked or flagged as spam.
How to Fix the WordPress Not Sending Email Issue
The right way to deal with the issue is to send your emails using SMTP instead of relying on WordPress’ PHP mail.
And we’re going to show you how to use an SMTP service to make sure that your email is always delivered. All you need to do is install the WP Mail SMTP plugin.
The WP Mail SMTP plugin will help you fix your email delivery issues in a few simple steps. And it’s not technical at all. It’s super simple and anyone can do it. So, go ahead and install and activate the plugin. If you’re not sure how to do that, this tutorial will show you how to install a WordPress plugin.
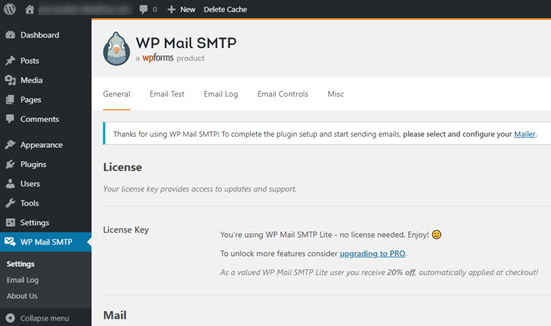
Step #1: Installing the WP Mail SMTP Plugin
Once you’re done installing the plugin, head over to your WordPress dashboard and click on WP Mail SMTP to configure the plugin:
After you enter your license key, enter your email and name in the Mail section:
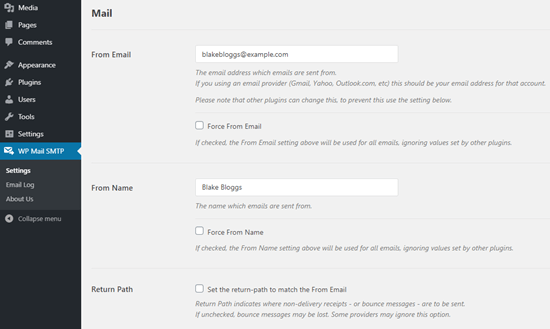
NOTE: Make sure that you enter the same email address as the one you’ll be using for your SMTP service. If there are conflicting emails, you’ll keep getting errors from the email service provider dashboard.
Не беспокойтесь, если вы используете какой-либо другой адрес электронной почты в других плагинах WordPress, таких как WPForms. WP Mail SMTP принудительно заставляет другие плагины автоматически использовать адрес электронной почты, который вы используете для настройки вашей службы SMTP.
That’s all for now.
Step #2: Selecting an Email Service Provider
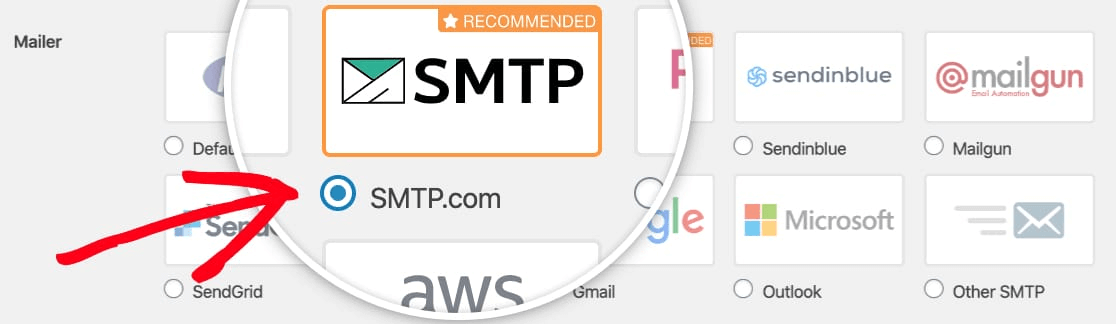
Next, you’ll need to choose an SMTP mailing service for your site. We recommend using SMTP.com. But you can find a lot of different services there.
Head over to your WordPress dashboard and go to WP Mail SMTP » Settings.
Then, under Mailer, select a service provider. You can choose between a whole host of options:

We recommend using SMTP.com:
To finish setting up the WP Mail SMTP plugin, you’ll have to create an account with SMTP.com next. It’s a super popular SMTP service that allows you to send bulk emails with high delivery rates.
Step #3: Creating an SMTP Account
Перейдите к созданию новой учетной записи:

Once you’ve signed up, you’ll be asked to click on an activation link via email and confirm your identity.
So, keep an eye out for multiple emails.
And then, go back to the WP Mail SMTP plugin to connect your SMTP account to the plugin.
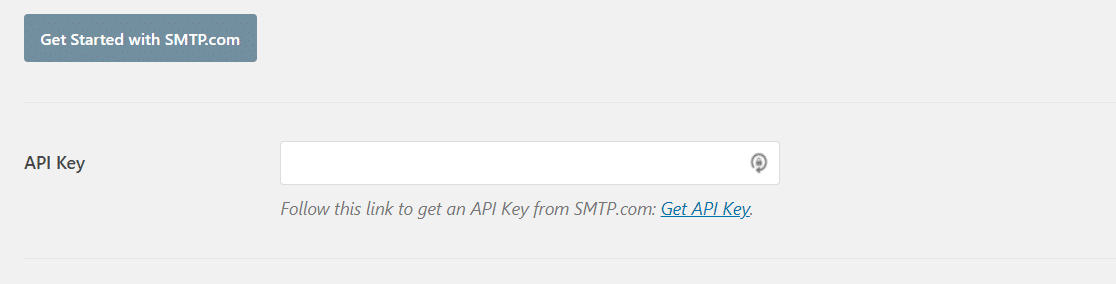
Во всплывающем окне будет запрошен API-ключ, который вы можете получить из своей панели управления SMTP.com. Нажмите на ссылку Получить API-ключ (нажмите на эту ссылку, чтобы перейти туда напрямую):
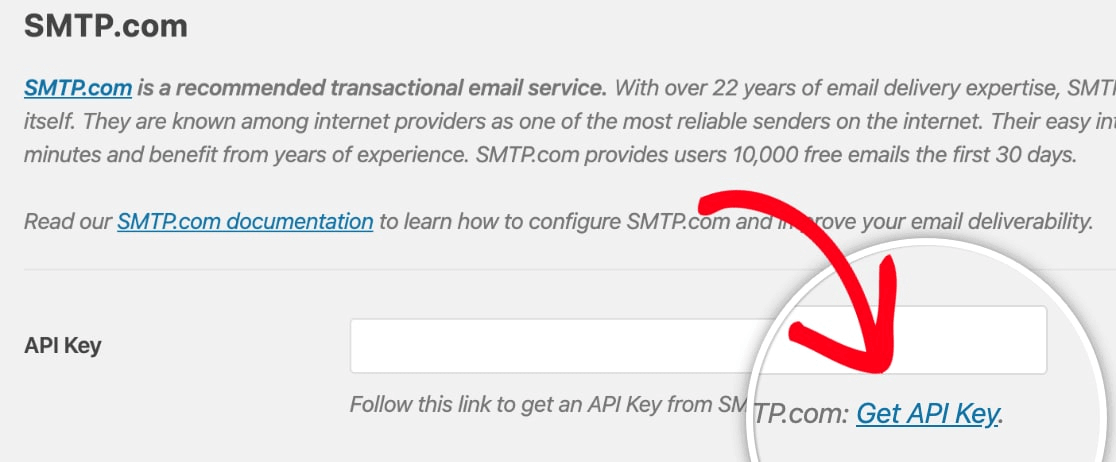
You should see a table on this page. Copy the API Key in the Key column:
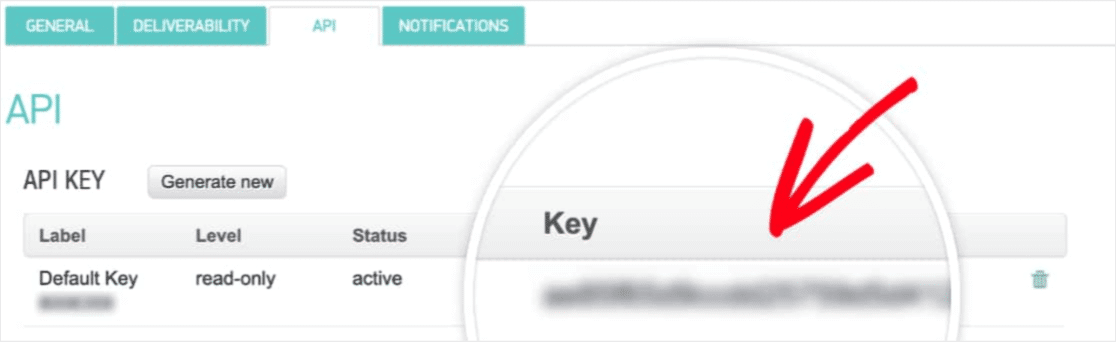
Then paste this API key in WP Mail SMTP:
Finally, in the Sender Name field, click on the Get Sender Name link:

Copy the name in the Name column:
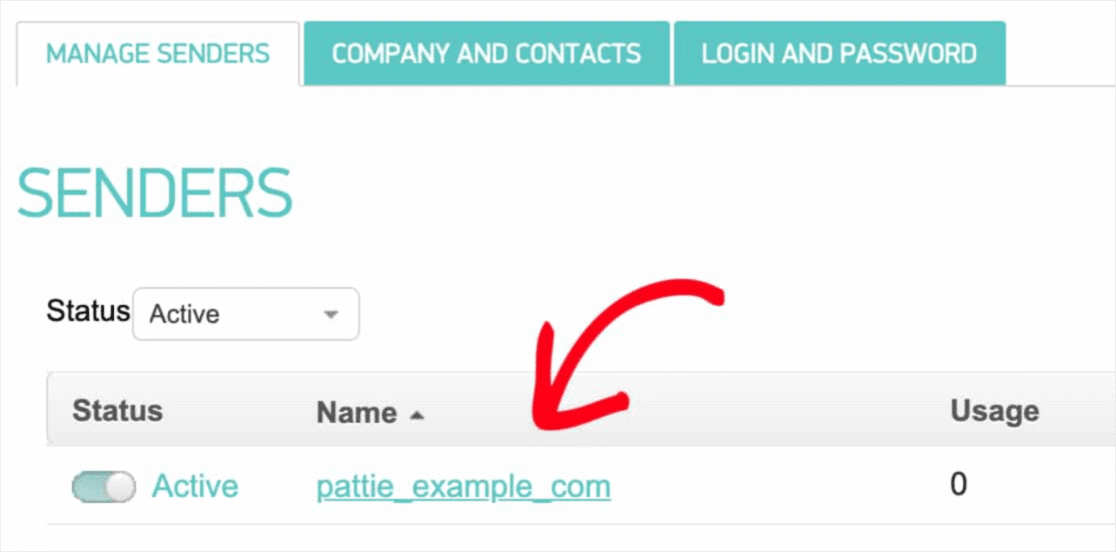
And paste it in WP Mail SMTP.
Then hit Save Settings:

Step #4: Adding the SPF Record to Your DNS
Now, you’ll have to add the SPF record to your DNS records.
If you don’t know what any of these mean, don’t worry. We’ll explain.
The Sender Policy Framework (SPF) is how SMTP.com authenticates your emails. Implementing this step ensures that your emails won’t get kicked into the Spam inbox.
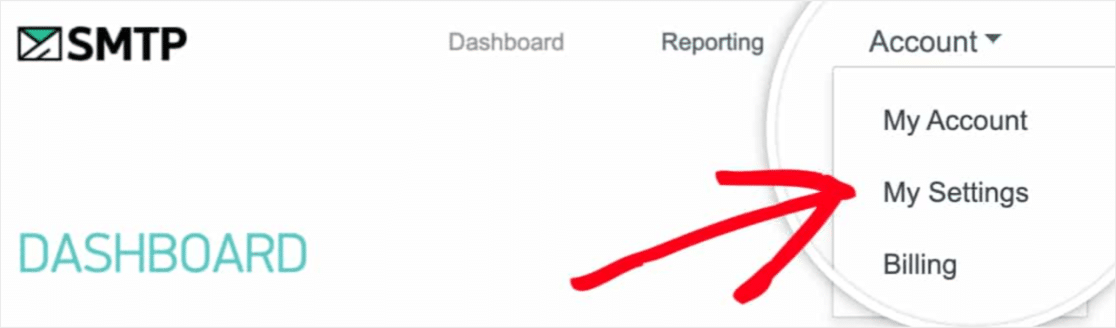
Перейдите в меню навигации вашей учетной записи SMTP.com и нажмите Учетная запись » Мои настройки:
Then, go to General Settings and look under SPF Record:
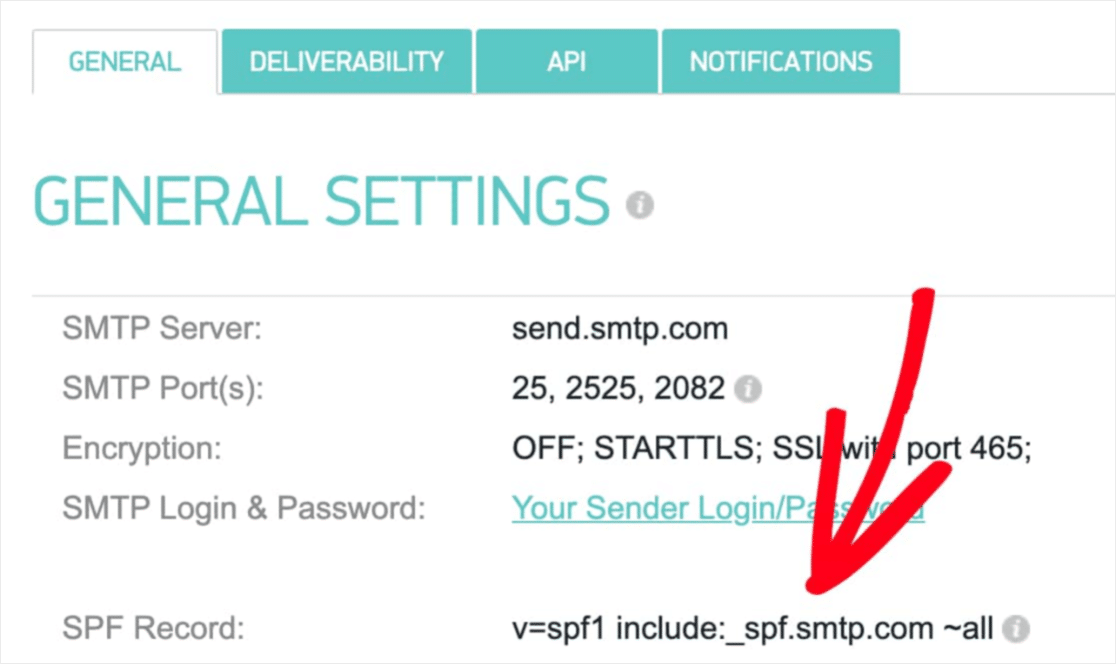
You’ll need to add this SPF record to the DNS settings for your site. If you don’t know how to do this, check out this article on how to add SPF records.
NOTE: In the DNS settings, you’ll see a field called TTL (Time To Live). The default value is usually 1 hour. If you can change this record, we recommend changing it to 1 day or 86400 seconds. This will allow the server to cache this information for a full day.
Шаг № 5: Проверка ваших SPF-записей
Если вы добавили SPF-запись, вам следует проверить, были ли обновлены изменения. Изменения могут отражаться до 48 часов. Поэтому перед переходом к следующему шагу рекомендуется проверить результаты.
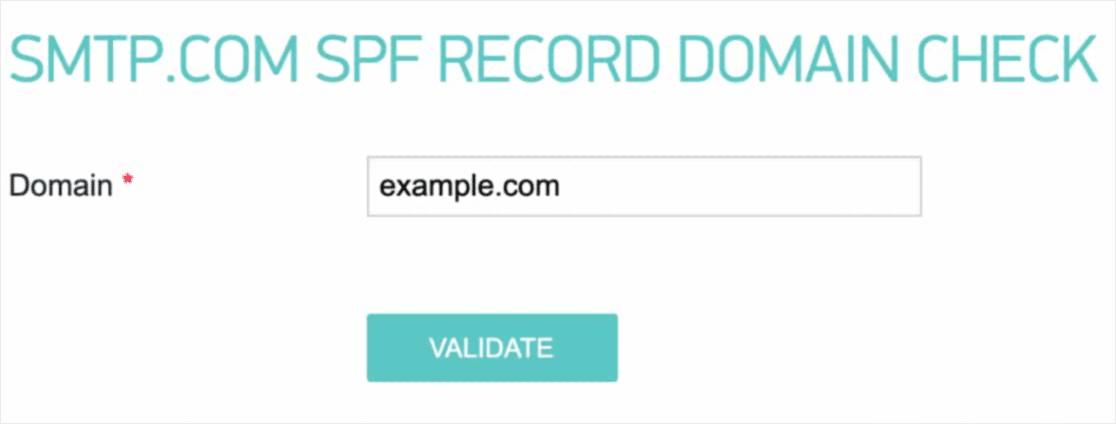
Click on this link and head to the section that says SMTP.com SPF Record Domain Check.
In the Domain field, submit your website’s URL and click on Validate:
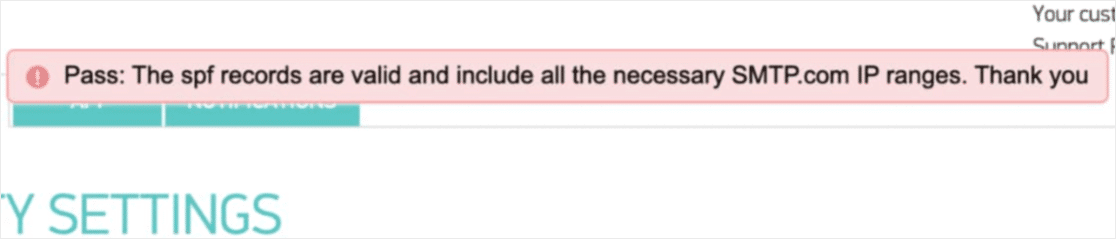
If you followed every step, you should see this Pass message:
И вы закончили!
Шаг № 6: Отправка тестового письма
You’re done configuring WP Mail SMTP. It’s time to check if everything’s working properly.
Go to WP Mail SMTP in your WordPress dashboard and click on the Email Test tab:
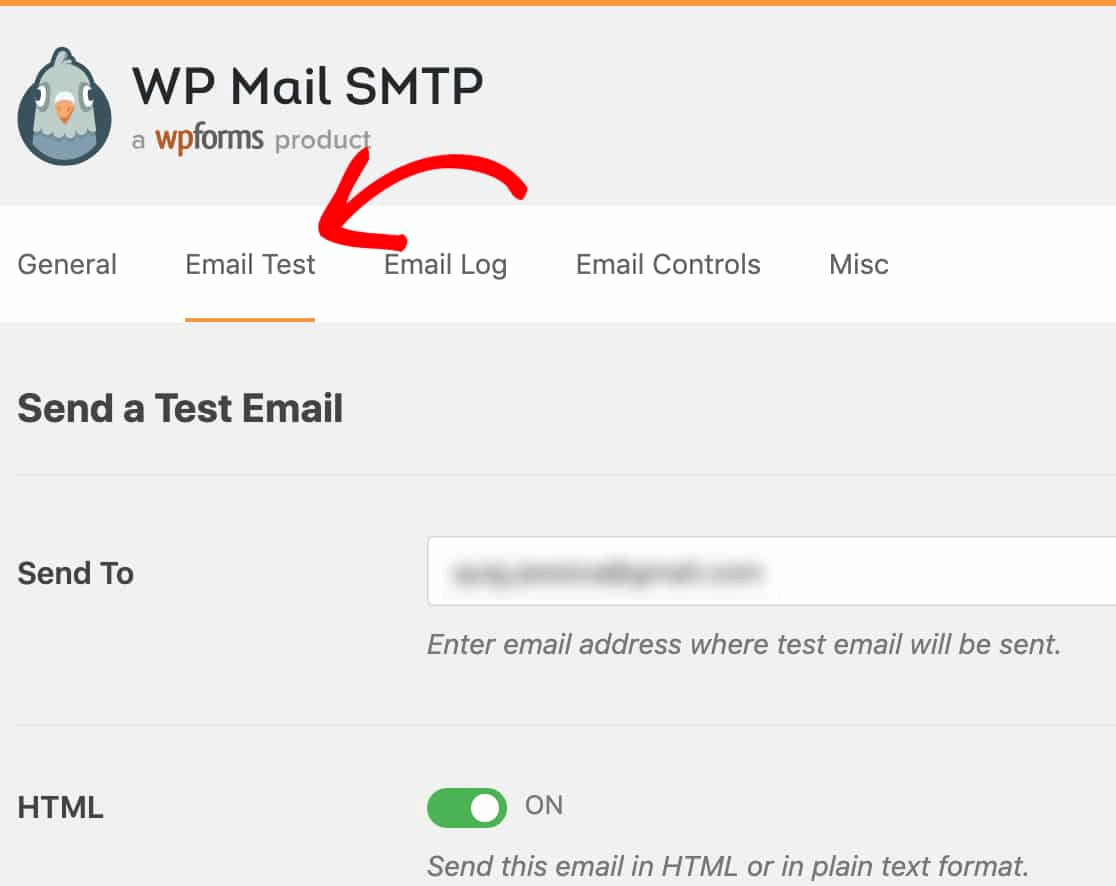
Введите любой адрес электронной почты, к которому у вас есть доступ, и отправьте тестовое письмо. Если все прошло успешно, вы должны увидеть это сообщение об успехе:

Now, check your inbox and confirm that you received the email in your Primary inbox. We’re very confident that you’ll find it there.
Finally, all you have to do is verify that the email went through your SMTP.com account. Click on this link to go to the Deliverability Settings page. If you see the ‘Pass’ notification like this one, you did a great job:
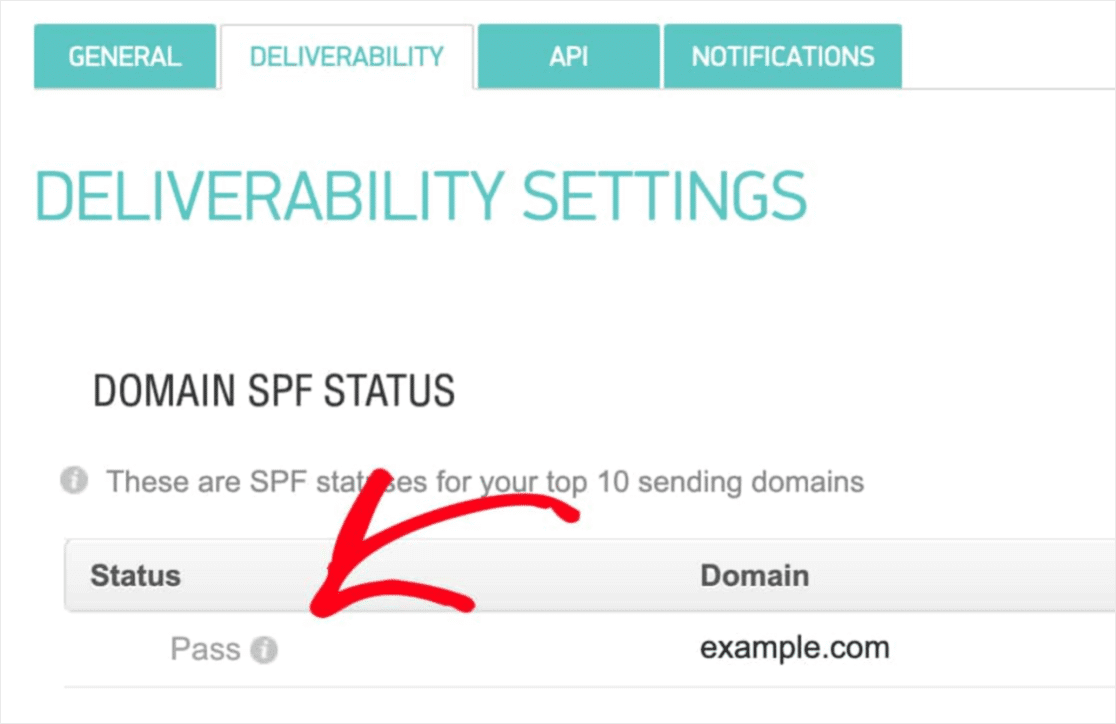
Если вы не видите «Успешно» в поле Статус, значит, вы где-то ошиблись. Просто вернитесь к шагам 1–4 и убедитесь, что вы ничего не упустили.
Заключение
На этом всё, друзья!
If you’re not happy to see your marketing efforts go down the drain, then it’s time to install the WP Mail SMTP plugin.
Once your WordPress email deliverability issues are fixed, you can go back to increasing your traffic, engagement, and sales in peace. Speaking of which, have you tried using push notifications yet?
Push notifications are a great way to increase traffic, engagement, and sales for any business. And if you’re starting out with push notifications, we recommend using PushEngage. PushEngage is the #1 push notification software in the market.
И самое приятное — PushEngage позволяет малым предприятиям конкурировать с крупными брендами. Таким образом, это хороший выбор на любом этапе роста, независимо от того, хотите ли вы начать, развивать или масштабировать свой бизнес.
Если вы только начинаете работать с push-уведомлениями, вам также стоит ознакомиться с некоторыми из этих статей:
- 7 умных стратегий для повышения вовлеченности клиентов
- Как привлечь больше трафика на ваш блог WordPress (9 простых способов)
- Как повысить коэффициент согласия на получение push-уведомлений (7 способов)
И если вы еще этого не сделали, начните работу с PushEngage сегодня и выйдите на новый уровень!


