Looking for a quick and easy way to create a Kickstarter landing page in WordPress?
Running a Kickstarter campaign is tough. It’s not just about going live and writing the content for your Kickstarter campaign. You have to promote your funding campaign as much as possible. And your business depends on how many people sign up to support you financially.
Sure, you get some funding by posting on LinkedIn and Twitter and creating auto DMs. But that’s difficult to manage and you have very little command over the features. Not to mention, social media platforms usually only promote organic content that won’t take users to some other website.
This is where having a Kickstarter landing page in WordPress can help you out. But how do you build a Kickstarter landing page? Do you need developers to do it for you? How easy is that page to modify and customize if you need last-minute changes?
Fortunately, there’s an easy way to create a landing page in WordPress. In this article, we’re going to help you launch your Kickstarter campaign in less than 15 minutes.
準備はいいですか?始めましょう。
What’s a Kickstarter Landing Page?
A Kickstarter landing page is a fully customizable web page that’s focused on giving your visitors a reason to signup for your campaign. Unlike a social media site, the landing page is entirely focused on getting people to sign up. And the best part is that you can embed an advertising video that you can keep promoting till kingdom come!
The cool bit about a Kickstarter landing page in WordPress is that you can customize it any way you want. You can include and control elements in your landing page that you can’t really do with a social media profile page.
Here’s the best part: You can convert your signups into paying customers in SO many ways.
どれくらいの時間があるか、そして購読者からどれくらいの収益を見込んでいるかによって、次のことができます:
その他多数!
ただし、開始する前に、ランディングページの非常に明確で具体的な目標を設定することを忘れないでください。多くのことができるからといって、すべてを1つのページで行う必要はありません。多くの場合、訪問者にクリックするものが多すぎると、何もクリックしなくなります。
What do All Successful Kickstarter Landing Pages Have?
Now that you know what a Kickstarter landing page in WordPress does and why you should build one, it’s time to create a blueprint for your landing page. If you check out any successful landing pages, you’ll notice that they all have some very basic common elements:
- ヘッドライン:ヘッドラインは、人々の注意を引き、もっと知りたいと思わせる場所です。
- Description: Just below the headline, you should have a description of what your viewers should expect from the rest of the page. This is a great place to convince readers to subscribe to your campaign as well.
- Promotional Videos: Once people know what to expect from your brand, give them a taste of your product using a promo videos. We recommend mentioning your call to action in your video as well to get better conversions.
- Donation button: Follow up with a donation button so that your visitors can become campaign subscribers. This is known as the call to action (CTA) button. It’s how you nudge your visitors to take action on your page. Depending on your goal for the landing page, your CTA will vary.
- Social proof: A great way to give your readers a strong reason to subscribe is by offering social proof. Social proof simply tells your visitor that there are other people who are already taking the same action as you want them to take.
- Newsletter optin: Once you hit your visitors with the core offer, you can also ask them to become email subscribers. You can also ask them to become push notification subscribers using a click to subscribe button. It’s always best if you offer something valuable in exchange.
- Social sharing buttons: The more people talk about you on social media, the better chances you have of skyrocketing your subscribers. So, put up social sharing buttons on your landing page to encourage people to share it on social media.
Remember, these are only the most basic parts of any successful landing page. For your page, you can add a lot of other sections and create custom offers to increase your conversions.
How to Create a Kickstarter Landing Page in WordPress
Now that you know what to create, it’s time to launch your Kickstarter landing page in WordPress. For this tutorial, we highly recommend using SeedProd to create your landing pages.

SeedProd is the best WordPress landing page builder. It’s perfect for businesses, bloggers, and website owners looking to build high-converting landing pages without any development skills.
With SeedPreed, you get pre-built templates for high-converting landing pages that you can publish instantly. This includes templates for:
そして、さらに多くの機能があります!
ステップ#1:SeedProdのインストールと有効化
まず、SeedProd Proプラグインを入手して有効化します。方法がわからない場合は、WordPressプラグインのインストール方法に関するこの記事をご覧ください。次に、WordPressダッシュボードのSeedProd » Settingsに移動して、Proバージョンを有効化します。

次に、SeedProdのランディングページダッシュボードの概要を確認するために、SeedProd » Pagesに移動します。ここで、SeedProdを使用して作成できるさまざまな種類のランディングページを確認できます。

Keep in mind that these are all special pages with pre-built functionality and design templates. For a campaign landing page, you don’t want to use ANY of these special landing pages. Instead, you’re going to create a custom landing page.
さらに下にスクロールして、新しいランディングページを追加ボタンをクリックして開始してください。
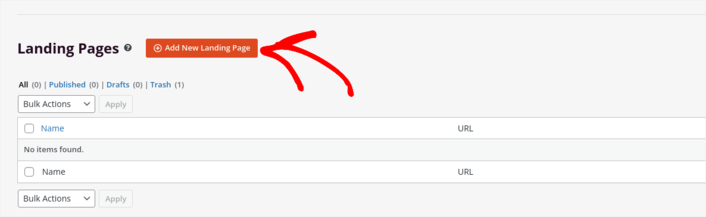
ステップ #2: 新しいランディングページを作成する
新しいランディングページを追加ボタンをクリックすると、SeedProdのランディングページテンプレートライブラリが表示されます。これらは、完全にレスポンシブな、専門的にデザインされたランディングページテンプレートです。
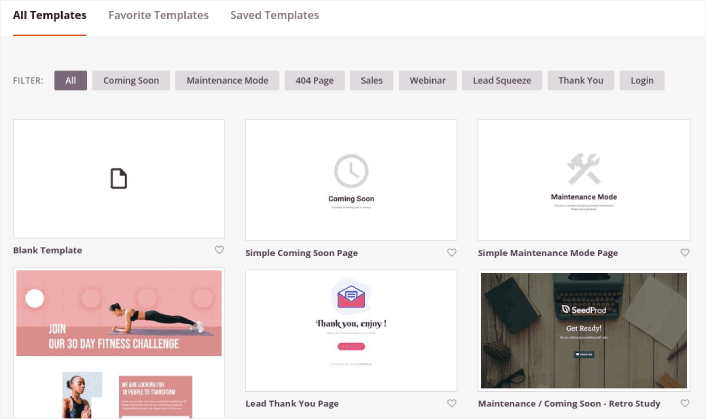
Next, you can select one of these templates to help you get started. Remember, the template is just a starting point. you can customize everything about the page later on. For now, find a template that you think will fit. When the templates page opens, you can click Webinar to filter the list:
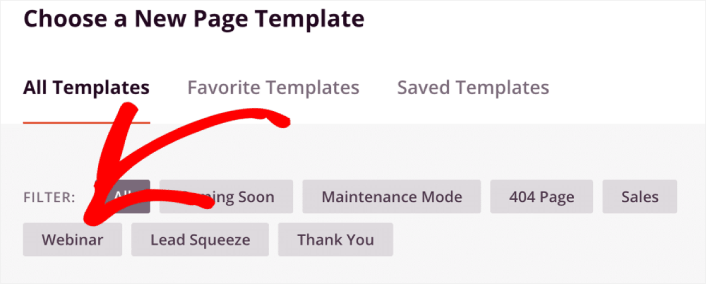
For this guide, we’re going to customize the Webinar 3 Page template. Go ahead and click on it now.
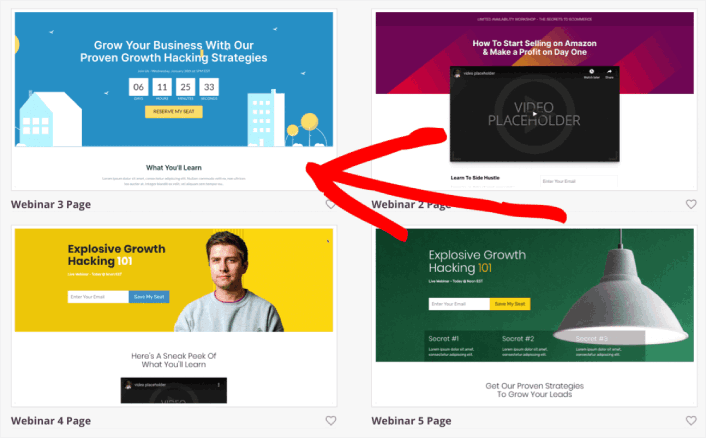
We’re using a webinar template because it has the most amount of similarities with a Kickstarter campaign. But you can choose whatever template makes the most sense for you. Remember, you can customize everything about your landing page. So, doesn’t really matter what template you start with.
Step #3: Customize Your Kickstarter Landing Page Design
SeedProdのビジュアルビルダーを使用すると、ドラッグアンドドロップのコンテンツブロックを使用してランディングページをカスタマイズできます。
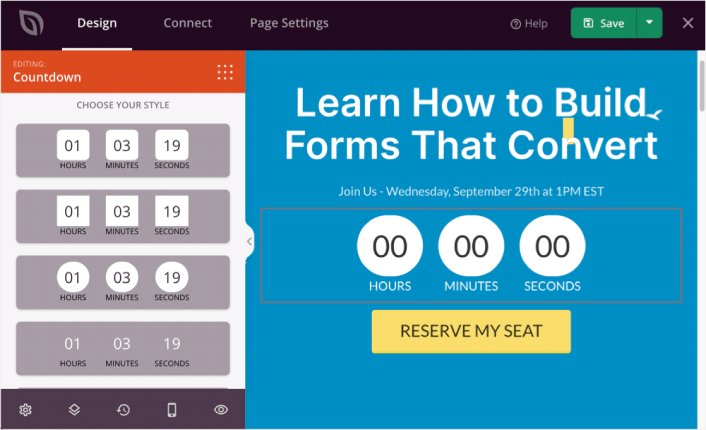
You can create a fully customized header for your landing page in a matter of minutes. You can even add custom elements to convince and convert your traffic. For instance, you can create a video module and embed a YouTube video to convince your visitors to sign up for your campaign.
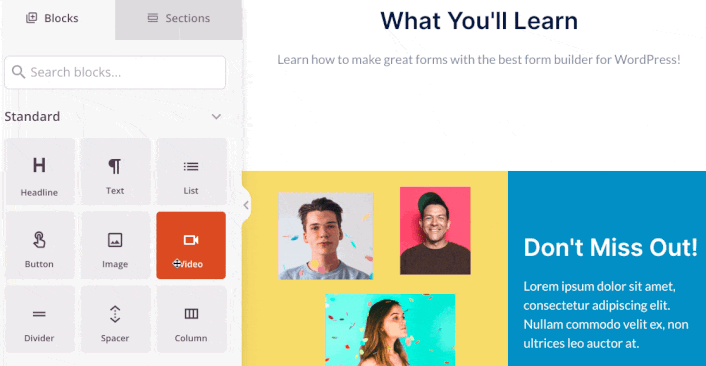
It’s also super easy to add a section with a brief description of your campaign . Head over to the Sections tab in the visual builder and under the Hero section, you’ll find several pre-built templates that you can import with a single click.
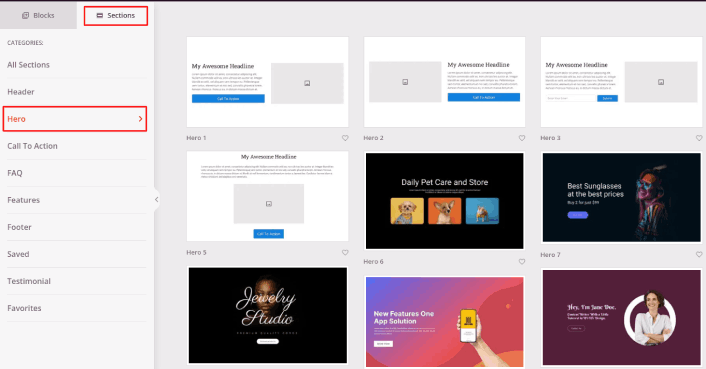
好きなものを選択してください。色やコンテンツについては心配しないでください。すべて編集できます。テンプレートによく合うレイアウトを探してください。
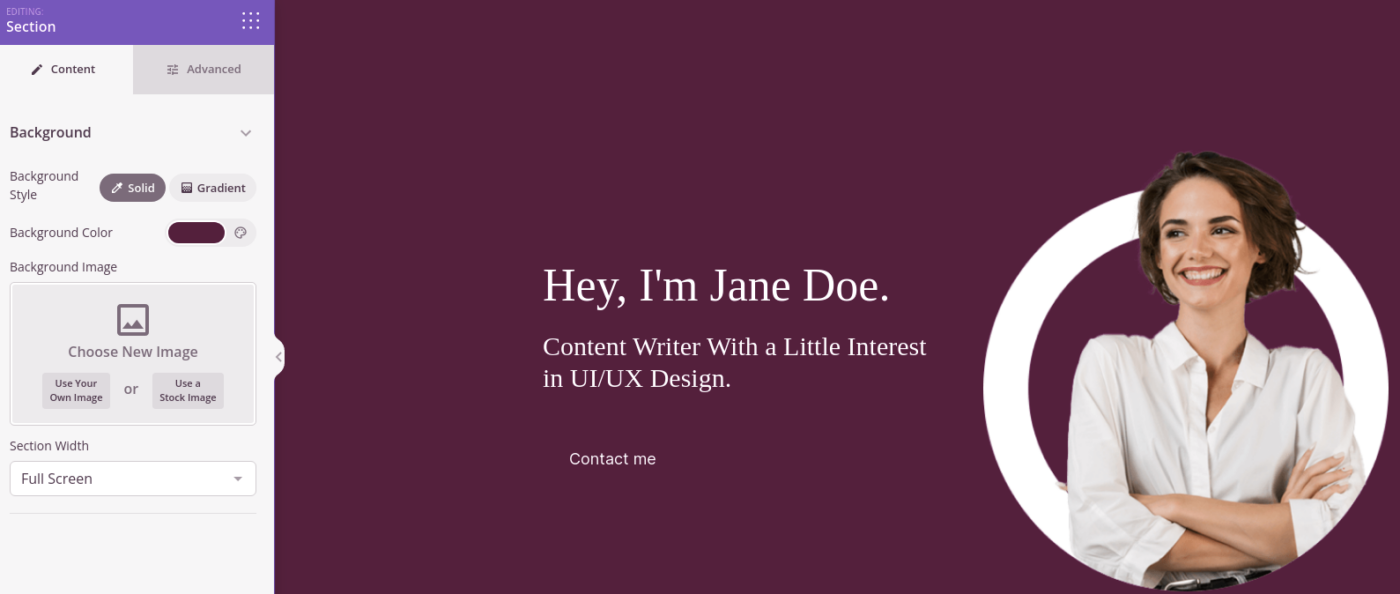
You can customize the hero section the same way we did earlier by choosing a different image and changing the headline and description. While you’re at it, add a call-to-action button that nudges viewers to subscribe to your Kickstarter campaign as well.
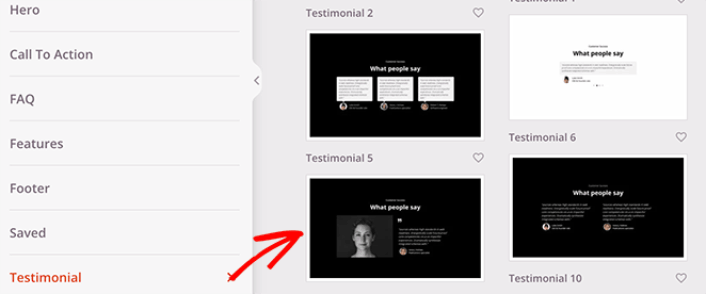
次に、セクションタブから、お客様の声の見出しを選択し、好きなデザインを選びます。そして、あっという間に、ランディングページにお客様の声セクションができます。
とても簡単です!
Step #4: Add a Click to Subscribe Button to Your Kickstarter Landing Page
プッシュ通知購読者を収集するために、クリックして購読ボタンを追加することもできます。プッシュ通知は、リピートトラフィックを増やし、エンゲージメントを高め、公式グッズがあれば販売するためにも役立ちます。
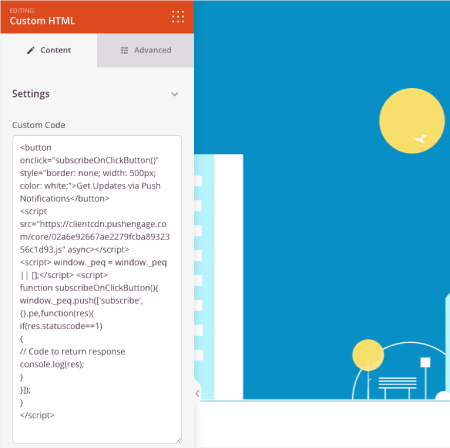
SeedProdでは、サイドバーからカスタムHTMLモジュールをドラッグアンドドロップするだけです。
最初の折り目のメールサインアップフォームのすぐ下に、購読ボタンを配置しました。

しかし、ボタンは好きな場所に挿入できます。
For this part, you need some experience with HTML and CSS. Or, you can copy this code and paste it into your Custom HTML block:
<button onclick="subscribeOnClickButton()" style="border: none; padding-left: 5%; padding-right:5%; text-align: center; display: inline-block; color: blue;">Get Updates via Push Notifications</button>That’s a standard button in HTML with very little styling. The only fancy bit is the onclick function in the code. It basically means that your visitors can click on the button to subscribe to something. Now, we need to give the button some extra code to allow your visitors to subscribe to push notifications.
PushEngageのホームページにアクセスし、開始するボタンをクリックします。

次に、PushEngage を試すために無料プランを選択するか、ビジネスの成長に真剣に取り組んでいる場合は有料プランを選択します。有料プランには、より多くのキャンペーンオプションと、さらに大きな購読者リストを構築する機能が付属しています。
あなたのPushEngageダッシュボードで、サイト設定 »サイト詳細に移動し、セットアップ手順を表示するにはここをクリックボタンをクリックします。「任意のサイト」の下に、インストールコードが表示されます。

警告:ダッシュボードから取得したコードをコピーする必要があります。コードはPushEngageユーザーごとに固有です。画像内のコードをコピーしてプッシュ通知購読者を収集することはできません。
PushEngage ダッシュボードでコードを取得したら、このスニペットをコードに追加します。
<script> window._peq = window._peq || [];</script> <script>
function subscribeOnClickButton(){
window._peq.push(['subscribe',{}.pe,function(res){
if(res.statuscode==1)
{
// Code to return response
console.log(res);
}
}]);
}
</script>
最終的なコードは次のようになります。
<script src="https://clientcdn.pushengage.com/core/02a6e92667ae2279fcba8932356c1d93.js" async></script>
<script> window._peq = window._peq || [];</script> <script>
function subscribeOnClickButton(){
window._peq.push(['subscribe',{}.pe,function(res){
if(res.statuscode==1)
{
// Code to return response
console.log(res);
}
}]);
}
</script>
You’ll want to add this code to the HTML block in your landing page after the code for the button. It should look something like this:
Feel free to customize the styles for the button any way you please. When you’re done customizing your Kickstarter landing page, go ahead and hit the Save button.
Step #5: Configure Your Page Settings
After you’re done designing your landing page, click the Connect tab at the top of your page builder, and select your email marketing provider to collect leads on your site.

次に、画面上部にある「ページ設定」タブをクリックします。

ここで、ランディングページにSEOプラグインとGoogle Analyticsプラグインを追加できます。広告パフォーマンスを追跡するために、FacebookピクセルやPinterestピクセルなどのカスタムトラッキングコードを設定することもできます。
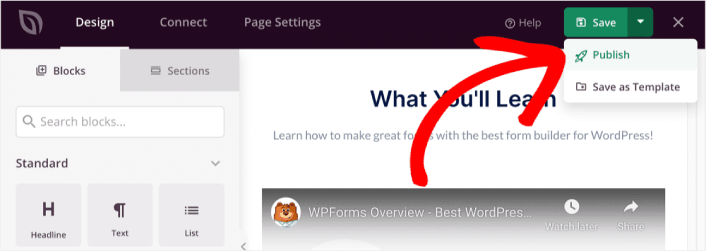
Step #6: Publish Your Kickstarter Landing Page in WordPress
Now let’s go ahead and publish your design. To do this, click the dropdown arrow next to the save button and click Publish.
You can then click the See Live Page button to see how it looks.
Congratulations! You just published your very first Kickstarter landing page.
What to do After You Build a Kickstarter Landing Page
Now that your Kickstarter landing page is live, it’s time to work on your traffic, engagement, and sales. You should try using push notifications on your site. Push notifications are a great marketing tool that can help you grow your business.
これらの素晴らしいリソースをご覧ください。きっと意味がわかるはずです。
プッシュ通知キャンペーンを作成するためにPushEngageの使用をお勧めします。PushEngageは世界No.1のプッシュ通知ソフトウェアです。まだお済みでない場合は、 今すぐPushEngageを使い始めましょう!


