
Looking for a simple guide to iOS push alert campaigns? iOS push alerts, those handy little messages that pop up on your screen, can be a real game-changer for your business if used properly.
Now picture this: You’re a business owner and you’ve just launched a flash sale on your website and app. How do you get customers to immediately flock to your site? Simple, by sending out an iOS push alert. Just like that, shoppers receive a timely notification about the sale, and your website and app traffic shoots through the roof.
But what is an iOS push alert exactly? Think of it as your personal, pocket-sized billboard. It’s a brief message or notification pushed to iOS devices (iPhones, iPads) from apps installed on the device.
The best part is that you can get all this set up super fast! Sounds interesting, right? Let’s dive in.
What is an iOS Push Alert?
An iOS push alert is akin to a small digital memo that shows up on your Apple mobile devices. It could be from your favorite social media platforms, news distributors, or online shopping apps – all aiming to keep you in the loop, engaged, and connected.
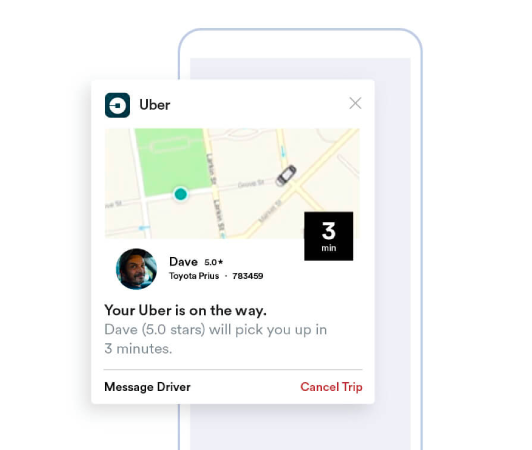
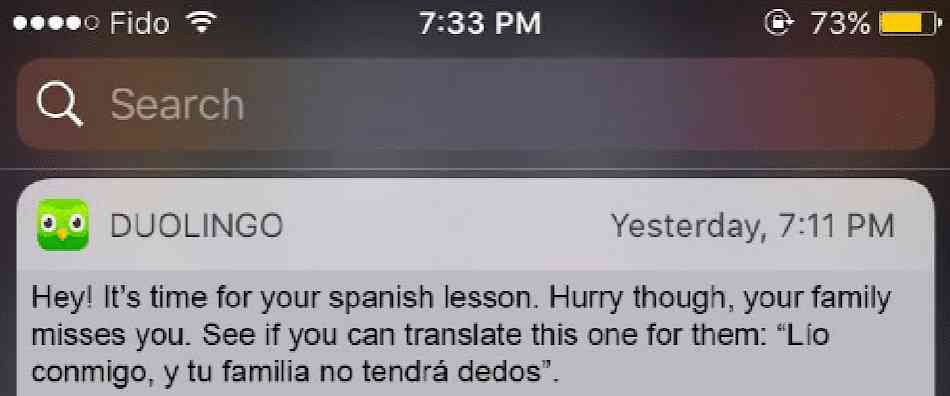
Think of these mini-messages as gentle taps on your iOS device’s shoulder sent via the Apple Push Notification service (APNs). It’s almost as if the app is whispering to your device, requesting for your attention. The remarkable aspect of iOS push alerts is that you don’t even need to have the app active, or be using it. As if by a stroke of wizardry, notifications pop-up even on your locked screen, assuring you never bypass essential updates or prompts.
iOS push alerts offer a wealth of benefits. First and foremost, they are an exceptional tool for keeping you informed with up-to-the-minute information. Picture an alert from an online shopping app informing you about a current sale.

Additionally, they can save you precious time. Imagine your banking app sending an alert confirming a successful transaction, negating the need to login and check manually. On top of these pragmatic benefits, iOS push alerts enhance your overall app experience by making it more lively and interactive.
Navigating these notifications is made user-friendly by platforms such as PushEngage. Empowered with sophisticated features, PushEngage ensures these bite-sized information pieces serving your interests, reach you timely and are streamlined according to your preferences. Whether it’s notification frequency or the type of alerts; PushEngage places the control in your hands.
Armed with a basic understanding of what iOS push alerts are and their mechanics, let’s delve deeper into the variety of notifications and unravel how apps harness them to engage and convert their users.
Types of iOS Push Alert Campaigns You Can Use
There are many types of iOS push alerts that can be used to increase interaction with your audience. By understanding these different types, you can improve their effectiveness and create a more personalized and interactive user experience.
- In-App Alerts: These alerts can be sent when a user is actively using your app. For example, an e-commerce app can send an alert about a special discount on an item that the user is interested in. With PushEngage, businesses can easily send these relevant and timely messages to increase user engagement.
- Location-Based Notifications: These alerts are sent based on the user’s geographical location. They are great for businesses like retail outlets or events that want to inform nearby users about exclusive offers. PushEngage makes geo-targeting simple, ensuring businesses can effectively reach their target audience no matter where they are.
- Behavior-Based Alerts: These notifications are sent in response to specific actions taken (or not taken) by the user in the app. For example, if a user adds an item to their cart but doesn’t buy it, a behavior-based alert could remind them. With PushEngage, businesses can precisely manage these types of notifications.
- Timed Notifications: These push alerts are set to be sent at predetermined times and can be used for recurring events or notifications. With PushEngage, these notifications can be scheduled ahead of time, ensuring users stay informed about important updates or events.
A successful push alert campaign needs the right type of notification for its goals. So, if you’re looking to boost your business using iOS push alert campaigns, you need an iOS push notification service with many choices available to optimize your strategy for maximum engagement.
How Does an iOS Push Alert Work?
An iOS push alert is generated when the specific app on your iOS device communicates with the APNs. Once the notification is crafted and sent, APNs routes it to the intended device – all within the space of a few microseconds.
Now let’s dive deeper into the world of iOS push alerts. Consider checking your phone and you immediately see a notification from your favorite news app telling you about breaking news, or your go-to shopping app alerting you about a flash sale. These are the moments when iOS push alerts come into play. These notifications are small messages that apps send to appear on the device’s home or lock screen, even when the app is not currently in use.
iOS push alerts are vital parts of our day-to-day digital interaction. They are powered by Apple’s push notification service, known as APNs. This service coordinates the delivery of notifications from the servers of your apps to your Apple devices. This process ensures that you’re always in the loop, receiving real-time updates from your apps without having to check them manually.
These alerts not only provide information, but also save you time and keep you connected. Using our partner, PushEngage, businesses can send targeted iOS push alerts that enhance user dopamine and engagement levels. For instance, PushEngage-driven notifications can intelligently remind you about the items left in your e-commerce cart or alert you about the arrival of a much-awaited product. In this sense, they enrich the overall user experience by providing optimized and personalized notifications.
Think of it this way: iOS push notifications are like friendly gatekeepers, providing helpful updates right at the doorsteps of your device. And what’s more, their roles are becoming increasingly diverse and exciting with passing time. So, by using a powerful tool like PushEngage, both businesses and users can derive significant benefits from these sophisticated alert systems.
How to Add iOS Push Alerts to Your App
There are fundamentally two types of iOS push alert campaigns:
- An iOS web push alert
- An iOS app push alert
Based on your business, you might be able to send both web and app push notifications. And we highly recommend sending both types of push alerts. But before you create an iOS push alert, you need to select a push notification service. A push notification service is a software that allows you to create push campaigns without any coding.
Vi anbefaler at bruge PushEngage.

PushEngage er verdens førende plugin til push-notifikationer.
Push-notifikationer hjælper dig med at øge din webtrafik og dit engagement automatisk. Og hvis du driver en onlinebutik, hjælper PushEngage dig også med at øge dit salg ved at hjælpe dig med at oprette automatiserede e-handels-push-notifikationer.
Du kan komme i gang gratis, men hvis du er seriøs omkring at vækste din forretning, bør du købe en betalt plan. Før du køber en push-notifikationstjeneste, bør du også se denne guide til priser på push-notifikationer.
Her er et hurtigt overblik over, hvad du får med PushEngage:
- Højtkonverterende automatiserede kampagner
- Flere målretnings- og kampagneplanlægningsmuligheder
- Målsporing og avanceret analyse
- Intelligent A/B-test
- Proven push notification templates to help you get more traffic and conversions
- En dedikeret succesmanager
Du vil se, at PushEngage uden tvivl er det bedste valg, hvis du vil opbygge trafik, engagement og salg for din virksomhed. Og hvis du har et stramt budget, kan du altid være lidt kreativ med dine push-notifikationer.
How to Create a Free PushEngage Account
Gå til PushEngage og klik på Kom i gang gratis nu:
Du kan komme i gang med gratisplanen. Men hvis du leder efter de mest kraftfulde browserunderretninger, bør du vælge en betalt plan baseret på dine forretningsbehov. Når du ved, hvilken plan du vil have, skal du klikke på Kom i gang for at oprette din PushEngage-konto.
Sign Up for PushEngage
Nu er det tid til at oprette din PushEngage-konto. Start med at tilmelde dig med en e-mailadresse eller et Gmail-id:

Udfyld derefter dine kontooplysninger:

Og tilføj dine kreditkortoplysninger for at købe din plan:

Hvis du valgte gratis kontoen, vil dit kreditkort aldrig blive opkrævet penge, før du vælger at opgradere din plan. Og nu er du klar til at få adgang til dit PushEngage-dashboard. Klik blot på Gennemfør registrering og få øjeblikkelig adgang.
Hvis du har brugt OneSignal eller PushAlert før, vil du se, at PushEngage giver dig en meget renere oplevelse fra dashboardet. OneSignal-dashboardet er ikke beregnet til avancerede kampagner. Til det skal du bruge API'en mere end OneSignal-pluginet.
How to Add Web App iOS Push Alert Campaigns to Your Website
Let’s start by setting up iOS push alerts from your website. The idea behind this is simple. We turn your website into a simple web app that can send iOS and iPadOS push notifications. This approach is ideal for sending web app push notifications.
Step #1: Add a Web App Manifest to Your Website to Send Web Push Notifications
Think of a web app manifest as a special file that acts like a guidebook for your website when it’s installed on someone’s phone or computer. It’s written in a language called JSON, but you don’t have to worry about that part.
The manifest file contains important information about your Progressive Web App (PWA), like its name, description, icons, and colors. So, when someone adds your website to their home screen or installs it on their device, the browser uses this manifest to know how your app should look and behave. This allows you to send PWA push notifications.
For example, the manifest tells the browser what icon to use for your app on the home screen or app drawer, so it looks nice and recognizable. It also specifies the colors and theme of your app to give it a consistent and appealing appearance.
Additionally, the manifest includes the URL that should be opened when someone launches your app. This way, the browser knows which page or section of your website to show them first.
Creating a manifest file can be done quickly with online tools that do the hard work for you. We recommend using this free app manifest generator to build your web app manifest in a few clicks and zero coding.
Once you have the manifest ready, you usually name it “manifest.json” and upload it to the root folder of your website.
In a nutshell, the web app manifest is like a manual that makes your web app look and feel just right when people use it on their devices. It’s an essential part of creating a great user experience for your website visitors.
A typical manifest looks something like this:
{
	"name": "PushEngage",
	"short_name": "PushEngage",
	"start_url": "/",
	"display": "standalone",
	"theme_color": "#3b43ff",
	"background_color": "#ffffff",
	"icons": [
		{
			"src": "icon/icon-128x128.png",
				"sizes": "128x128",
				"type": "image/png"
		},
		{
			"src": "img/icon-192x192.png",
			"sizes": "192x192",
			"type": "image/png"
		},
		{
			"src": "img/icon-512x512.png",
			"sizes": "512x512",
			"type": "image/png"
		}
 	]
}
Once you add your manifest file to the root folder of your website server, you need to add a code snippet in the HTML head of your website. The snippet would look something like this:
<link rel="manifest" href="/manifest.json">If you’re using WordPress and need help adding this code snippet to your site’s header, you can use WPCode to upload the manifest file. It’s one of the best code snippet plugins for WordPress.
Step #2: Install PushEngage to Your WordPress Site
You’re done creating your account. So, head over to the PushEngage dashboard and follow along.
NOTE: If you’re not running a WordPress site, you should check out our other installation guides.

Klik på Sideindstillinger » Sideoplysninger og klik på knappen Klik her for opsætningsinstruktioner:

Klik på fanen WordPress og klik på knappen Installer PushEngage WordPress Plugin for at installere pluginet på din hjemmeside.

Here’s the cool part: When you created your PushEngage account, you already synced your website with your PushEngage account. So, click on the installation link in the PushEngage dashboard to automatically install the PushEngage WordPress plugin to your website.
Step #3: Connect Your WordPress Website with PushEngage
When you’re done installing and activating the PushEngage WordPress plugin, you’ll see the PushEngage onboarding wizard:

Guiden er ret ligetil. Hvis du er ny bruger, skal du klikke på Ny? Gør krav på din gratis konto. Og hvis du allerede har tilmeldt dig, skal du klikke på Forbind din eksisterende konto.
Dernæst kan du vælge din side fra rullemenuen Vælg en side under Forbind en registreret side, hvis du allerede har registreret en side under tilmelding:

Eller du kan klikke på Registrer en ny side for at tilføje en ny side, hvis du har en Premium prisplan eller højere. I næste trin vil guiden bede dig om at installere andre nødvendige WordPress-plugins.

Hvis du fulgte hvert trin korrekt, vil du se denne succesmeddelelse fra guiden:

Du er nu klar til at oprette kampagner og push-underretningspop op-modaler.
Step #4: Test Your Website Manifest
Alright, let’s walk through the steps to test your web app and make sure everything is working smoothly.
First, open your website using the Safari browser on your iPhone or iPad. Make sure your device is running iOS 16.4 or a newer version. Once your website is loaded, you’ll see a Share button. It looks like a square with an arrow pointing up. Tap on that button to open the sharing menu.
In the sharing menu, you should find an option called Add to Home Screen. Click on that option.
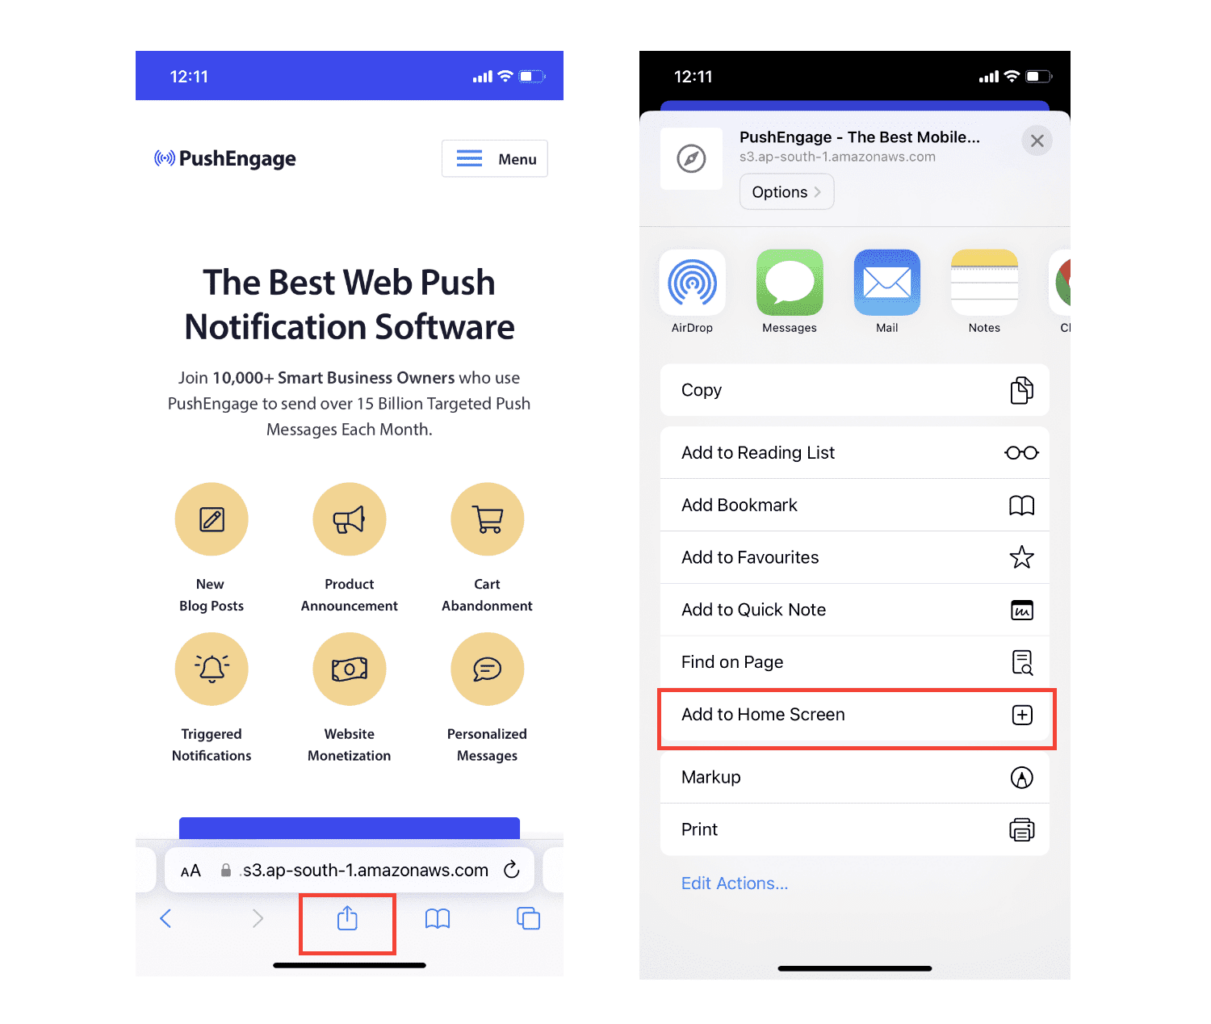
Now, the web app will be saved to your device’s Home Screen, just like any other app you download from the App Store.
If everything has been set up correctly, when you open the app from your Home Screen, it won’t open in the Safari browser anymore. Instead, it will feel like using a regular app on your iPhone or iPad.
To let your users know that they can get web push notifications from your app, you can show them a banner on the screen. This banner will prompt them to add your app to their Home Screen and subscribe to the web push notifications. It’s a handy way to keep your users engaged with your app and receive important updates.
So, follow these steps, and you’ll be all set to provide a smooth and app-like experience to your users on iOS devices! For a full walkthrough on testing your push notifications, check out our documentation on iOS web push notifications.
How to Add Mobile App iOS Push Alert Campaigns to Your App
The easiest way to send mobile iOS mobile app push alerts from your native iOS app is to use the PushEngage iOS SDK. Right till now, you had to use skeleton SDKs to send app push notifications. The problem with using those SDKs is that they are pretty bare bones.
Teoretisk set kan du sende enhver form for mobilapp-push-kampagner med dem. Men så skal du også bygge:
- En grænseflade til at administrere dine kampagner
- En analyse-suite til at spore dine kampagners ydeevne
- Bedre understøttelse af rich media og omdirigeringslinks i appen (eller deep links)
- Processer til at koordinere både marketing- og udviklingsteams
Alt sammen for at introducere en enkelt kanal for vækst. Brugen af de gamle værktøjer til at sende mobilapp-push-notifikationer er kedelig, dyr, ressourcekrævende og tidskrævende. Og selvfølgelig kræver det dybe kodningsfærdigheder i dit team at udvikle og administrere alt, hvad du bygger.
Med PushEngage Android- og iOS SDK'er kan du sende mobilapp-push ved hjælp af den samme pålidelige software for gode leveringsrater. Men vi har bygget flere lag ovenpå, der gør det super nemt at bygge brugerdefinerede integrationer med din app. Og PushEngage administrerer hele SDK'en. Så du behøver ikke engang at bruge en masse tid og penge på at administrere dine integrationer.
Alt du skal gøre er at bygge!
Du kan sende broadcast-notifikationer direkte fra dit PushEngage-dashboard når du har sat din app op til at sende push-notifikationer til mobilapps ved hjælp af PushEngages SDK. Ja, du skal stadig tilføje kode til din app og udvikle forbindelserne mellem din app og PushEngage API'en. Men når det er gjort, kan du nemt oprette push-kampagner til mobilapps fra en færdigbygget softwaregrænseflade, der også kommer med:
- Meget engagerende push-kampagnetyper
- Beviste kampagneskabeloner med høje konverteringsrater
- Automatiserede kampagner til at promovere dit indhold, når du udgiver
- Flere målretnings- og kampagneplanlægningsmuligheder
- Web-push-kampagner som en supplerende vækstkanal
- Øget publikumsfastholdelse ved hjælp af databaseret personalisering
- Målsporing og avanceret analyse
- Smart A/B-test
- En dedikeret succesmanager
And so much more. PushEngage takes the pain out of developing Android and iOS mobile push campaigns for your app.
We created a detailed step-by-step guide to setting up iOS app push notifications for PushEngage. Go check that out to start sending iOS app push alerts right away.
Sådan personliggør du dine kampagner
Før du opretter en kampagne, bør du opsætte segmenter og målgruppegrupper for at sende personlige push-beskeder.
Intet slår niveauet af personalisering, du kan opnå ved at oprette segmenter og målgruppegrupper til dine push-notifikationsabonnenter. Gå til PushEngage » Audience og begynd at oprette segmenter og målgruppegrupper med det samme.
Under fanen Segments kan du oprette nye segmenter eller redigere eksisterende:

Og hvis du har brug for endnu dybere personalisering, skal du oprette en målgruppegruppe under fanen Audience Groups:

Hvis du er nybegynder inden for push-notifikationssegmenter og personaliserede push-notifikationer, bør du læse vores artikel om hvordan man opretter segmenter og vores meddelelse om avanceret målgruppegruppering.
The coolest bit is that you can create targeted push campaigns by creating an Audience Group for just your iOS and iPadOS users:
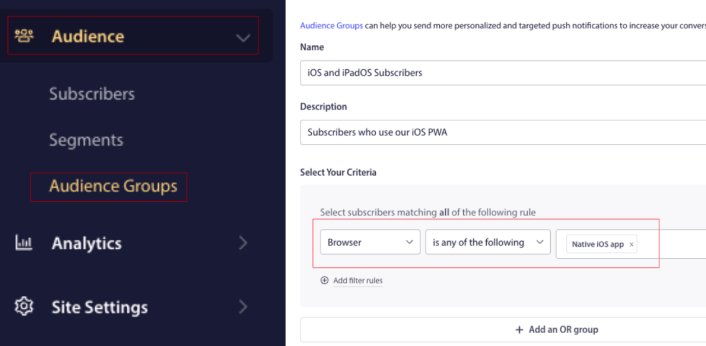
And you can use this Audience Group for your drip campaigns and broadcasts.
Sådan opretter du en push-notifikations-drip-kampagne
Gå til PushEngage dashboard og gå til Campaign » Drip Autoresponders og klik på Create New Drip Autoresponder:

Navngiv derefter din kampagne (vi foreslår noget som "Velkomst Drip"), og under Content, vælg muligheden "Send notification immediately after user subscribes“:

På dette tidspunkt kan du klikke på pilen ved siden af notifikationen for at redigere indholdet af din notifikation.
Hvis du har en Premium- eller Enterprise-plan med PushEngage, vil du kunne tilføje mere end én notifikation for at oprette en sekvens af automatiserede velkomstbeskeder. Klik blot på Add New Notification og rediger indholdet.
Når du er færdig, skal du klikke på Drip Settings og vælge muligheden for at sende din velkomstkampagne til alle abonnenter:

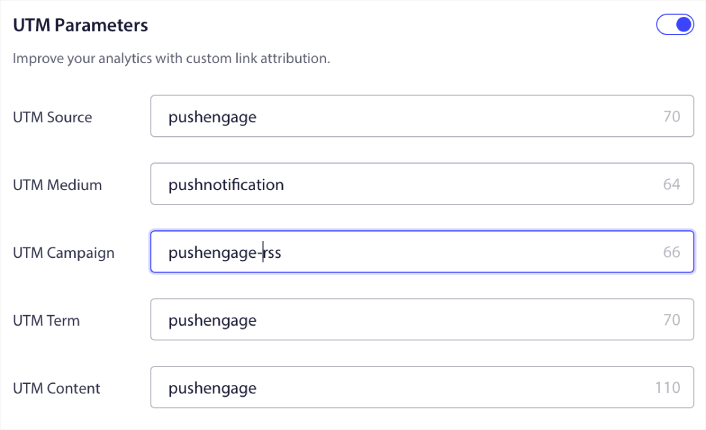
Rul derefter ned for at indstille dine egne UTM-parametre for at spore push-notifikationerne:
Og når du er færdig, rul op igen og klik på knappen Activate Autoresponder:

Og du er færdig!
How to Send a iOS Web Push Broadcast
Gå til dit PushEngage dashboard og gå til Campaign » Push Broadcasts og klik på knappen Create a New Push Broadcast:

Under fanen Content, tilføj dit push-notifikationsindhold:

Og du kan opsætte en A/B-test for at øge dine klikrater, eller du kan planlægge dine push-udsendelser for at få flere visninger. I begge tilfælde bør du tjekke vores bedste praksis for push-notifikationer for de bedste resultater.
How to Create a iOS Push Notification Popup Modal
En push-notifikations popup-modal er et lille vindue, der vises oven på en hjemmeside eller mobilapp-grænseflade for at vise en besked eller notifikation til hjemmesidebesøgende.
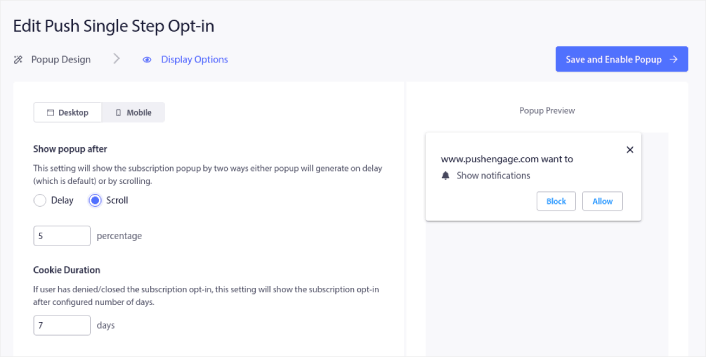
Popup-modellen kan udløses af forskellige begivenheder. Du kan opsætte popups, der udløses ved sidebesøg, ved scroll-dybde og endda ved brugerdefinerede handlinger som f.eks. klik på knap.
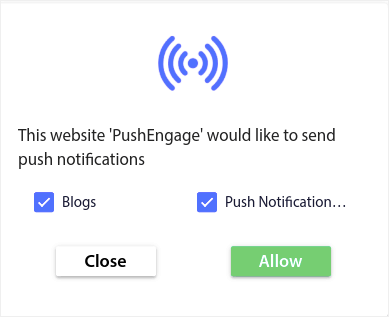
Normalt vil du se en opfordring til handling på popup-modellen, såsom "Abonner" eller "Tillad" for at få samtykke fra besøgende til at sende dem push-notifikationer. Hvis du følger denne vejledning, kan du oprette en popup som denne:
Du kan oprette popup-modalvinduer, der kan segmentere abonnenter direkte, eller oprette almindelige popups, der blot indsamler abonnenter med standardattributter som geolokation og browser.
Gå tilbage til dit WordPress-dashboard. Gå til PushEngage » Design:
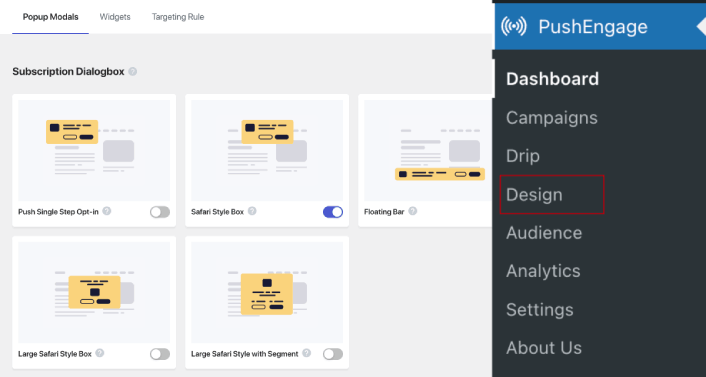
Og du kan opsætte så mange popup-modalvinduer, som du ønsker. Selvfølgelig kan du sørge for, at de udløses på forskellige tidspunkter under Visningsindstillinger for hvert popup-modalvindue.
Idéen her er at give dine besøgende en solid grund til at abonnere. Hvis du har brug for hjælp til det, kan du se vores artikel om hvordan man opretter en brugerdefineret push-notifikations-opt-in.
Og hvis du vil oprette mere målrettede popup-modalvinduer, kan du bruge målretningsreglerne under fanen Målretningsregel :
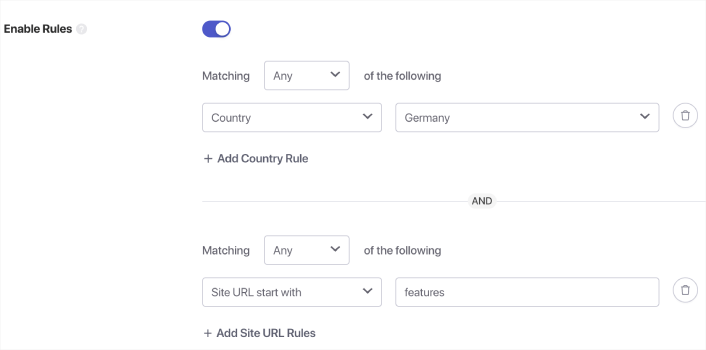
Dette er globale målretningsregler og vil have præference frem for målretningsregler for individuelle popup-modalvinduer. Men hvis du ønsker det, kan du oprette robuste målretningsregler for hvert modalvindue ved at redigere dem.
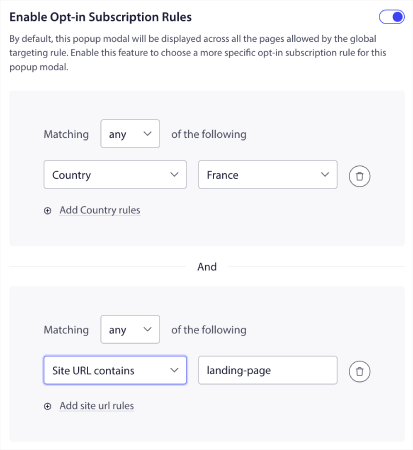
For eksempel kan du oprette popup-modalvinduer på forskellige sprog for at målrette besøgende fra forskellige lande.
Og hvis du gerne vil have nogle skabeloner med en høj klikrate til at komme i gang, bør du se denne artikel om konverteringsdygtige push-notifikations-opt-ins.
What to Do Before You Send iOS Push Alerts
Du er næsten færdig.
Before you start sending web push notifications for iOS and iPadOS, you’ll need to set up a subscription opt-in for your website. Your opt-in will convert web visitors into push notification subscribers. So, this is a critical element.
Hvis du har brug for inspiration, kan du se denne artikel om konverteringsdygtige push-notifikations-opt-ins. Når du er færdig med at opsætte opt-in, kan dit websted indsamle abonnenter. Men hvordan ved du overhovedet, at din opt-in fungerer korrekt?
Så det fornuftige er at opsætte en velkomst-push-notifikation.
Pro-tip: Du bør bruge noget tid på en fuldskala test af dine push-notifikationer. Dette vil fejlfinde de mest almindelige problemer, og du spilder ikke din tid på at forsøge at løse problemer senere.
What to Do After You Send iOS Push Alerts
Det var alt for denne gang, folkens!
Hvis du fandt denne artikel nyttig, så sørg for at efterlade en kommentar nedenfor.
At komme i gang med push-notifikationer kan virke skræmmende. Men hvis du holder øje med målsporing og analyse, skal det nok gå fint. Vigtigere er, at du vil tjene meget mere profit med hjælp fra push-notifikationskampagner. Her er et par seje ressourcer til at komme i gang:
- Sådan bruges retargeting push-notifikationer til at fordoble din omsætning
- Sådan sorteres dine push-notifikationer og finder vindende kampagner
- Sådan renses push-notifikationsabonnentlister (nemt)
- Sådan sendes RSS push-notifikationer automatisk
- Sådan bruges push-notifikationer til at promovere en nyhedsside
- Sådan bruges cross-selling push-notifikationer til at fordoble dit salg
- Sådan bruges browse abandonment push-notifikationer (4 trin)
Hvis du er ny til push-notifikationer, bør du prøve PushEngage. PushEngage er den #1 push-notifikationssoftware på markedet. Og dine kampagner vil være i sikre hænder.
Så hvis du ikke allerede har gjort det, kom i gang med PushEngage i dag!


