Looking for a simple way to add Webflow push notifications?
That’s a really great idea. Webflow is a powerful website builder that enables you to create instant websites. It’s super easy to create a website and start selling a product or a service.
But once your site is live, how do you get traffic? How do you build engagement? How do get more sales?
That’s where push notifications can be super effective as a marketing tool because they can generate repeat traffic and sales without having to run paid ads. You can also create automated campaigns to boost engagement and sales with very little effort.
But the painful bit is that there are hardly any articles out there that show you how to add Webflow push notifications.
Don’t worry! In this article, we’re going to show you step-by-step how you can add push notifications to a Webflow site in less than 10 minutes.
Lad os dykke ned.
How to Install Webflow Push Notifications
Adding push notifications to a Webflow site is quite simple. Just follow the steps in this article. If you follow every step, by the end of this article, you should be able to send push notifications like this one:

Lad os komme i gang!
Trin #1: Opsæt din PushEngage-konto
Gå til PushEngage hjemmeside og klik på knappen Kom i gang :

You can try out PushEngage for free. If you’re running a small blog that needs repeat traffic and engagement, that’s probably good enough. But if you’re serious about sales, you should get the Enterprise package and unlock the automated campaigns.
Når du har tilmeldt dig din PushEngage-konto, skal du gå til dit PushEngage-dashboard og gå til Sideindstillinger » Sideoplysninger:

Du kan indstille dit logo, sidenavn og side-URL her. Det er virkelig vigtigt at få styr på disse ting lige nu, så du kan teste hele din opsætning senere.
Trin #2: Hent installationskoden fra PushEngage
For at installere push-notifikationer skal du have en installationskode. På din Sideindstillinger-skærm skal du rulle ned og klikke på knappen Klik her for opsætningsinstruktioner:

Klik derefter på fanen Enhver side:

Og kopier Javascript-kodestykket. Du får brug for det snart.
Step #3: Place the Installation Code For Webflow Push Notifications
Log in to your Webflow dashboard and in the site builder, press A to open up the Add Panel and an Embed element:
Then, simply paste the code snippet you got from your PushEngage dashboard. This is typically where you would place your Google Analytics code, Facebook Pixel, and other tracking code as well. When you’re done, hit Save.
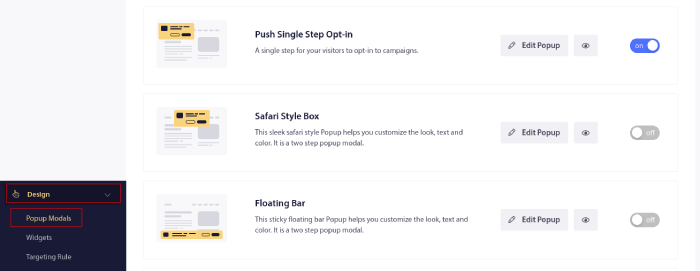
Trin #4: Konfigurer PushEngage Opt-In
Gå nu tilbage til dit PushEngage-dashboard. Gå til Design » Popup Modals og vælg den optin, du ønsker:
Idéen her er at give dine besøgende en solid grund til at abonnere. Hvis du har brug for hjælp til det, kan du se vores artikel om hvordan man opretter en brugerdefineret push-notifikations-opt-in.
Og hvis du ønsker nogle skabeloner til at komme i gang, bør du tjekke denne artikel om konverteringsdygtige push-notifikations-opt-ins.
Trin #5: Opret din første kampagne
Now that your Webflow site can send push notifications, you should create an actual campaign.
Webflow isn’t really a frivolous free site builder. It’s an advanced builder for custom web development. So, you’re likely going to sell a product on your landing page. If that’s you, you should definitely set up an abandoned cart reminder for your store.
En kampagne for forladt indkøbskurv hjælper med at generere ekstra indtægter ved at konvertere forladte indkøbskurve. Det er en simpel påmindelse, der sælger mange produkter automatisk. Så det er en god kampagne til at understøtte enhver landingsside, der giver direkte salg.
Just head over to your PushEngage dashboard and go to Campaigns » Triggered Campaigns » Create A New Triggered Campaign:

And then, select the Cart Abandonment campaign template:

Hvis du er ny til at oprette automatiserede marketingkampagner, kan du blot følge vores artikel om hvordan man opsætter en push-notifikationskampagne for forladt indkøbskurv. Følg hvert trin, og du kan opsætte push-notifikationer som denne:
Og bare for en sikkerheds skyld, du behøver ikke at være et kendt mærke for, at dine push-notifikationskampagner er effektive. Faktisk blev PushEngage bygget til at hjælpe små virksomheder med at vokse ved hjælp af push-notifikationer.
But before you start marketing your site, you should fix any issues with your push notification subscription process. Check out this article on testing your push notifications. If everything’s working perfectly, you’re done!
What To Do After Adding Webflow Push Notifications?
Det var alt for denne gang, folkens!
You just added push notifications to your Webflow site. Then, you created a powerful push notification campaign to boost your growth. All that, in less than 10 minutes!
Check out how to create other automated push notification campaigns as well. Most push campaigns are simple and effective. So, we recommend setting up multiple campaigns for your site. Here are a few great ones to start with:
- Sådan sendes RSS push-notifikationer automatisk
- Sådan opsætter du push-notifikationer for forladte indkøbskurve ved hjælp af GTM
- Sådan planlægger du push-meddelelser på den nemme måde [5-min. guide]
Og hvis du ikke allerede har gjort det, kom i gang med PushEngage. PushEngage er den #1 push-meddelelsessoftware i verden. Så dine kampagner er i sikre hænder.


