Looking for a quick and easy way to sort push notifications and find your best performing campaigns?
Sorting your push campaigns by performance metrics helps you understand what works and what doesn’t. More importantly, you can use your best campaigns as a base for new campaigns.
The sorting feature isn’t standard for all push notification services. Even if you get the feature, you might not be able to use it without using their API service. Which means that you’ll need a developer to do it for you.
If you have an in-house developer, that’s fine. But if you don’t, we highly recommend shifting to PushEngage. PushEngage allows you to filter your campaigns in a few simple clicks.
In this article, we’re going to show you step by step how to sort push notifications and find your best campaigns.
Why Would You Want to Filter and Sort Push Notifications?
You can filter and sort push notifications to find the best performing campaigns or even your worst performing campaigns.
The epic thing about these filters is that you can see:
- Types of push notifications that you send the most
- How well specific types of notifications perform
- Identify seasonal trends in campaign performance
- What kinds of campaigns need to be optimized immediately
And you can do it in a few simple clicks!
You can also sort the push notifications by Latest Created or Oldest Created. This way, you can make it super easy to find specific campaigns even after your filter by a date range.
Does Your Push Notification Service Allow Campaign Sorting?
Not every push notification service allows you to filter and sort push notifications. At least, not directly. Sometimes, you can do it using their API service. But that’s difficult to do if you don’t have an in-house developer.
En god måde at verificere på er simpelthen at spørge din tjenesteudbyder, om de har en oprydningsmulighed. Men chancerne er, at de ikke har en med tilgængelige muligheder.
Vi anbefaler, at du skifter til PushEngage med det samme.

PushEngage er den bedste push-notifikationstjeneste i verden. Og vi taler ikke kun om gratisversionen. Den giver dig mulighed for at forbinde med besøgende, efter de har forladt dit websted, med målrettede push-beskeder.
PushEngage is our first choice for push notification services and tools because it’s:
- Den er så nem at bruge
- Effektiv på HTTP- og HTTPS-websteder
- Leveres med en visuel builder, der kræver lidt eller ingen kodning at sætte op
- Opsæt nemt fuldt automatiserede push-meddelelseskampagner for enhver form for websted
- Har flere muligheder for at sende personlige push-notifikationer for højere klikrater
- Udstyret med brugerdefineret målsporing, UTM-parametre og avanceret analyse
Og dette er kun lige begyndelsen. Tjek PushEngages fulde liste over funktioner, før du går videre.
Den mest utrolige del ved PushEngage er, at den har en evigt gratis plan, som du kan prøve, før du træffer en købsbeslutning.
PushEngage's gratis plan er god nok til at få din virksomhed til et punkt, hvor du nemt har råd til de betalte planer, der starter fra 9 USD/måned for 100.000 abonnenter.
De samlede skifteomkostninger er ret lave. Så vi opfordrer dig kraftigt til at skifte til PushEngage med det samme. Oprydningsfunktionen er ikke den eneste grund til at købe en PushEngage-plan. Du får en masse avancerede funktioner, som andre push-notifikationsværktøjer simpelthen ikke tilbyder.
How to Filter and Sort Notifications Quickly
Nu hvor du har skiftet til PushEngage, er det tid til at rydde op i din push-notifikationsabonnentliste.
If you’re new to tracking push notification performance, we have some really great news for you. You can sort and filter your push broadcasts easily.
Head over to your PushEngage dashboard and go to Push Broadcasts:

Here, you’ll notice that there’s a filter option:
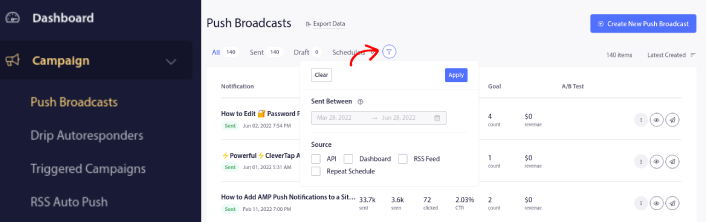
You can filter the push broadcasts you sent out by date and source:

Let’s say that you have a Black Friday push notification campaign spanning multiple days.
Now, you can get a clear picture of which notifications performed the best and which ones aren’t performing too well. And this information can help you optimize your current broadcasts and campaigns.
If you’re new to using push notifications, you should know that you can only A/B test push broadcasts. But you can use the sorting and filtering options to apply optimizations to even your automated campaigns. It’s a really neat way to set up push notification best practices for your industry and brand.
What to do After You Sort Push Notifications
After you sort your push notifications, you can look into detailed analytics and then get back to optimizing your push notification campaigns and growing your business.
Vi foreslår også, at du tager dig tid til at læse vores artikler og lære, hvordan du supercharger dine automatiserede push-notifikationer. Start med vores artikel om bedste praksis for push-notifikationer.
If you’re new to push notifications, you should follow a full-blown push notification testing process before you go live. It’ll help you troubleshoot common issues before your visitors see them and start complaining about a broken user experience. And most definitely you should set up Google Analytics to track push notifications.
Retargeting af push-notifikationer for at målrette abonnenter, der klikkede på dem eller ej. Lad os vide, hvordan det virker for dig. I mellemtiden kan du tjekke disse ressourcer:
- Sådan øger du klik på dine push-notifikationer med nysgerrighed
- Sådan personaliserer du hver push-notifikation
- Sådan skiller du dig ud med rich media i dine push-notifikationer
- Sådan genaktiverer du inaktive push-abonnenter
- Sådan bruger du push-notifikationer til at holde kunderne informeret
- Sådan bruger du emojis i dine push-notifikationer for højere klikrater
- Sådan øger du konverteringer ved at skabe en følelse af hastværk
Og hvis du ikke allerede har gjort det, kom i gang med PushEngage.


