Leder du efter en nem måde at sende RSS push-notifikationer på?
Det er hårdt arbejde konstant at skabe indhold og administrere en blog. Men hvis du driver en seriøs forretning, ved du, at det ikke er nok bare at skabe indhold. Du skal også kunne promovere dit indhold.
Og push-notifikationer er en fantastisk måde at få abonnenter på en omkostningseffektiv måde. Det, der gør push-notifikationer så gode som et marketingværktøj, er, at de kan automatiseres fuldstændigt.
Det er her, RSS push-notifikationer kommer ind i billedet.
Hvis du opsætter RSS push-notifikationer på den rigtige måde, vil dine abonnenter automatisk modtage en push-notifikation, der fører dem til dit indhold, hver gang du udgiver indhold på dit websted.
Og i denne artikel vil vi vise dig præcis, hvordan du opsætter RSS auto push på dit websted.
Sådan aktiverer du RSS push-notifikationer på ethvert websted
Du kan opsætte RSS push-notifikationer til enhver type websted, så længe det har et RSS-feed. Hvis du ikke er sikker på, om dit websted har et RSS-feed, skal du blot gå til URL'en 'yoursite.com/rss' for at tjekke (Erstat 'yoursite' i eksemplet med dit faktiske webstedsnavn).
Og for at sende RSS push-notifikationer skal du også bruge en push-notifikationsudbyder. I denne artikel vil vi vise dig, hvordan du bruger PushEngage til at sende RSS auto push. PushEngage er verdens førende software til push-notifikationer. Så dine kampagner vil være i sikre hænder.
Lad os komme i gang.
Trin #1: Installer PushEngage
Gå til PushEngage hjemmeside og klik på knappen Kom i gang :

Du kan vælge gratisplanen for at prøve PushEngage, eller vælge en betalt plan, hvis du er seriøs omkring at vækste din forretning. De betalte planer inkluderer bedre målretningsmuligheder for publikum og funktioner til kampagneautomatisering.
Når du har oprettet en konto, skal du gå til PushEngage dashboard og gå til Webstedsindstillinger » Webstedsdetaljer :

Her kan du tilpasse, hvordan dit brand ser ud i de push-notifikationer, du sender ud. Fortsæt og indstil et logo og en websteds-URL for dine push-notifikationer.
Dine push-notifikationsabonnenter vil se dit Webstedsnavn, Webstedsbillede og Websteds-URL på dine notifikationer. Så du bør opsætte disse nu, så du kan teste dine push-notifikationer senere.
Når dette er gjort, skal du gå til PushEngage dashboard og hente installationskoden. Klik på knappen Klik her for opsætningsvejledning :

Kopiér installationskoden:
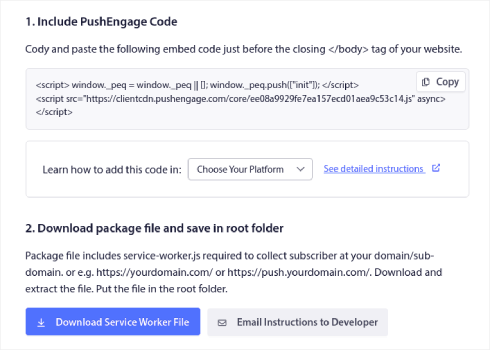
Og derefter skal du indsætte installationskoden i HTML-<head>-sektionen på dit websted. Hvis du ikke er sikker på, hvordan du gør det, kan du tjekke denne artikel om hvordan man installerer web push-notifikationer på ethvert websted.
Or, if you’re running a WordPress site, you can install the web notifications WordPress plugin. The plugin takes care of the entire installation by itself. And you’re ready to set up your push notification campaigns next.
Step#2: Create a New RSS Push Notifications Campaign
Once you’ve installed PushEngage on your site, head over to your PushEngage dashboard and go to Campaign » RSS Auto Push and click on Create New Campaign:

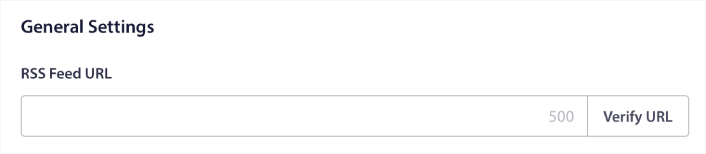
This will create a brand new RSS push notification campaign. You can set up multiple RSS feed campaigns in PushEngage. Start by giving your campaign a descriptive name. Then, paste in the URL for your RSS feed:
Step #3: Setup RSS Notification Settings
Next, you want to set the Campaign Frequency:
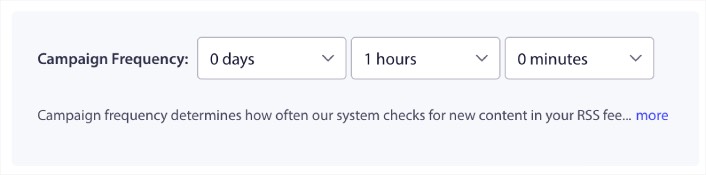
The Campaign Frequency is how often the RSS feed campaign looks for new content in your blog to send an automated push notification. The minimum value is 15 minutes and the maximum value is 7 days.
We recommend looking for content to promote once every 2 days unless you’re a news agency. For news agencies, you should keep it to 15 minutes. Keep in mind that PushEngage will only look for new content after you set up and publish your RSS feed campaign.
Step #4: Select Posts to Promote
You can select what posts to promote. You can choose between Only the latest item or All items. If you set up the RSS push notifications to select only the latest item, PushEngage only sends the latest post:
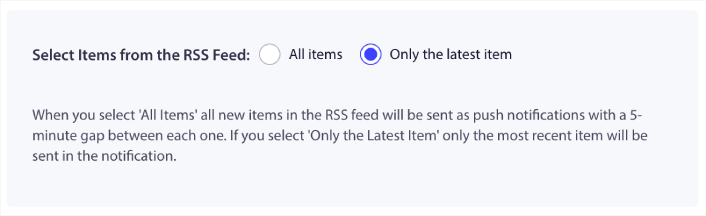
Or, you can select the All items options. In this case, the campaign will select all the posts on your site and send out push notifications for each with a 5-minute gap between them.
Step #5: Set an RSS Push Notifications Icon
Your push notification icon establishes your brand identity in your RSS push notifications. We recommend using your brand mark so that your subscribers know instantly that the notification is from your brand.
Now, there are two options here. You can either upload the notification icon manually:
And that’s really simple to do. Just click on Change image and upload your notification icon. Or, you can fetch it from your RSS feed:
You can either select the item element or the attribute inside an element to dynamically select your notification icon from the feed. Typically, most RSS feeds will hold the site icon inside the media:content item element. Even more specifically, it’s usually inside the media:thumbnail attribute of the media:content element.
To target the element, you can select the Item Element Value option and set it to media:content. Or, you can select the Element Attribute Value option and set it to media:content > media:thumbnail.
NOTE: We recommend using this option only if you know how to read XML. RSS feeds might not contain the site icon in the same XML tags as our example. So, if you’re not sure how to fetch the notification icon from the RSS feed, we recommend uploading it manually instead.
Step #6: Select Large Image for RSS Feed Notifications
Now, we’re going to select the large image for your RSS feed notifications. Again, there are two ways to do this. You can let PushEngage automatically find the image from the RSS feed:

Or, you can manually select which image you want from the feed:
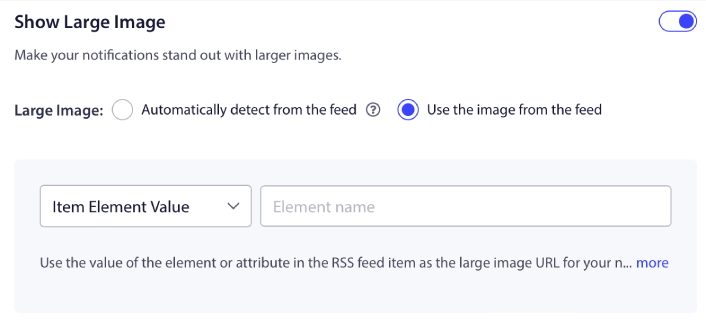
This is exactly the same as selecting the notification icon from the RSS feed. You can once again, select the image from XML element that contains it or you can select the specific attribute that contains your preferred image.
NOTE: We only recommend selecting a URL from your RSS feed if you know how to read XML. If you’re not sure how to read XML, it’s better to let PushEngage find the best image for your notifications.
Step #7: Set Push Notification Duration
The push notification duration is how long the notification stays in your subscriber’s notification tray before it get automatically deleted.
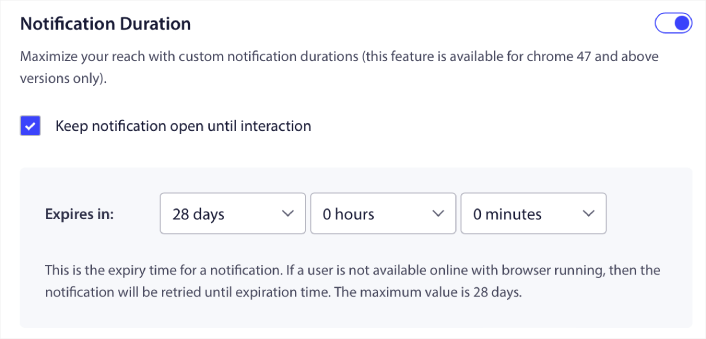
If you don’t want to overwhelm your subscribers with a bunch of unread notifications, it’s probably best to let the push notifications expire in a couple of days.
Unlike broadcast notifications or even other automated push notifications, you can’t really schedule RSS push notifications. So, you always have the option to keep the notification open until your subscriber interacts with it, even within the expiry limit.
Step #8: Set UTM Parameters
We’re almost done. Scroll down to set your own UTM parameters to track the push notifications:
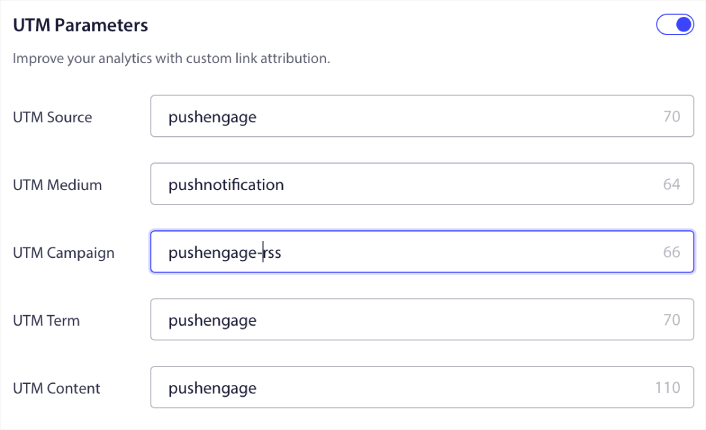
This way, you can attribute your traffic from these push notifications easily in Google Analytics.
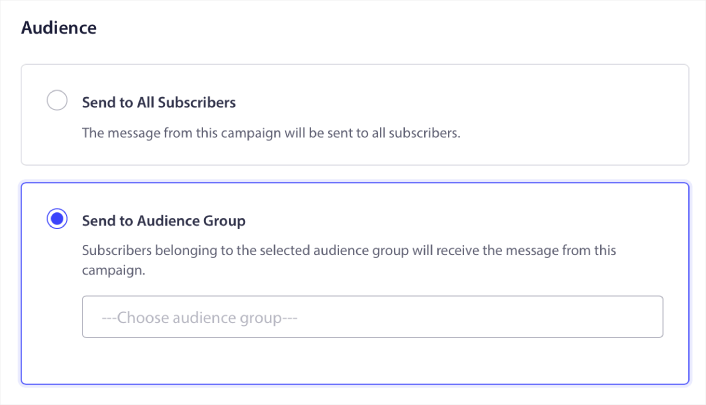
Step #9: Select Audience Group
Finally, we’re going to select an Audience Group to send your RSS push notifications. You either send the RSS feed campaign to all your subscribers, or you can create Audience Groups to send personalized push notifications even from your RSS feed.
And that’s it! That’s really all there is to it.
Now, every time you publish a new post, any push notification subscribers in the selected Audience Group will automatically receive a push notification about your new content.
What to do After You Set Up RSS Push Notifications
If you’re new to sending push notifications, you should follow a full-blown push notification testing process before you go live. It will help you troubleshoot common issues before your visitors see them and start complaining about a broken user experience.
And if you haven’t already, go ahead and give PushEngage a try. PushEngage is the #1 push notification service in the world. So, if you’re serious about growing your business, you should invest in PushEngage.
RSS push-notifikationer er fantastiske. Men du bør begynde at oprette mere målrettede push-notifikationer for bedre resultater. Oprettelse af brugerdefinerede push-notifikationskampagner kan tage tid, men de er virkelig det værd. Tjek disse artikler, før du beslutter dig:
- Sådan konverterer du abonnenter til købere ved hjælp af web push-notifikationer
- Bedste praksis for push-notifikationer
- 21 bedste eksempler på velkomstbeskeder til hjemmesider, du kan bruge
- Hvorfor velkomst-push-notifikationer er vigtige
- Sådan udføres A/B-test af push-meddelelser (bedste praksis)
Push-notifikationer hjælper virksomheder med at vokse over hele verden. Vil du bare vente, indtil dine konkurrenter begynder at bruge det, før du gør?


