
Looking for a way to add push notifications to the AMP version of your site? Adding AMP push notifications can be a little technical. But we’re going to help you do it the easy way.
AMP or Accelerated Mobile Pages are essentially a mobile version of your site. So, if you’re not setting up web push on your AMP site, then you’re going to lose a bunch of subscribers because a huge part of your audience will use mobile devices to visit your site.
In this article, we’re going to use PushEngage to install AMP push notifications because it’s way easier than doing things manually.
Lad os dykke ned.
How to Install AMP Push Notifications
Installing AMP push notifications is a really quick and easy process. Just follow these steps and by the end of this article, you should be able to send push campaigns from your site like this one:

Looks good, doesn’t it? Let’s dive in.
Trin #1: Opsæt din PushEngage-konto
Gå til PushEngage-hjemmesiden og klik på knappen Kom i gang:

Du kan vælge gratisplanen for at prøve PushEngage, eller vælge en betalt plan, hvis du er seriøs omkring at vækste din forretning. De betalte planer kommer med flere kampagnemuligheder og muligheden for at opbygge endnu større abonnentlister.
Når du har tilmeldt dig din PushEngage-konto, skal du gå til dit PushEngage-dashboard og gå til Sideindstillinger » Sideoplysninger:

Du kan indstille dit logo, sidenavn og side-URL her. Det er virkelig vigtigt at få styr på disse ting lige nu, så du kan teste hele din opsætning senere.
Step #2: Get the AMP Push Notifications Installation Code
To install web push on your AMP site, you’ll need to get an installation code. In your Site Settings screen, scroll down and click on the Click Here For Setup Instruction button:

Head over to the AMP tab to get installation settings.
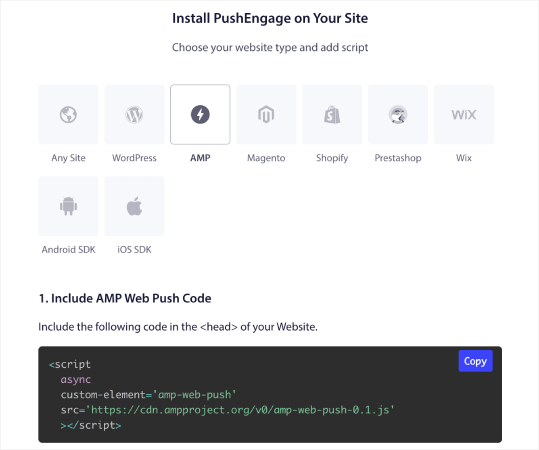
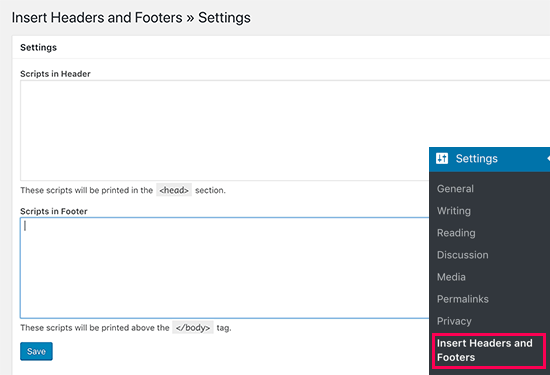
Copy this code. You’ll need to paste this code in the HTML <head> of your site. If you’re running a WordPress site with an AMP version, the simplest way to do this is to use the Insert Headers and Footers plugin. It’s a free plugin where you can paste in the AMP installation code without having to go into the actual HTML of your site:
Step #3: Install Service Worker on Your AMP Site
Next, download the package file that includes the service worker.

Dette inkluderer:
- service-worker.js
- amp-helper-frame.html
- amp-permission-dialog.html
Unzip the package and place these files in the root folder of your server. This part is super important. If you skip this step, your site won’t be able to collect push subscribers.
Pro Tip: If you’re not sure what the root folder is and how you can upload files there, you should check out this article on the WordPress File and Directory Structure. It’s a really simple guide for beginners and you get a lot of insight into how WordPress works.
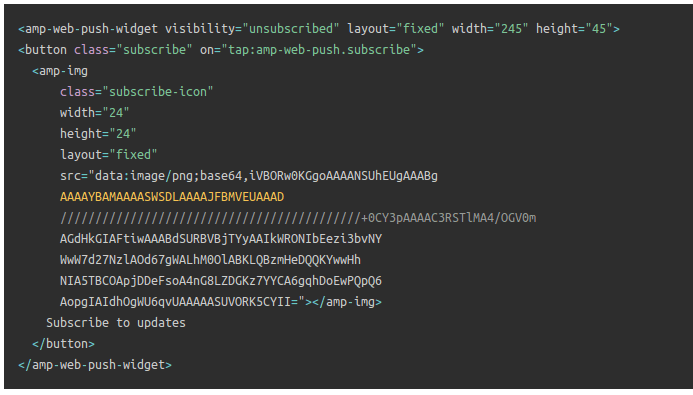
Step #4: Add the AMP Push HTML Code to Your Site
Next, add the HTML code to enable a subscribe on click button and a button to unsubscribe from push campaigns.
This code enables the service worker file you uploaded and allows your site to display subscribe and unsubscribe buttons. To collect subscribers, you need to give your visitors a simple way to subscribe to your push campaigns. The unsubscribe button will give your active subscribers a way to opt out if they’re not interested in your content. Both are pretty important.
Add the `Subscribe to updates’ button where you want it to show up on your site:
And add an ‘Unsubscribe from updates’ button:
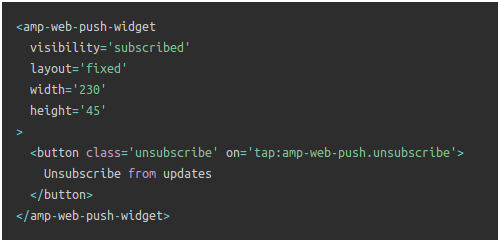
The Unsubscribe button is going to be a simple ‘tap to unsubscribe’ button. You get a lot more customization options for the non-AMP version of your site on both mobile and desktop devices. So, we recommend that you add AMP CSS to your <body> section.
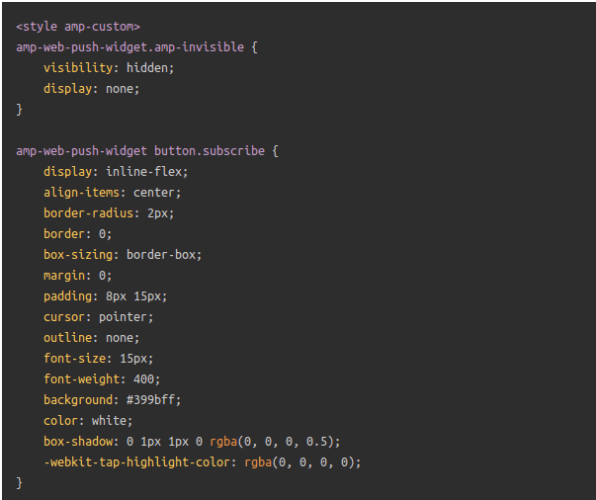
This code snippet is meant to customize the look and feel of both Subscribe and Unsubscribe buttons. If you’d like to play around with these styles, go for it. Just make sure that you don’t change the AMP HTML tags that the code is styling.
And that’s it. You’re done.
Step #5: Configuring the PushEngage Opt-In
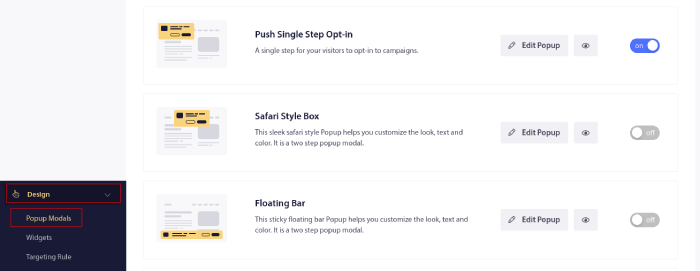
Gå nu tilbage til dit PushEngage-dashboard. Gå til Design » Popup Modals og vælg den optin, du ønsker:
Idéen her er at give dine besøgende en solid grund til at abonnere. Hvis du har brug for hjælp til det, kan du se vores artikel om hvordan man opretter en brugerdefineret push-notifikations-opt-in.
Og hvis du ønsker nogle skabeloner til at komme i gang, bør du tjekke denne artikel om konverteringsdygtige push-notifikations-opt-ins.
BONUS Step: Create a Welcome Campaign
Når du er færdig med at opsætte tilmeldingen, kan dit websted indsamle abonnenter.
But how do you know if your push campaigns are working properly?
We recommend that you create a welcome push notification to test if your setup went smoothly. A welcome notification is a web push notification you send a new subscriber to confirm their subscription and welcome them on board.
Gå til PushEngage dashboard og gå til Campaign » Drip Autoresponders og klik på Create New Drip Autoresponder:

Navngiv derefter din kampagne (vi foreslår noget som "Velkomst Drip"), og under Content, vælg muligheden "Send notification immediately after user subscribes“:

På dette tidspunkt kan du klikke på pilen ud for notifikationen for at redigere indholdet af din notifikation. Hvis du har en Premium- eller Enterprise-plan med PushEngage, vil du kunne tilføje mere end én notifikation for at oprette en sekvens af automatiserede velkomstbeskeder. Klik blot på Tilføj ny notifikation og rediger indholdet.
Når du er færdig, skal du klikke på Drip Settings og vælge muligheden for at sende din velkomstkampagne til alle abonnenter:

Then, scroll down to set your own UTM parameters to track the push campaigns:

Og når du er færdig, rul op igen og klik på knappen Activate Autoresponder:

Og det er alt, hvad der er at sige!
You have successfully set up AMP web push notifications on your website. It’s time to head back to your PushEngage dashboard and start creating your push campaigns.
What to do After You Add AMP Push Notifications to Your Site
Det var alt for denne gang, folkens!
If you’re new to push campaigns, you should follow a full-blown push notification testing process before you go live. It’ll help you troubleshoot common issues before your visitors see them and start complaining about a broken user experience.
Du bør også tjekke nogle flere automatiserede push-notifikationskampagner ud, såsom:
Vi anbefaler, at du kontakter vores Customer Success Managers, hvis du sidder fast med noget af dette. Vi hjælper dig meget gerne med ethvert problem.
Og hvis du ikke allerede har gjort det, så prøv PushEngage. PushEngage er den #1 push-notifikationstjeneste i verden. Så hvis du er seriøs omkring at vækste din virksomhed, er PushEngage den rigtige løsning for dig.


Thanks for this tips & information. Its very easy to understand.
good explanation