Looking for a quick way to add and edit your push notification icon?
It’s actually super easy. The notification icon tells your subscribers who you are. It’s a brand mark on each push notification you send. And that can be priceless because it helps your audience remember your brand.
The cost of making sure that each push notification you send helps you become more memorable? Less than 5 minutes.
In this article, we’re going to show you how to add and edit your push notification icon. And like we said, it’s super easy.
Lad os dykke ned.
Why Add a Push Notification Icon?
A push notification icon is a small, distinctive image that represents an app on a user’s device. It appears alongside push notifications to visually identify the source app of the message or alert.
This icon helps users quickly recognize which app or website is communicating with them without having to read the notification’s text.
Adding a push notification icon is a smart move for a few reasons:
- Recognition: Just like seeing a familiar face in a crowd, we instantly recognize icons. When your app sends a notification, the icon acts like a little wave, saying, “Hey, it’s me!” This helps users quickly identify which app is calling for their attention.
- Branding: Your icon is like a tiny billboard for your app. It’s a part of your brand identity. Each time users see it, they’re reminded of your app. This can help keep your app top-of-mind.
- User Experience: Users often have many apps installed, and it can be a real jumble. A unique icon helps them manage their notifications more efficiently. They can see at a glance which notifications they want to check out first.
- Professionalism: An app with its own notification icon looks more polished and professional. It shows that you’ve put thought into even the small details, which can improve overall user satisfaction.
- Functionality: Sometimes, the icon can also convey additional information. For example, a messaging app might show different icons for a new message vs. a missed call. This adds an extra layer of functionality and user convenience.
So, a push notification icon might be small, but it plays a big role in how users interact with your app and perceive it!
How to Add a Push Notification Icon
Now that we understand what a push notification icon is and why you should add it, let’s check out how you can add it easily without any coding at all.
Trin #1: Vælg en Push-notifikationstjeneste
Push notifications are a marketing tool that helps you to connect with web visitors even after they leave your website. You can send targeted notifications to your push subscribers and even personalize your notifications for difference customer segments. But which push notification service should you choose?
We recommend using PushEngage to send push notification campaigns.

PushEngage er den bedste push-notifikationstjeneste i verden. Og vi taler ikke kun om gratisversionen. Den giver dig mulighed for at forbinde med besøgende, efter de har forladt dit websted, med målrettede push-beskeder.
PushEngage er vores førstevalg til push-notifikationstjenester og -værktøjer, fordi den er:
- Den er så nem at bruge
- Effektiv på HTTP- og HTTPS-websteder
- Leveres med en visuel builder, der kræver lidt eller ingen kodning at sætte op
- Opsæt nemt fuldt automatiserede push-meddelelseskampagner for enhver form for websted
- Har flere muligheder for at sende personlige push-notifikationer for højere klikrater
- Udstyret med brugerdefineret målsporing, UTM-parametre og avanceret analyse
Og dette er kun lige begyndelsen. Tjek PushEngages fulde liste over funktioner, før du går videre.
Den mest utrolige del ved PushEngage er, at den har en evigt gratis plan, som du kan prøve, før du træffer en købsbeslutning.
Pro Tip: Læs vores artikel om analyse af push-notifikationsomkostninger, før du køber nogen service.
Step #2: Install the PushEngage Plugin
Once you’re done creating your account, head over to the PushEngage dashboard and follow along:

Klik på Webstedsindstillinger » Webstedsdetaljer og klik på knappen Klik her for opsætningsinstruktioner:

Klik på fanen WordPress og klik på knappen Installer PushEngage WordPress Plugin for at installere pluginnet på dit websted.

Here’s the cool part: When you created your PushEngage account, you already synced your website with your PushEngage account. So, click on the installation link in the PushEngage dashboard to automatically install the PushEngage WordPress plugin to your website.
And you’re done! You have successfully set up a web notifications WordPress plugin on your website. You don’t have to login to your WordPress admin panel at all. For a more detailed guide, check out our article on how to install web notifications on WordPress.
Step #3: Add or Edit Your Push Notification Icon
Go back to your PushEngage dashboard. Click on Site Settings » Site Details and under Upload Your Site Icon, you can upload an image:
The image you upload is your push notification icon. Keep the dimensions of the image at 192px x192px for the best results and make sure that the image size is less than 1MB. You can use a JPG, PNG, or even a GIF for animated brand marks. Just makes sure that the icon is consistent with brand marks that you use on social network sites.
Hvis du skal redigere dit ikon senere, er det her, du gør det. Upload blot et andet billede, og du er færdig!
Step #4: Send a Test Notification to Check Your Notification Icon
We recommend creating a website welcome message to test your push notifications. Welcome push notifications are great for:
- Bekræftelse: Du vil bekræfte, at din nye abonnent faktisk er tilmeldt dine web-push-notifikationer.
- Genaktivering: Velkomstkampagner er en god måde at få dine abonnenter til at vende tilbage til dit websted.
- Salg: Du kan give dine nye abonnenter et velkomsttilbud med rabatter, gratis gaver og kuponer.
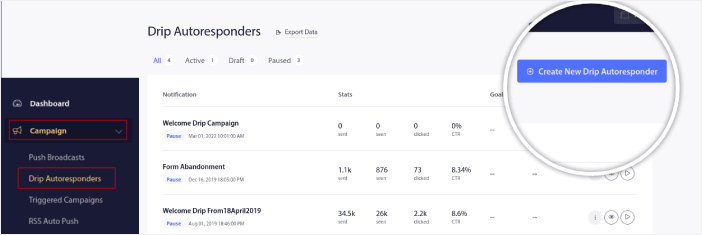
Lad os oprette en velkomst-push-notifikationskampagne nu. Gå til dit PushEngage-dashboard og gå til Kampagne » Drip Autoresponders » Opret ny Drip Autoresponder:
Giv din drip-kampagne et navn, som du nemt kan huske. Indstil derefter den første push-notifikation til at blive sendt umiddelbart efter, at en besøgende abonnerer på dine push-notifikationer.

Du kan redigere notifikationen for at oprette brugerdefineret indhold til din velkomstbesked. Når du er færdig, skal du klikke på knappen Tilføj ny notifikation for at tilføje flere notifikationer til sekvensen. Du kan redigere de nye notifikationer og indstille en brugerdefineret forsinkelse mellem hver notifikation.
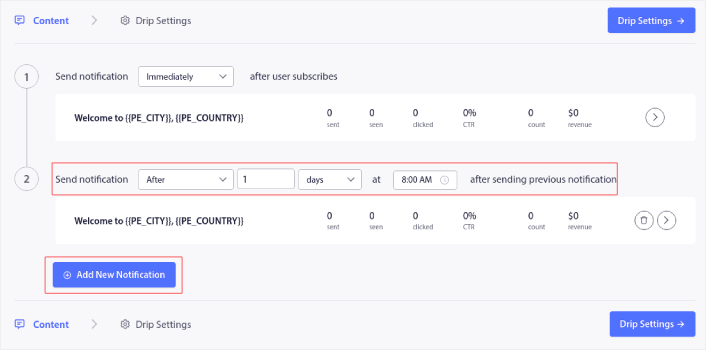
Du kan tilføje så mange notifikationer, som du vil, men vi anbefaler at oprette en velkomst-drip med 5-7 notifikationer.
Derefter skal du vælge dit publikum i Drip-indstillinger:
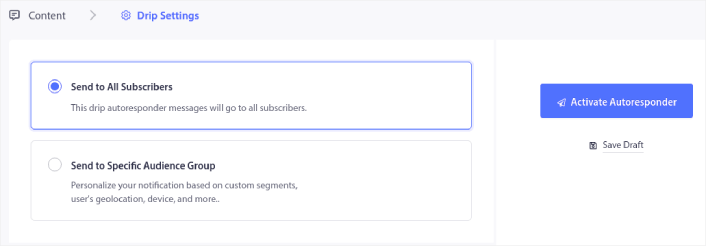
You can send different welcome drips for different segments by using the Send to Specific Audience Group option. This is especially useful when you’re segmenting visitors when they opt for push notifications.
When you’re happy with your targeting, click on the Activate Autoresponder button.
Og du er færdig!
If your push notifications were installed correctly, you should see a welcome notification like this one:

And as you can see, the notification icon is pretty prominent in our example!
If you’re new to push notifications, you should follow a full-blown push notification testing process before you go live. It’ll help you troubleshoot common issues with the functionality before your visitors see them and start complaining about a broken user experience.
What to do After You Add a Notifications Icon
Now that you know how to add a push notification icon, it’s time for you to start creating your own campaigns. But before you get started with the campaigns, you should study some great push notification examples first.
Og hvis du er ny til push-notifikationer, bør du tjekke vores artikel om bedste praksis for push-notifikationer, før du begynder at oprette kampagner. Nogle af de bedste praksisser, som vi aktivt anbefaler, inkluderer:
- Boost klik med nysgerrighed
- Personliggør hver push-notifikation
- Skil dig ud med rigt medieindhold
- Genaktiver inaktive push-abonnenter
- Hold kunderne informeret
- Brug emojis, hvor du kan
- Skab en følelse af hastværk
Vi anbefaler at bruge PushEngage til at oprette dine push-notifikationskampagner. PushEngage er den førende push-notifikationssoftware på markedet, og dine kampagner vil være i sikre hænder.
Så hvis du ikke allerede har gjort det, så kom i gang med PushEngage i dag.


