
Looking for a simple way to add push notifications to your Volusion store?
You made the right decision to add push notifications to your site. You can create automated push notifications for eCommerce sites that generate traffic, engagement, and sales on autopilot.
Volusion is a great platform to launch your eCommerce business. Now, let’s grow it using push notifications.
In this article, we’re going to show you how to install push notifications to your Volusion store in 5 simple steps.
We’re going to use PushEngage to set up push notifications. PushEngage is the #1 push notification software in the world. So, if you haven’t already picked a vendor, you get started with PushEngage today.
But if you have a different vendor, don’t worry. The steps should be almost identical for any push notification software.
Lad os dykke ned.
How to Install Push Notifications on Volusion
Adding push notifications to a Volusion store is quite simple. All you have to do is follow along with this article.
Hvis du følger hvert trin, bør du i slutningen af denne artikel kunne sende push-notifikationer som denne:

Lad os komme i gang.
Trin #1: Opsæt din PushEngage-konto
Gå til PushEngage hjemmeside og klik på knappen Kom i gang :

You can try out PushEngage for free. But if you’re serious about growing your business, you should select a paid plan to unlock the most powerful features and campaigns that PushEngage has to offer. Since Volusion is an eCommerce site builder, you should ideally get the Enterprise package to get full access to automated push notification campaigns.
Når du har tilmeldt dig din PushEngage-konto, skal du gå til dit PushEngage-dashboard og gå til Indstillinger » Webbetsindstillinger » Installationsindstillinger:
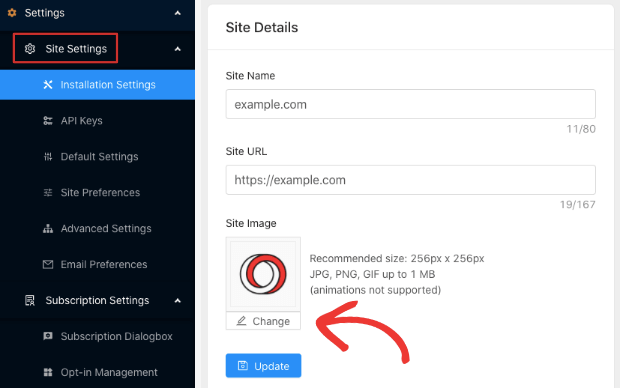
You can set your logo, site name, and site URL here. You can set up your brand later on. But honestly, if you just get it done right now, it’ll be way easier for you to test things later on.
Trin #2: Hent installationskoden fra PushEngage
Before you can add push notifications to your Volusion site, you’ll need to get an installation code from your PushEngage dashboard.
Head over to Settings » Site Settings » Installation Settings:
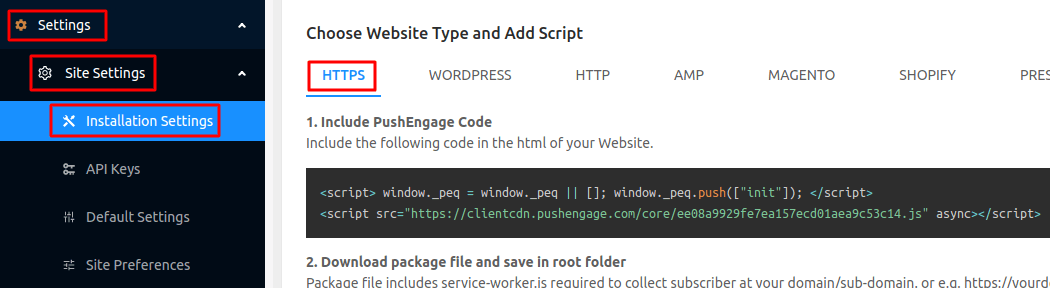
The image only shows you a sample code for HTTPS sites. If you don’t have an SSL certificate installed, you can click on the HTTP tab on the same screen. And the code you get will be unique for your site. So, please don’t copy the code in the image. Go and get your own code!
And you should copy this Javascript code snippet. You’ll need it soon.
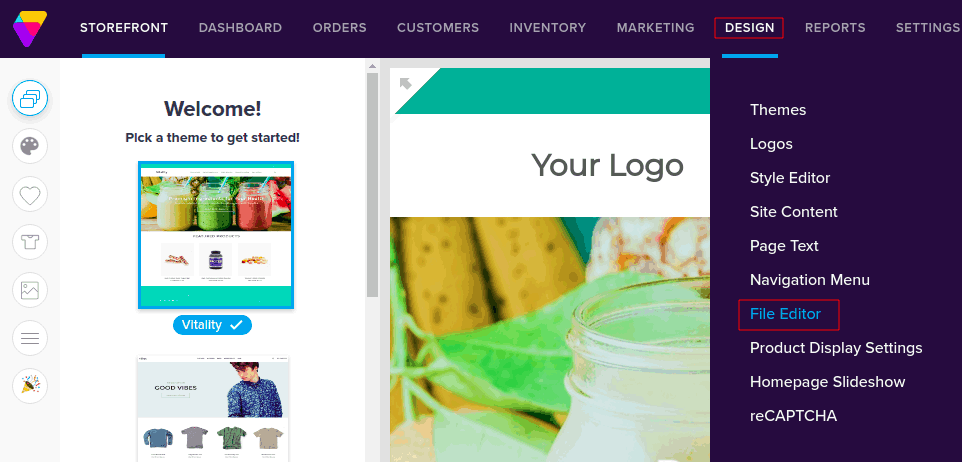
Step #3: Place the Installation Code in Your Volusion Site
In your Volusion site, head over to Design » File Editor:
This will open up the File Editor and on the right-hand side, you’ll see a pane that lists theme files under Shortcuts:
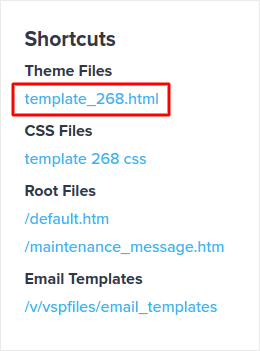
Click on the HTML file to edit it and insert your PushEngage Javascript code snippet right before </head>:
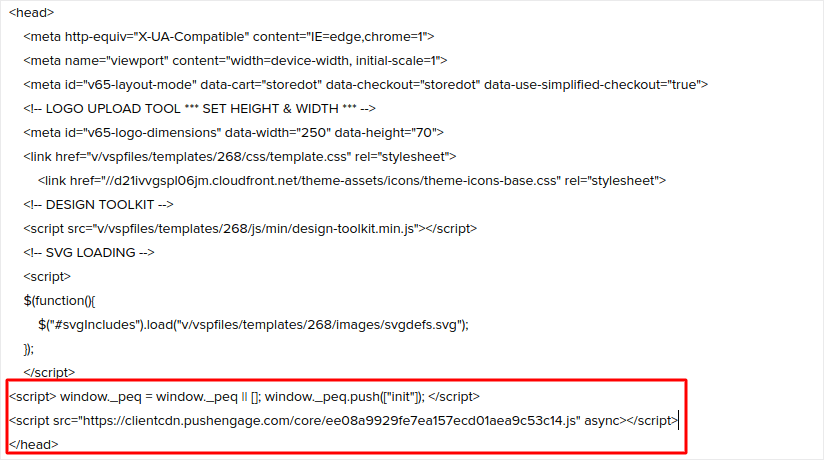
Finally, when you’re done, hit Save.
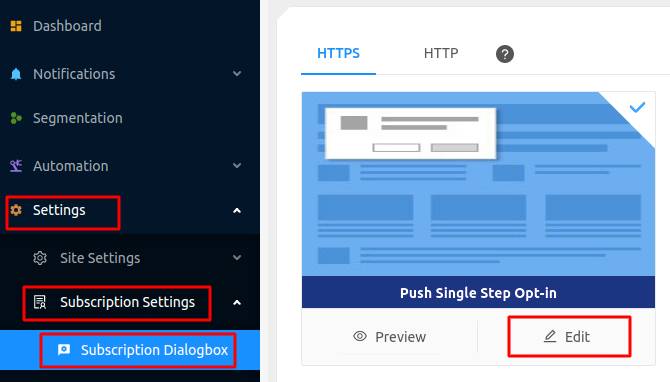
Trin #4: Konfigurer PushEngage Opt-In
Next, in your PushEngage dashboard, go to Settings » Subscription Settings » Subscription Dialogbox » Edit:
Idéen her er at give dine besøgende en solid grund til at abonnere. Hvis du har brug for hjælp til det, kan du se vores artikel om hvordan man opretter en brugerdefineret push-notifikations-opt-in.
Og hvis du ønsker nogle skabeloner til at komme i gang, bør du tjekke denne artikel om konverteringsdygtige push-notifikations-opt-ins.
Trin #5: Opret din første kampagne
Now that your Volusion site can send push notifications, let’s create an actual campaign.
One of the best campaigns you can create for an eCommerce site is a cart abandonment campaign. A cart abandonment campaign helps you add to your revenue by recovering sales that are already half-made.
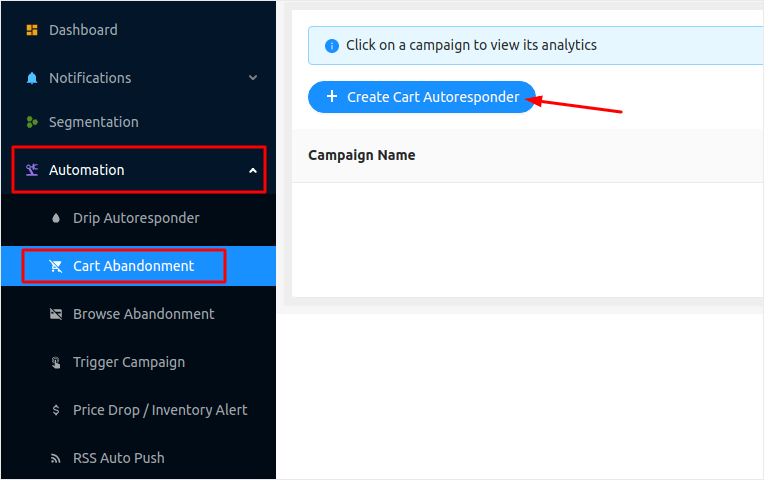
Gå blot til dit PushEngage-dashboard og gå til Automation » Cart Abandonment » Create Cart Autoresponder:
Følg vores artikel om hvordan man opretter en kampagne for forladte indkøbskurve, og du kan oprette og sende en autoresponder som denne:
Pro-tip: Dette er et godt tidspunkt også at teste dine push-meddelelser og kontrollere, at alt i din kampagne fungerer fint.
Afslutning
Det var alt for denne gang, folkens!
Hvis du nød denne artikel, og du formåede at opsætte din første push-meddelelseskampagne i din Volusion-butik, godt gået!
Du bør også tjekke hvordan man opretter prisaldrigvarsler til din butik også.
Og hvis du ikke allerede har gjort det, kom i gang med PushEngage. PushEngage er den #1 push-meddelelsessoftware i verden. Så dine kampagner er i sikre hænder.


