Looking for a guide to create waterfall push campaigns?
Waterfall notifications are gaining a lot of popularity these days. For a long time, you could only send waterfall email campaigns. But now, you can recreate the same effective campaigns and use the targeting options in push notification software to send waterfall push notifications.
But how do you get started? Do you need experience with waterfall campaigns? Do you need any experience setting up push notification campaigns?
In this article, we’re going to help you create waterfall push campaigns using an example. We’ll also answer all your questions about waterfall push notifications.
Lyder godt? Lad os dykke ned.
What Are Waterfall Push Campaigns?
A waterfall push campaign is a type of ad campaign for mobile devices. It works like this: you send push notifications to a group of people, but not all at once. Instead, you send the notification first to the people who are most likely to engage with the notification and take the action you want them to take.
If those people don’t respond, you move on to the next group of people, and so on.
The idea is to get as many people as possible to engage with the notification while spending the least amount of money. It’s called a “waterfall” because it’s like a series of steps that the network goes through, targeting different groups of people at each step.
Let me explain.
With any business your run, you’ll see a group of subscribers who are extremely engaged. They buy anything you sell, happily offer testimonials and reviews, and refer new customers to you.
And then again, you’ll see subscribers who simply aren’t interested in anything about your business.
Push notification campaigns come with detailed analytics. So, you can see both groups pretty clearly in your subscriber list. And the cool thing is that you can create Audience Groups in PushEngage to retarget both types of subscribers.
Then, you can create targeting options for your push notifications to retarget specific behavior on each notification you send. Once we get into our example, you’ll see more clearly how behavior targeting impacts a waterfall push campaign. For now, you should know that all push waterfall campaigns have two core components:
- A set of push notifications with a common goal
- Audience groups to retarget different types of subscribers
Let’s check out why waterfall push campaigns are so effective next.
Why Send Waterfall Push Campaigns?
There are several advantages of using waterfall push campaigns to grow your brand:
- Efficient use of advertising budget: By targeting the most valuable users first, and then moving down the priority list, a waterfall push campaign can help to maximize the return on investment (ROI) for your advertising spend. This ensures that your advertising budget is being used as effectively as possible.
- Higher engagement rates: By targeting users who are more likely to engage with the ad, you increase the chances of getting a higher click-through rate and conversion rate, which can lead to increased revenue.
- Customizable targeting: With a waterfall push campaign, you can create different segments of users based on their demographics, behavior, and other factors. This allows you to tailor your messaging to each group and increase the likelihood of success.
- Real-time optimization: With a waterfall push campaign, you can track the performance of each segment in real-time and adjust your targeting strategy accordingly. This ensures that you are always optimizing for the best possible results.
Overall, waterfall push campaigns can be an effective way to reach your target audience and drive engagement and conversions, while minimizing wasted ad spend.
How to Send Waterfall Push Notifications
Now that we know what a waterfall push campaign is and why you should create them, let’s take a look at a real example with step-by-step instructions to create one.
Before you get started with sending waterfall push notifications, you need to select a push notification service. We recommend using PushEngage.
Trin #1: Opret en gratis PushEngage-konto
Gå til PushEngage og klik på Kom i gang gratis nu:

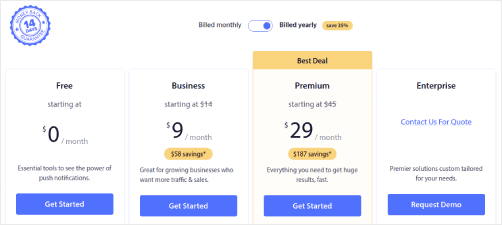
Du kan komme i gang med den gratis plan. Men hvis du leder efter de mest kraftfulde browser-notifikationer, bør du vælge en betalt plan baseret på dine forretningsbehov:
Når du ved, hvilken plan du vil have, skal du klikke på Kom i gang for at oprette din PushEngage-konto.
Trin #2: Tilmeld dig PushEngage
Nu er det tid til at oprette din PushEngage-konto. Start med at tilmelde dig med en e-mailadresse eller et Gmail-id:

Udfyld derefter dine kontooplysninger:

Og tilføj dine kreditkortoplysninger for at købe din plan:

Hvis du valgte den gratis konto, vil dit kreditkort aldrig blive opkrævet penge, før du vælger at opgradere din plan. Og nu er du klar til at få adgang til dit PushEngage-dashboard. Klik blot på Gennemfør registrering og få øjeblikkelig adgang.
Hvis du har brugt OneSignal eller PushAlert før, vil du se, at PushEngage giver dig en meget renere oplevelse fra dashboardet. OneSignal-dashboardet er ikke beregnet til avancerede kampagner. Til det skal du bruge API'en mere end OneSignal-pluginet.
Trin #3: Installer WordPress-pluginnet til webenotifikationer
Du er færdig med at oprette din konto. Så gå til PushEngage-dashboardet og følg med:

Klik på Webstedsindstillinger » Webstedsdetaljer og klik på knappen Klik her for opsætningsinstruktioner:

Klik på fanen WordPress og klik på knappen Installer PushEngage WordPress Plugin for at installere pluginnet på dit websted.

Here’s the cool part: When you created your PushEngage account, you already synced your website with your PushEngage account. So, click on the installation link in the PushEngage dashboard to automatically install the PushEngage WordPress plugin to your website.
Trin #4: Forbind dit WordPress-websted med PushEngage
Når du er færdig med at installere og aktivere PushEngage WordPress-pluginet, vil du se PushEngage-guiden:

Guiden er ret ligetil. Hvis du er ny bruger, skal du klikke på Ny? Gør krav på din gratis konto. Og hvis du allerede har tilmeldt dig, skal du klikke på Forbind din eksisterende konto.
Dernæst kan du vælge dit websted fra rullemenuen Vælg et websted under Forbind et registreret websted, hvis du allerede har registreret et websted under tilmelding:

Eller du kan klikke på Registrer et nyt websted for at tilføje et nyt websted, hvis du har en Premium-prisplan eller højere. I næste trin vil onboarding-guiden bede dig om at installere andre must-have WordPress-plugins.

Hvis du fulgte hvert trin korrekt, vil du se denne succesmeddelelse fra guiden:

You are now ready to create campaigns.
Step #5: Create Waterfall Push Campaigns
Finally, it’s time for our example. To show you a real use case for waterfall push campaigns, we’re going to take the example of Black Friday promotions. Our objective is to maximize the conversions on our Black Friday offer.
To retarget our subscribers based on their behavior, we’re going to send a broadcast to all our subscribers. Then, based on their engagement levels, we’re going to create different Audience Groups for retargeting.
How to Send Your Notification to All Subscribers
We want the maximum reach for 3 notifications:
- Early Black Friday Announcement
- Black Friday Flash Sale
- Cyber Monday Sale
So, we’re sending those 3 notifications to everyone. In the Audience tab, select Send to All Subscribers:

How to Retarget Subscribers Who Didn’t Click the Broadcast to Everyone
If you’re not sending the notification to all subscribers, you’ll need to create an Audience Group. For instance, if you want to target the subscribers who didn’t click on the broadcast to everyone, you’ll need to create a new Audience Group.
In your WordPress dashboard, go to Audience » Audience Groups and click Create New Audience Group:

To target subscribers who didn’t click the last notification, you’ll need to filter by Last click date:
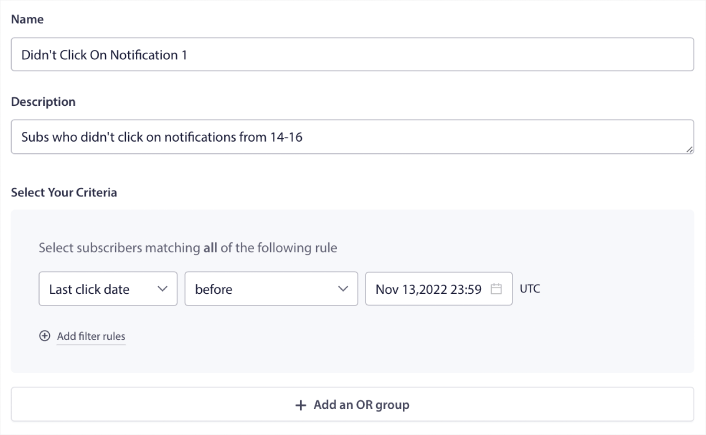
Filter by last click date before the date you sent your previous notification. So, if you sent the last push notification on 14th November, filter for subscribers who clicked on notifications only before 13th November at midnight.
NOTE: Unlike an email campaign, you can’t actually filter by click rate on the last notification. The closest approximation is to filter for clicks in a date range.
When you’re done, click on Save Notification.
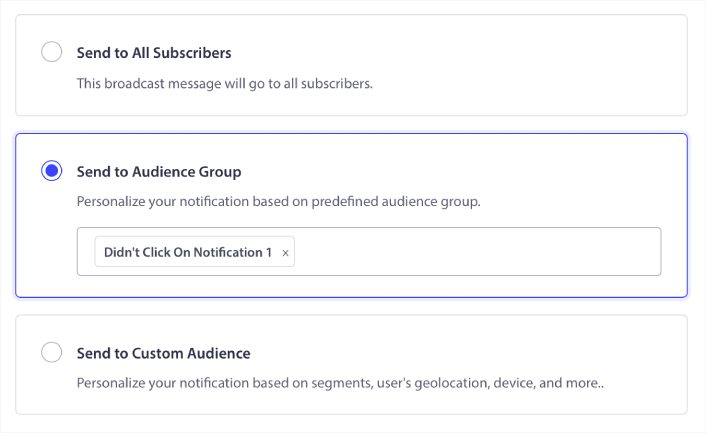
Then, head back to your push notification broadcast and select Send to Audience Group. From the dropdown, select your Group:
How to Retarget Subscribers Who Clicked the Broadcast to Everyone
Hvis du vil målrette abonnenter, der klikkede på din sidste notifikation, kan du oprette en anden Målgruppe.
Filter your subscribers by Last click date after the date you sent your previous notification AND before the date you want to send your next notification:
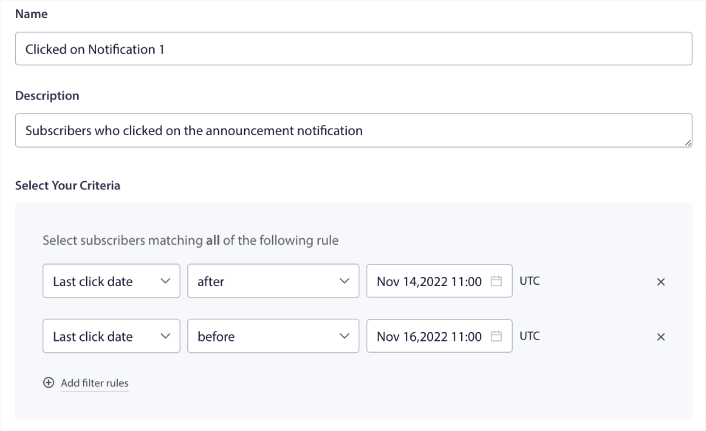
You can add AND criteria to your filter by clicking on Add filter rules. A filter like this is great for cross-selling push notifications.
The outcome of these Audience Groups is more granular targeting. So, each time, you can send different offers to improve your conversion rates.
What to do After You Create Waterfall Push Campaigns
One of the most important things to remember about waterfall push campaigns is that you can only use this methodology on broadcast push notifications. Drip campaigns in push notifications don’t have targeting options that granular yet.
So, make sure to A/B test your push notifications. We also suggest that you take some time to read our articles and learn how to supercharge your automated push notifications. Start with our article on push notification best practices.
Hvis du er ny til push-notifikationer, bør du følge en fuld push-notifikationstestproces, før du går live. Det vil hjælpe dig med at fejlfinde almindelige problemer, før dine besøgende ser dem og begynder at klage over en dårlig brugeroplevelse. Og helt sikkert bør du opsætte Google Analytics til at spore push-notifikationer.
Retargeting af push-notifikationer for at målrette abonnenter, der klikkede på dem eller ej. Lad os vide, hvordan det virker for dig. I mellemtiden kan du tjekke disse ressourcer:
- Sådan øger du klik på dine push-notifikationer med nysgerrighed
- Sådan personaliserer du hver push-notifikation
- Sådan skiller du dig ud med rich media i dine push-notifikationer
- Sådan genaktiverer du inaktive push-abonnenter
- Sådan bruger du push-notifikationer til at holde kunderne informeret
- Sådan bruger du emojis i dine push-notifikationer for højere klikrater
- Sådan øger du konverteringer ved at skabe en følelse af hastværk
And if you haven’t already, get started with PushEngage.


