Looking for a guide to creating drip campaigns to boost your sales?
Marketing is incomplete today without automation. Sure, you can collect subscribers and send out push notifications and emails. What then? Keep selling them on your business with every newsletter and hope that your subscribers convert?
There’s no way to:
- Personalize your campaigns
- Get new customers on autopilot
- Retain existing customers with your content
- Upsell or cross-sell products
- Recover lost sales
Unless… you use drip campaigns that convert.
In this article, we’ll show you how to set up drip campaigns and make the most of them. The best part? You don’t need any previous experience.
Lyder godt? Lad os dykke ned.
What Are Drip Campaigns?
Think of drip campaigns like setting up a bunch of emails or even push notifications to be sent out automatically, sort of like a sprinkler system for your garden. Instead of watering plants, you’re sending out messages to people who are interested in what you’ve got to say or sell.
Her er, hvordan det fungerer:
- It’s not magic, it’s automated: Once you set it up, these messages keep going out on their own. You don’t have to keep sending them manually.
- You can talk to the right people: You can send different messages to different groups of people. For example, someone who just signed up might get a friendly “hello” message, while someone else who’s been around for a while might get special deals or updates.
- It’s personal: These messages can use the person’s name or talk about things they’ve shown interest in. It makes them feel like you’re really talking to them, not just sending the same thing to everyone.
- Timing is everything: The messages are sent at times that make the most sense – like right after someone signs up or looks at something on your site.
- Each message has a job: Every email or notification is meant to do something specific, like help people get to know your product better or remind them about something they looked at but didn’t buy.
- You can see how it’s doing: You can check out things like how many people open the messages or click on links inside them. This helps you know if your messages are working well.
Drip campaigns aren’t just for emails – they work app push notifications and web push notifications as well. They’re great for keeping in touch with people who are interested in your stuff, without overwhelming them. It’s a smart way to keep people engaged and interested in what you’re doing.
Types of Drip Campaigns
Let’s dive into the different types of drip campaigns. Just like ice cream comes in all sorts of varieties, drip campaigns have different types too. Each kind is tailored for a specific purpose or audience. Here are some of the most common ones:
- Welcome Series: This is like saying “Hi!” to someone new. When someone signs up for your emails or notifications, you send them a few friendly messages to introduce them to your brand or service. It’s like rolling out the red carpet for your new guests.
- Onboarding Campaigns: Think of this as a helpful guide. When someone buys a product or signs up for a service, these messages walk them through how to use it, offer helpful tips, or show them things they might not know about. It’s like giving a tour to someone new in town.
- Abandoned Cart Reminders: Ever put something in your online shopping cart and then forget about it? These campaigns are little nudges to remind people about stuff they were interested in but didn’t buy. It’s like a gentle tap on the shoulder saying, “Hey, did you forget about this?”
- Re-engagement Campaigns: These are for reaching out to people who used to interact with your brand but haven’t in a while. It’s like calling up an old friend and saying, “Hey, let’s catch up!” You might offer them a special deal or just remind them about your brand.
- Educational Content: Here, the goal is to teach your audience something valuable related to your product or industry. It’s like a mini-course, delivered in small, digestible messages. Think of it as a series of fun and informative lessons.
- Product Updates: Got something new or improved? This type of campaign keeps your audience in the loop about new features, products, or services. It’s like showing off your latest gadget to friends.
- Event Invites: Hosting a webinar, workshop, or another event? These campaigns are all about getting people excited and signed up for your events. It’s like sending out cool invitations to a party.
- Seasonal Campaigns: These are tied to specific times of the year, like holidays, seasons, or special events. It’s like decorating your store for Christmas or having a summer sale.
Each type of drip campaign has its own charm and purpose. By matching the right type of campaign with your audience and goals, you can create meaningful connections and keep your audience engaged in a way that feels natural and not too sales-y.
How to Create Push Notification Drip Campaigns
Det er ikke svært at installere push-notifikationer på et websted. Men det indebærer et par trin, og du vil gerne følge denne guide trin for trin.
Spring ikke frem i tiden på noget tidspunkt, og du vil være okay.
Before you create a welcome push notification campaign, you need to select a push notification service. A push notification service is a software that allows you to create push campaigns without any coding.
We recommend using PushEngage.

PushEngage er verdens førende plugin til push-notifikationer.
Push-notifikationer hjælper dig med at øge din webtrafik og dit engagement automatisk. Og hvis du driver en onlinebutik, hjælper PushEngage dig også med at øge dit salg ved at hjælpe dig med at oprette automatiserede e-handels-push-notifikationer.
Du kan komme i gang gratis, men hvis du er seriøs omkring at vækste din forretning, bør du købe en betalt plan. Før du køber en push-notifikationstjeneste, bør du også se denne guide til priser på push-notifikationer.
Her er et hurtigt overblik over, hvad du får med PushEngage:
- Højt konverterende automatiserede kampagner
- Flere målretnings- og kampagneplanlægningsmuligheder
- Målsporing og avanceret analyse
- Smart A/B-test
- En dedikeret succesmanager
Du vil se, at PushEngage uden tvivl er det bedste valg, hvis du vil opbygge trafik, engagement og salg for din virksomhed. Og hvis du har et stramt budget, kan du altid være lidt kreativ med dine push-notifikationer.
NOTE: If you’re running a WordPress site, you should install and activate the PushEngage WordPress plugin.
Lad os komme i gang!
Trin #1: Opret en gratis PushEngage-konto
Gå til PushEngage og klik på Kom i gang gratis nu:
Du kan komme i gang med gratisplanen. Men hvis du ønsker at sende målrettede push-notifikationer, bør du vælge Growth Plan. Når du ved, hvilken plan du vil have, skal du klikke på Kom i gang for at oprette din PushEngage-konto.
Trin #2: Tilmeld dig PushEngage
Nu er det tid til at oprette din PushEngage-konto. Start med at tilmelde dig med en e-mailadresse eller et Gmail-id:

Udfyld derefter dine kontooplysninger:

Og tilføj dine kreditkortoplysninger for at købe din plan:

Hvis du valgte gratis kontoen, vil dit kreditkort aldrig blive opkrævet penge, før du vælger at opgradere din plan. Og nu er du klar til at få adgang til dit PushEngage-dashboard. Klik blot på Gennemfør registrering og få øjeblikkelig adgang.
Hvis du har brugt OneSignal eller PushAlert før, vil du se, at PushEngage giver dig en meget renere oplevelse fra dashboardet. OneSignal-dashboardet er ikke beregnet til avancerede kampagner. Til det skal du bruge API'en mere end OneSignal-pluginet.
Trin #3: Installer WordPress-pluginnet til webenotifikationer
NOTE: If you’re not running a WordPress site, you should check out our installation guides to get started.
Du er færdig med at oprette din konto. Så gå til PushEngage-dashboardet og følg med:

Klik på Sideindstillinger » Sideoplysninger og klik på knappen Klik her for opsætningsinstruktioner:

Klik på fanen WordPress og klik på knappen Installer PushEngage WordPress Plugin for at installere pluginet på din hjemmeside.

Her er den fede del: Da du oprettede din PushEngage-konto, synkroniserede du allerede din hjemmeside med din PushEngage-konto. Så klik på installationslinket i PushEngage-dashboardet for automatisk at installere PushEngage WordPress-pluginet på din hjemmeside.
Trin #4: Forbind dit WordPress-websted med PushEngage
Når du er færdig med at installere og aktivere PushEngage WordPress-pluginet, vil du se PushEngage-guiden:

Guiden er ret ligetil. Hvis du er ny bruger, skal du klikke på Ny? Gør krav på din gratis konto. Og hvis du allerede har tilmeldt dig, skal du klikke på Forbind din eksisterende konto.
Dernæst kan du vælge din side fra rullemenuen Vælg en side under Forbind en registreret side, hvis du allerede har registreret en side under tilmelding:

Eller du kan klikke på Registrer en ny side for at tilføje en ny side, hvis du har en Premium prisplan eller højere. I næste trin vil guiden bede dig om at installere andre nødvendige WordPress-plugins.

Hvis du fulgte hvert trin korrekt, vil du se denne succesmeddelelse fra guiden:

Du er nu klar til at oprette kampagner og push-underretningspop op-modaler.
Step #4: Send Personalized Drip Campaigns
Before you create a campaign, you should set up segments and audience groups to send personalized push messages.
Intet slår niveauet af personalisering, du kan opnå ved at oprette segmenter og målgruppegrupper til dine push-notifikationsabonnenter. Gå til PushEngage » Audience og begynd at oprette segmenter og målgruppegrupper med det samme.
Under fanen Segments kan du oprette nye segmenter eller redigere eksisterende:

Og hvis du har brug for endnu dybere personalisering, skal du oprette en målgruppegruppe under fanen Audience Groups:

Hvis du er nybegynder inden for push-notifikationssegmenter og personaliserede push-notifikationer, bør du læse vores artikel om hvordan man opretter segmenter og vores meddelelse om avanceret målgruppegruppering.
Step #5: Create Your Drip Push Notifications Campaign
Go to PushEngage dashboard and head over to Campaign » Drip Autoresponders and click on Create New Drip Autoresponder:

Then, name your campaign (we suggest something like Welcome Drip), and under Content, select the option that says, “Send notification immediately after user subscribes“):

På dette tidspunkt kan du klikke på pilen ved siden af notifikationen for at redigere indholdet af din notifikation.
If you have a Premium or Enterprise plan with PushEngage, you’ll be able to add more than one notification to create a sequence of automated welcome messages. Just click on Add New Notification and edit the content.
Once you’re done, click on Drip Settings and select the option to send your welcome campaign to all subscribers:

Then, scroll down to set your own UTM parameters to track the push notifications:

And when you’re done, scroll back up and click the Activate Autoresponder button:

Og du er færdig!
How to Create Email Drip Campaigns
Setting up those nifty automated drip campaigns in WordPress? You can do that easily with an email marketing tool. Follow along with the rest of this guide and you’re all set!
Step #1: Select an Email Drip Service
We suggest giving Constant Contact a whirl. It’s like the superstar of email marketing services. Super user-friendly and it comes with a cool drag-and-drop feature for crafting emails.

Constant Contact er den bedste e-mailmarkedsføringstjeneste til at opsætte autosvar til din virksomhed. Den er super nem at bruge og tilbyder masser af automatiseringsfunktioner til at forbedre dine e-mailkampagner.
Her er, hvad der gør Constant Contact til et så godt valg til opsætning af e-mailmarketingkampagner:
- Nem træk-og-slip-bygger til at oprette e-mails
- Hundredvis af foruddesignede e-mailskabeloner
- Velkomstbeskeder, fødselsdagstilbud og autoresponders for forladte indkøbskurve
- Værktøjer til at opbygge lister og tilmeldingsformularer til at udvide din målgruppe
- Split-test til målrettede e-mails
- Integrationer med CRM'er og tredjepartstjenester
- Fremragende support via live chat og telefon
For ikke at nævne, at Constant Contact har et formular-plugin til WordPress, som du kan bruge til leadgenerering. Du kan også pleje og lukke dine leads med autosvar.
But hey, this isn’t the only game in town. Most of the big email marketing services, like Brevo (you might know it as Sendinblue), HubSpot, and others, they’ve got this drip email magic too.
With a few clicks, you can get those automated emails rolling out to your subscribers. Plus, Constant Contact plays nice with WordPress plugins like WPForms and OptinMonster. And if you’re into eCommerce, using WooCommerce or Shopify, it’s got you covered for reaching out to new customers or reminding folks about those items they left in their carts.
Ready to give it a go? Pop over to the Constant Contact website, sign up, and guess what? You get to try it out with a 60-day free trial. It’s like test driving a car but for email marketing. This way, you can see if it’s the right fit before you decide to go for a paid plan.
Step #2: Create an Email List
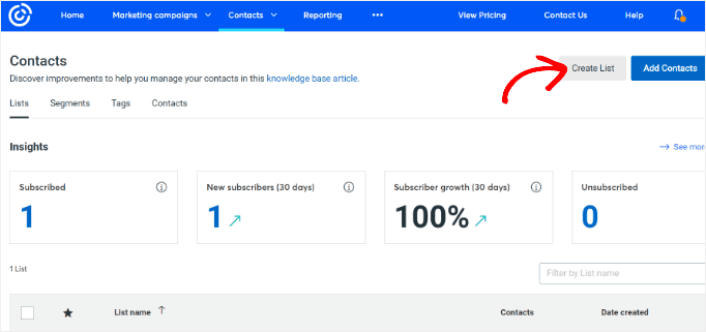
After creating an account, you can visit the Constant Contact dashboard to create a contact list.
Constant Contact will have already created a default list for you. However, you can create your own list by going to the Contacts tab in the top menu and then clicking the Create List button.
You can connect your WordPress newsletter form with Constant Contact and start building an email list. You should also check out our blog post on how to add a WordPress blog subscription widget.
Step #3: Create Marketing Drip Campaigns
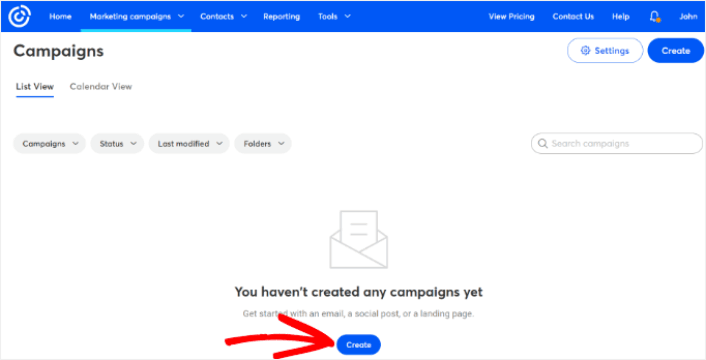
Now that you’ve added subscribers to your Constant Contact list, the next step is to create an automated drip campaign. Head over to the Marketing Campaigns tab and then click the Create button.
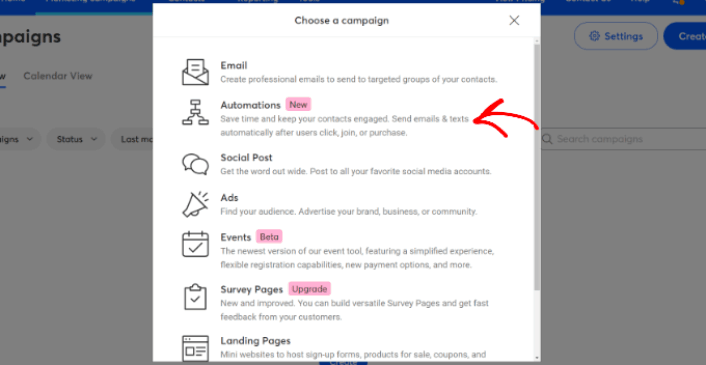
Constant Contact will show you multiple options for creating a campaign. Go ahead and select the Automations campaign.
From here, you can choose from several pre-built campaign templates to set up a drip campaign. You can create a Custom Automation to start from scratch, or you can quickly get started using any of the campaign templates.
For this tutorial, we will select the Create custom path template to get started. Select the Subscribes for email option and then click the Next button.
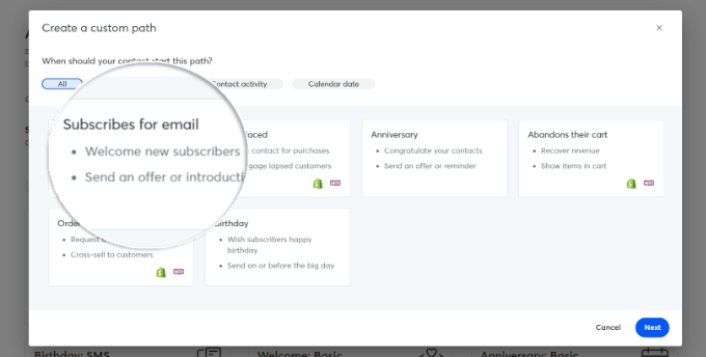
Give your custom path a name and you’re done! This template will trigger a drip campaign any time someone new subscribes to your email list. So, it’s perfect for a welcome campaign. If you’re looking to create an onboarding campaign, you can use tags to put them on a separate drip campaign.
Step #4: Create a Campaign Flow
However, you can simply drag actions and rules from the menu on the left onto the path. For instance, you add different actions like sending an email or sending an SMS to your workflow.
There are also different rules that help you customize your automation. You can add a time delay and specify when the next email should be sent. Similarly, there is a conditional split option that lets you set up Yes and No conditions and split the path.
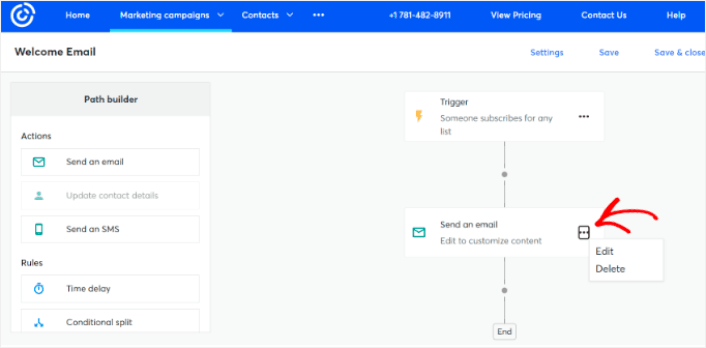
Tweaking your automated workflow is a breeze too. Just spot the three dots icon and give it a click. Choose Edit to make changes. Say you want to change up the Send an email action.
Once you do that, a popup window shows up. Here’s where you can either whip up a brand new email or use one you’ve already made.
Since it’s your first time setting up this workflow, go ahead and pick Create a new email. Put in a cool name for your email, then hit Continue. And just like that, you’re on your way to customizing your email workflow!
Step #5: Creating Your Email Campaign
You can search for a template based on the occasion or use a blank template to create an email from scratch.
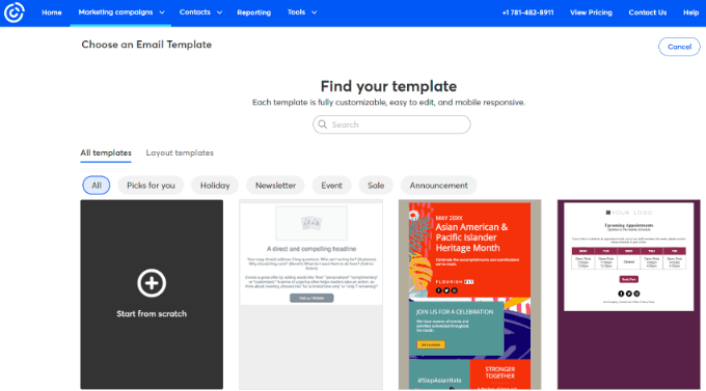
Once you select a template, the email editor will launch.
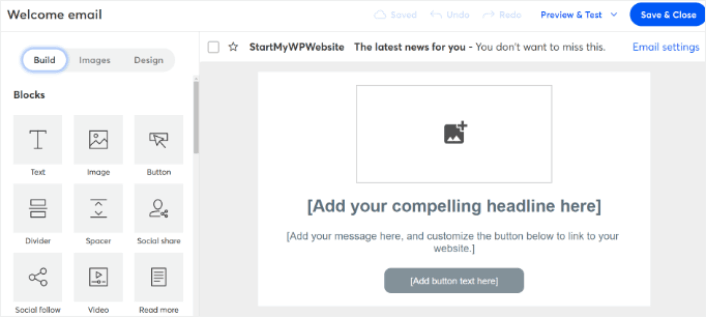
When you are done, hit the Save & Close button at the top. This will take you back to the Path Builder in Constant Contact. Go ahead and finish your automation path by adding as many actions and rules to your path and editing each one of them.
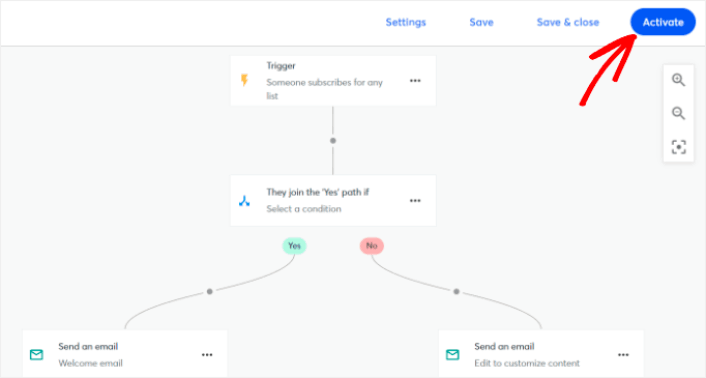
After creating an automated workflow, you can simply click the Activate button at the top. And you’re done!
What to do After You Create a Drip Campaign
Det var alt for denne gang, folkens!
Hvis du fandt denne artikel nyttig, så sørg for at efterlade en kommentar nedenfor.
Getting started with drip campaigns can seem intimidating. But if you keep an eye on goal tracking and analytics, you should be fine. More importantly, you’ll make a lot more profit with the help of push notification campaigns. Here are a few cool resources to get you started:
- Sådan bruges retargeting push-notifikationer til at fordoble din omsætning
- Sådan sorteres dine push-notifikationer og finder vindende kampagner
- Sådan renses push-notifikationsabonnentlister (nemt)
- Sådan sendes RSS push-notifikationer automatisk
- Sådan bruges push-notifikationer til at promovere en nyhedsside
- Sådan bruges cross-selling push-notifikationer til at fordoble dit salg
- Sådan bruges browse abandonment push-notifikationer (4 trin)
Hvis du er ny til push-notifikationer, bør du prøve PushEngage. PushEngage er den #1 push-notifikationssoftware på markedet. Og dine kampagner vil være i sikre hænder.
Så hvis du ikke allerede har gjort det, kom i gang med PushEngage i dag!


