
Looking for a way to add push notifications to your Jimdo site?
That’s a really great decision.
Push notifications can help you generate a lot of traffic, engagement, and sales on autopilot and with very little effort. And it’s really easy to add push notifications to a Jimdo site. So, it’s really a quick win.
In this article, we’ll show you how to add push notifications to Jimdo even if you’ve never done it before.
For this article, we’re going to use PushEngage to set up push notifications on your Jimdo website. PushEngage is the #1 push notification software in the world. So, your campaigns will be in good hands.
But even if you’re not using PushEngage, this process should be fairly similar to other vendors.
Lad os dykke ned.
How to Install Push Notifications on Jimdo
Installing push notifications on Jimdo is super easy. Just follow these steps and by the end of this article, you should be able to send push notifications from your site like this one:

And you don’t have to run a huge business to leverage the power of push notifications. You can do the same thing very effectively even if you’re running a small business site with very little traffic.
Lad os dykke ned.
Trin #1: Opsæt din PushEngage-konto
Gå til PushEngage-hjemmesiden og klik på knappen Kom i gang:

You can select the free plan to try out PushEngage, or choose a paid plan if you’re serious about growing your business. The paid plans come with more campaign options and the ability to build even bigger subscriber lists.
Once you’ve signed up for an account, head over to the PushEngage dashboard and go to Settings » Site Settings » Installation Settings:
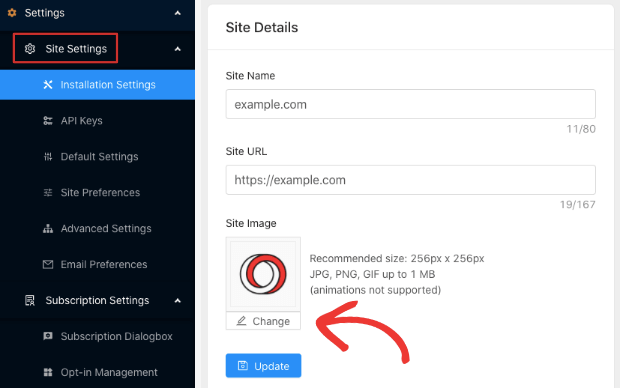
Her konfigurerer du dine webstedsdetaljer og branding. Fortsæt og indstil et logo og en websteds-URL til dine push-notifikationer. Du bør gøre dette lige nu, så du kan teste dine push-notifikationer korrekt.
Trin #2: Hent installationskoden fra PushEngage
Next, you’ll need to head over to the PushEngage dashboard and get the installation code. Go to Settings » Site Settings » Installation Settings:
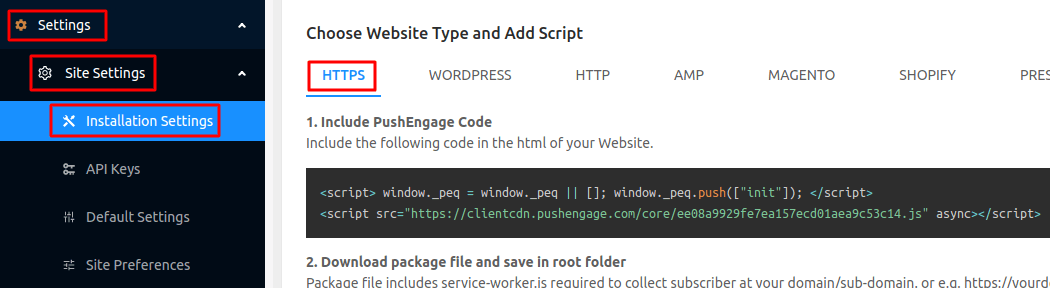
Depending on whether your site has an SSL certificate installed, go to either the HTTP tab or the HTTPS tab to get your installation code.
Copy this code. You’ll need it later.
Step #3: Place the Installation Code in Your Jimdo Site
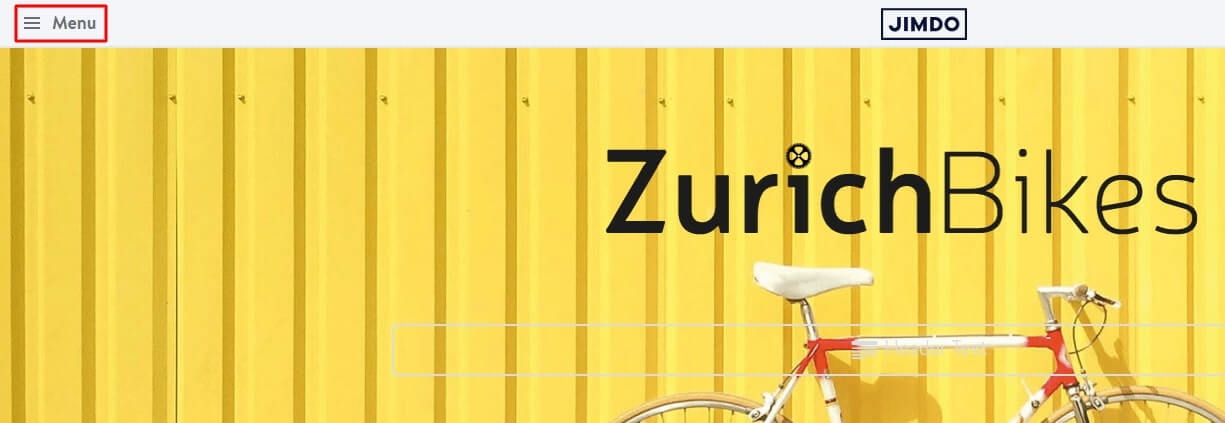
Log in to your Jimdo Creator and click on Menu:
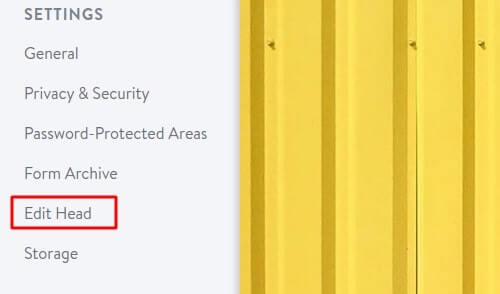
Then, go to Settings:

And click on Edit Head:
In the code editor, paste your PushEngage installation code:
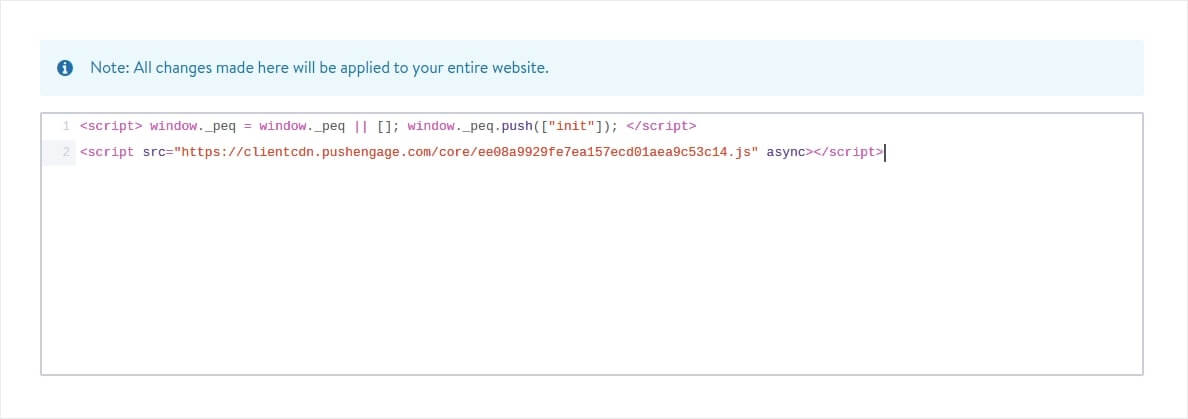
When you’re done, hit Save.
Step #4: Configuring the PushEngage Opt-In
Finally, in your PushEngage dashboard, go to Settings » Subscription Settings » Subscription Dialogbox » Edit:
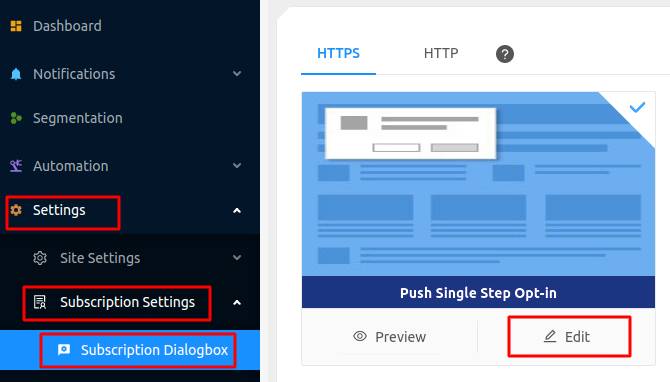
From here, you can customize your push notification opt-in. If you need help with that, you should check out this article on how to create a custom push notification opt-in.
If you need some inspiration, you can check out this article on high-converting push notification opt-ins.
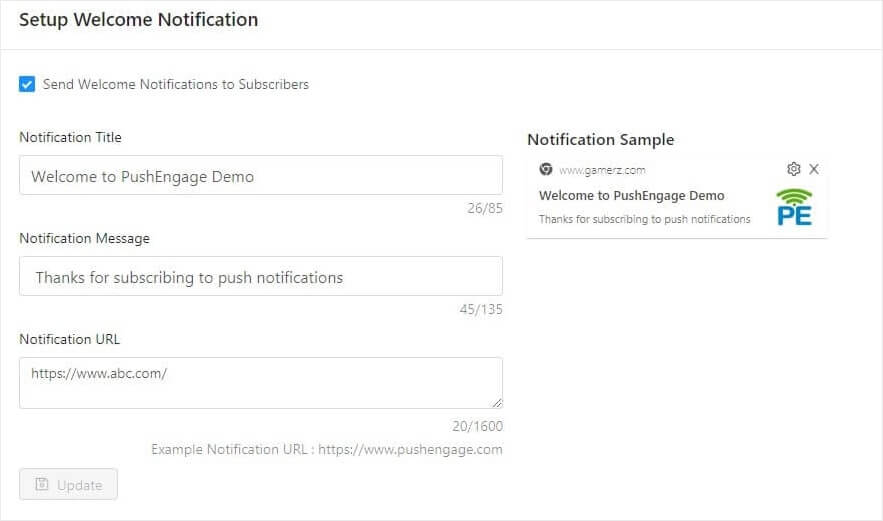
Step #5: Create a Welcome Notification
Når du er færdig med at opsætte tilmeldingen, kan dit websted indsamle abonnenter.
Men hvordan ved du, om dine push-notifikationer fungerer korrekt?
We recommend that you create a welcome push notification to test if your setup went smoothly. A welcome notification is a push notification you send a new subscriber to confirm their subscription and welcome them on board.
Gå til Indstillinger » Webbetsningsindstillinger » Installationsindstillinger og konfigurer din velkomstbesked:
Til sidst skal du gå tilbage til dit websted og vælge dine egne push-notifikationer for at teste, om det hele fungerer problemfrit.
Og det er alt, hvad der er at sige!
Du har nu sat push-notifikationer op på din Jimdo-side. Det er tid til at vende tilbage til dit PushEngage-dashboard og begynde at oprette dine push-notifikationskampagner.
Afslutning
Det var alt for denne gang, folkens!
Hvis du er ny til push-notifikationer, bør du følge en fuld push-notifikationstestproces, før du går live. Det vil hjælpe dig med at fejlfinde almindelige problemer, før dine besøgende ser dem og begynder at klage over en dårlig brugeroplevelse.
Og hvis du ikke allerede har gjort det, så prøv PushEngage. PushEngage er den #1 push-notifikationstjeneste i verden. Så hvis du er seriøs omkring at vækste din virksomhed, bør du investere i PushEngage.


