Looking for a quick guide to set up browse abandonment push notifications?
Browse abandonment push notification campaigns are automated campaigns that can nudge your website visitors to add products to their cart. But how do you set one up? Is it a complicated process? What push notification service do you use? Do browse abandonment campaigns work that well?
In this article, we’ll answer all these questions. We’ll also show you how to set up browse abandonment push notifications in less than 10 minutes with no coding.
Lad os dykke ned.
What are Browse Abandonment Push Notifications?
En notifikation om afbrudt browsing er en automatiseret push-notifikation, der sendes, når nogen, der browser på din hjemmeside, beslutter sig for at forlade uden at foretage sig noget. At sende den besøgende en påmindelse om, at de var interesserede i noget på din hjemmeside, kan øge dine konverteringsrater enormt.

Browse abandonment campaigns are most commonly used by eCommerce sites. But that’s not to say that a travel portal or a news site (or any website, really) can’t use them. If you’re selling anything at all, you need to set up browse abandonment push notifications to recover lost sales.

En notifikation om afbrudt browsing slutter, når din besøgende tilføjer noget til deres indkøbsvogn. Derefter overtager en notifikation om indkøbsvognsafbrydelse for at konvertere dem til betalende kunder.
That’s where browse abandonment campaigns come into play. You can target, convince, and convert customers who:
- Added a product to a Wishlist, but not their Cart
- Viewed a product more than once
- Gennemset mere end 3 produkter i samme kategori
- Søgt på siden efter et specifikt produkt
- Stayed on a product page for at least 3 minutes and didn’t buy
The coolest bit is that you can set up browse abandonment emails to support your browse abandonment push notifications. As long as you can afford one of the best email marketing services, you can set up automated campaigns easily.
And trust us when we say it, you will get awesome returns on your marketing efforts with browse abandonment campaigns.
Pro Tip: Check out our list on the most powerful eCommerce push notifications you can use. Set up as many of these automated campaigns as you can.
How to Set Up Browse Abandonment Push Notifications
Now that we understand what a browse abandonment campaign is and why you should create one, let’s dive into how you can set one up. We’re going to use PushEngage to set up your browse abandonment campaign.

PushEngage er den bedste push-notifikation software i verden.
Push-notifikationer hjælper dig med at øge din webtrafik og dit engagement automatisk. Og hvis du driver en onlinebutik, hjælper PushEngage dig også med at øge dit salg ved at hjælpe dig med at oprette automatiserede e-handels-push-notifikationer.
Du kan komme i gang gratis, men hvis du er seriøs omkring at vækste din forretning, bør du købe en betalt plan. Før du køber en push-notifikationstjeneste, bør du også se denne guide til priser på push-notifikationer.
Her er et hurtigt overblik over, hvad du får med PushEngage:
- Højt konverterende automatiserede kampagner
- Flere målretnings- og kampagneplanlægningsmuligheder
- Målsporing og avanceret analyse
- Smart A/B-test
- En dedikeret succesmanager
You’ll see that PushEngage is hands down the best bet if you want to build traffic, engagement, and sales for your business. And if you’re on a budget, you can always get a little bit creative with your push notifications. Let’s create our browse abandonment push notifications now.
Step #1: Create a New Browse Autoresponder
Gå til dit PushEngage-dashboard og gå til Kampagne » Udløste kampagner. Klik derefter på Opret ny autoresponder for afbrudt browsing:

Og vælg derefter kampagnetypen Browse Abandonment Campaign fra listen over kampagnetyper, og klik på Create New:

Step #2: Create a Series of Push Notifications
Nu burde du kunne se et kampagneopsætnings-dashboard. Opret din kampagne under Content:
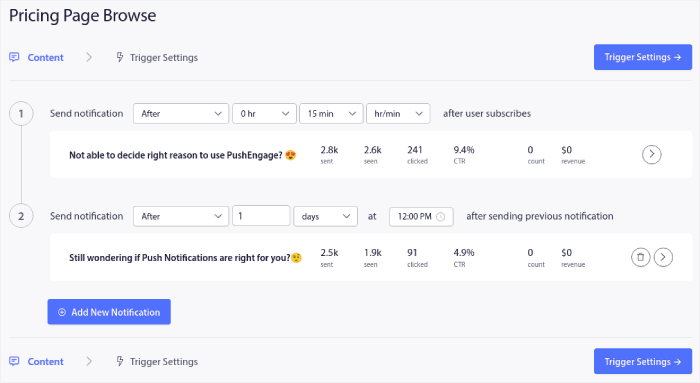
Most of this is straightforward. Give your campaign a name and create a sequence of browse abandonment push notifications.
Step #3: Configure the Browse Abandonment Trigger
When you’re done, click on Trigger Settings. It’s time to set up the trigger for browse abandonment:
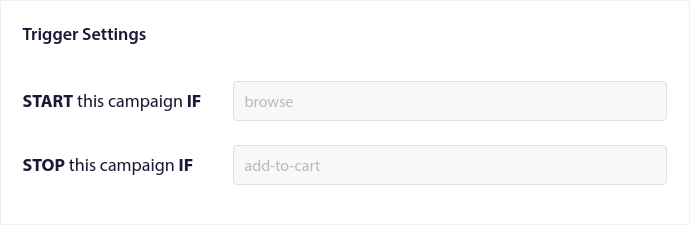
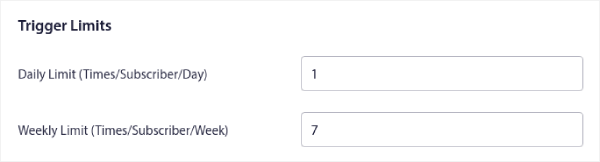
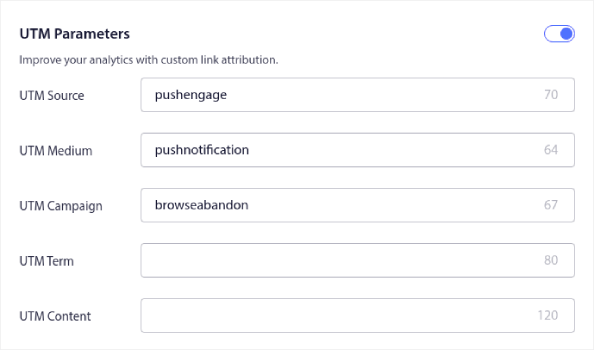
Dette er standardværdier for skabelonen til kampagnen for forladt browsing. Så du behøver ikke ændre noget her. Du kan indstille Udløsergrænser baseret på hvor ofte du vil sende push-meddelelser:
Og du kan også opsætte UTM-parametre her:
Og aktiver også Goal Tracking:
Hvis du er ny inden for push-notifikationsanalyse, så tjek vores guide til målsporing for push-notifikationer.
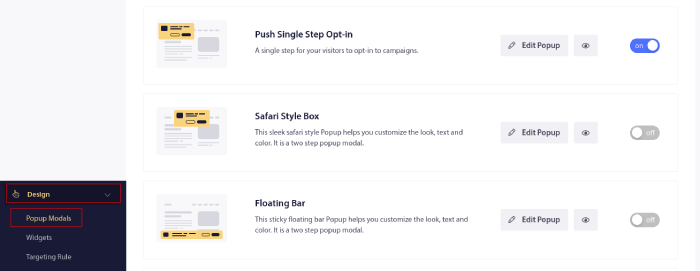
Step #4: Configure Your Push Notification Popup Modal
Finally, in your PushEngage dashboard, go to Design » Popup Modals:
From here, you can customize your push notification opt-in. If you need help with that, you should check out this article on how to create a custom push notification opt-in.
Hvis du har brug for inspiration, kan du tjekke denne artikel om push-notifikationer, der konverterer højt.
Hvad du skal gøre, efter du har oprettet push-notifikationer om forladte indkøbskurve
Nu hvor du kender kraften i e-handels push-notifikationer, er det tid til, at du begynder at oprette dine egne kampagner. Men før du går i gang med kampagnerne, bør du først studere nogle gode eksempler på push-notifikationer.
Og hvis du er ny til push-notifikationer, bør du tjekke vores artikel om bedste praksis for push-notifikationer, før du begynder at oprette kampagner. Nogle af de bedste praksisser, som vi aktivt anbefaler, inkluderer:
- Boost klik med nysgerrighed
- Personliggør hver push-notifikation
- Skil dig ud med rigt medieindhold
- Genaktiver inaktive push-abonnenter
- Hold kunderne informeret
- Brug emojis, hvor du kan
- Skab en følelse af hastværk
Pro Tip: Hvis du er ny inden for e-handels push-notifikationer, bør du også tjekke denne artikel om hvordan du får flere anmeldelser.
Vi anbefaler at bruge PushEngage til at oprette dine push-notifikationskampagner. PushEngage er den førende push-notifikationssoftware på markedet, og dine kampagner vil være i sikre hænder.
Så hvis du ikke allerede har gjort det, så kom i gang med PushEngage i dag.


