Are you looking for a detailed, step-by-step guide to creating Black Friday push notifications that convert?
Sure, you can send out a simple push notification broadcast. But will that work? We’ve figured out a rock solid process to help you get more sales from holiday season. And we’ve tested it out multiple times with multiple brands.
In this article, we’re covering how we create push notifications for PushEngage’s Black Friday Sale. And how you can do the same thing as well. We’re going to check out what you need to get started, how you would create the campaigns, and what an ideal schedule would look like.
Lyder godt? Lad os dykke ned.
Before You Get Started with Black Friday Push Notifications
Push notifications are a marketing tool that helps you to connect with web visitors even after they leave your website. You can send targeted notifications to your push subscribers and even personalize your notifications for difference customer segments. But which push notification service should you choose?
We recommend using PushEngage to send push notification campaigns.

PushEngage er den bedste push-notifikationstjeneste i verden. Og vi taler ikke kun om gratisversionen. Den giver dig mulighed for at forbinde med besøgende, efter de har forladt dit websted, med målrettede push-beskeder.
PushEngage er vores førstevalg til push-notifikationstjenester og -værktøjer, fordi den er:
- Den er så nem at bruge
- Effektiv på HTTP- og HTTPS-websteder
- Leveres med en visuel builder, der kræver lidt eller ingen kodning at sætte op
- Opsæt nemt fuldt automatiserede push-meddelelseskampagner for enhver form for websted
- Har flere muligheder for at sende personlige push-notifikationer for højere klikrater
- Udstyret med brugerdefineret målsporing, UTM-parametre og avanceret analyse
Og dette er kun en lille del af mulighederne. Tjek PushEngages fulde liste over funktioner, før du går videre. Det mest utrolige ved PushEngage er, at den har en evigt gratis plan, som du kan prøve, før du træffer en købsbeslutning.
Pro Tip: Check out our article on push notification cost analysis before you buy any service.
Once you’re done creating your account, head over to the PushEngage dashboard and follow along:

Klik på Webstedsindstillinger » Webstedsdetaljer og klik på knappen Klik her for opsætningsinstruktioner:

Klik på fanen WordPress og klik på knappen Installer PushEngage WordPress Plugin for at installere pluginnet på dit websted.

Here’s the cool part: When you created your PushEngage account, you already synced your website with your PushEngage account. So, click on the installation link in the PushEngage dashboard to automatically install the PushEngage WordPress plugin to your website.
And you’re done! You have successfully set up a web notifications WordPress plugin on your website. website. You don’t have to login to your WordPress admin panel at all. For a more detailed guide, check out our article on how to install web notifications on WordPress.
Before you start creating Black Friday push notifications, you should also check out these resources to help you get started.
- Sådan tilføjer du et WordPress-plugin til webenotifikationer til dit websted
- Sådan tilføjer du dit push-notifikationsikon (den nemme måde)
- 7 bedste praksisser for push-meddelelser for at få øjeblikkelig trafik
- Sådan aktiverer du enkelttrins-tilmeldinger til push-notifikationer
- [Annoncering] PushEngage har nu avanceret målgruppegruppering
I highly recommend using these resources to get started with PushEngage quickly.
How to Create Your Push Notification Campaign
Now that we have a basic understanding of how PushEngage works, let’s create our campaign. Currently, PushEngage only offers the Audience Group feature for Push Broadcasts.
So, in your PushEngage dashboard, go to Campaign » Push Broadcasts to create your push notifications.

Next, follow our step-by-step process to create a powerful Black Friday Sale. If you follow every step, you should have powerful push notifications like this one:
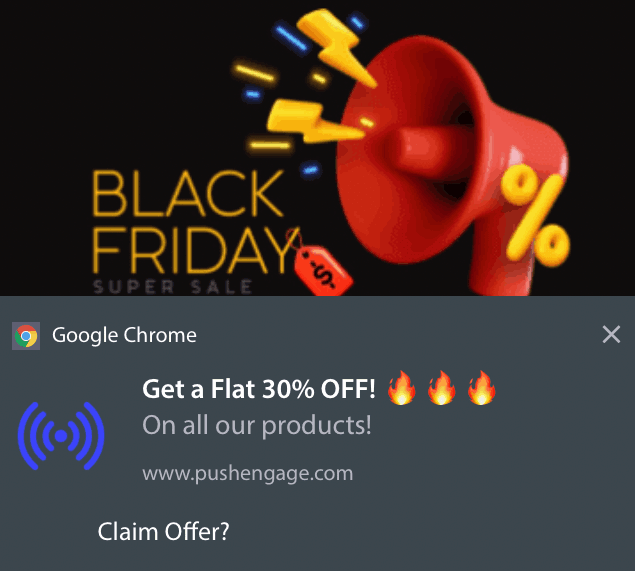
Step #1: Draft Your Push Notification Content
Your push notification content will include:
- A Notification Title
- A Notification Message
- A URL to redirect to
- A Large Image for the Notification
- Call-to-Action Buttons
- A notification expiration limit
Start with the basic content of your notification first:
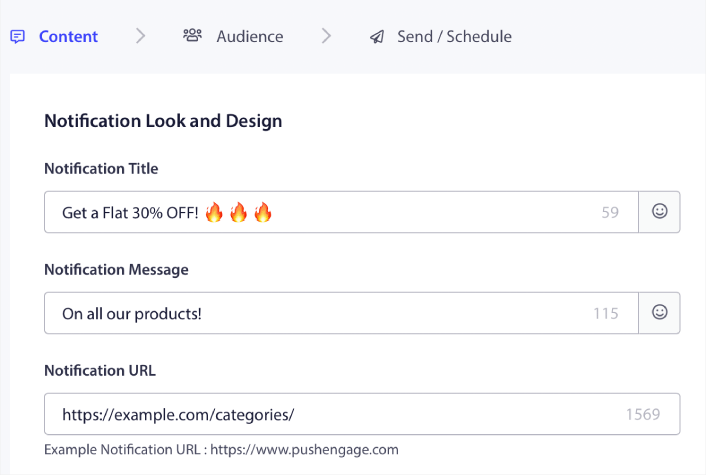
Notice the use of emojis in the Notification Title. We recommend using emojis in the title and the message for all your push notifications for higher open rates. You can A/B test your notifications as well for better performance.
Step #2: Add a Large Image to Your Notification
It’s difficult to stand apart from a bunch of notifications in the Notification Tray. That’s why you need a Large Image to make your notifications pop:
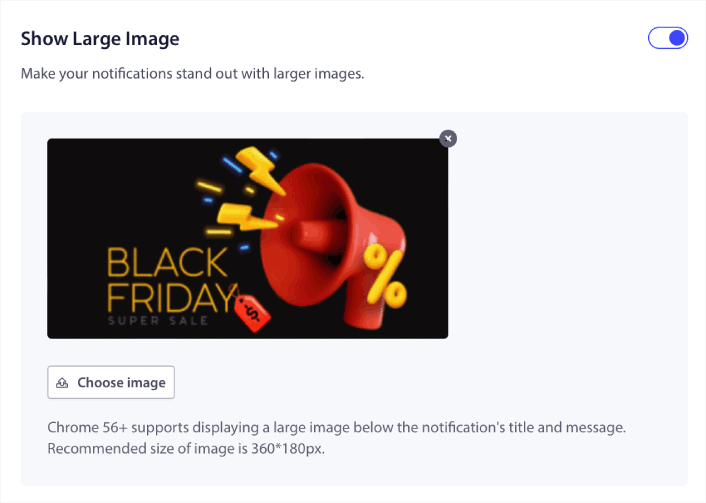
You can use PNG and JPEG formats for images.
Step #3: Add CTAs for Higher Click Rates
We’ve seen that using custom call-to-action buttons increase the click rates on your notifications. So, we highly recommend using the Multi Action Notification option to create a custom CTA:
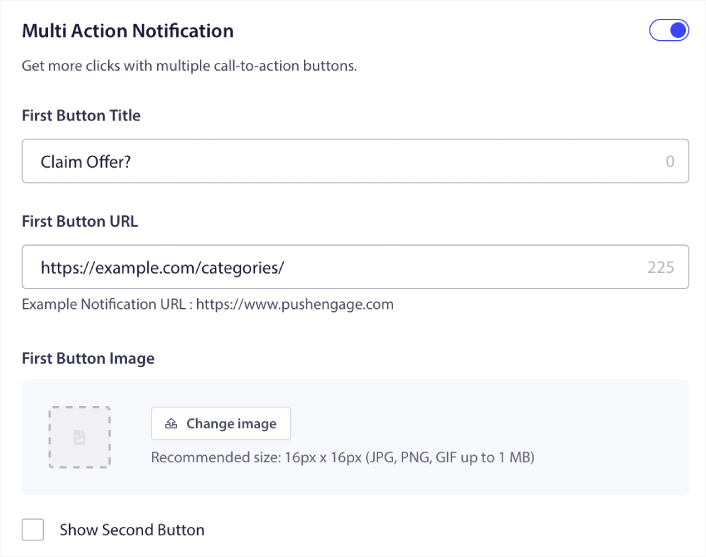
You can add at most two CTAs. If you want, you can create a split test with one CTA or two. In our experience, it’s usually best to use multiple CTAs unless you are super focused on ONLY one action.
One thing you want to be careful about is push notification character limits. Everything in push notifications has a character limit based on your subscriber’s browser and device. If your notifications are too wordy, they simply won’t show up the right way.
Step #4: Set Notification Duration
The Notification Duration is a time limit after which your push notification expires. After expiry, your subscriber won’t be able to see the notification even if it was delivered to them.
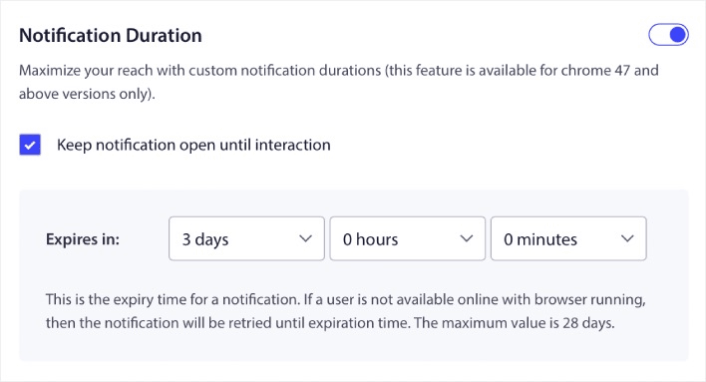
Setting a Notification Duration is a great practice for all sales. This way, your subscribers won’t get flooded with a bunch of notifications.
Pro Tip: Make sure to set the right duration for a Flash Sale. If your subscribers click through to an offer that’s already expired, they will be very unhappy.
Step #5: Select Your Audience Group
Now that you have your content in place, it’s time to find the right audience for your notifications.
How to Send Your Notification to All Subscribers
We want the maximum reach for 3 notifications:
- Early Black Friday Announcement
- Black Friday Flash Sale
- Cyber Monday Sale
So, we’re sending those 3 notifications to everyone. In the Audience tab, select Send to All Subscribers:

How to Retarget Subscribers Who Didn’t Click the Broadcast to Everyone
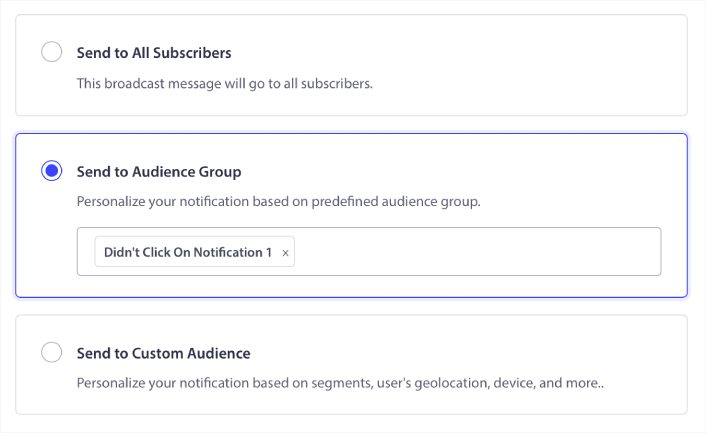
If you’re not sending the notification to all subscribers, you’ll need to create an Audience Group.
Go to Audience » Audience Groups and click Create New Audience Group:

To target subscribers who didn’t click the last notification, you’ll need to filter by Last click date:
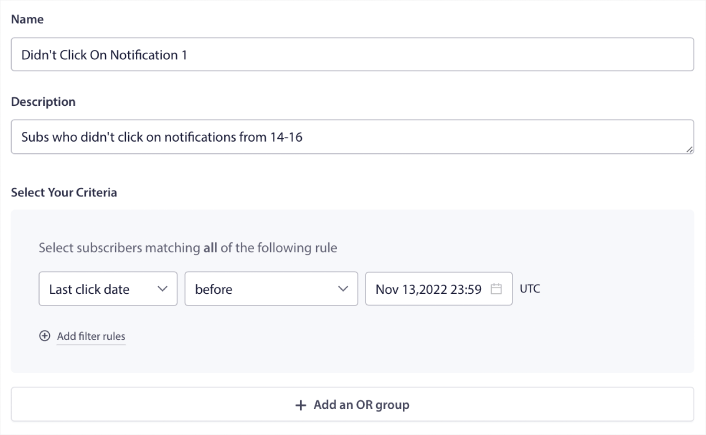
Filter by last click date before the date you sent your previous notification. So, if you sent the last push notification on 14th November, filter for subscribers who clicked on notifications only before 13th November at midnight.
NOTE: Unlike an email campaign, you can’t actually filter by click rate on the last notification. The closest approximation is to filter for clicks in a date range.
When you’re done, click on Save Notification.
Then, head back to your push notification broadcast and select Send to Audience Group. From the dropdown, select your Group:
How to Retarget Subscribers Who Clicked the Broadcast to Everyone
If you want to target subscribers who did click on your last notification, you can create another Audience Group.
Filter your subscribers by Last click date after the date you sent your previous notification AND before the date you want to send your next notification:
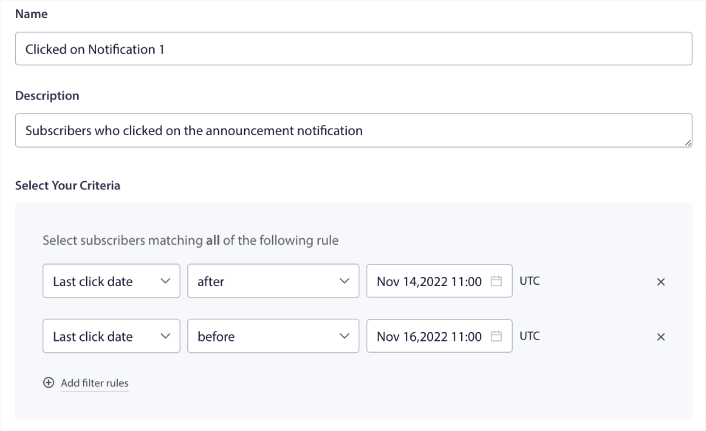
You can add AND criteria to your filter by clicking on Add filter rules. A filter like this is great for cross-selling push notifications.
Step #6: Schedule Your Push Notification
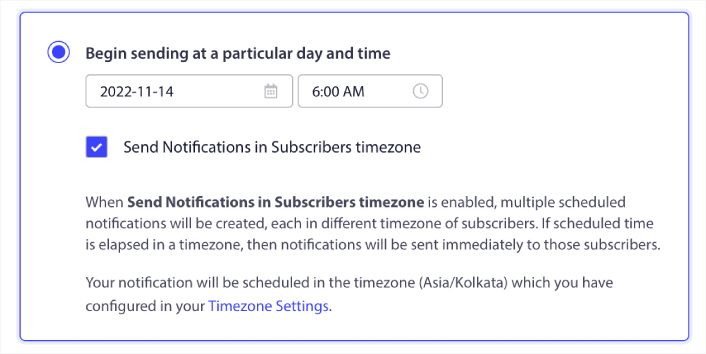
In the Schedule tab, select the Begin sending at particular day and time for granular scheduling options.
We’re sending the notification at 11:00 AM. Since browser push notifications get shown no matter when you actually sent the notification, you can send it even earlier if you want.
Since my default Timezone Setting is not in EST, I’m using the Send Notifications in Subscribers timezone option:
Don’t forget to test your notifications by clicking the Test Notification button. When you’re done, click Schedule Notification.
What’s the Ideal Black Friday Push Notifications Schedule
There’s no one right or wrong schedule with holiday campaigns. But we follow a very strict schedule and it works:
- 3 notifications for an early Black Friday sale
- 1 notification for Black Friday
- 1 notification for Small Business Saturday
- 1 notification for Cyber Monday
- 1 notification for Cyber Monday Extended sale
And retargeting push notifications to target the subscribers who clicked on them or didn’t. Let us know how that works for you. In the meantime, check out these resources:
- Sådan øger du klik på dine push-notifikationer med nysgerrighed
- Sådan personaliserer du hver push-notifikation
- Sådan skiller du dig ud med rich media i dine push-notifikationer
- Sådan genaktiverer du inaktive push-abonnenter
- Sådan bruger du push-notifikationer til at holde kunderne informeret
- Sådan bruger du emojis i dine push-notifikationer for højere klikrater
- Sådan øger du konverteringer ved at skabe en følelse af hastværk
Og hvis du ikke allerede har gjort det, så kom i gang med PushEngage i dag.


