Aviso: No hay documentación heredada disponible para este elemento, por lo que está viendo la documentación actual.
PushEngage te permite agrupar a los suscriptores de tu aplicación en segmentos para que puedas dirigirte a audiencias específicas con notificaciones relevantes en lugar de transmitir a todos a la vez. Esta guía cubre tanto los segmentos estáticos, donde un suscriptor permanece en el grupo hasta que lo eliminas, como los segmentos dinámicos, donde el suscriptor se elimina automáticamente después de un número determinado de días. Incluye la configuración del panel, métodos del SDK de iOS y Android, y enlaces a la API REST para la gestión del lado del servidor.
Antes de empezar
- Tu aplicación debe estar integrada con el SDK de iOS o Android de PushEngage. Si aún no lo has hecho, completa la configuración primero:
- Los segmentos deben crearse en el panel de PushEngage antes de que tu código SDK pueda hacer referencia a ellos. El nombre del segmento que pases al SDK debe coincidir exactamente con el nombre en el panel (distingue mayúsculas y minúsculas).
- Las referencias completas de los métodos del SDK están disponibles en Referencia del SDK de iOS y Referencia del SDK de Android.
Cómo funciona la segmentación de notificaciones push para aplicaciones
Cuando un usuario abre tu aplicación y tu código SDK llama a un método de agregar segmento, PushEngage registra ese dispositivo bajo el segmento correspondiente en tu cuenta. A partir de ese momento, cualquier campaña que dirijas a ese segmento incluirá a ese suscriptor.
Hay dos tipos de segmentos:
Los segmentos estáticos persisten hasta que eliminas explícitamente al suscriptor. Úsalos para agrupaciones permanentes que reflejen un estado fijo, como el nivel del plan de un suscriptor, la categoría de contenido preferida o un paso de incorporación completado.
Los segmentos dinámicos tienen un límite de tiempo que defines en días. PushEngage elimina automáticamente al suscriptor del segmento después de que expire ese período sin necesidad de ninguna acción por parte de tu aplicación. Usa segmentos dinámicos para estados temporales como una ventana de compra reciente, un período de prueba activo o una retención posterior a la reserva.
Ambos tipos se crean de la misma manera en el panel. La diferencia está en el método del SDK que llamas para agregar suscriptores a ellos.
Paso 1: Crear un segmento en el panel
Antes de que tu SDK pueda asignar un suscriptor a un segmento, el segmento debe existir en PushEngage.
- Inicia sesión en tu cuenta de PushEngage en app.pushengage.com.
- Ve a Audiencia » Segmentos.
- Haz clic en Crear un nuevo segmento.
- Introduce un nombre de segmento. Usa un nombre descriptivo y fácil de referenciar en el código, por ejemplo, "Compradores Recientes" o "Usuarios Premium".
- Haz clic en Guardar segmento.
No necesitas agregar patrones de URL ni reglas al crear segmentos para notificaciones push de aplicaciones. El SDK se encarga de la asignación mediante programación.
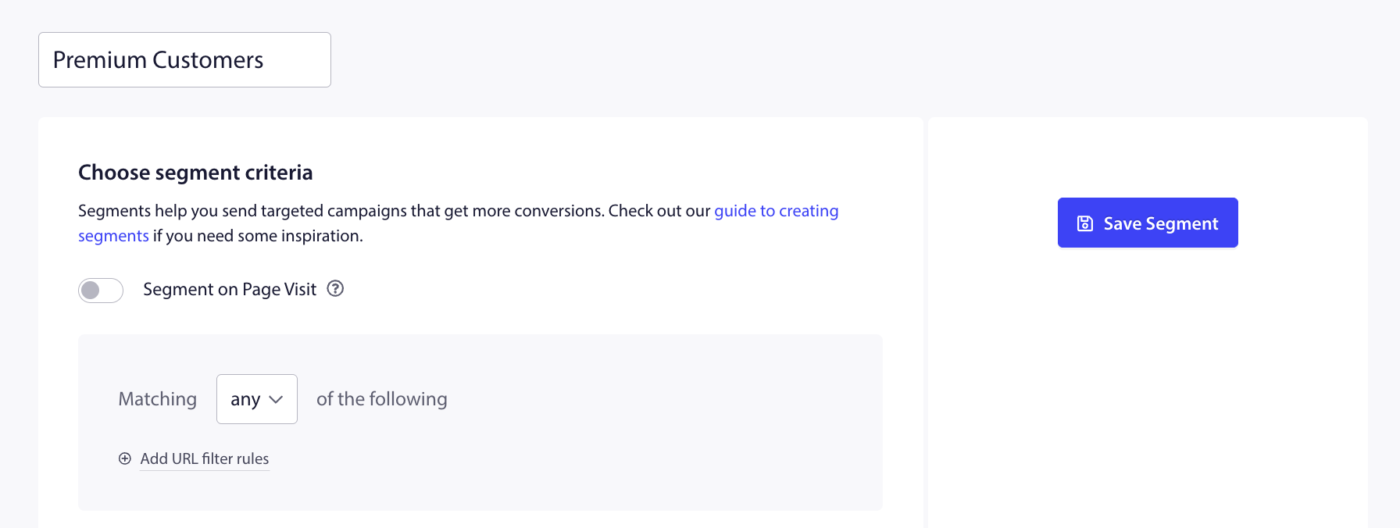
Repite este paso para cada segmento que desees utilizar.
Paso 2: Agregar un suscriptor de aplicación a un segmento (iOS)
Llame a los métodos de segmento desde donde tenga sentido en la lógica de su aplicación, como después de confirmar una compra, después de que un usuario seleccione una preferencia de contenido o cuando se vea una pantalla específica.
Segmento estático (iOS)
Use addSegments para agregar el suscriptor actual a uno o más segmentos de forma permanente.
PushEngage.addSegments(["Premium Users", "US Customers"]) { response, error in
 if response {
 print("Segments added successfully.")
 } else {
 if let error = error {
 print("Failed to add segments: \(error.localizedDescription)")
 }
 }
}
Para eliminar un suscriptor de un segmento estático:
PushEngage.removeSegments(["US Customers"]) { response, error in
 if response {
 print("Segments removed successfully.")
 }
}
Segmento dinámico (iOS)
Use addDynamicSegments para agregar el suscriptor a un segmento durante un número fijo de días. PushEngage elimina automáticamente al suscriptor cuando expira la duración.
Cada entrada en la matriz es un diccionario con dos claves: "name" (el nombre del segmento tal como aparece en el panel) y "duration" (el número de días que se mantendrá al suscriptor en ese segmento).
let dynamicSegments: [[String: Any]] = [
 ["name": "Recent Buyers", "duration": 30],
 ["name": "Trial Active", "duration": 14],
]

PushEngage.addDynamicSegments(dynamicSegments) { response, error in
 if response {
 print("Dynamic segments updated successfully.")
 } else {
 if let error = error {
 print("Failed to update dynamic segments: \(error.localizedDescription)")
 }
 }
}
Las firmas de métodos completas están disponibles en la Referencia del SDK de iOS.
Paso 3: Agregar un suscriptor de la aplicación a un segmento (Android)
Segmento estático (Android)
Use addSegment para agregar el suscriptor actual a uno o más segmentos de forma permanente. Pase una lista de nombres de segmentos que coincidan exactamente con lo que creó en el panel.
Java:
List<String> segmentList = new ArrayList<>();
segmentList.add("Premium Users");

PushEngage.addSegment(segmentList, new PushEngageResponseCallback() {
 @Override
 public void onSuccess(Object responseObject) {
 // Segment added successfully
 }

 @Override
 public void onFailure(Integer errorCode, String errorMessage) {
 // Handle failure
 }
});
Para eliminar un suscriptor de un segmento estático:
List<String> segmentList = new ArrayList<>();
segmentList.add("Premium Users");

PushEngage.removeSegment(segmentList, new PushEngageResponseCallback() {
 @Override
 public void onSuccess(Object responseObject) {
 // Segment removed successfully
 }

 @Override
 public void onFailure(Integer errorCode, String errorMessage) {
 // Handle failure
 }
});
Segmento dinámico (Android)
Use addDynamicSegment para agregar el suscriptor a un segmento durante un número determinado de días. Cree un objeto Segment con un nombre y una duración, luego páselo en una lista.
Java:
AddDynamicSegmentRequest addDynamicSegmentRequest = new AddDynamicSegmentRequest();
List<AddDynamicSegmentRequest.Segment> segments = new ArrayList<>();
AddDynamicSegmentRequest.Segment segment = addDynamicSegmentRequest.new Segment("Recent Buyers", 30);
segments.add(segment);

PushEngage.addDynamicSegment(segments, new PushEngageResponseCallback() {
 @Override
 public void onSuccess(Object responseObject) {
 // Dynamic segment added successfully
 }

 @Override
 public void onFailure(Integer errorCode, String errorMessage) {
 // Handle failure
 }
});
Las firmas de métodos completas y los equivalentes de Kotlin están disponibles en la Referencia del SDK de Android.
Paso 4: Dirigirse a un segmento en una campaña
Una vez que los suscriptores se asignan a segmentos, puede dirigirse a esos segmentos al crear cualquier campaña de notificación push.
- Vaya a Campaña » Difusiones push (para envíos únicos) o abra una campaña de activación que desee configurar.
- Haga clic en Crear nueva difusión push o abra una campaña existente.
- Rellene el título de la notificación, el mensaje y la URL.
- En la sección Audiencia, seleccione Enviar a un segmento.
- Elija el nombre del segmento en el menú desplegable.
- Complete el resto de la configuración de la campaña y prográmela o envíela.
También puede dirigirse a varios segmentos a la vez o combinar la segmentación con otros filtros de audiencia utilizando Grupos de audiencia. Consulte la documentación de Grupos de audiencia para obtener más detalles.
Paso 5: Administrar segmentos a través de la API REST (Opcional)
Si el servidor de su aplicación maneja la administración de suscriptores, puede usar la API REST de PushEngage para crear segmentos y asignar suscriptores sin pasar por el SDK móvil.
Los puntos de conexión de segmentos de la API REST son:
| Punto de conexión | Método | Lo que hace |
|---|---|---|
https://api.pushengage.com/apiv1/segments | POST | Crear un nuevo segmento |
https://api.pushengage.com/apiv1/segments | GET | Ver todos los segmentos |
https://api.pushengage.com/apiv1/segments/addSegmentWithHash | POST | Añadir un suscriptor por hash de suscriptor |
https://api.pushengage.com/apiv1/profile | POST | Añadir o eliminar un suscriptor por ID de perfil |
Todas las llamadas a la API REST requieren su clave de API en la cabecera Api-Key. Los ID de perfil son un identificador flexible que asigna a los suscriptores (por ejemplo, una dirección de correo electrónico o un ID de usuario) que le permiten gestionar el mismo suscriptor en varios dispositivos.
Ejemplo: Añadir un suscriptor a un segmento usando un ID de perfil:
curl -X POST \
 -H "Api-Key: <your_pushengage_api_key>" \
 -H "Content-Type: application/x-www-form-urlencoded" \
 -d 'segment_name=Recent+Buyers&profile_id=user123&operation=add' \
 "https://api.pushengage.com/apiv1/profile"
Para eliminar el mismo suscriptor del segmento, cambie operation=add por operation=delete.
Consulte la Referencia de la API REST de Segmentos completa para obtener documentación detallada.
Preguntas frecuentes
¿Cuál es la diferencia entre un segmento estático y un segmento dinámico? Un segmento estático mantiene a un suscriptor en el grupo hasta que llama a un método de eliminación. Un segmento dinámico caduca automáticamente después del número de días que especifica al añadir el suscriptor. Utilice segmentos estáticos para estados permanentes como el tipo de cuenta. Utilice segmentos dinámicos para ventanas de tiempo limitado como un período posterior a la compra o una prueba gratuita.
¿Necesito crear un segmento separado en el panel para uso dinámico? No. Los segmentos se crean de la misma manera en el panel, independientemente de cómo añada suscriptores. La diferencia está solo en qué método del SDK llama: addSegments añade permanentemente y addDynamicSegments añade con una fecha de caducidad.
El nombre del segmento que paso al SDK no coincide. ¿Qué debo comprobar? Los nombres de los segmentos distinguen entre mayúsculas y minúsculas y deben coincidir exactamente con el nombre en el Panel de PushEngage, incluyendo espacios y capitalización. Vaya a Audiencia » Segmentos para verificar el nombre exacto.
¿Puede un suscriptor pertenecer a varios segmentos a la vez? Sí. Puede añadir un suscriptor a tantos segmentos como necesite. Cuando envía una campaña a un segmento, todos los suscriptores asignados actualmente a ese segmento la reciben.
¿Puedo usar segmentos con Campañas de Disparador, no solo con Difusiones Push? Sí. La segmentación de audiencia está disponible en Difusiones Push, Autorespondedores de Goteo y Campañas de Disparador. La sección Audiencia en cada tipo de campaña incluye la opción de segmentar por segmento.
¿Dónde puedo ver qué suscriptores están en un segmento? Vaya a Audiencia » Segmentos en el panel y haga clic en el nombre del segmento para ver los detalles y recuentos de suscriptores.
Si tienes algún problema, no dudes en contactarnos haciendo clic aquí. Nuestro equipo de soporte podrá ayudarte.


