Aviso: No hay documentación heredada disponible para este elemento, por lo que está viendo la documentación actual.
Ahora puedes implementar notificaciones push para tu aplicación iOS utilizando nuestro SDK de aplicaciones iOS. Necesitarás la ayuda de tu desarrollador, ya que será una integración única antes de que puedas enviarles notificaciones push usando el panel de PushEngage.
Antes de empezar
- Necesitarás tener Xcode instalado en tu sistema.
- Una cuenta de desarrollador válida y un ID de aplicación están configurados en el Portal de Desarrolladores de Apple.
Seguiremos estos pasos para habilitar las notificaciones push para tu Aplicación iOS.
- Configuración de tu Aplicación
- Integración del SDK de PushEngage para iOS
- Inicialización del SDK de PushEngage para iOS
- Creación de la Extensión de Servicio de Notificaciones
- Inicialización del SDK de PushEngage para la Extensión de Servicio de Notificaciones
- Creación de la Extensión de Contenido de Notificaciones
- Inicialización del SDK de PushEngage para la Extensión de Contenido de Notificaciones
- Añadir Grupos de Aplicaciones
- Enlaces Profundos
- Manejo de Notificaciones en Primer Plano
- Solución de Problemas
Configuración de tu Aplicación
Habilitar Notificaciones Remotas
1. Abre tu proyecto de Xcode y selecciona el proyecto raíz en el Navegador de Proyectos. Elige tu objetivo de aplicación principal.
2. Navega a Firmas y Capacidades. Asegúrate de que la capacidad de Modos en Segundo Plano esté añadida. Si no es así, añádela haciendo clic en el botón “+ Capacidad”.
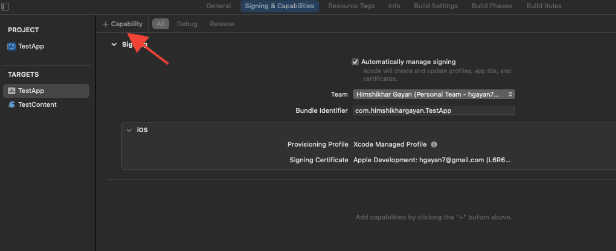
3. De manera similar, asegúrate de que la capacidad de Notificaciones Push esté añadida. Si no es así, añádela usando el botón “+ Capacidad”.

Si la capacidad de Notificaciones Push no es visible en Xcode. Necesitas seguir los pasos a continuación:
1. Ve a tu cuenta de desarrollador de Apple.
2. Navega a Certificados, Identificadores y Perfiles.
3. Selecciona el identificador de tu aplicación. Edita la configuración de tu ID de aplicación y asegúrate de que Notificaciones Push esté habilitado.
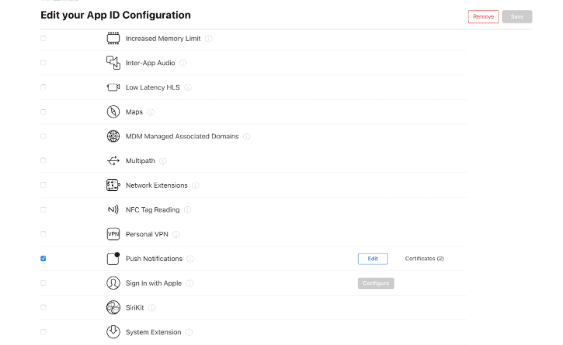
4. Regresa a Xcode e intenta añadir la capacidad de “Notificaciones Push” de nuevo.
Habilitar Modos en Segundo Plano
1. En tu proyecto de Xcode, navega a Firmas y Capacidades.
2. Dentro de Modos en Segundo Plano, habilita tanto Notificaciones Remotas como Extracción en Segundo Plano.
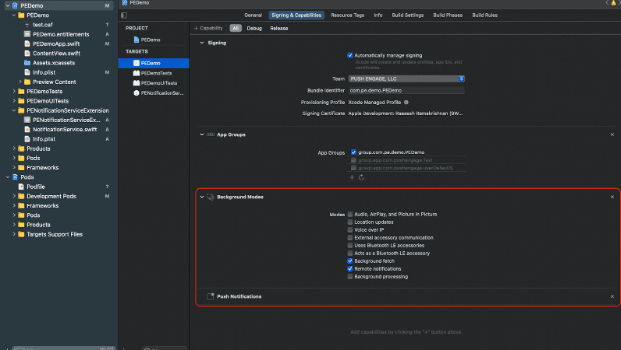
Este paso asegura que tu app pueda gestionar eficientemente las notificaciones remotas y las cargas en segundo plano.
Aquí tienes la guía para crear tu certificado APNs.
Integración del SDK de PushEngage para iOS
El SDK de PushEngage para iOS está disponible como un paquete Swift y un pod de CocoaPods. Te pedimos que revises ambos métodos, pero solo utilices uno de ellos al completar tu configuración.
Integración del SDK de PushEngage para iOS con SPM
Para integrar el SDK de PushEngage para iOS usando Swift Package Manager, sigue estos pasos:
- Abre Xcode y navega hasta tu proyecto. Selecciona la pestaña de dependencias del paquete. Haz clic en el botón +.
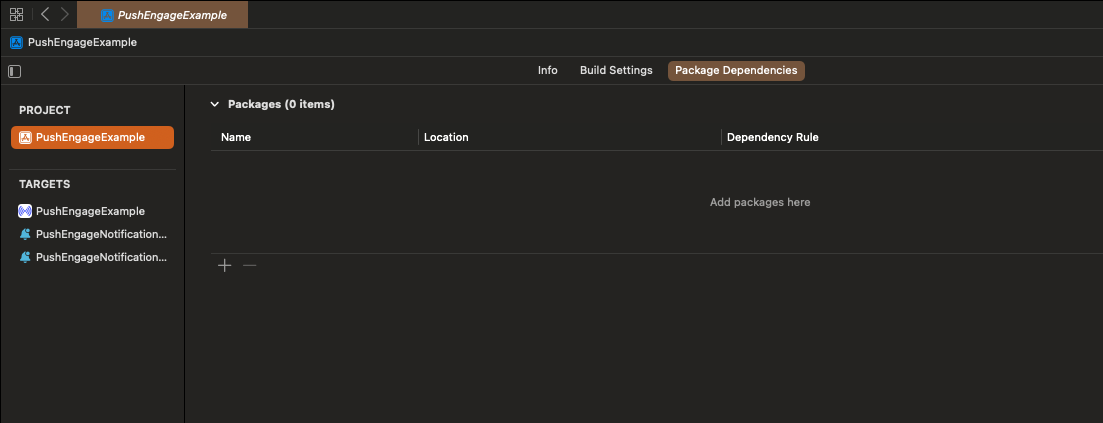
- Pega la URL
https://github.com/awesomemotive/pushengage-ios-sdken la barra de búsqueda. Haz clic en “Add Package”.
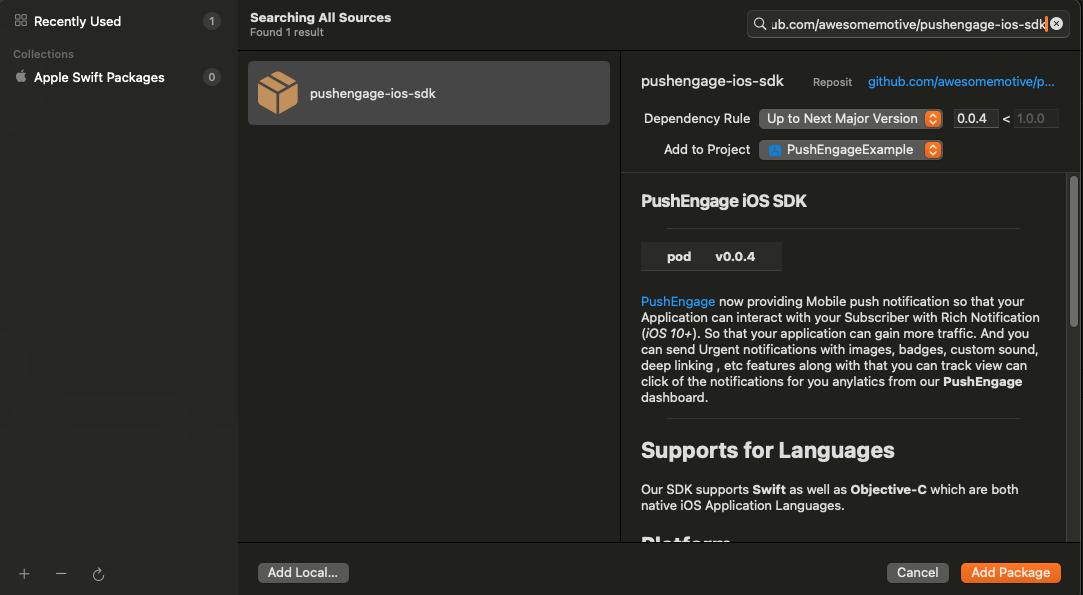
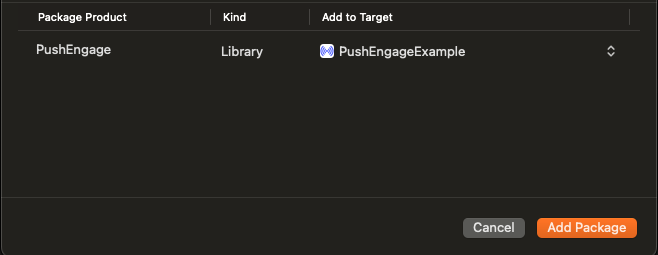
- Selecciona el destino principal de tu app bajo “Add to Target” y haz clic en “Add Package”.
Integración del SDK de PushEngage para iOS con CocoaPods
Para integrar el SDK de PushEngage para iOS usando CocoaPods, necesitas seguir estos pasos:
Si CocoaPods no está instalado, cierra tu proyecto Xcode actual y ejecuta el siguiente comando en el directorio raíz de tu proyecto
sudo gem install cocoapods
Ejecuta el siguiente comando para inicializar un Podfile en tu proyecto
pod initAbre el Podfile recién creado usando un editor de texto o siguiendo el comando en tu terminal en el directorio raíz del proyecto.
open PodfileAñade la dependencia de PushEngage bajo el destino de tu proyecto. Asegúrate de que tu Podfile se parezca al ejemplo a continuación
# Uncomment the next line to define a global platform for your project
# platform :ios, '9.0'

target 'YourProjectName' do
  # Add PushEngage SDK dependency
  pod 'PushEngage'
  post_install do |installer|
    installer.pods_project.targets.each do |target|
      target.build_configurations.each do |config|
        config.build_settings['APPLICATION_EXTENSION_API_ONLY'] = 'NO'
      end
    end
  end
end
Guarda el Podfile y ejecuta los siguientes comandos en la terminal.
pod repo update
pod install
Abre el archivo <project-name>.xcworkspace recién creado en Xcode.
Inicialización del SDK de PushEngage para iOS
Una vez que hayas integrado el SDK, tendremos que inicializar el SDK de iOS en tu AppDelegate.
Usando el lenguaje Swift, así es como puedes hacerlo
import PushEngage
class AppDelegate: UIResponder, UIApplicationDelegate {
    var window: UIWindow?
    override init() {
        super.init()
        PushEngage.swizzleInjection(isEnabled: true)
    }

    func application(_ application: UIApplication, didFinishLaunchingWithOptions launchOptions: [UIApplication.LaunchOptionsKey: Any]?) -> Bool {
       // Set your PushEngage App ID (replace       "APP_ID_FROM_PUSH_ENGAGE_DASHBOARD" with your actual App ID)
        PushEngage.setAppId(key: "APP_ID_FROM_PUSH_ENGAGE_DASHBOARD")
        // Start PushEngage initial info
        PushEngage.setInitialInfo(for: application, with: launchOptions)
        // Enable logs for debugging (optional)
        PushEngage.enableLogs = true
        return true
    }
}
Usando el lenguaje Objective-C, así es como puedes hacerlo
#import "AppDelegate.h"
@import PushEngage;
@implementation AppDelegate

- (instancetype)init {
    self = [super init];
    if (self) {
       [PushEngage swizzleInjectionWithIsEnabled:YES];
    }
    return self;
}

- (BOOL)application:(UIApplication *)application didFinishLaunchingWithOptions:(NSDictionary *)launchOptions {
// Set your PushEngage App ID (replace "APP_ID_FROM_PUSH_ENGAGE_DASHBOARD" with your actual App ID)
    [PushEngage setAppIdWithKey:@"APP_ID_FROM_PUSH_ENGAGE_DASHBOARD"];
    // Set initial info
    [PushEngage setInitialInfoFor:application with:launchOptions];
    // Enable logs for debugging (optional)
    [PushEngage setEnableLogs:YES];
    return YES;
}

@end
A veces, al usar SwiftUI, el AppDelegate podría no estar disponible por defecto. En tales casos, puedes inicializar el SDK de PushEngage en tu archivo App principal. Aquí tienes un ejemplo en SwiftUI
import SwiftUI
import PushEngage

@main
struct PEDemoApp: App {
    @UIApplicationDelegateAdaptor(AppDelegate.self) var appDelegate
    var body: some Scene {
        WindowGroup {
            ContentView()
        }
    }
}

class AppDelegate: NSObject, UIApplicationDelegate {

    override init() {
        super.init()
        PushEngage.swizzleInjection(isEnabled: true)
    }

    func application(_ application: UIApplication, didFinishLaunchingWithOptions launchOptions: [UIApplication.LaunchOptionsKey : Any]? = nil) -> Bool {
        PushEngage.setAppId(key: "APP_ID_FROM_PUSH_ENGAGE_DASHBOARD")
        PushEngage.setIntialInfo(for: application,
                                             with: launchOptions)

        PushEngage.enableLogs = true
        return true
    }
}
Nota: Mientras desarrollas tu aplicación, puede que te resulte útil habilitar los registros del SDK de PushEngage para fines de depuración. Sin embargo, es esencial deshabilitar los registros en la compilación de producción para evitar exponer información sensible.
Creación de la Extensión de Servicio de Notificaciones
La Extensión de Servicio de Notificaciones mejora la capacidad de tu app iOS para recibir notificaciones. Se utiliza para modificar el contenido de la notificación o para obtener/procesar cualquier dato al recibir la notificación. Puedes seguir los pasos a continuación para crear una Extensión de Servicio de Notificaciones:
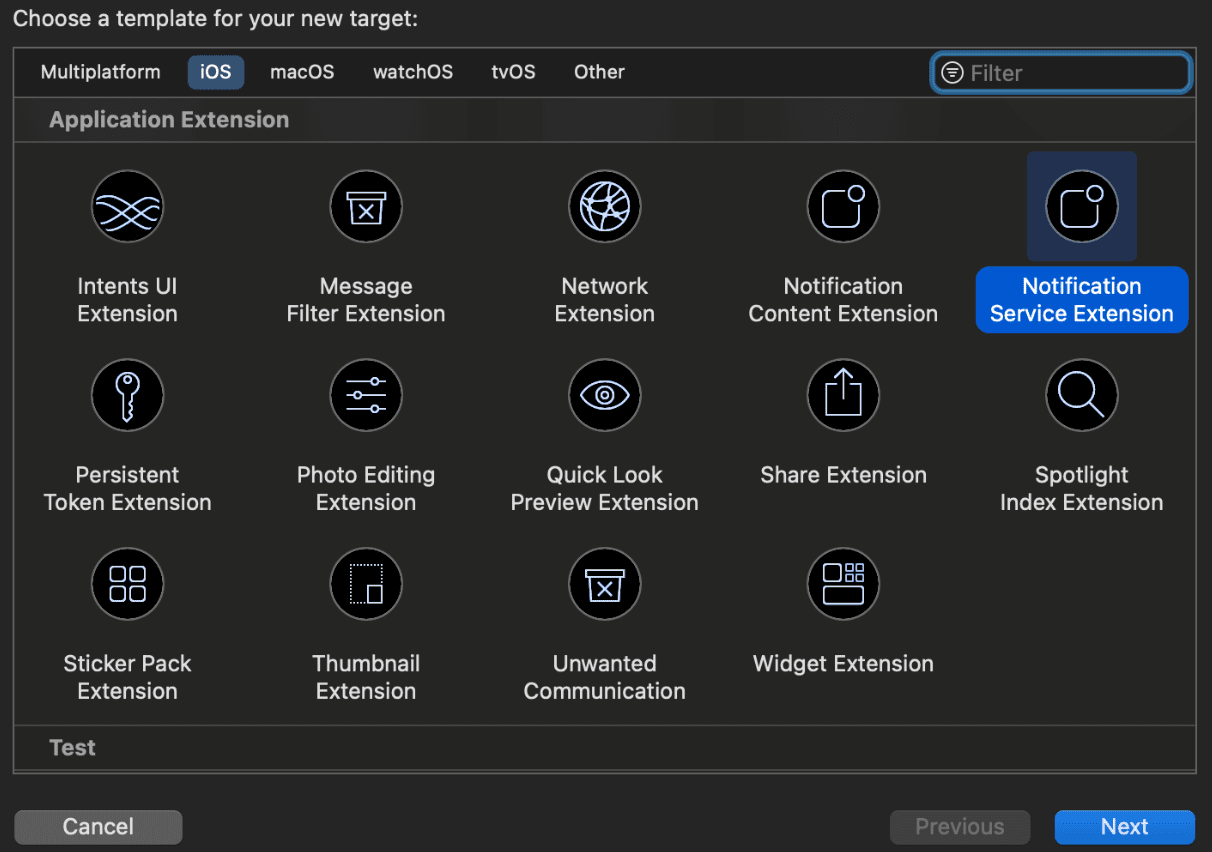
1. Abre Xcode y navega hasta tu proyecto. Elige Archivo » Nuevo » Destino en el menú.
2. En la ventana de selección de plantillas, elige Notification Service Extension y haz clic en Siguiente.
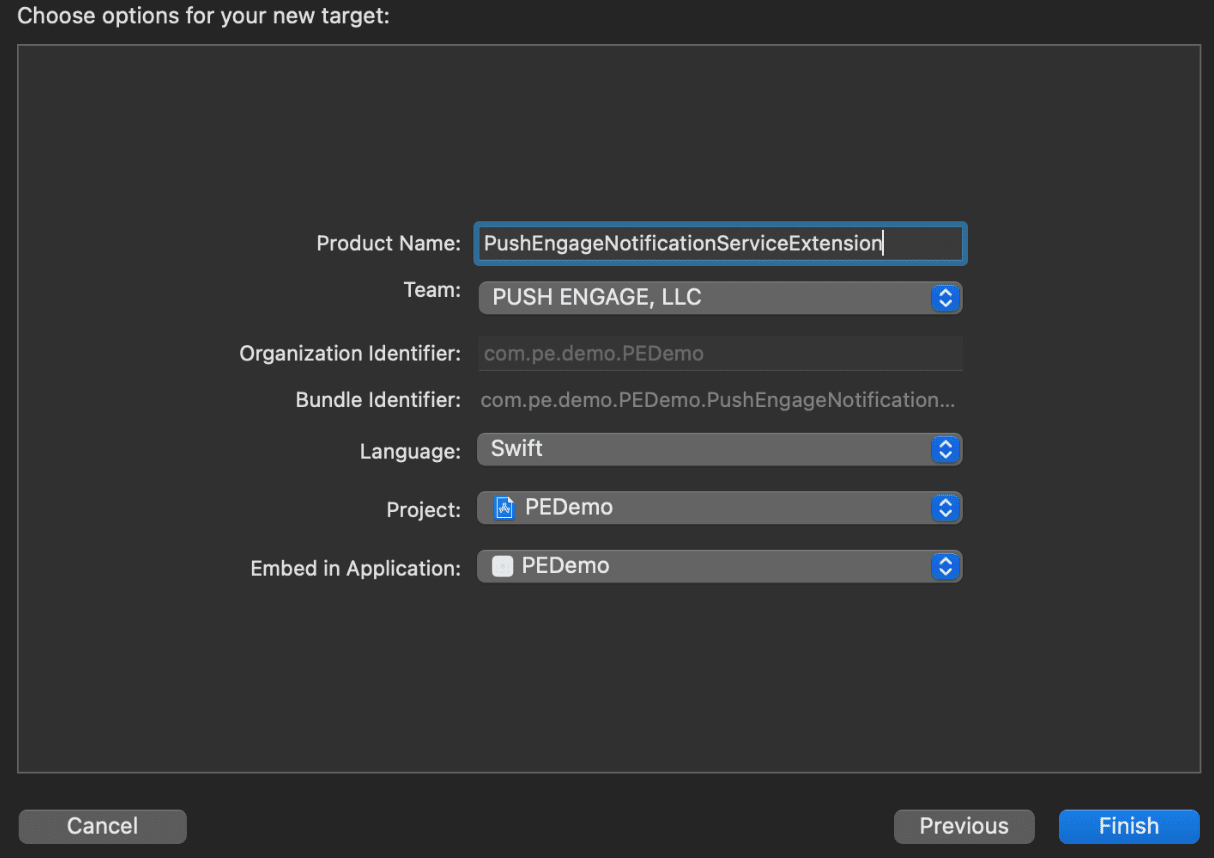
3. Proporciona un nombre para tu extensión, por ejemplo, PushEngageNotificationServiceExtension, y haz clic en Finalizar.
4. Cuando termines de crear la Extensión de Servicio de Notificaciones, es posible que se te pida que la actives. No la actives inmediatamente.
Activar la extensión cambiaría el enfoque de depuración de Xcode de tu app a la extensión. Si la activas por accidente, no te preocupes; puedes volver a depurar tu app dentro de Xcode.
Inicialización del SDK de PushEngage para la Extensión de Servicio de Notificaciones
Para asegurar el correcto funcionamiento del SDK de PushEngage en tu Extensión de Servicio de Notificaciones de iOS, necesitas seguir estos pasos:
1. Abre el Podfile asociado a tu proyecto.
2. A continuación, debes añadir la dependencia. Inserta el siguiente fragmento de código en tu Podfile:
target 'Your_Main_Application_Target' do
      pod 'PushEngage'
      post_install do |installer|
          installer.pods_project.targets.each do |target|
            target.build_configurations.each do |config|
              config.build_settings['APPLICATION_EXTENSION_API_ONLY'] = 'NO'
          end
        end
      end

      target 'Your_Notification_Service_Extension_Target' do
              pod 'PushEngage'
      end
end
3. Ejecuta los siguientes comandos en tu terminal dentro del directorio raíz de tu proyecto:
pod repo update
pod install
4. En tu target de Notification Service Extension, importa el framework PushEngage y añade el código de inicialización necesario. Aquí te mostramos cómo hacerlo.
Usando Swift
import UserNotifications
import PushEngage

@available(iOSApplicationExtension 10.0, *)
class PushEngageNotificationServiceExtension: UNNotificationServiceExtension {

    var contentHandler: ((UNNotificationContent) -> Void)?
    var bestAttemptContent: UNMutableNotificationContent?
    var request : UNNotificationRequest?

    override func didReceive(_ request: UNNotificationRequest, withContentHandler contentHandler: @escaping (UNNotificationContent) -> Void) {
        self.request = request
        self.contentHandler = contentHandler
        self.bestAttemptContent = (request.content.mutableCopy() as? UNMutableNotificationContent)

        if let bestContent = bestAttemptContent {
            PushEngage.didReceiveNotificationExtensionRequest(request, bestContentHandler: bestContent)
            contentHandler(bestContent)
        }
    }

    override func serviceExtensionTimeWillExpire() {
        // Called just before the extension will be terminated by the system.
        // Use this as an opportunity to deliver your "best attempt" at modified content, otherwise the original push payload will be used.
        if let contentHandler = contentHandler, let request = request ,let bestAttemptContent =  bestAttemptContent {
            guard let content = PushEngage.serviceExtensionTimeWillExpire(request, content: bestAttemptContent) else {
                contentHandler(bestAttemptContent)
                return
            }
            contentHandler(content)
        }
    }

}
Usando Objective-C
#import "NotificationService.h"
@import PushEngage;

@interface NotificationService ()

@property (nonatomic, strong) void (^contentHandler)(UNNotificationContent *contentToDeliver);
@property (nonatomic, strong) UNMutableNotificationContent *bestAttemptContent;
@property (nonatomic, strong) UNNotificationRequest *request;

@end

@implementation NotificationService

- (void)didReceiveNotificationRequest:(UNNotificationRequest *)request withContentHandler:(void (^)(UNNotificationContent * _Nonnull))contentHandler {
    self.request = request;
    self.contentHandler = contentHandler;
    self.bestAttemptContent = [request.content mutableCopy];

    if (self.bestAttemptContent) {
        [PushEngage didReceiveNotificationExtensionRequest:request bestContentHandler:self.bestAttemptContent];
        contentHandler(self.bestAttemptContent);
    }
}

- (void)serviceExtensionTimeWillExpire {

    if (self.contentHandler && self.request && self.bestAttemptContent) {
        UNNotificationContent *content = [PushEngage serviceExtensionTimeWillExpire:self.request content:self.bestAttemptContent];
        if (content) {
            self.contentHandler(self.bestAttemptContent);
            return;
        }
    }
    self.contentHandler(self.bestAttemptContent);
}

@end
Creación de la Extensión de Contenido de Notificaciones
Para mejorar la forma añadiendo una interfaz de usuario personalizada, necesitarás crear una Notification Content Extension. Sigue los pasos a continuación para configurar la extensión:
1. En Xcode, ve a Archivo » Nuevo » Target.
2. Selecciona Notification Content Extension y haz clic en Siguiente.
3. No selecciones "Activar" en el diálogo que aparece después de hacer clic en Finalizar. Cancelar mantiene Xcode depurando tu aplicación en lugar de la extensión. Si la activas accidentalmente, vuelve a depurar tu aplicación dentro de Xcode (junto al botón de ejecutar).
4. En el navegador de proyectos, selecciona el directorio raíz del proyecto y selecciona el target de NotificationContentExtension en el proyecto de la lista de targets creada en el paso nº 2.
5. Establece el Deployment Target a iOS 10 o superior, que es la versión de iOS en la que Apple lanzó el soporte para esta extensión.
Inicialización del SDK de PushEngage para la Extensión de Contenido de Notificaciones
Para asegurar el correcto funcionamiento del SDK de PushEngage en tu Notification Content Extension de iOS, necesitas seguir estos pasos:
1. Abre el Podfile asociado a tu proyecto.
2. Añade Dependencia, inserta el siguiente fragmento de código en tu Podfile:
target 'Your_Main_Application_Target' do
  pod 'PushEngage'
  target 'Your_Notification_Content_Extension' do
    pod 'PushEngage'
  end
end
3. Ejecuta los siguientes comandos en tu terminal dentro del directorio raíz de tu proyecto:
pod repo update

pod install
4. En tu target de Notification Content Extension, importa el framework PushEngage y añade el código de inicialización necesario. Aquí te mostramos cómo hacerlo con algunos ejemplos de elementos de interfaz de usuario:
Usando Swift
import UIKit
import UserNotifications
import UserNotificationsUI
import PushEngage

@available(iOSApplicationExtension 10.0, *)
class NotificationViewController: UIViewController, UNNotificationContentExtension {

    fileprivate var hostingView: UIHostingController<ContentView>?

    override func viewDidLoad() {
        super.viewDidLoad()
        self.view.backgroundColor = .white
    }

    func didReceive(_ notification: UNNotification) {
        if(notification.request.content.categoryIdentifier == "your_identifier"){
            let payLoad = PushEngage.getCustomUIPayLoad(for: notification.request)
  //pass the payload to your custom View
            let view = CustomView(payLoadInfo: payLoad)
            hostingView = UIHostingController(rootView: view)
If let customView = self.hostingView {
            addChild(hostingView!)
}
        }
    }

}
Objective-C:
#import "NotificationViewController.h"
#import <UserNotifications/UserNotifications.h>
#import <UserNotificationsUI/UserNotificationsUI.h>

@import PushEngage;
@import UIKit;

@interface NotificationViewController () <UNNotificationContentExtension>

@property IBOutlet UILabel *label;
@property (weak, nonatomic) IBOutlet UIImageView *imageView;
@property (weak, nonatomic) IBOutlet UIButton *firstButton;
@property (weak, nonatomic) IBOutlet UIButton *secondButton;

@end

@implementation NotificationViewController

- (IBAction)firstbuttonAction:(id)sender {
    // do what action you want to perform.
}

- (void)viewDidLoad {
    [super viewDidLoad];
    // Do any required interface initialization here.
}

- (void)didReceiveNotification:(UNNotification *)notification {

    NotificationViewController * __block blockSelf = self;
    CustomUIModel *object = [PushEngage getCustomUIPayLoadFor:notification.request];
    dispatch_async(dispatch_get_main_queue(), ^{
        blockSelf.label.text = object.title;
        blockSelf.imageView.image = object.image;
        [blockSelf.firstButton setTitle:object.buttons.firstObject.text forState:UIControlStateNormal];
        [blockSelf.secondButton setTitle:object.buttons.lastObject.text forState:UIControlStateNormal];
        blockSelf = NULL;
    });
}

@end
Añadir Grupos de Aplicaciones
Los App Groups son esenciales para la comunicación entre la aplicación principal, la extensión de servicio de notificaciones y la extensión de contenido. Puedes seguir estos pasos para añadir App Groups a tu proyecto de iOS:
Si tienes un grupo de aplicaciones existente y solo quieres usar ese, salta al paso nº 5.
1. En tu proyecto de Xcode, en el navegador de proyectos, selecciona el directorio raíz del proyecto y selecciona el target principal de la aplicación.
2. Navega a la pestaña Signing & Capabilities.
3. Haz clic en el botón "+ Capability" y selecciona App Groups de la lista.
4. Haz clic en el botón + para añadir un App Group. Añade un nombre único a tu App Group y haz clic en OK.

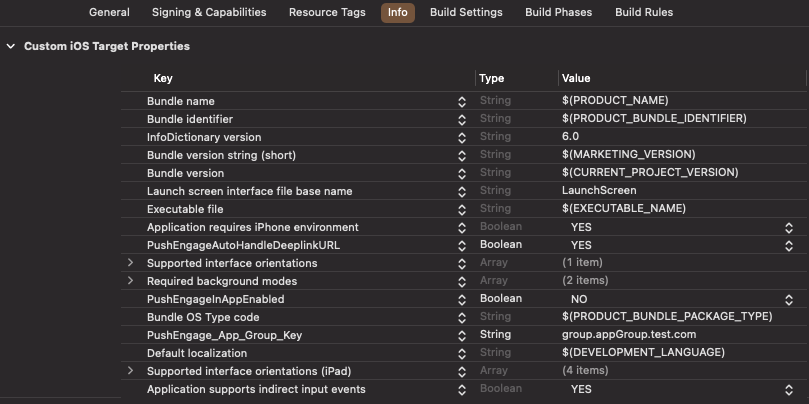
5. En el área del editor principal, selecciona el target principal de tu aplicación y crea un grupo de aplicaciones. Por favor, proporciona el nombre del grupo en el Info.plist de tu aplicación con la clave PushEngage_App_Group_Key.
6. Añade la misma clave y valor en el archivo Info.plist de la Notification Service Extension.
7. Selecciona el mismo grupo de aplicaciones en el Target de la Aplicación Principal y en la YourNotificationServiceExtension.
Asegúrate de que estás eligiendo tu extensión de servicio de notificaciones en el paso anterior.
Enlaces Profundos
El deep linking permite a tus suscriptores navegar directamente a una pantalla específica dentro de la aplicación o a una página web designada al interactuar con las notificaciones push. Por defecto, si proporcionas una URL válida, el suscriptor será redirigido a esa página web.
Manejo de URLs web:
- Proporcione
PushEngageInAppEnableda SÍ en Info.plist, luego la URL se cargará dentro de la aplicación usando WKWebview. - Proporcione
PushEngageInAppEnableda NO en Info.plist, si desea que su suscriptor sea redirigido a Safari para cargar la URL. - Proporcione
PushEngageAutoHandleDeeplinkURLa SÍ en Info.plist, entonces el SDK manejará el enlace profundo según la configuración dePushEngageInAppEnabled. - Proporcione
PushEngageAutoHandleDeeplinkURLa NO en Info.plist, entonces el control de manejo del enlace profundo se le dará a la aplicación cliente desde el SDK. - Si el enlace profundo no es una URL válida, necesita configurar la navegación usando
setNotificationOpenHandleren elAppDelegatedentro del métododidFinishLaunchingWithOptions. Esto le permite navegar a una pantalla específica según la cadena proporcionada, como se muestra a continuación. Si no está configurado, el SDK simplemente abrirá la aplicación.
Usando Swift:
class AppDelegate: UIResponder, UIApplicationDelegate {

    var window: UIWindow?


    override init() {
        super.init()
        // method Swizzling enabled for the application.
        PushEngage.swizzleInjection(isEnabled: true)
    }

   func application(_ application: UIApplication, didFinishLaunchingWithOptions launchOptions: [UIApplication.LaunchOptionsKey: Any]?) -> Bool {

     PushEngage.setAppId(key: "APP_ID_FROM_PUSH_ENGAGE_DASHBOARD")
     PushEngage.setInitialInfo(for: application,with: launchOptions)


     // Notification open handler.
     // deep linking screen
     // here ShoesScreen and pepay are example deep link texts
     PushEngage.setNotificationOpenHandler { (result) in
            //replace this block with your own handling
            let additionData = result.notification.additionalData
            if result.notificationAction.actionID == "ShoesScreen" {
                print(additionData ?? [])
                let storyBoard = UIStoryboard(name: "Main", bundle: .main)
                let viewController = storyBoard.instantiateViewController(withIdentifier: "SportViewController")
                let navcontroller = application.windows.first?.rootViewController as? UINavigationController
                navcontroller?.popToRootViewController(animated: true)
                navcontroller?.pushViewController(viewController, animated: true)
            } else if result.notificationAction.actionID == "SalesScreen" {
                let storyBoard = UIStoryboard(name: "Main", bundle: .main)
                let viewController = storyBoard.instantiateViewController(withIdentifier: "NotificationApiTestViewconttoller")
                let navcontroller = application.windows.first?.rootViewController as? UINavigationController
                navcontroller?.popToRootViewController(animated: true)
                navcontroller?.pushViewController(viewController, animated: true)
            } else if result.notificationAction.actionID == "pepay" {
                let storyBoard = UIStoryboard(name: "Main", bundle: .main)
                let viewController = storyBoard.instantiateViewController(withIdentifier: "PEPay")
                let navcontroller = application.windows.first?.rootViewController as? UINavigationController
                navcontroller?.popToRootViewController(animated: true)
                navcontroller?.pushViewController(viewController, animated: true)
            }
        }

        PushEngage.enableLogs = true

        return true
    }
}
Usando Objective-C:
@implementation AppDelegate


- (instancetype)init
{
    self = [super init];
    if (self) {
       [PushEngage swizzleInjectionWithIsEnabled: YES];
    }
    return self;
}

typedef void (^PEnotificationOpenHandler)(PENotificationOpenResult * nonnull);

- (BOOL)application:(UIApplication *)application didFinishLaunchingWithOptions:(NSDictionary *)launchOptions {
    UNUserNotificationCenter.currentNotificationCenter.delegate = self;
    PEnotificationOpenHandler actionHandler = ^void(PENotificationOpenResult *result) {
       //replace this block with your own handling
        if ([result.notificationAction.actionID isEqualToString: @"ShoesScreen"]) {
            AddToCart *controller = [AddToCart new];
            UINavigationController *navigationController = (UINavigationController *) application.windows.firstObject.rootViewController;
            [navigationController popToRootViewControllerAnimated:YES];
            [navigationController pushViewController:controller animated:YES];
        } else if ([result.notificationAction.actionID isEqualToString: @"SalesScreen"]) {
            SportsViewcontroller *controller = [SportsViewcontroller new];
            UINavigationController *navigationController = (UINavigationController *) application.windows.firstObject.rootViewController;
            [navigationController popToRootViewControllerAnimated:YES];
            [navigationController pushViewController:controller animated:YES];
        }
    };
    application.applicationIconBadgeNumber = 0;
    [PushEngage setAppIdWithKey:@"APP_ID_FROM_PUSH_ENGAGE_DASHBOARD"];
    [PushEngage setInitialInfoFor:application with:launchOptions];
    [PushEngage setNotificationOpenHandlerWithBlock:actionHandler];
    [PushEngage setEnableLogs:true];
    return YES;
}
@end
Manejo de Notificaciones en Primer Plano
Cuando las notificaciones llegan en primer plano, debe decidir si mostrar o no la alerta de notificación al dispositivo. Para manejar notificaciones en primer plano, use setNotificationWillShowInForgroundHandler
Si el bloque de finalización no es llamado por usted en absoluto, el SDK llamará al bloque de finalización después de 29 segundos. En cualquier caso, notificación silenciosa o de alerta cuando la aplicación está en modo de primer plano.
Usando Swift
class AppDelegate: UIResponder, UIApplicationDelegate {

    var window: UIWindow?


    override init() {
        super.init()
        // method Swizzling enabled for the application.
       PushEngage.swizzleInjection(isEnabled: true)
    }

    func application(_ application: UIApplication, didFinishLaunchingWithOptions launchOptions: [UIApplication.LaunchOptionsKey: Any]?) -> Bool {

        PushEngage.setAppId(key: "APP_ID_FROM_PUSH_ENGAGE_DASHBOARD")
        PushEngage.setInitialInfo(for: application, with: launchOptions)

        // Notification handler when notification deliver's and app is in foreground.

        PushEngage.setNotificationWillShowInForgroundHandler { notification, completion in
            if notification.contentAvailable == 1 {
                // in case the developer failed to set the completion handler. After 29 sec the handler will call from the SDK after 29 sec.
                completion(nil)
            } else {
                completion(notification)
            }
        }

        PushEngage.enableLogs = true

        return true
    }
}
Usando Objective-C
@implementation AppDelegate


- (instancetype)init
{
    self = [super init];
    if (self) {
       [PushEngage swizzleInjectionWithIsEnabled: YES];
    }
    return self;
}
// please create this handlers
typedef void (^ _Nonnull PENotificationDisplayHandler)(PENotification * _Nullable);

-(BOOL)application:(UIApplication*)application didFinishLaunchingWithOptions:(NSDictionary *)launchOptions {
    UNUserNotificationCenter.currentNotificationCenter.delegate = self;

    [PushEngage setNotificationWillShowInForgroundHandlerWithBlock:^(PENotification * _Nonnull notification, PENotificationDisplayHandler completion) {
        if (notification.contentAvailable == 1) {
            completion(nil);
        } else {
            completion(notification);
        }
    }];
    [PushEngage setAppIdWithKey:@"APP_ID_FROM_PUSH_ENGAGE_DASHBOARD"];
    [PushEngage setInitialInfoFor:application with:launchOptions];
    [PushEngage setEnableLogs:true];
    return YES;
}
@end
Solución de Problemas
Problema:
Está experimentando problemas de compilación relacionados con el sandboxing.
Solución:
- Abra su proyecto en Xcode.
- Navegue a Configuración de compilación.
- Localice la opción User Script Sandboxing.
- Establézcala en No.
Problema:
Está utilizando tanto el SDK de Firebase como el SDK de PushEngage con el método swizzling habilitado para ambos, y esto está causando problemas.
Solución:
Deshabilite el método swizzling para el SDK de PushEngage y siga los pasos manuales para manejar los métodos de PushEngage. Puede encontrar instrucciones detalladas en:
Documentación del SDK de PushEngage para iOS
Si desea explorar más las capacidades del SDK de iOS, puede consultar nuestra detallada documentación de la API.
Si encuentra algún problema, por favor contáctenos haciendo clic aquí. Nuestro equipo de soporte podrá ayudarle.


