Notice: There is no legacy documentation available for this item, so you are seeing the current documentation.
Workflows let you automate what happens when visitors do something on your site like subscribing, completing a goal, or matching a segment so you can send the right push at the right time without manual campaigns. This guide walks you through finding Workflows, creating one, and turning it on.
Before You Start
- PushEngage is installed on your site and your site is connected in the dashboard.
- Workflows are available on all plans; limits and advanced features depend on your plan (see Plans and limits below). If you don’t see Workflows under Campaign, check your plan on the pricing page.
Plan Capacity
Maximize your impact by choosing the plan that fits your volume of automation.
| Plan | Max Workflows | Max Steps per Workflow | Most Suitable for.. |
| Free | 1 | 5 | Getting started with the basics. |
| Business | 5 | 10 | Growing your core automation. |
| Premium | 10 | 25 | Advanced branching and logic. |
| Growth | 10,000 | 100 | Unlimited |
| Enterprise | 10,000 | 100 | Unlimited |
Note : If you hit the limit, you’ll need to delete an existing workflow or upgrade to create more or add more steps.
Setting up Workflows
1. Log in to your PushEngage dashboard.
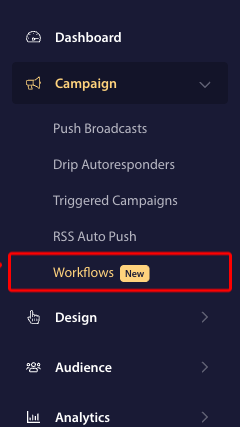
2. Navigate to Campaign » Workflows.
You’ll see your Workflows list or, if you have none yet, an option to create your first workflow or use a template.
You have two options to create a workflow either you can start from a template or from scratch.
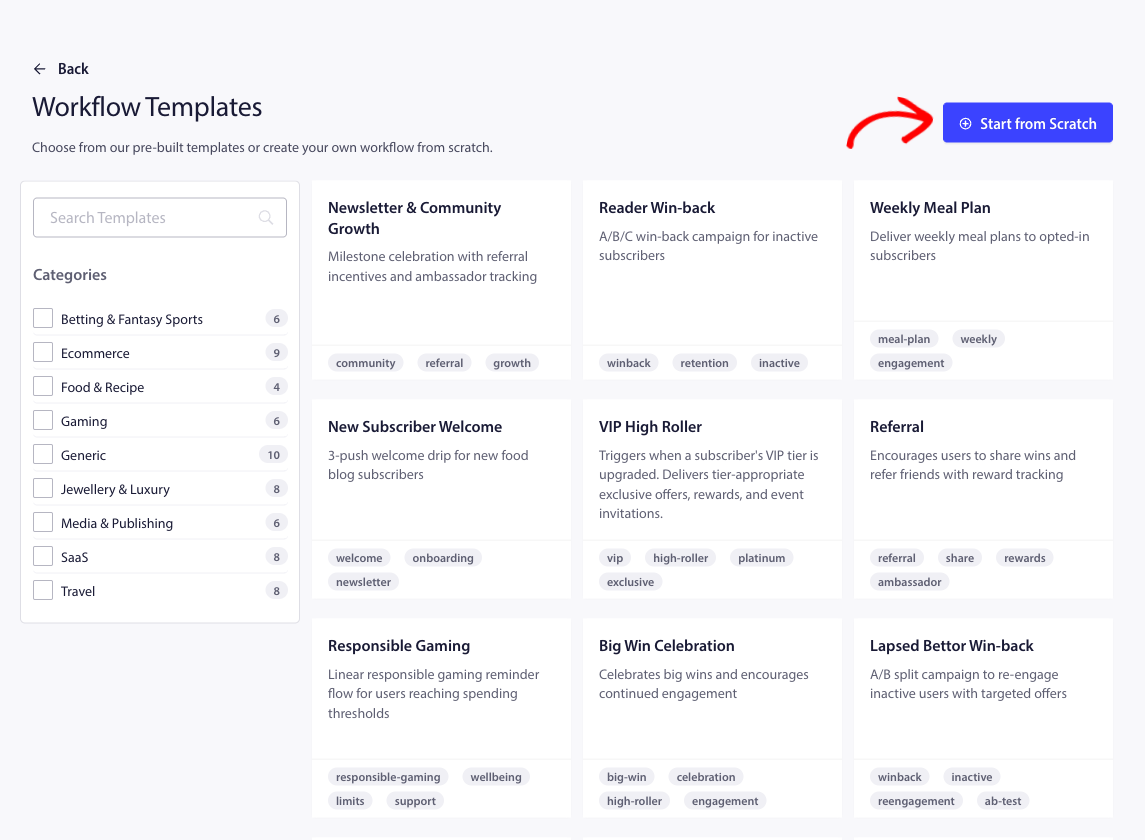
A. Creating Workflow from a Template
1. Navigate to Campaigns » Workflows.
2. Click Create Workflow and Open the Templates tab.
3. Pick a template that fits your use case. Some templates may be restricted to higher plans.
Click the template card to create a new workflow from it. You’ll be taken to the workflow builder to edit it.
B. Creating Workflow from Scratch
1. Go to Campaign » Workflows.
2. Click Create Workflow and choose to create a blank workflow
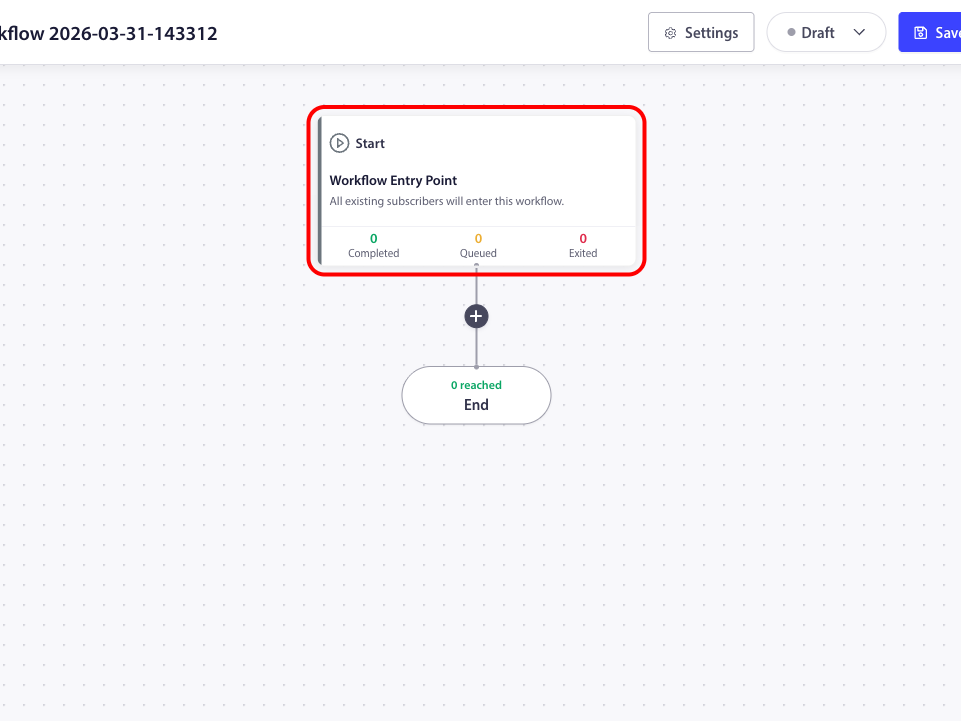
3. You’ll open the workflow builder with a single Start and End node.
Building Your Workflow
Workflows are made of nodes connected in a path. You always have a Start and an End. Between them you add Wait, Decision, Split Path, Action, and optionally Exit nodes.
Give it a clear title and description so your team knows its goal.
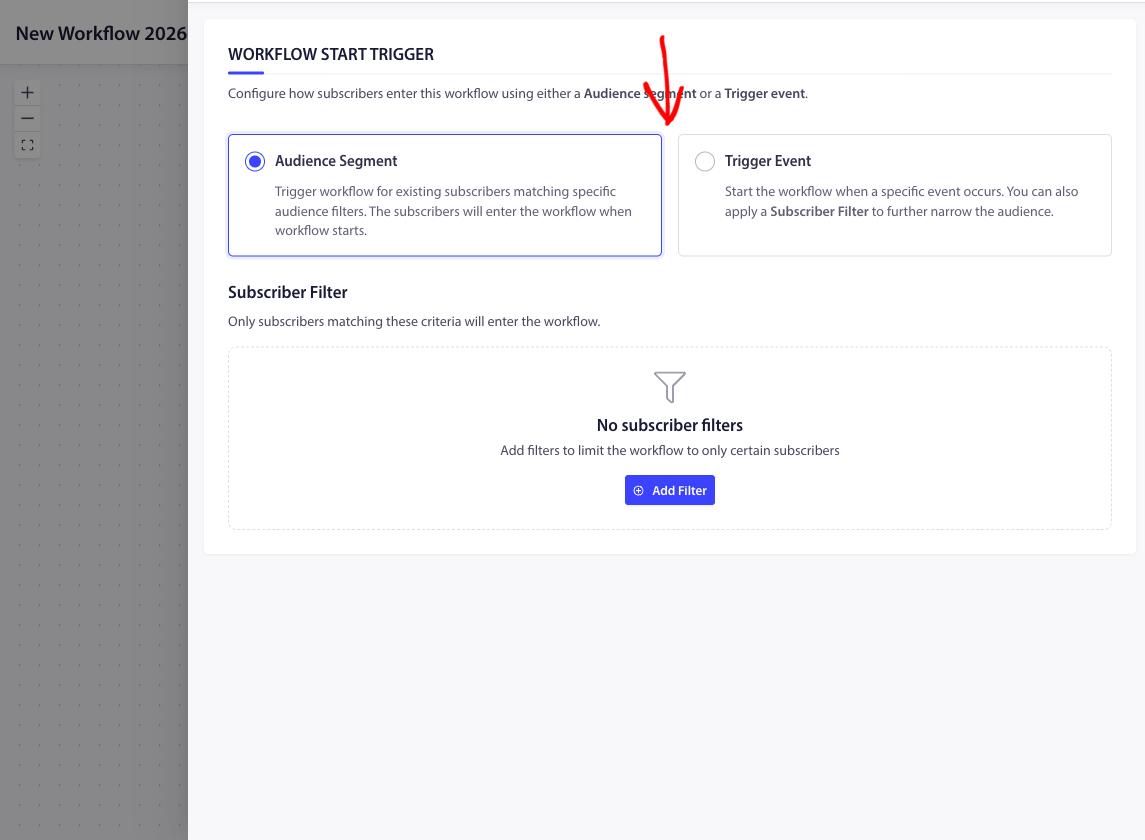
Step 1: Set Your Start Trigger
The Start node is the “green light” that tells your workflow when to begin.
- Trigger by Event: Fire the workflow the moment a subscriber takes an action (e.g., subscribing to push, updating an attribute, or completing a goal).
- Trigger by Audience: Automatically enroll existing subscribers who meet specific criteria (e.g., everyone in your “VIP” segment).
1. Click the Start node on your canvas.
2. In the side panel, choose your Trigger Type.
3. Add an Audience Filter to narrow down exactly who should enter (e.g., “Only subscribers from New York”). This is an optional step if you like
4. Hit Save
Step 2: Design Your Journey
Add steps between the Start and End nodes to create a personalized experience. Click the (+) icon on any node to extend your path.
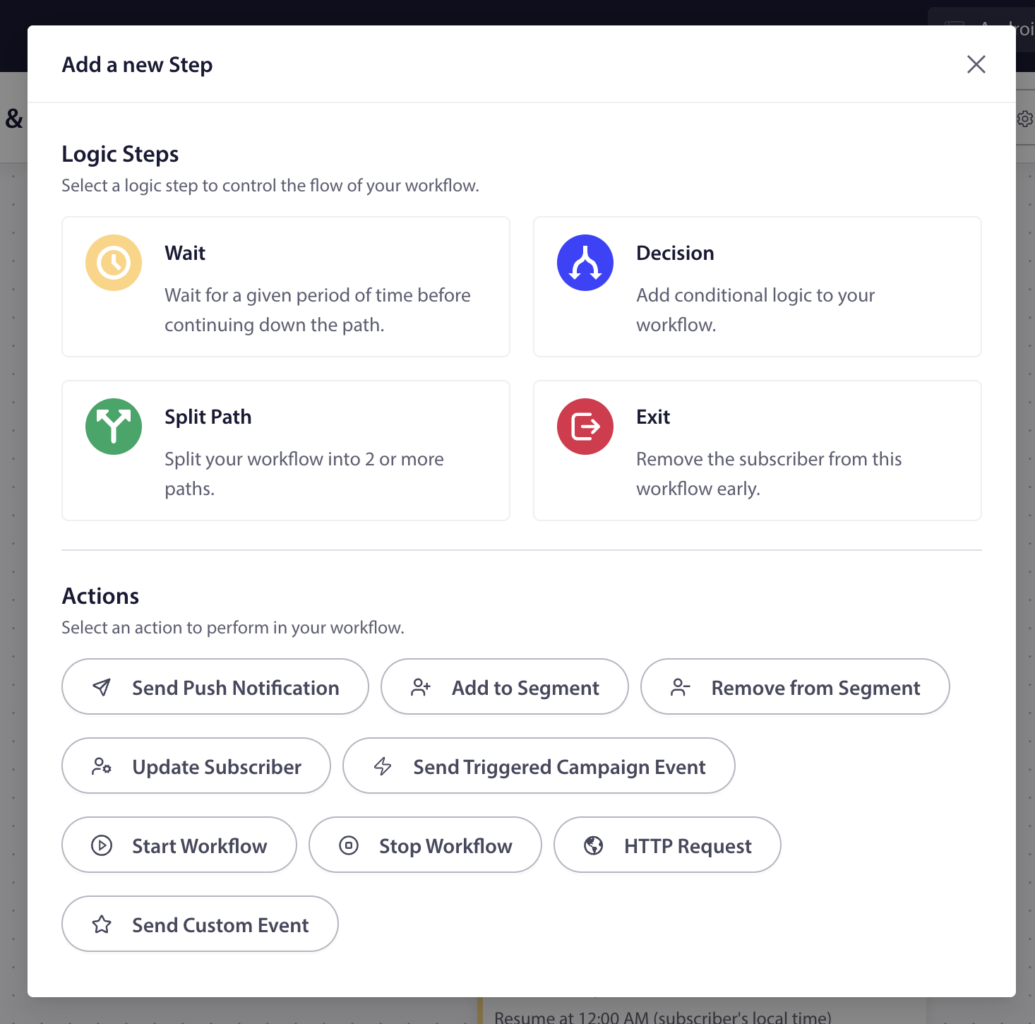
Logic & Flow
- Wait: Give your subscribers some breathing room. Pause for a set duration (2 hours) or until a specific date.
- Decision: Create a fork in the road. Send subscribers down “Yes” or “No” paths based on their behavior.
- Split Path: Perfect for A/B testing! Split your traffic by percentage to see which strategy performs best.
Actions
- Send Push Notification: Deliver your message with custom titles, images, and links.
- Manage Segments: Automatically add or remove subscribers from lists as they move through the flow.
- Data Updates: Keep your records fresh by updating subscriber attributes automatically.
- Advanced Integrations: Use HTTP Requests or Custom Events to sync with your external tools and APIs.
Note: If you see a Lock icon on a specific node, that feature is available on a higher plan. You can still add it to your draft to see how it looks.
Understanding decision points
Decision points are where your workflow branches. Each type serves a different purpose, here’s how they work and when to use them.
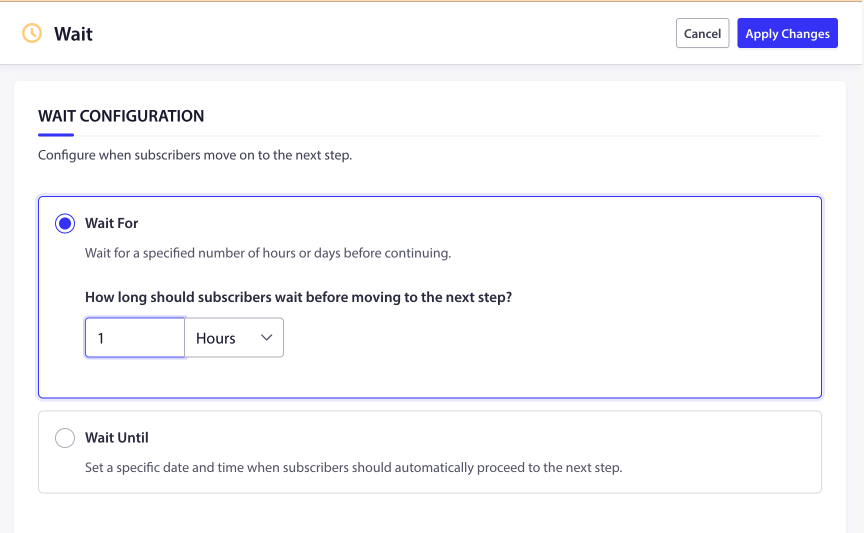
Wait node
Requires a Business plan or higher.
The Wait node pauses a subscriber’s journey before moving to the next step. Use it to add breathing room between actions — for example, waiting 24 hours after a welcome push before sending a follow-up.
You have two wait modes:
Wait for a duration:
- Set a number of minutes, hours, or days.
- For days, you can also pick a specific time of day and timezone (subscriber’s local time or your site’s timezone).
- Optionally restrict to certain days of the week — for example, “Wait 3 days, resume at 9:00 AM on weekdays only.”
Wait until a specific date:
- Pick an exact date and time.
- Choose between subscriber’s timezone or site timezone.
- Use this for event-based campaigns — for example, “Wait until Black Friday at 10 AM.”
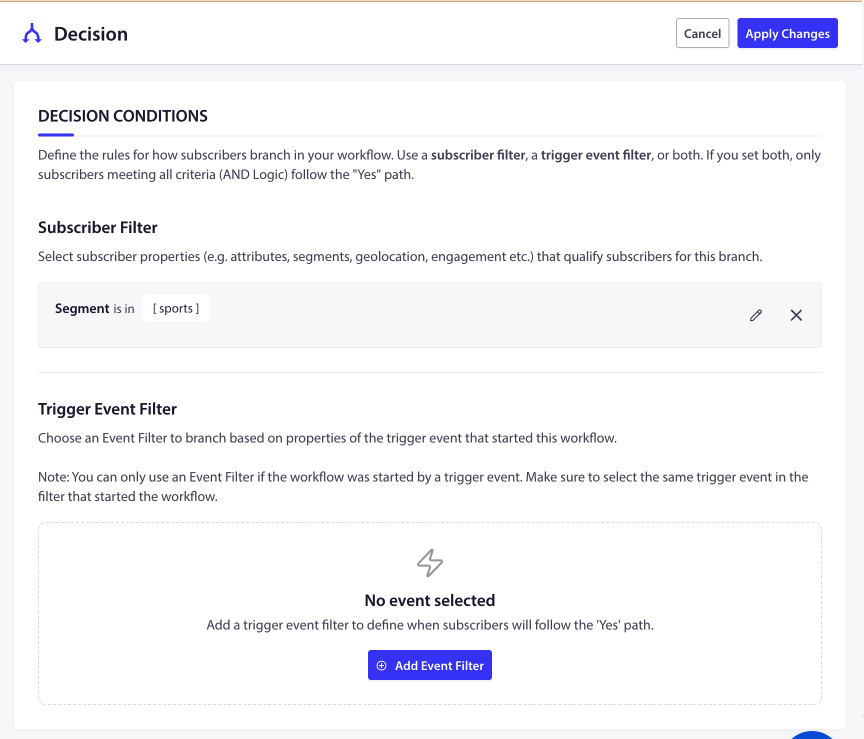
Decision node
Requires a Business plan or higher.
The Decision node creates a Yes/No fork in your workflow. Subscribers who match your conditions follow the “Yes” path; everyone else follows the “No” path. This is the most powerful branching tool in your workflow.
You configure a Decision node with one or both of these filter types:
Subscriber filter: Define conditions based on subscriber properties — segments, attributes, geolocation, engagement level, and more. For example:
- “Is the subscriber in the ‘VIP Customers’ segment?”
- “Does the subscriber’s city attribute equal ‘New York’?”
- “Has the subscriber been active in the last 7 days?”
Trigger event filter: Branch based on properties of the trigger event that started this workflow. For example, if the workflow started from a custom event, you can check whether a specific data field in that event matches a value.
How the two filters combine:
- If you set only a subscriber filter, branching is based on subscriber properties alone.
- If you set only a trigger event filter, branching is based on event data alone.
- If you set both, the subscriber must match all conditions (AND logic) to follow the “Yes” path.
When to use a Decision node:
- Route VIP subscribers to a special offer while others get a standard message.
- Check whether a subscriber completed onboarding before sending a follow-up.
- Filter by location to send region-specific content.
- Separate engaged vs. disengaged subscribers for different re-engagement strategies.
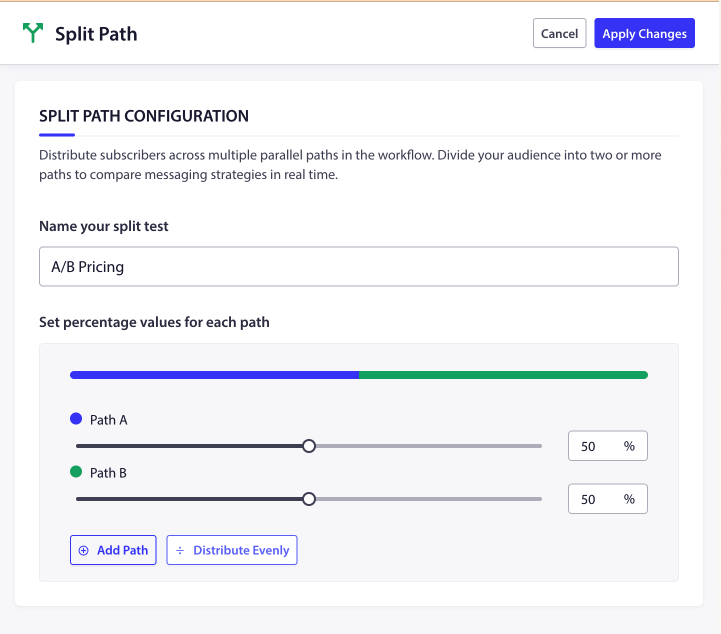
Split Path node
Requires a Premium plan or higher.
The Split Path node divides your traffic across 2 to 5 parallel paths, each receiving a percentage you define. The percentages must total exactly 100%. This is ideal for A/B testing different messages or strategies.
Each path is labeled alphabetically (Path A, Path B, Path C, etc.) and color-coded on the canvas.
Setting up a Split Path:
- Click the (+) icon and select Split Path.
- Give your split a descriptive name (e.g., “Welcome message A/B test”).
- Set the number of paths (2–5).
- Assign percentages to each path. They must add up to 100%.
Declaring a winner: After running your test, you can declare a winning path. The winner receives 100% of future traffic, and the other paths drop to 0%. This lets you lock in the best-performing approach without rebuilding the workflow.
When to use a Split Path node:
- A/B test two different push notification messages to see which gets more clicks.
- Split traffic 80/20 to gradually roll out a new notification strategy.
- Run a 50/50 split to compare two completely different engagement approaches.
Exit node
Requires a Business plan or higher.
The Exit node immediately removes a subscriber from the workflow. No further steps execute after this point.
Use it to end a subscriber’s journey early based on a condition — for example, place an Exit node after a Decision node’s “Yes” path to remove subscribers who’ve already converted. This prevents them from receiving irrelevant follow-up pushes.

Using actions
Actions are the steps that do something to or for a subscriber. Here’s what’s available:
| Action | What it does | Plan |
|---|---|---|
| Send Push Notification | Deliver a push notification with custom title, message, image, and link. | All plans |
| Add to Segment | Add the subscriber to one or more segments for future targeting. | Business+ |
| Remove from Segment | Remove the subscriber from specific segments. | Business+ |
| Update Subscriber | Update subscriber data fields and custom attributes (set, remove, increment, or decrement values). | Business+ |
| Send Triggered Campaign Event | Fire an event that activates a separate triggered campaign. | Growth+ |
| Start Workflow | Start a different workflow for this subscriber. | Growth+ |
| Stop Workflow | Stop a specific running workflow for this subscriber. | Growth+ |
| HTTP Request | Send data to an external system via GET, POST, PUT, or DELETE request. | Growth+ |
| Send Custom Event | Send a custom event that other workflows can listen for. | Growth+ |
To configure an action, click it on the canvas to open its settings panel, fill in the required fields, and click Save.
Step 3: Refine Your Settings
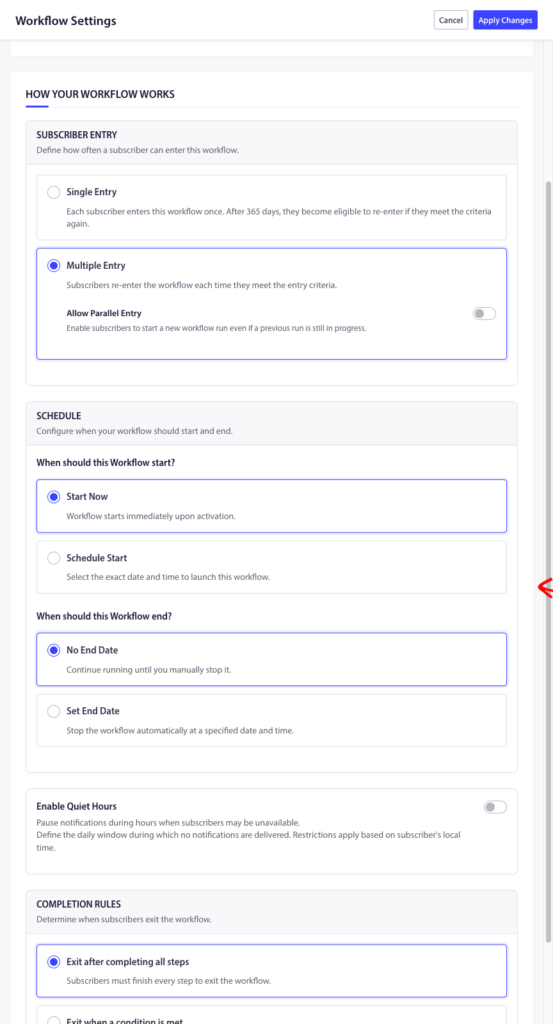
Subscriber entry
Control how often subscribers can enter this workflow:
- Single Entry — Each subscriber enters once. After 365 days, they become eligible to re-enter if they meet the criteria again.
- Multiple Entry — Subscribers re-enter the workflow each time they meet the entry criteria.
You can also toggle Allow Parallel Entry to let subscribers start a new run even if a previous run is still in progress.
Schedule
Define when your workflow is active:
- Start Now — The workflow starts immediately when you activate it.
- Schedule Start — Pick a specific date and time to launch.
- No End Date — Runs until you manually stop it.
- Set End Date — Stops automatically at a specified date and time.
Completion rules
Determine when subscribers exit the workflow:
- Exit after completing all steps — Subscribers must finish every step to exit.
- Exit when a condition is met — Subscribers exit as soon as they match a subscriber filter or perform a specific trigger event. Use this for goals like “exit when the subscriber makes a purchase.”
Quiet hours
Pause notifications during set hours so you don’t disturb subscribers at inconvenient times:
- Set a start time and end time for the quiet period.
- Choose a fallback behavior:
- Skip — Notifications scheduled during quiet hours are skipped, and the workflow moves to the next step.
- Reschedule — Notifications are delayed until quiet hours end, then sent before continuing.
Once your workflow is ready, it’s time to go live.
You can Save as Draft or toggle the status to Active.

Activating and managing your workflows
You can view all workflows by navigating to Campaign » Workflow , filter by status, duplicate, or delete.
You can also edit the workflow to make any changes, Open a workflow to edit it in the builder; you can change triggers, add/remove nodes, and update actions.
You can also view the Analytics for entire workflow or node-level analytics to see how many subscribers entered, completed, or exited.
If in case you run into any issues, please feel free to contact us by clicking here. Our support team would be able to help you.


