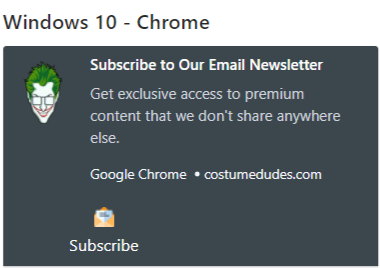
If email open rates are dropping and your social posts are getting buried, it might be time to try something different. A web push notification campaign could be exactly what you need.
Web push is fast, direct, and shows up right when your subscriber is online. No inbox. No algorithm. Just a quick message that brings people back to your site when it matters most.
In this guide, I’ll show you how to set up your first web push notification campaign using PushEngage. It’s easier than you might think, and you’ll see how even a simple campaign can drive real results.
Kulağa hoş geliyor? Hemen başlayalım.
Send Web Push Notifications Today!
Anlık bildirimler, tekrar eden trafiğinizi, etkileşiminizi ve satışlarınızı otomatik olarak artırmanıza yardımcı olan süper etkili, düşük maliyetli bir pazarlama aracıdır.
Why Web Push Works (Even When Other Channels Don’t)
Web push notifications cut through the noise in a way that email and social just can’t.
- You don’t need a phone number or email address to grow your list
- Messages show up while your subscriber is actively browsing
- You can automate everything — from cart recovery to product drops
- It works across devices and browsers (no app required)
It’s like having your own private traffic channel… one that actually gets noticed. Think about it… when was the last time you ignored a browser notification that popped up with your name, a juicy headline, and a call to action you cared about?
⚡ Instant Visibility: Unlike emails that sit unread for days, push notifications hit instantly. Right on the user’s screen. Desktop, mobile, doesn’t matter. You’re not waiting for them to open an inbox. You’re showing up exactly when it matters.
🧠 Zero Memory Required: Users don’t need to remember your website. Or your product. Or even their login.
Once they subscribe, you can re-engage them anytime — no forms, no friction, no fuss. It’s like having a fast lane straight into their attention span.
📈 Stupid-High Engagement: Web push CTRs often 2–3x email. Why? Because it’s short. Unexpected. And native to how people browse. Plus, no one’s inbox is drowning in push notifications (yet). So you stand out.
💸 You Own the Channel: No algorithms. No bidding. No social feed shenanigans. Push subscribers are yours. You decide what they see and when. It’s your audience, not rented from Meta or Google.
🧪 Perfect for Testing: Need to know if a headline works? If people care about a new feature? Push is the fastest A/B testing tool you didn’t know you had. Send a headline variation. See which one gets more clicks. Learn fast. Move faster.
Web push is the rare channel that’s cheap, high-converting, and brutally effective when used right.
And the best part… it takes under 10 minutes to launch your first campaign.
Let’s build one.
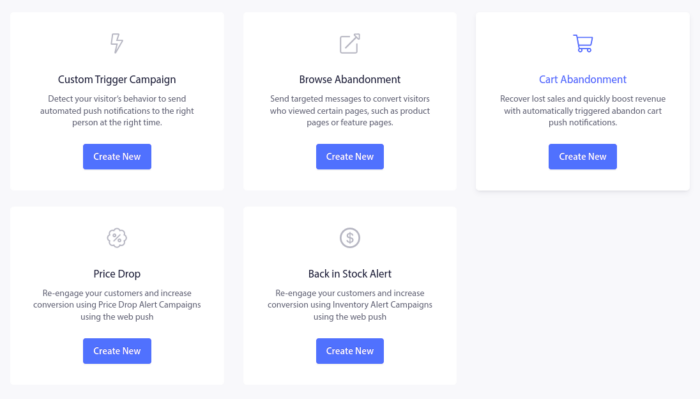
A Breakdown of Web Push Notification Campaign Types
In the broadest sense, there are 3 types of web push notification campaigns:
- Broadcast notifications
- Drip web push notification campaigns
- Triggered web push notification campaigns
Broadcasts are push notifications that you send out as a single notification. You can schedule them, but they will only fire off once. Triggered campaigns involve setting up a push notification, defining a trigger to set it off, and a workflow to control its scheduling. Automated drip notifications are a series of notifications that set off automatically at specific times or when specific conditions are met.
For all intents and purposes, triggered campaigns and automated drip campaigns look the same from the outside. The critical difference is that trigger campaigns are way more flexible and customizable. If you consider that push notifications cost way less than most other channels, it makes perfect sense to use a combination of all three to grow your business.
If you’re new to push notifications, we strongly recommend starting your journey using proven templates.
NOTE: Most triggered campaigns need some development experience. You’d need to use an API to make the best use of triggered notifications. However, there are some triggered notifications that you can send straight off the rack. If you’re curious, check our article on eCommerce push notifications for a better idea.
The Best Service to Send a Web Push Notification Campaign
Let’s start things off by saying that most of the “free push notification services” out there are actually free trials. Some of the providers we’ve listed here are trial software, while others have a forever-free plan that you can opt for.
There are some other freemium options, such as Firebase Cloud Messaging (FCM), but that’s not really a good option at all. You can read more about why FCM can’t compete with a service provider like PushEngage. But for now, just take our word for it and jump into the better options.
PushEngage kullanmanızı öneririz.

PushEngage, dünyadaki 1 numaralı anlık bildirim eklentisidir.
Anlık bildirimler, web sitesi trafiğinizi ve etkileşiminizi otomatik olarak artırmanıza yardımcı olur. Ve bir çevrimiçi mağaza işletiyorsanız, PushEngage ayrıca otomatik e-ticaret anlık bildirimleri oluşturmanıza yardımcı olarak satışlarınızı artırmanıza da yardımcı olur.
Ücretsiz başlayabilirsiniz, ancak işletmenizi büyütme konusunda ciddiyseniz, ücretli bir plan satın almalısınız. Ayrıca, herhangi bir anlık bildirim hizmeti satın almadan önce, anlık bildirim maliyetleri hakkındaki bu kılavuza göz atmalısınız.
PushEngage ile nelerin geldiğine hızlı bir bakış:
- Yüksek dönüşüm sağlayan otomatik kampanyalar
- Birden fazla hedefleme ve kampanya zamanlama seçeneği
- Hedef takibi ve gelişmiş analizler
- Akıllı A/B testi
- Anlık kampanya şablonları
- Güçlü segmentasyon seçenekleri
- Özel Bir Başarı Yöneticisi
Ve bu sadece yüzeyin bir kısmı. Devam etmeden önce PushEngage'ın tüm özellikler listesine göz atın.
Ancak PushEngage hakkındaki en çekici kısım, sonsuza dek ücretsiz bir planla başlayabilmenizdir. Ve bunu birden fazla özelleştirme seçeneği kullanarak işinizi büyütmek için kullanabilirsiniz.
İşletmeniz için trafik, etkileşim ve satış oluşturmak istiyorsanız, PushEngage'in tartışmasız en iyi seçenek olduğunu göreceksiniz. Ve bütçeniz kısıtlıysa, anlık bildirimlerinizle biraz yaratıcı olabilirsiniz.
NOT: WordPress siteniz varsa, PushEngage WordPress eklentisini kurmalı ve etkinleştirmelisiniz.
Ücretsiz sürüm 200 aboneye ve ömür boyu 30 bildirime kadar izin verir. Bu, işletmenizi, ayda 100.000 abone için 9 ABD dolarından başlayan ücretli planları kolayca karşılayabileceğiniz bir noktaya getirmeniz için yeterlidir.

Ve kodlama hakkında hiçbir şey bilmeseniz de endişelenmeyin. Herhangi bir web sitesi ve CMS için birçok kurulum kılavuzumuzdan birini kullanarak PushEngage'ı yükleyebilirsiniz.
Pushengage’s AI-powered optimization helps you craft better titles and messages, leading to increased engagement and campaign success. Ever wished that your push notifications would write themselves? Well, now they can!
In all likelihood, you can cut down campaign creation time for push broadcasts, drip campaigns, and automated trigger campaigns by as much as 50% while improving the quality of your copywriting.
The PushEngage AI uses high-performing campaigns as a reference point for all copywriting and will always stick to best practices by default.
And the best part is that it works for web push, Android native notifications, iOS native notifications, Flutter notifications, and React Native notifications from the same dashboard!
You can use AI text generation for any campaign type. For this example, I’m using a push broadcast to demonstrate the capabilities. But if you want to see its full potential in action, watch this video!
Create a new campaign or choose any from the Templates. You can then click on Generate Text Button.
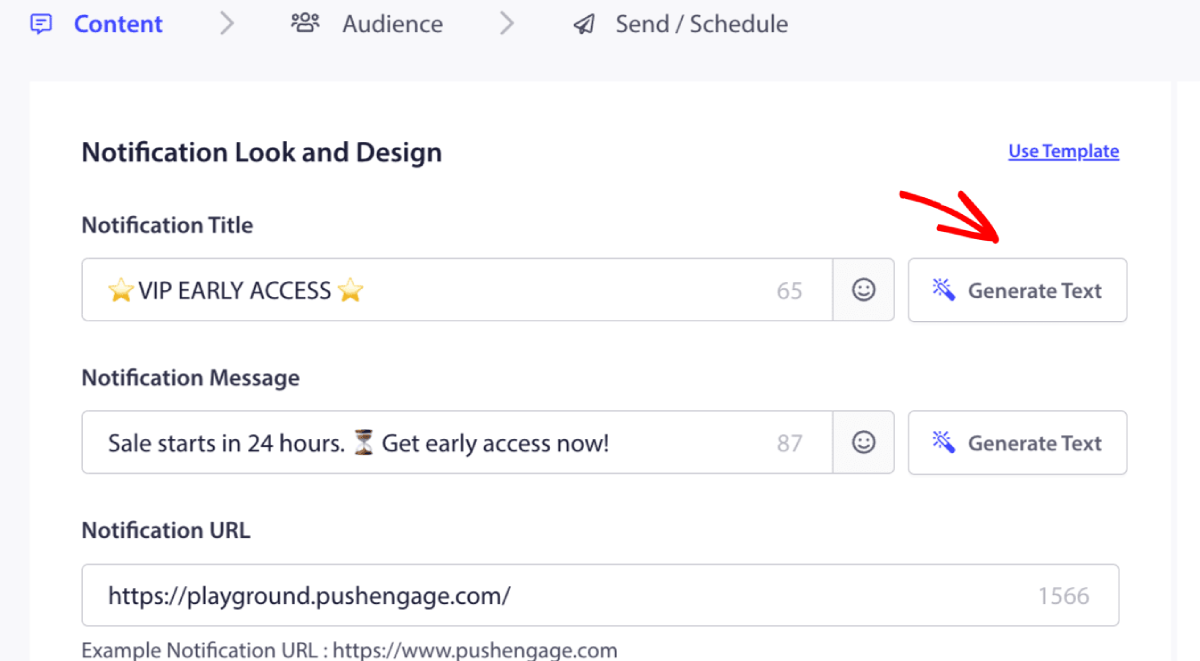
It will open up a small window for the web push notification campaign title & message. You can start by adding any keywords that will act as a prompt for the AI. The prompt can be as detailed as you like.
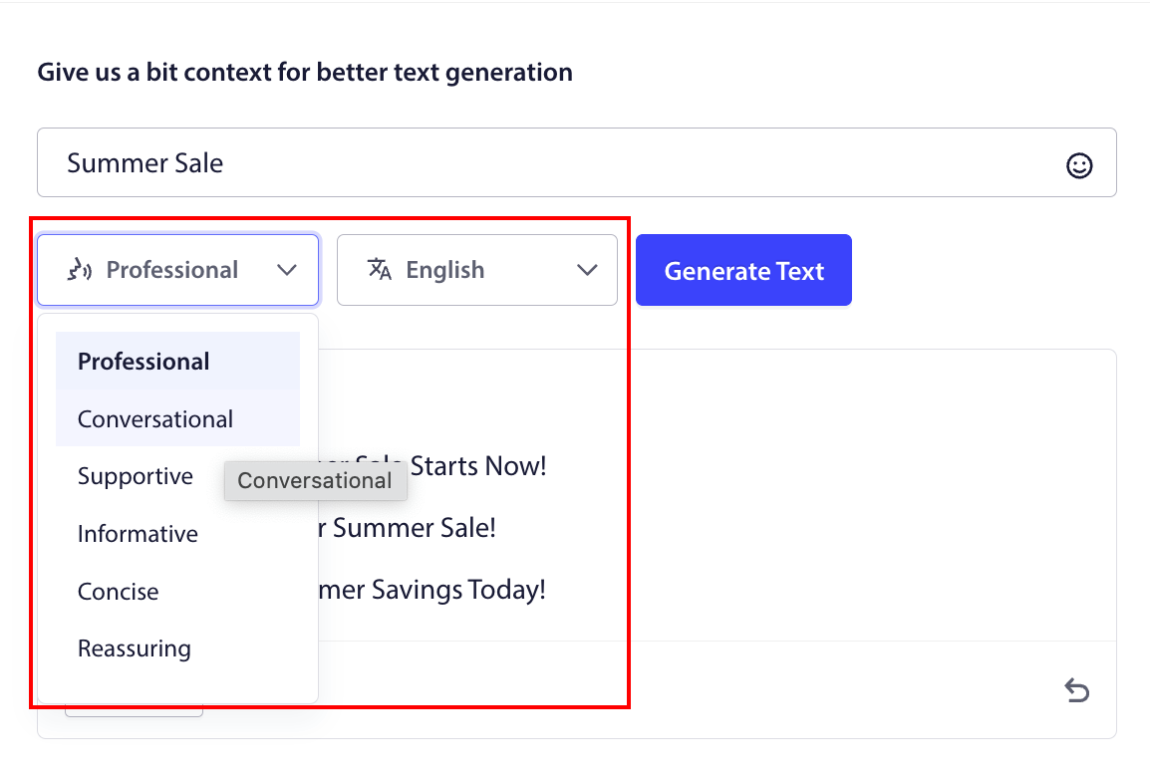
You can also set the tone for the web push notification campaign title or message. The tone of the conversation is very important in deciding the type of campaign that will be created. Make sure that it resonates with your brand style.
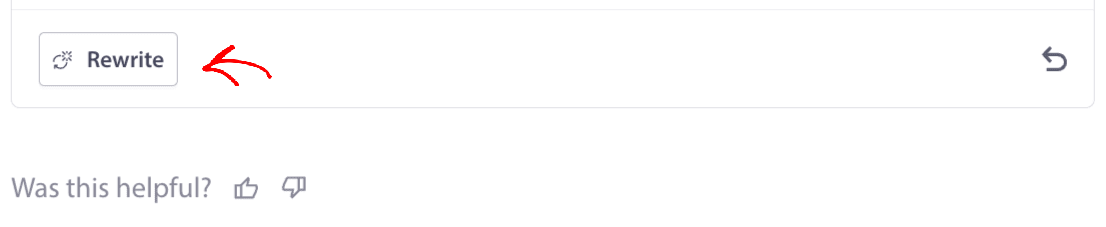
Once it’s set, you can click on the Generate Text button. Not happy with the generated text? Simply click the Rewrite button!
You can actually craft copy in ANY LANGUAGE!
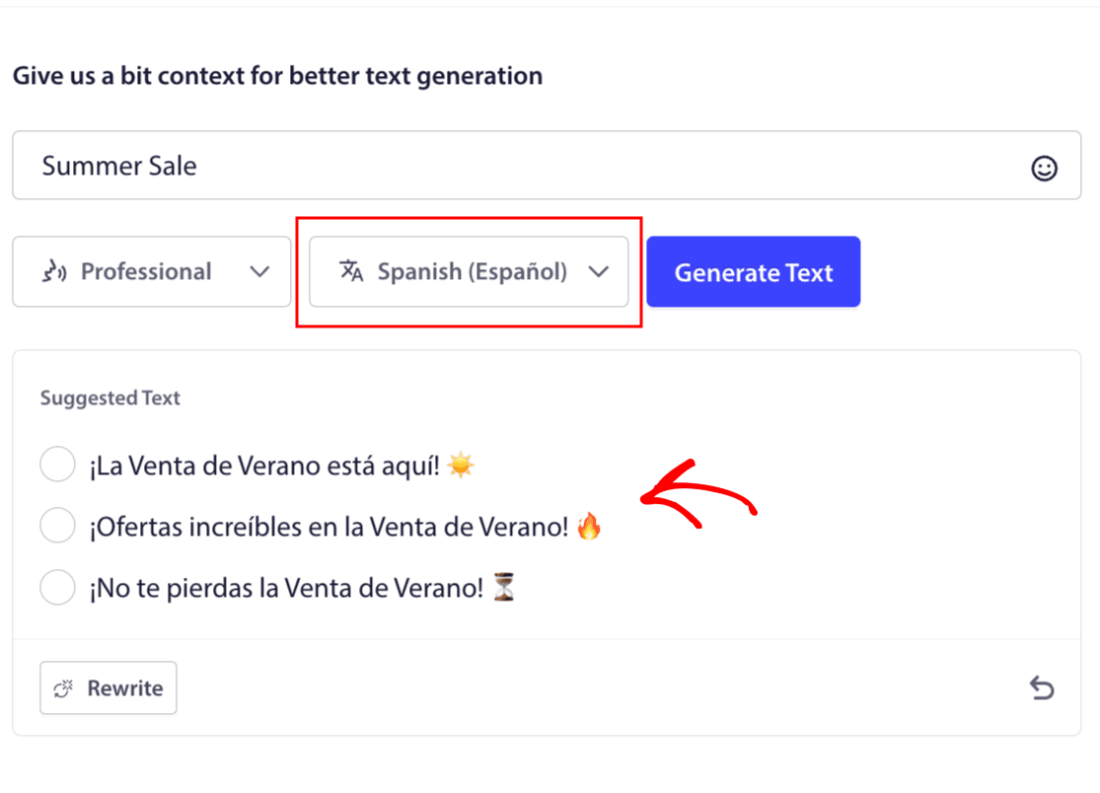
This level of built-in multi-language support simply doesn’t exist in any other push notification software. And don’t worry, the translations are dead on! So, you can send geo-specific campaigns very easily now. Select the right Audience Group, select the language, and let our AI do its magic.
How to Send a Web Push Notification Campaign
Now that you know what a web push notification campaign is and what service you need to send them, it’s time to check out how to send different notifications.
Here’s what web push campaigns look like in the wild:
🛒 E-commerce:
- Welcome discount: “Thanks for subscribing! Here’s 10% off.”
- Price drop alert: “The jacket you liked? It’s finally on sale.”
- Product drops: “New arrivals just landed. Be the first to shop.”
📚 Publishers & Bloggers:
- New post alert: “Don’t miss this week’s breakdown on [Topic].”
- Weekly digest: “Your Friday readlist is here.”
- Lead magnet delivery: “Here’s your free guide. Let us know what you think.”
💼 SaaS & Tools:
- Feature updates: “We just launched something new. Try it free.”
- Trial reminders: “Your free trial ends tomorrow.”
- Abandoners: “Still thinking it over? Here’s 20% off to try us out.”
Start small. Steal these. Tweak them to match your tone. Done.
For practical purposes, we aren’t talking about custom triggered campaigns you can create using an API service here. If you’re more interested in custom notifications, you should check out our documentation.
#1. Welcome Web Push Notification Campaign
A welcome web push notification campaign is a simple push notification meant to welcome any new subscriber.
You can also send an offer or a gift for subscribing to your push notifications. This is pretty common with a lot of our customers. You can use your welcome push notifications to:
- Hoş Geldin Kuponu Paylaşın
- Premium Özellikler Sunun
- Ücretsiz Teslimat Gönder
- Ücretsiz Hediyeler Sun
- Abonenizi Bir Tanıtımla Dahil Edin
Şimdi, ilk hoş geldin anlık bildiriminizi PushEngage kullanarak kuralım.
Here is how to Enable Welcome Notifications in PushEngage. Go to the PushEngage dashboard and head over to Campaign » Drip Autoresponders and click on Create New Drip Autoresponder:

Ardından, kampanyanıza bir ad verin (Hoş Geldin Drip gibi bir şey öneririz) ve Content altında, “Kullanıcı abone olduktan hemen sonra bildirim gönder“ seçeneğini seçin):

Bu noktada, bildiriminizin içeriğini düzenlemek için bildirim yanındaki oka tıklayabilirsiniz. PushEngage ile Premium veya Enterprise planınız varsa, bir dizi otomatik hoş geldin mesajı oluşturmak için birden fazla bildirim ekleyebileceksiniz. Sadece Add New Notification'a tıklayın ve içeriği düzenleyin.
İşiniz bittiğinde, Drip Ayarları'na tıklayın ve karşılama kampanyasını tüm abonelere gönderme seçeneğini belirleyin:

Ardından, anlık bildirimleri izlemek için kendi UTM parametrelerinizi ayarlamak üzere aşağı kaydırın:

Ve işiniz bittiğinde, yukarı kaydırın ve Otomatik Yanıtlayıcıyı Etkinleştir düğmesine tıklayın:

Now you know why setting up a welcome push notification campaign is important. You also know how to set it up. Go ahead and activate welcome push notifications to re-engage new subscribers, or check out this article on website welcome messages for inspiration.
#2. Abandoned Cart Web Push Notification Campaign
Alışveriş sepeti terk etme, potansiyel bir müşterinin alışveriş sepetine bir ürün ekleyip ödeme işlemini tamamlamadığı zaman meydana gelir.
İşiniz, sepet terk etmeyi mümkün olduğunca azaltmaktır.
One way to recover your lost sales is to use a cart abandonment web push notification campaign. Cart abandonment recovery campaigns target subscribers with an abandoned cart and send them follow-ups, reminders, offers, coupons, and discounts.

Basit bir fikir: Mümkün olduğunca çok insanı bir şeyler satın almaya ikna edin.
Sepet terk etme anlık bildirimleri, gelirleriniz üzerinde çok gerçek bir etkiye sahiptir. Örneğin, WickedWeasel, sepet terk etme anlık bildirim kampanyasından haftada 2.000 ila 4.000 $ ek satış elde ediyor.
Şimdi, ilk sepet terk etme kampanyamızı PushEngage ile kuralım.
Go to the PushEngage dashboard and head over to Campaign » Triggered Campaigns, and click on Create New Triggered Campaign:

Ardından, Sepet Terk Etme şablonunu seçin ve Yeni Oluştur'a tıklayın:
Ve terk edilmiş sepet otomatik yanıtlayıcısını tasarlamaya başlayabilirsiniz. İçerik sekmesi altında bir dizi push bildirimi oluşturabilirsiniz:
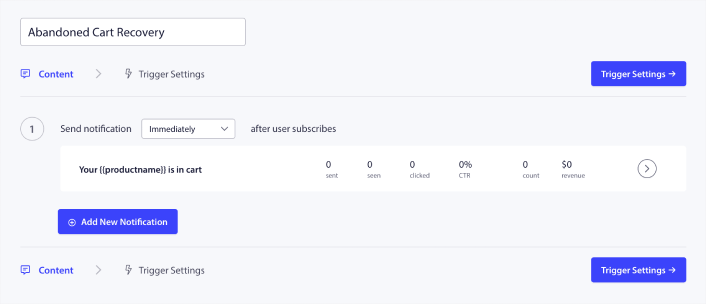
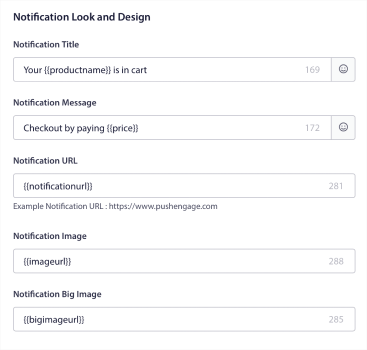
To edit a notification, simply click the arrowhead next to it, and you can customize the push notification:
Daha fazla eğitim için terk edilmiş sepet push bildirimlerinin nasıl kurulacağına dair bu makaleye göz atın.
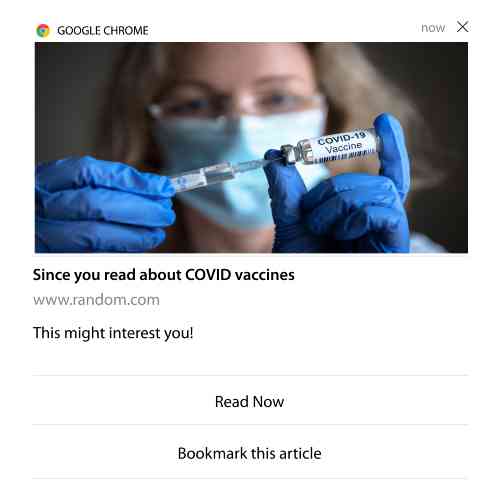
#3. Browse Abandonment Web Push Notification Campaigns
Göz atma terk etme tam olarak adından da anlaşılacağı gibi. Bir web sitesi ziyaretçisinin web sitenizde gezinirken aniden ayrılmaya karar vermesidir. Bu olaylar diğer satıcılar tarafından huni terk etme olarak da bilinir.
Göz atma terk etme, neredeyse her sektörde çok yaygın bir durumdur.
Ve azaltması veya kontrol etmesi gerçekten zordur çünkü rastgele bir kullanıcıyı web sitenizde kalmaya teşvik etmenin bir yolu yoktur. Göz atma terk etme kampanyalarının bu kadar güçlü olmasının nedeni budur.
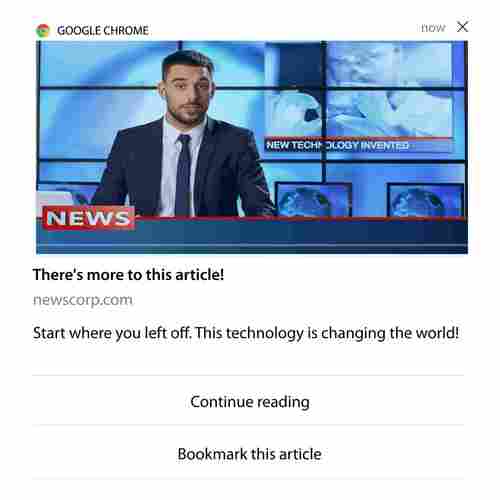
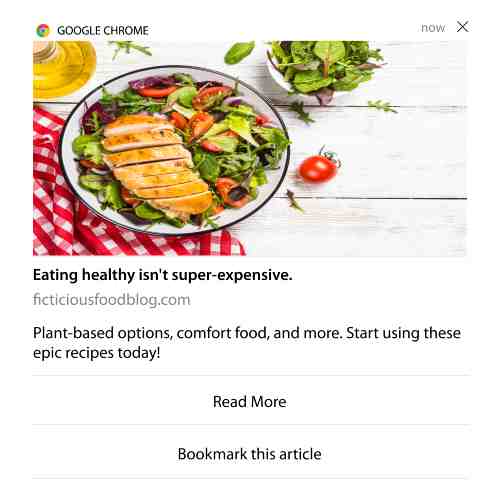
İşte bir yayıncı için göz atma terk etme anlık bildirimlerine bir örnek:
PushEngage'ın etkileyici yanı, hemen hemen her sektör için kampanyalar ayarlayabilmenizdir. Bu nedenle, SaaS ve seyahat web siteleri için de göz atma terk etme anlık bildirimleri gönderebilirsiniz.
Peki, göz atma terk etme kampanyalarını nasıl ayarlarsınız?
Sepet terk etme işleminde, anlık bildirimlerinizi tetiklemek için çok net bir parametre vardır. Göz atma terk etme için şu gibi parametreleri göz önünde bulundurabilirsiniz:
- Ürünü İstek Listesine ekledi
- Aynı ürüne X kereden fazla baktı
- Aynı kategoride X'ten fazla ürün inceledi
- Belirli bir ürün için siteyi arama
- Ayrılmadan önce sitede en az X dakika kaldı
Bir e-ticaret sitesi için bu kampanyanın arkasındaki fikir, aboneyi ürünü sepetine eklemeye ikna etmektir. Yayıncılar için, okudukları makaleye bir tıklama veya indirme olabilir.
PushEngage kontrol paneline tekrar gidin ve yeni bir tetiklenmiş kampanya oluşturmak için Kampanya » Tetiklenmiş Kampanyalar bölümüne gidin:

Ardından, Yeni Oluştur düğmesine tıklayarak yeni bir Göz Atma Terk Etme kampanyası oluşturun:

Ardından, her bildirim arasındaki gecikmeyle birlikte tüm push bildirim dizinizi ayarlayabileceksiniz:
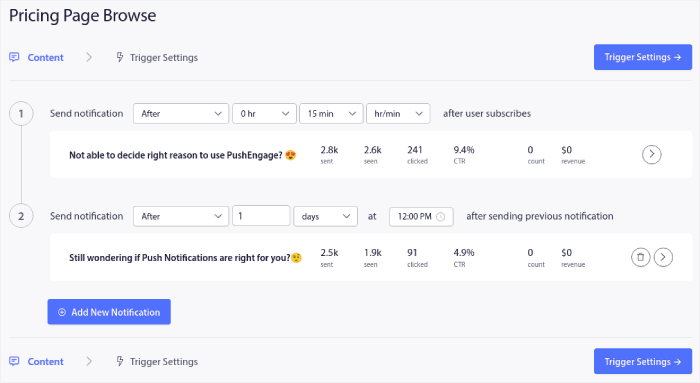
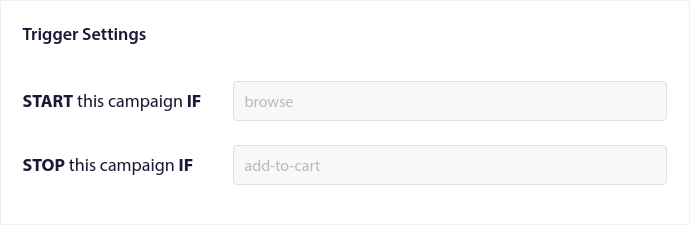
Push bildirimlerine yeni başlıyorsanız, push bildirim en iyi uygulamaları hakkındaki makalemize göz atmalısınız. Push bildirim içeriğinizden memnun kaldığınızda, Tetikleyici Ayarları'na tıklayın. Göz atma terk etme kampanyası için koşulların diziye önceden yapılandırıldığını göreceksiniz.
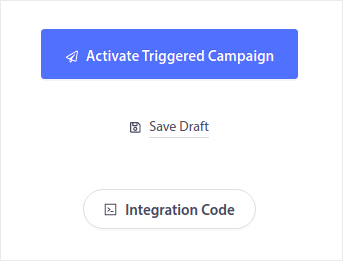
Göz atma terk etme kampanyasını sitenize yerleştirmek için gereken kod parçasını almak üzere Entegrasyon Kodu düğmesine tıklayın.
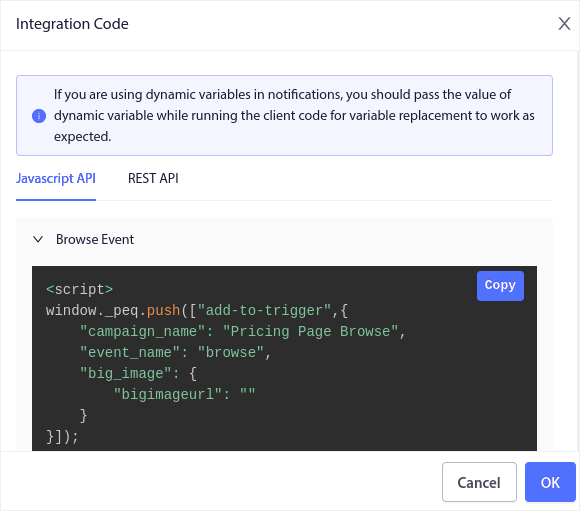
Ardından, kodu kopyalayın ve sitenize yapıştırın. Bu kodu izlemek istediğiniz sayfanın HTML <head> bölümüne yapıştırmak isteyeceksiniz. Son olarak, Tetiklenmiş Kampanyayı Etkinleştir düğmesine tıklayın:
Ve işte bu kadar!
#4. RSS Feed Web Push Notification Campaign
RSS Otomatik Anlık Bildirim, bildirimlerinizi RSS aracılığıyla otomatikleştirmenizi sağlar.
PushEngage, RSS beslemenize eklenen yeni bir gönderi için her 10 dakikada bir kontrol eder. Yeni bir gönderi bulunursa, PushEngage bunu bir anlık bildirime dönüştürür ve tüm abonelerinize gönderir. En iyi yanı, tamamen otomatik olmasıdır.
RSS Besleme kampanyaları yayıncılar ve haber siteleri için mükemmeldir:
Büyük bir yayıncıysanız ve 30 dakikada birden fazla gönderi yayınlıyorsanız, PushEngage 2 gönderi bildirimi arasında 5 dakikalık bir gecikme tutar.
Daha fazla ilerlemeden önce, daha epik ipuçları ve püf noktaları için RSS akışlarının nasıl kullanılacağı hakkındaki bu makaleye göz atmalısınız.
Now, let’s go set up an RSS feed web push notification campaign on PushEngage.
Create a New RSS Web Push Notification Campaign
Once you’ve installed PushEngage on your site, head over to your PushEngage dashboard and go to Campaign » RSS Auto Push and click on Create New Campaign:

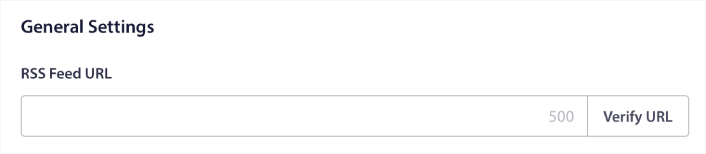
This will create a brand new RSS web push notification campaign. You can set up multiple RSS feed campaigns in PushEngage. Start by giving your campaign a descriptive name. Then, paste in the URL for your RSS feed:
Set Up RSS Notification Settings
Next, you want to set the Campaign Frequency:
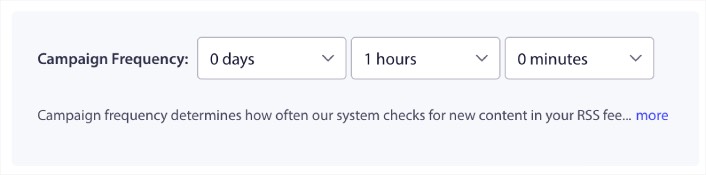
The Campaign Frequency is how often the RSS feed web push notification campaign looks for new content in your blog to send an automated push notification. The minimum value is 15 minutes, and the maximum value is 7 days.
Haber ajansı değilseniz, her 2 günde bir tanıtılacak içerik aramanızı öneririz. Haber ajansları için bunu 15 dakikada bir tutmalısınız. PushEngage'ın yalnızca RSS besleme kampanyasını kurup yayınladıktan sonra yeni içerik arayacağını unutmayın.
Tanıtılacak Gönderileri Seçin
You can select what posts to promote. You can choose between Only the latest item or All items. If you set up the RSS push notifications to select only the latest item, PushEngage only sends the latest post:
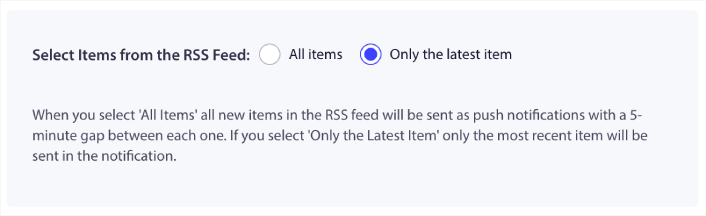
Or, you can select the All items options. In this case, the campaign will select all the posts on your site and send out a web push notification campaign for each with a 5-minute gap between them.
Set an RSS Push Notifications Icon
Your push notification icon establishes your brand identity in your RSS push notifications. We recommend using your brand mark so that your subscribers know instantly that the notification is from your brand.
Burada iki seçeneğiniz var. Bildirim simgesini manuel olarak yükleyebilirsiniz:
And that’s really simple to do. Just click on Change image and upload your notification icon. Or, you can fetch it from your RSS feed:
You can either select the item element or the attribute inside an element to dynamically select your notification icon from the feed. Typically, most RSS feeds will hold the site icon inside the media:content item element. Even more specifically, it’s usually inside the media:thumbnail attribute of the media:content element.
To target the element, you can select the Item Element Value option and set it to media:content. Or, you can select the Element Attribute Value option and set it to media:content > media:thumbnail.
NOTE: We recommend using this option only if you know how to read XML. RSS feeds might not contain the site icon in the same XML tags as our example. So, if you’re not sure how to fetch the notification icon from the RSS feed, we recommend uploading it manually instead.
Select Large Image for RSS Feed Notifications
Now, we’re going to select the large image for your RSS feed web push notifications. Again, there are two ways to do this. You can let PushEngage automatically find the image from the RSS feed:

Veya, beslemeden hangi resmi istediğinizi manuel olarak seçebilirsiniz:
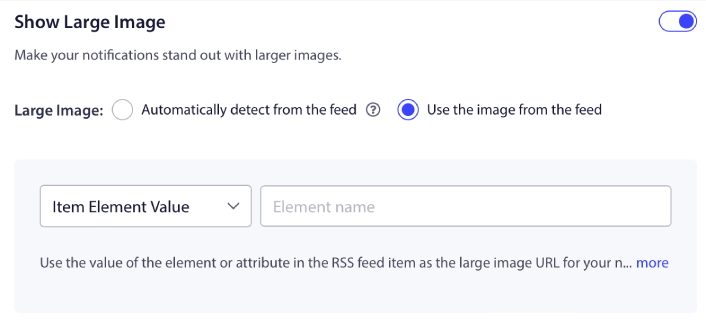
Bu, bildirim simgesini RSS beslemesinden seçmekle tamamen aynıdır. Resmi, onu içeren XML öğesinden seçebilir veya tercih ettiğiniz resmi içeren belirli özniteliği seçebilirsiniz.
NOTE: We only recommend selecting a URL from your RSS feed if you know how to read XML. If you’re not sure how to read XML, it’s better to let PushEngage find the best image for your notifications.
Set Web Push Notification Campaign Duration
The web push notification campaign duration is how long the notification stays in your subscriber’s notification tray before it gets automatically deleted.
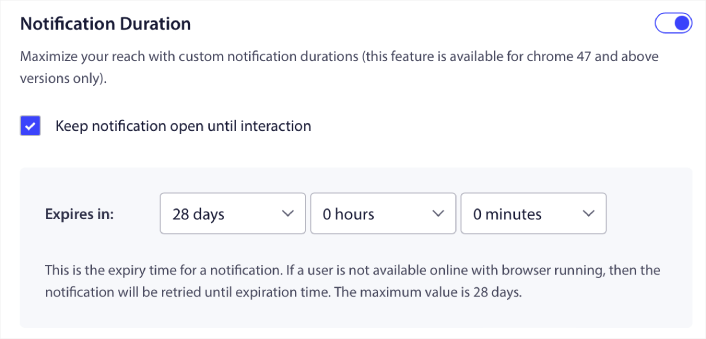
Abonelerinizi okunmamış bir sürü bildirimle bunaltmak istemiyorsanız, anlık bildirimlerin birkaç gün içinde sona ermesine izin vermek muhtemelen en iyisidir.
Unlike broadcast notifications or even other automated web push notifications, you can’t really schedule RSS push notifications. So, you always have the option to keep the notification open until your subscriber interacts with it, even within the expiry limit.
Set UTM Parameters
Neredeyse bitti. Anlık bildirimleri izlemek için kendi UTM parametrelerinizi ayarlamak üzere aşağı kaydırın:
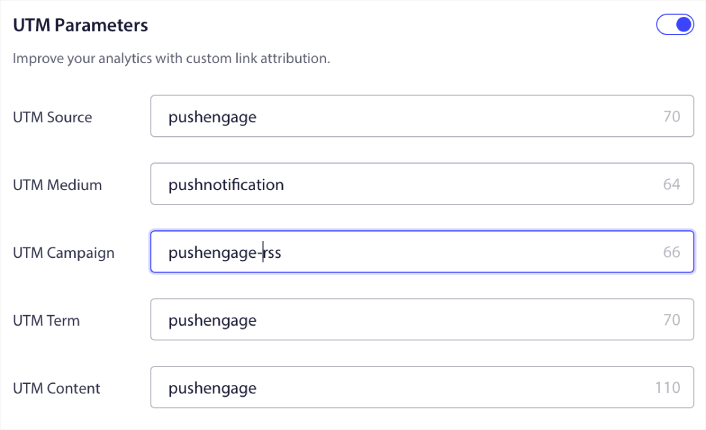
Bu şekilde, bu anlık bildirimlerden gelen trafiği Google Analytics'te kolayca atfedebilirsiniz.
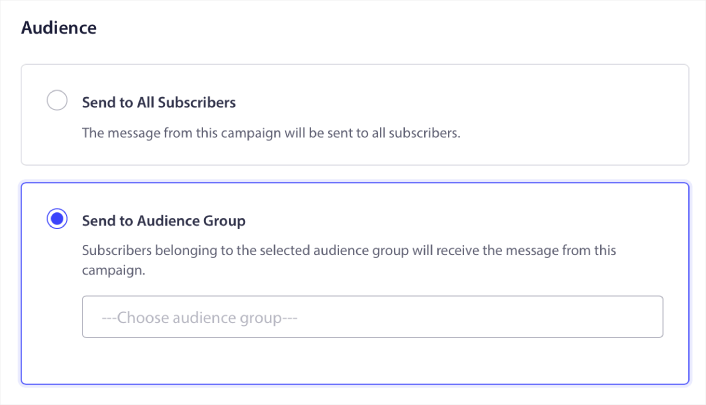
Kitle Grubu Seç
Finally, we’re going to select an Audience Group to send your RSS web push notification campaign. You can either send the RSS feed campaign to all your subscribers, or you can create Audience Groups to send personalized push notifications even from your RSS feed.
Ve hepsi bu kadar! Gerçekten hepsi bu kadar.
Artık yeni bir gönderi yayınladığınızda, seçilen Kitle Grubundaki tüm anlık bildirim aboneleri, yeni içeriğiniz hakkında otomatik olarak bir anlık bildirim alacaktır.
İşte bu kadar! Hazırsınız. Yeni bir gönderi yayınladığınızda, bu otomatik olarak tüm abonelerinize gönderilecektir.
#5. Otomatik Yeniden Etkileşim Bildirimleri
Bir süredir içeriğinizle etkileşim kurmamış aboneler için otomatik yeniden etkileşim kampanyaları ayarlayabilirsiniz.
Ama bunu neden ilk etapta yapasınız ki?
Nasıl ama:
- Yeni müşteri edinmenin maliyeti, mevcut müşterileri elde tutma maliyetinden 5 kat daha fazladır
- Kişisel tercihlerini zaten anladığımız bilinen bir kitleyi hedeflemek ve yeniden pazarlamak kolaydır.
- Uzun vadede, etkileşim kuran müşteriler, markanızla zar zor bağlantı kuran birinden daha fazla iş getirir.
Ofertia, kişiselleştirilmiş teklifler sunan anında iletme bildirimlerini kullanarak tekrar eden kullanıcılarını %39 artırmayı başardı. Onlar da yalnız değiller. Bunu bir e-ticaret web sitesi için büyük bir etkiyle kullanabilirsiniz:
Abonelerinizi yeniden etkileşim kurmanın birçok yolu vardır.
Picture this:
- A user visits your site. Sees a subtle opt-in. Clicks “Allow.”
- Instantly gets a welcome notification with a discount or the next step.
- Leaves your site…
- Later that day, they see a reminder: “Still thinking about it?”
- They click, come back, and buy.
That’s a basic push funnel — and you didn’t lift a finger once it was live.
Now, imagine layering in segmentation and automated campaigns. That’s when it gets fun. Using dynamic segments, you can figure out a lot about your subscribers and send them personalized content that they’ll love.
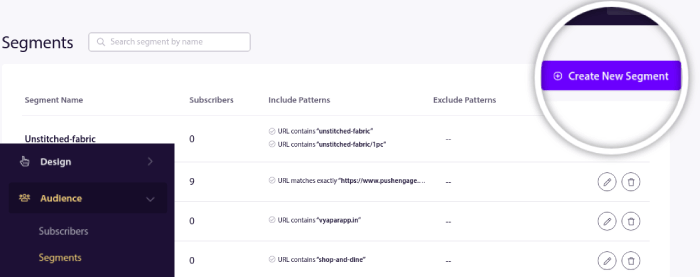
PushEngage kontrol panelinizde, Segmentasyon'a gidin ve yeni bir Segment oluşturun:
Bu, davranışı ve göz atma kalıplarını temel alan segmentler oluşturmanıza olanak tanır. Belirli segmentlerin ne zaman otomatik push bildirimleri alacağını belirleyen bir VE/VEYA işlemleri dizisi kurabilirsiniz.
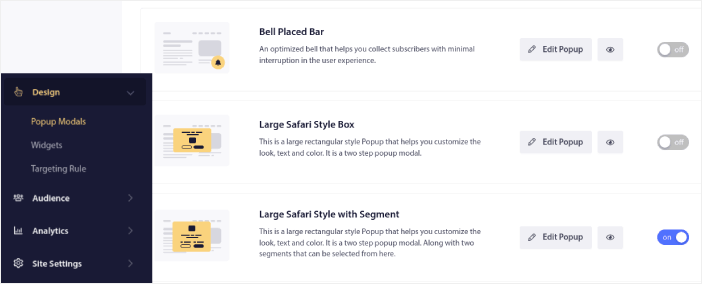
Kullanıcılarınız push bildirimlerine abone olduğunda bile onları segmentlere ayırabilirsiniz. Tasarım » Açılır Modallar bölümüne gidin ve Segmentli Büyük Safari Stili'ni seçin.
Kullanıcılarınızı segmentlere ayırmak için daha da fazla yol gerekirse, PushEngage Javascript API'yi kullanarak kullanıcı eylemlerine göre özel segmentler oluşturabilirsiniz.
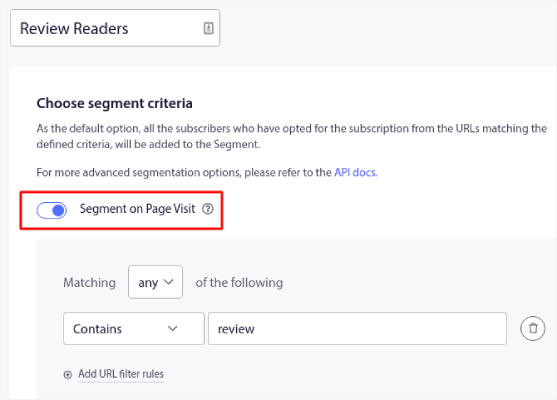
#6. Page Visit Web Push Notification Campaign
Sayfa ziyareti tetikleyicileri, anında iletme bildirimi segmentlerinin bir uzantısıdır. Tek yapmanız gereken, bir web ziyaretçisinin belirli bir ifade veya desene sahip bir URL'yi taraması üzerine bir segment oluşturmaktır.
Ardından, sadece Kitle » Segmentler bölümüne gidin ve kitlenizi belirli bir segmente ayarlayın:
Bu, gerçekten kişiselleştirilmiş ve otomatik anında iletme bildirimleri oluşturmanıza olanak tanır.
Ve en iyi yanı, PushEngage'de birkaç dakika içinde özel segmentler oluşturabilmenizdir.
#7. Otomatik Tıklanma Bildirimleri
PushEngage kullanarak, abonelerinizin gönderilen bir bildirime tıkladığında tetiklenen anında iletme bildirimleri oluşturamazsınız.
Ancak çok akıllı bir geçici çözüm var.
You can create a segment based on the URL that a particular notification leads to. Every time someone lands on this URL, they get added to the segment, and you can use this segment to send targeted notifications.
Anlık bildirim tıklama kampanyaları, aslında damla kampanyaları için standart kitle segmentasyonunun bir uzantısıdır.
Tıklayarak abone olma düğmesi oluşturma hakkındaki bu eğitime göz atın.
#8. Tekrarlayan Otomatik Anlık Bildirimler
Şöyle bir şey hayal edin…
- Haftalık bir bit pazarı indirimi;
- Veya hafta sonu indirimi;
- Veya stok tasfiye indirimi;
- Veya aylık flaş indirim.
Her etkinlik için anlık bildirimleri manuel olarak oluşturmak ne kadar zahmetli olurdu?
Neyse ki, PushEngage ile tekrarlayan bildirimler ayarlayabilirsiniz.
Bildirimleri tekrarla, yinelenen bir etkinlik için zamanlanmış ve otomatikleştirilmiş anlık bildirimlerdir. Bunları bir kez ayarlayabilir, bir program belirleyebilir ve işiniz biter.
Bu, MyDeal'in anlık bildirimleri kullandığı yollardan sadece biri. Tam vaka çalışmasını okuduğunuzdan emin olun!
Kampanya bölümüne gidin ve PushEngage kontrol panelinizde otomatik bir bildirim ekleyin. Ardından, zamanlama bölümüne gidin ve Gönder/Zamanla sekmesine tıklayın:
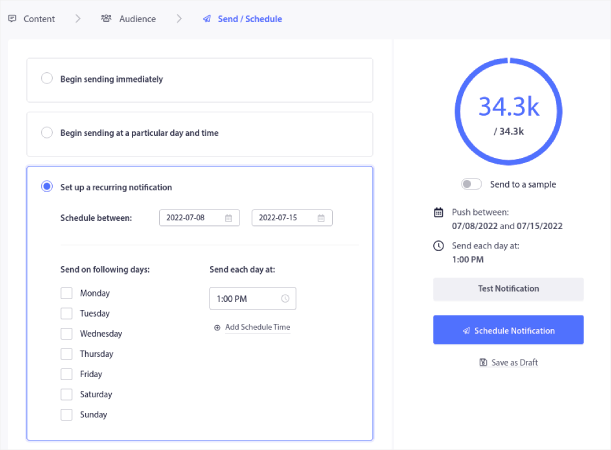
Zamanlamayı ayarlayın ve işiniz bitti!
#9. Abone Saat Dilimi Bildirimleri
Subscriber timezone notifications are exactly what they sound like. You send automated push notifications to your subscribers in their time zone.
Bu neden bu kadar büyük bir anlaşma?
Abone saat dilimi bildirimleri daha yüksek açılma oranlarına sahiptir. Tipik olarak, aboneniz çevrimdışı olsa bile herhangi bir anlık bildirim teslim edilir. Bu bildirimler birikir ve aboneniz nihayet çevrimiçi olduğunda göz ardı edilir.
On the other hand, a subscriber time zone web push notification campaign will get delivered when you KNOW your subscriber is most likely online.
İpucu: Abonelerinize anlık bildirim göndermek için en uygun zamanı bulmak üzere A/B testi kullanın.
Abone saat dilimi bildirimleri çok daha kişisel hissettirir. Ve akıllıysanız, bildirimlerinizi daha da kişiselleştirmek için bunu coğrafi konum verileriyle birleştirebilirsiniz. Bu tam olarak Phooto'nun yerel dilleri kullanarak açılma oranlarını artırdığı şeydir.
Şimdi PushEngage'de abone saat dilimi bildirimlerini ayarlayalım.
Yeni bir bildirim oluşturduğunuzda, zamanlama seçeneklerine gidin ve Bildirimleri Abone Saat Diliminde Gönder etiketli onay kutusuna tıklayın:
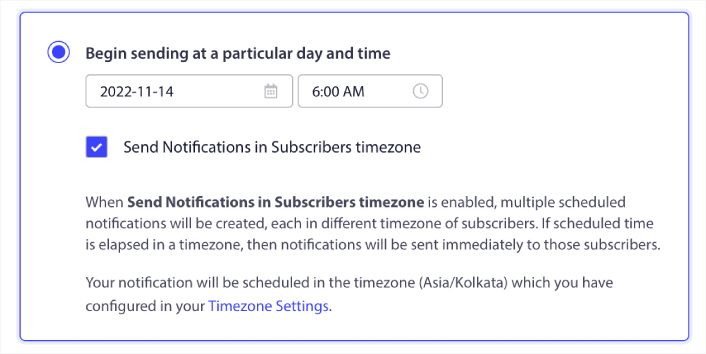
Hepsi bu kadar! Damla kampanyalarınız için de aynısını yapmanız gerekecek, ancak sonuçlar her kampanya için bir düğmeye tıklama zahmetine değecektir.
Start with 1–2 messages per week. Ramp up once you see what’s working.
Here’s a simple cadence to start with:
- Week 1: Welcome message + 1 product or content push
- Week 2: Reminder or discount follow-up
- Week 3: New drop, blog post, or feature highlight
If users stop clicking, pull back. If they keep clicking? Double down.
İpucu: Son iki taktik tamamen anlık bildirimleri zamanlamakla ilgiliydi. Ancak otomatik anlık bildirimleri zamanlamanın tek yolları bunlar değil. Daha epik püf noktaları için anlık bildirimler nasıl zamanlanır hakkındaki makalemize göz atın.
#10. E-posta Opt-in Bildirimleri
Email marketing has long been the best way to generate and nurture leads. The best part about automated push notifications is that you can generate more email subscribers using them.
It’s really simple to set up, and using a combination of email and web push notification campaigns is way more effective than using one or the other.
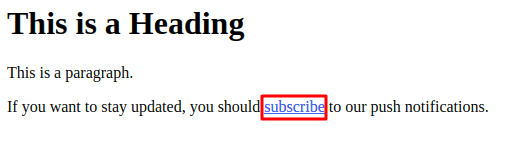
Tek yapmanız gereken, kullanıcıdan e-posta bildirimlerini kabul etmesini isteyen bir tetikleyici bildirim göndermektir.
Özel bir harekete geçirici mesaj (CTA) düğmesi oluşturun ve düğmenin URL'si olarak bir abonelik bağlantısı ekleyin. Gerçekten ihtiyacınız olan tek şey bu. Bir abonelik düğmesi oluşturmayı bilmiyorsanız, takip edin.
Herhangi bir bildirimde aşağı kaydırabilir ve Çoklu Eylem düğmelerini açabilirsiniz:
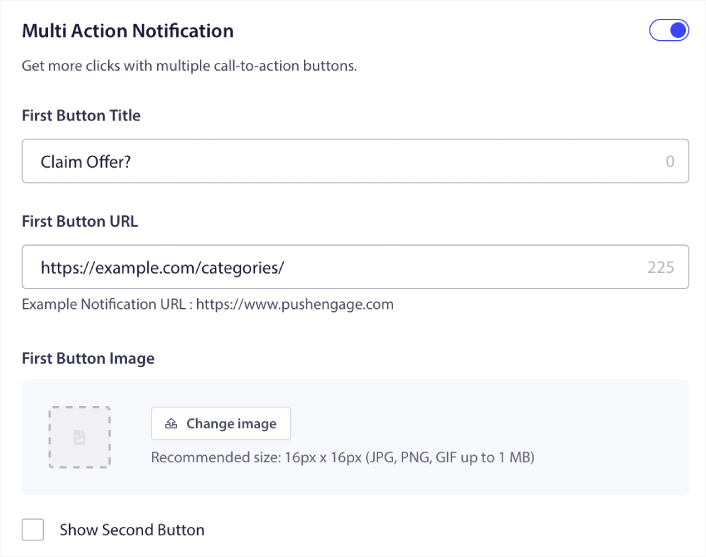
URL, bir e-posta kayıt formuna bağlantı olmalıdır. Bunu Drip gibi hemen hemen her e-posta hizmet sağlayıcısını kullanarak oluşturabilirsiniz. Tek yapmanız gereken, kayıt formunun paylaşım seçeneklerine tıklamak ve bu URL'yi kopyalamaktır. Ardından, anlık bildirim düğmenizin düğme URL'sine yapıştırın.
Daha fazla ayrıntı için çoklu eylem düğmeleri hakkındaki eğitimimize göz atın. Kullanıcılarınızdan e-posta bildirimlerinize abone olmanızı istediğinizi netleştirmek için düğmenize bir e-posta simgesi bile ekleyebilirsiniz:
Profesyonel İpucu: Aynı fikri YouTube kanalınızı büyütmek için de kullanabilirsiniz. Kanal URL'nizin sonuna sadece ‘?sub_confirmation=1’ ekleyin ve anlık bildirim düğme URL'nize yapıştırın.
Her biri anlık bildiriminizdeki abone ol düğmesine tıkladığında, YouTube kanalınıza yönlendirilecek ve abone olmanız istenecektir.
Segmentation Ideas You Can Steal
Segments are a really great way to send targeted push campaigns. And it should be a big part of your push notification marketing strategy. But how do you get started? What kinds of segments should you be creating?
Başlangıç olarak, yalnızca tek bir tür segment oluşturmaya odaklanmamalısınız. En etkili olduğunu düşündüğümüz farklı segmentasyon türlerini size adım adım anlatacağız.
Here are a few high-impact segments worth setting up:
- Engaged shoppers: People who clicked 2+ notifications in the past week
- Cart abandoners: People who visited a product but didn’t purchase
- Category fans: Users who keep checking one product category (e.g., “Sneakerheads”)
- Geo-targeted: Tailor messages based on country or city
The more specific you get, the more clicks you’ll earn. If you’re an advanced marketer, you should craft segments the way you would for an email campaign with different segmentation models:
- Geographic segments
- Behavioral segments
- Occasion-based segments
- Cultural segments
- Demographic segments
- Psychographic segments
Dynamic segments let you talk to subscribers like real people… not just traffic stats.
And if you’d like to further personalize your messaging, you can use audience groups.
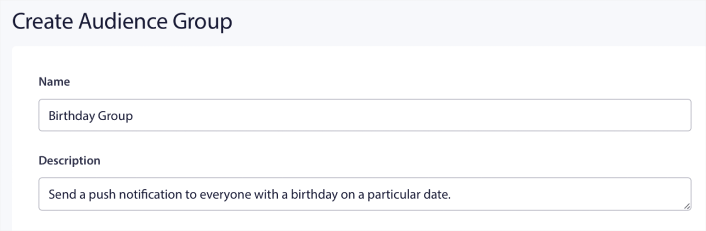
How to Create a Push Notifications Audience Group
To get started, head over to your PushEngage dashboard and go to Audience » Audience Groups and click the Create New Audience Group button:

Hedefli anlık bildirim yayınları göndermek için Kitle Gruplarınızı kullanabilmeniz için, o grubu oluşturacak kurallarla bir Kitle Grubu oluşturmanız gerekecektir. Kitle Grubunuz için bir ad ve açıklama ile başlayabilirsiniz.
Bir Seçim Kriteri Oluşturun
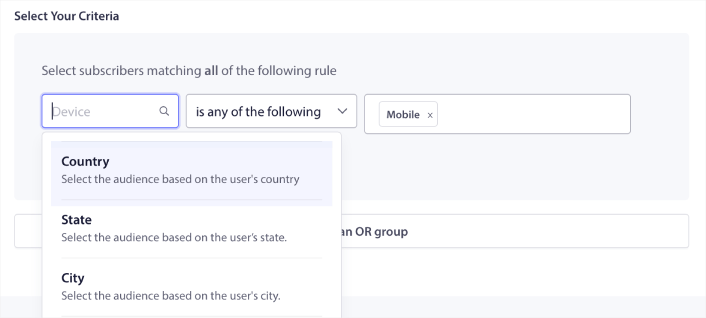
Next, create a selection criterion to filter and target the right audience:
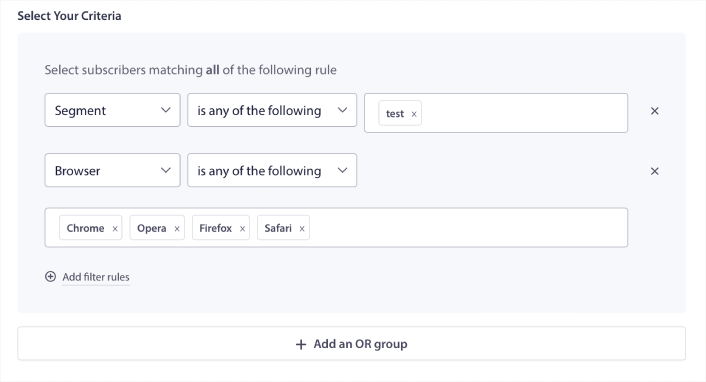
You can click Add filter rules to select subscribers who match ALL the filter rules or, you can click Add an OR group to create a filter where the subscribers meet at least one of the selection criteria.
Kullanıcı davranışı, anlık bildirim abonelerinizi hedeflemenin en temel yoludur. Daha önce de belirttiğimiz gibi, abone segmentleri genellikle benzer içerikleri gezinmeyi seven ziyaretçileri gruplandırır. Ancak aynı içeriği seven bu abone grubu içinde bile yapabileceğiniz küçük kişiselleştirmeler vardır.
Daha da önemlisi, onlara ortak, ilgili bir mesaj göndermek için birden fazla abone segmentini birleştirebilirsiniz.
Abone Segmentine Göre Filtrele
If you haven’t already, you should start segmenting your push notification subscribers right away. Otherwise, this filter simply won’t work. But if you already have segments, then you can select multiple segments as the base for your audience group.

Bundan sonra, hedeflemenizi iyileştirmek için diğer filtreleri ekleyebilirsiniz.
Abone Özelliğine Göre Filtrele
While attributes are mostly for drip push notifications, you can use them for push broadcasts as well. Now, push notification attributes are mostly useful for eCommerce sites. But you can also use them to send personalized push notifications if you have a Customer Relationship Management (CRM) tool.
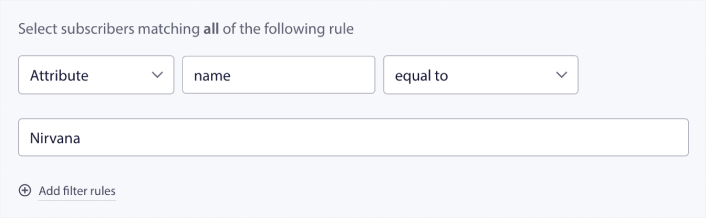
Özellikler, abone adları, doğum tarihleri, kişiselleştirilmiş pazarlama kampanyaları için CRM'inizde saklayacağınız diğer bilgiler gibi kişisel bilgileri içerebilir.
Abonenin Cihazına ve Tarayıcısına Göre Filtrele
Çoğu durumda, abonelerinizin mesajlarınızı nasıl aldığını bilmek çok önemlidir.
Michael Jackson hakkında gerçekten harika bir hikaye var. Bir şarkı kaydettiğinde, onu bir radyo üzerinden dinlerdi. Milyon dolarlık kayıt stüdyosunda üstün ses kalitesinde değil, çoğu dinleyicisinin daha sonra kullanacağı ucuz bir radyo üzerinden. Şarkı en ucuz cihazda bile kulağa hoş geliyorsa, şarkının yayınlanmasını onaylardı.
No wonder Billie Jean went Platinum 29 times!
Anlık bildirimleriniz için durum farklı değil.
Abone Tarayıcısına Göre Filtrele
Different browsers have different character limits for push notifications. So, when you send a push broadcast you need to be wary of these limits. The cool thing is that you can save different audience groups to retarget different browsers. You don’t need to create segments each time.

Abone Cihazına Göre Filtrele
There’s a difference in the types of rich push notifications you can send to iOS, Android, and Windows devices. So, not every campaign you send out will look the same on all devices. In fact, many push notification types won’t even show up on all devices. Different devices also have different screen sizes. So, you may want to optimize how your push notifications look before sending them.
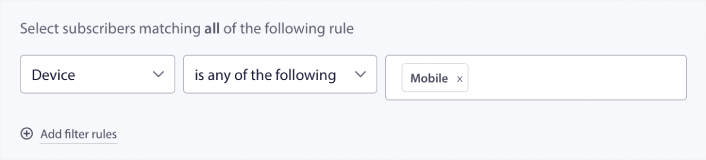
Ancak artık hedef kitlenizi cihazlarına göre filtreleyebildiğinize göre, bu artık bir sorun olmamalı.
Konuma Göre Nasıl Filtrelenir
Kampanyalarınızı daha fazla kişiselleştirmek için konuma göre de filtreleme yapabilirsiniz. Filtre, bir hedef kitle grubunu ülke, şehir ve eyalete göre seçmenize olanak tanır:
Phooto used geolocation to send push notifications in local languages. And it helped them skyrocket their engagement rates quickly. Read the full case study.
Etkileşim Metriklerine Göre Filtreleme Nasıl Yapılır
Kitle Grupları'nın en iyi yanlarından biri, anlık bildirimler kullanarak yeniden hedefleme kampanyaları oluşturmanıza yardımcı olabilmesidir. Kitlenizi şunlara göre filtreleyebilirsiniz:
- Abonelik Tarihi
- Son Gönderim Tarihi
- Son Tıklama Tarihi
- Son Görüntülenme Tarihi
Bu metrikleri kullanmak, düşük etkileşim oranlarına sahip aboneleri yeniden hedeflemenize veya yüksek etkileşim oranlarına sahip abonelere satış yapmanıza yardımcı olabilir.
Veya, kitleyi şunlara göre filtreleyebilirsiniz:
- Toplam Gönderim Sayısı
- Toplam Görüntülenme Sayısı
- Toplam Tıklama Sayısı
Bu sayılar, sizden en az mesaj alan aboneleri bulmanıza yardımcı olabilir, böylece bildirimleri kişiselleştirmenin daha iyi yollarını bulabilirsiniz. Ayrıca anlık bildirimlerinizle en sık etkileşim kuran aboneleri de bulabilirsiniz.
Pro Tip: Combine two or more filters to find the best ways to re-engage with your subscribers. For instance, subscribers with a high Total View Count and high Total Click Count will give you subscribers who have been engaging with you for a while. These are loyal subscribers who deserve a reward.
Tanımlayıcılara Göre Filtreleme Nasıl Yapılır
Tanımlayıcılar, PushEngage'in abonelerinizi nasıl tanımladığıdır. PushEngage varsayılan olarak GDPR uyumlu olduğundan, yazılımımız aboneleriniz için hiçbir kişisel olarak tanımlanabilir veri saklamaz. Bunun yerine, her aboneye bir profil kimliği ve bir abone karması atarız.
Keep in mind, you’ll be using profile IDs and subscriber hashes mostly as part of advanced campaigns. In other words, you’ll need to use the PushEngage API to create custom campaigns that use these identifiers.
Tanımlayıcılar, bunun gibi işlemsel anlık bildirimler göndermek için harikadır:
They’re great for custom eCommerce push notifications. So, we don’t really recommend using them for anything besides testing push broadcasts from the dashboard.
What to Do After You Set Up Web Push Notification Campaigns
Launching a web push notification campaign won’t guarantee success. As with any marketing tool, you need to test and improve your messaging and your segments.
Don’t get lost in the weeds. Focus on three numbers:
- Click-through rate (CTR): Are people engaging?
- Opt-in rate: Is your prompt working?
- Unsubscribes: Are you sending too much?
Bonus if you’re tracking revenue per send — but even without it, CTR and opt-in rate give you a fast feedback loop. Unfortunately, you can’t A/B test automated notifications directly. But these resources will help you get on the fast track:
- Sitenize Bir Web Bildirimleri WordPress Eklentisi Nasıl Kurulur
- Anlık Bildirim A/B Testi Nasıl Yapılır (En İyi Uygulamalar)
- Anında Trafik Almak İçin 7 Anında İletme Bildirimi En İyi Uygulaması
- 2022'de En İyi 21 E-ticaret WordPress Eklentisi (Ücretsiz ve Ücretli)
- 2022'de En İyi 7 WordPress Haber Eklentisi (Karşılaştırıldı)
Also, PushEngage comes with its fair share of integrations. You can even set up some custom triggers using Zapier. These are fairly advanced campaigns, and we recommend setting them up only once you’re familiar with our other built-in automation.
You should also know that the PushEngage Javascript API is very flexible, and you can set up custom triggers for pretty much any action on your website.
Tüm bu kaynakları inceledikten sonra, PushEngage'in piyasadaki 1 numaralı anlık bildirim yazılımı olduğunu anlayacaksınız.
Bu nedenle, henüz yapmadıysanız, bugün PushEngage ile başlayın!


