What is web push notifications? Don’t worry, we’ll tell you all about it. But first, picture this…
Zaman alan SEO kampanyaları olmadan, her yeni blog gönderisi yayınladığınızda otomatik olarak ücretsiz trafik aldığınızı hayal edin. Bir WordPress sitesi çalıştırıyorsanız, içeriğinizi tanıtmanın ve okuyucuları içeriğinize geri döndürmenin ne kadar iş olduğunu zaten biliyorsunuz.
İyi haber şu ki, otomatik olarak tekrar eden ziyaretçiler oluşturmanın zahmetsiz bir yolu var:
- Hatta… yeni başlıyor olsanız ve hayran kitleniz hala küçük olsa bile;
- Hatta… her ay yüzlerce promosyonla bir e-ticaret mağazası işletiyor olsanız bile;
- Hatta… zaten çok fazla SEO trafiği üreten devasa bir blogunuz olsa bile;
Cevap şu:
WordPress web push notifications!
In this article, we’re going to show you how to get repeat visitors instantly every time you hit publish:
En iyi kısmı?
It’s completely free, and you don’t have to wait around for search engines to start sending you any traffic.
Hemen başlayalım.
What is Web Push Notifications?
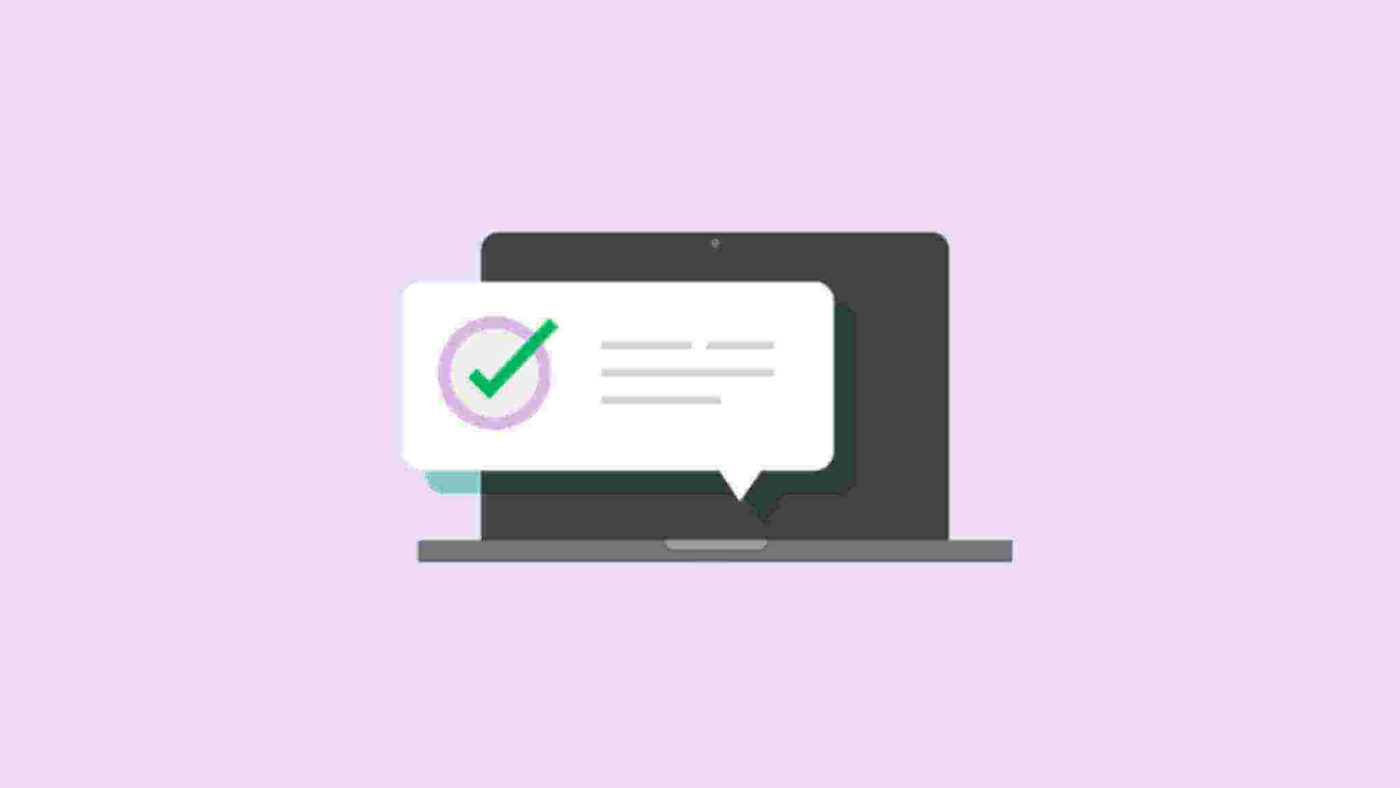
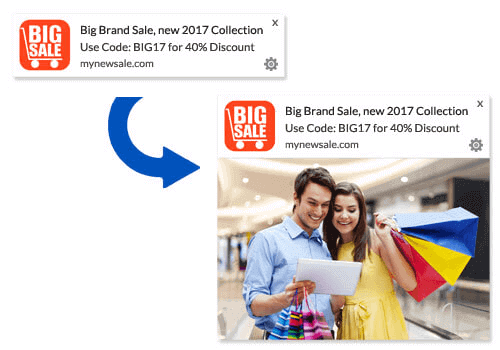
A push campaign is a short, clickable pop-up message that appears on a subscriber’s device and redirects the subscriber to your content with one click:
The best part is that the notifications pop up even if the subscriber isn’t using a browser. It’s like an email blast, but with a browser push campaign, your subscribers don’t need to be using an app to see your message.
In short: WordPress web push notifications is a simple way to send out a clickable link to your content to anyone who opted in.
With push campaign drip sequences, your audience now has no excuse to ignore you. And unlike social media websites, there is no algorithm throttling your reach to get you to pay for ads.
The coolest part about browser push campaigns is that you can use them to complement your lead magnets and email opt-in forms!
Pro Tip: If you’re not using lead magnets yet, you should start creating lead magnets with OptinMonster to boost your conversions.
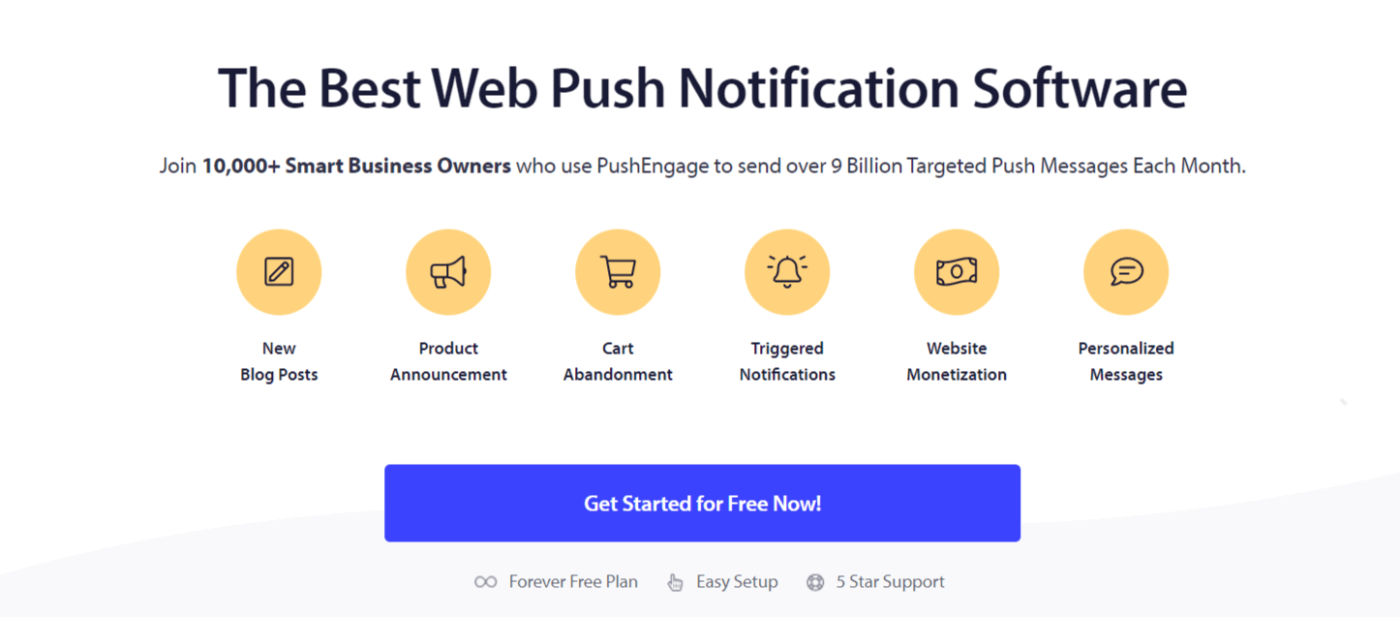
We recommend using PushEngage to get started with web push and mobile push for free. Every time you publish a blog post, PushEngage will automatically send out a push broadcast to all your subscribers.
In the next section, we’ll show you exactly how to set it up in 15 minutes or less.
How to Install Web Push Notifications In Your Website
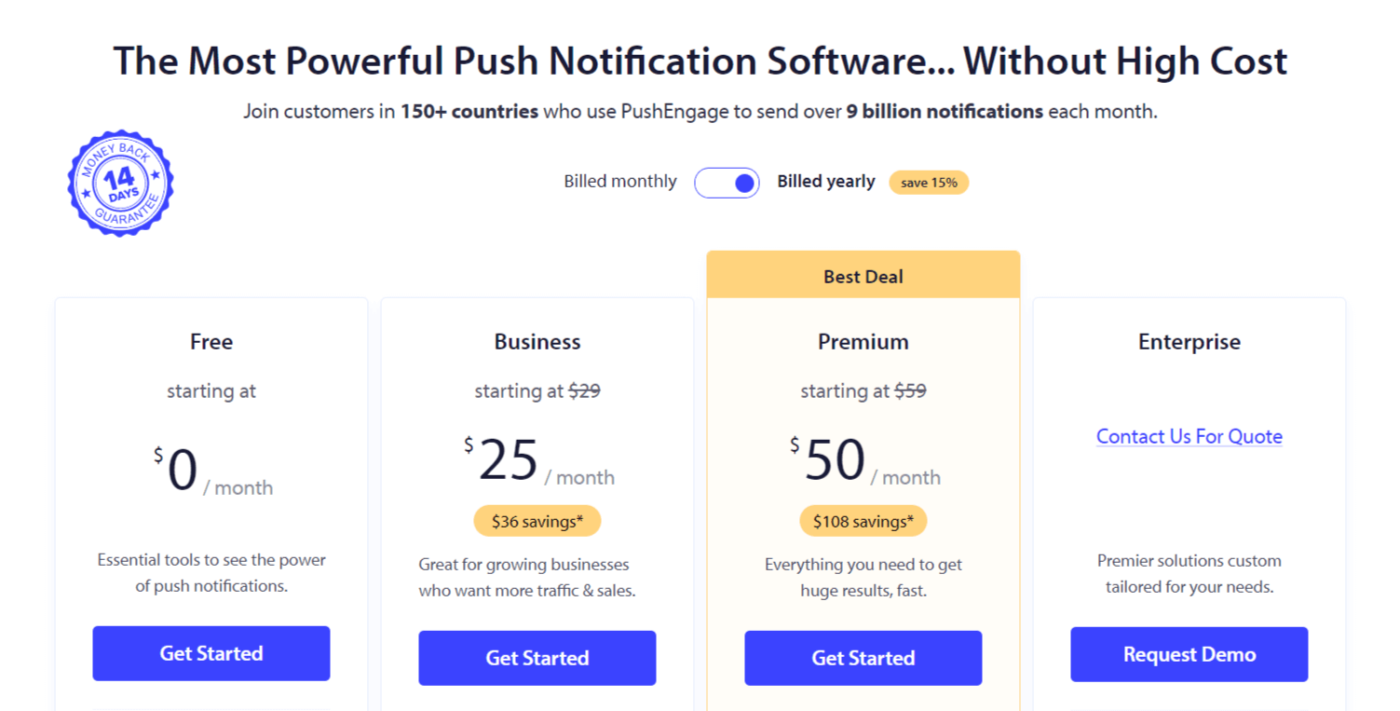
PushEngage is one of the best push notification plugins for WordPress. You instantly reach up to 2,500 subscribers with just the free tier. If your blog grows to more than 2,500 subscribers, you can quickly scale by upgrading your plan.
Now, let’s start growing your audience with browser push notifications for free.
Adım #1: Ücretsiz Bir PushEngage Hesabı Oluşturun
Head over to PushEngage and click on Get Started for Free:
Select the Free plan or whichever suits your needs the best:
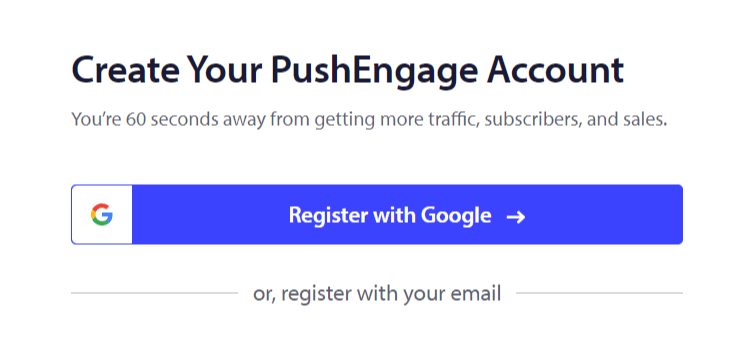
Adım #2: PushEngage'a Kaydolun
Signup for the plugin with your user details or your Gmail ID:
And just follow along with the instructions and finish setting up your account to add a web push notifications app to your website.
Step #3: Install the Web Push Notifications WordPress Plugin
NOTE: If your website isn’t built using WordPress, you can install website push notifications using other methods. We don’t cover those methods in this article but check out our installation guide if you’re interested.
Kaydolduktan sonra PushEngage kontrol paneline yönlendirileceksiniz:

Site Ayarları » Site Detayları bölümüne gidin:

Kurulum Talimatları İçin Buraya Tıklayın düğmesine tıklayın:

Ardından, WordPress Eklentisini Yükle düğmesine tıklayın:

Sitenizin URL'sini zaten ayarladıysanız, PushEngage sitenize otomatik olarak yüklenecektir.
Step #4: Connect Your WordPress Website to the Web Push Service
PushEngage WordPress eklentisini yükleyip etkinleştirmeyi bitirdiğinizde, PushEngage karşılama sihirbazını göreceksiniz:

Sihirbaz oldukça basittir. Yeni bir kullanıcıysanız, Yeni mi? Ücretsiz Hesabınızı Talep Edin'e tıklayın. Zaten kaydolduysanız, Mevcut Hesabınızı Bağlayın'a tıklayın.
Ardından, kayıt sırasında bir site kaydettiyseniz, Kayıtlı bir site bağla altında Bir Site Seçin açılır menüsünden sitenizi seçebilirsiniz:

Veya, Premium fiyatlandırma planınız veya daha üstü varsa yeni bir site eklemek için Yeni bir site kaydet'e tıklayabilirsiniz. Bir sonraki adımda, karşılama sihirbazı sizi diğer mutlaka sahip olunması gereken WordPress eklentilerini yüklemeniz için yönlendirecektir.

Her adımı doğru bir şekilde takip ettiyseniz, sihirbazdan bu başarı mesajını göreceksiniz:

Artık kampanyalar oluşturmaya ve anlık bildirim açılır pencereleri göndermeye hazırsınız.
How Do Web Push Notifications Work?
Let’s get a little bit technical now and explore how web push notifications work.
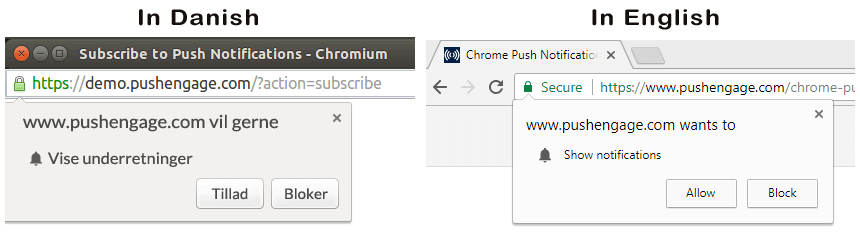
The simplified version is that every time a new visitor enters your website, they get prompted to become a web push subscriber.
All this is taken care of by a Javascript file called the service worker. The service worker’s job is to help create web push optins to collect push subscribers. This is not just true for websites, but also progressive web apps (PWAs). However, it’s different for Android app push and iOS app push notifications. Mobile push notifications typically require a push API like the PushEngage Mobile SDKs.
Next, you use a web push notification service like PushEngage to create and schedule the notifications you want to send out to your subscribers. You can choose to either send it to every subscriber on your list or to specific segments of your subscribers.
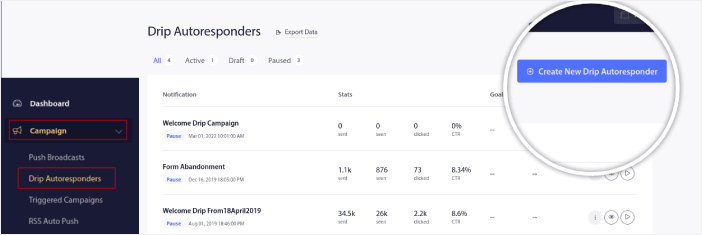
You’ll want to start by creating a Drip Autoresponder:
Finally, your subscribers receive your notifications when their device comes online and take the suggested action.
This is all perfectly true, but this is only a small part of what happens in the background. So, let’s take a look at the technical details. But first, if you haven’t already, get started with PushEngage today.
First off, PushEngage has servers that connect to your subscriber’s devices and send them your push notifications. Now, these servers don’t store any personal information such as the name or email address of any subscriber.
So, what do these servers store?
To PushEngage and our servers, your subscribers are a unique hash number generated based on your subscriber’s device and browser. Besides, the server can also store the geolocation of your subscribers.
Now, you won’t have direct access to these servers. You can only use the PushEngage Dashboard to create, optimize, and manage push notification campaigns.
In other words, PushEngage is your service provider. This means that you don’t need to know anything about coding or how to maintain the original servers. We take care of all that for you. All you have to worry about is setting up your campaigns and making a profit!
Some other popular browser push services include:
- Firebase Cloud Messaging
- Amazon Simple Notification Service
- Airship
- Leanplum Inc.
- Pushwoosh Inc.
If you’re not sure which service is right for you, start by taking a look at how much push notifications cost.
By now, you’re probably wondering how personalized push campaigns work if the servers only store a hash number and no personal details. The reality is that you can store enough customer data using segments without having to ever identify your subscribers. Also, you can create fully custom campaigns and store any type of user data you want. This is where the web push API comes into play. For you, that would be the PushEngage Javascript API.
You can use this API and connect it to any other CRM or database you might have. This allows you to use the personal details of your subscribers to send them personalized push notifications.
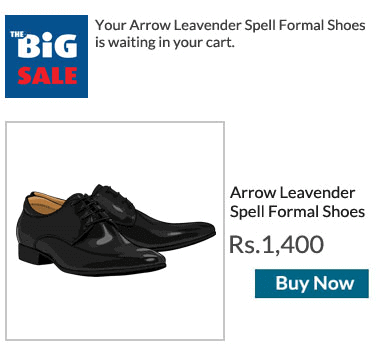
You can also use the PushEngage API to send out advanced campaigns such as cart abandonment campaigns.
What Are the Different Parts of Any Web Push Notification?
Now that we understand how push notifications technically work, let’s a look at the different parts of a push notification that you can customize (or can’t):
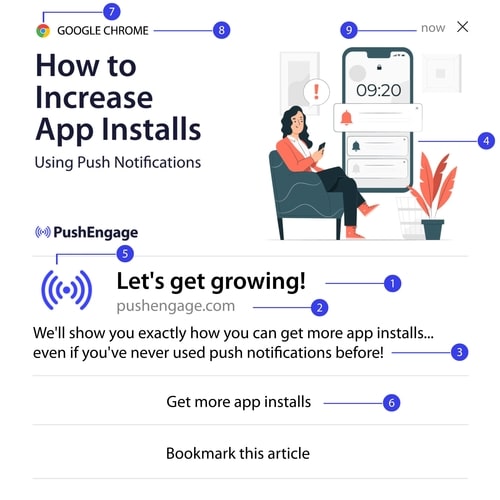
Also, you should check out some web push notification examples for a clearer picture.
#1. Anlık Bildirim Başlığı
Başlık, anlık bildirimin en belirgin metnidir. Net görünürlük için 60-80 karakter ile sınırlıdır. Bu başlığın amacı abonenin dikkatini çekmektir. Bu nedenle, tüm başlığın net bir şekilde görünür olması önemlidir.
Abonelerinizin seveceği harika başlıklar oluşturmak için anlık bildirim metin yazarlığı kılavuzumuza göz atın.
#2. Alan Adı
The domain on a push notification is just the URL of your website. You can’t change this either. But unlike the browser icon, your domain needs to be clearly visible as it adds to your brand recognition.
Artık anlık bildirim verilerini PushEngage'in bir alt alan adına depolama seçeneğiniz var. Alt alan adını kullanırsanız, anlık bildirimin bu bölümü markanız yerine bir PushEngage alt alan adının URL'sini görüntüler.
Bu seçeneği kullanmanızı önermiyoruz çünkü marka değerinizi düşürebilir.
#3. Anlık Bildirim İçeriği
Bildirim içeriği, tüm bildirimin en büyük metin bölümünü içerir. Başlık gibi görünürlük için 120-150 karakter ile sınırlıdır. Daha fazla karakter ekleyebilseniz de, kısa ve öz tutmanızı öneririz.
Typically, this part serves as a way to offer more context about the title or to complete an offer. Don’t bother using a call to action in the text itself. With web push, you can add call-to-action buttons.
Profesyonel İpucu: Anlık bildirimlerinizi daha kişisel hissettirmek için bölgesel dilleri kullanabilirsiniz. Etkileşimlerini artırmak için Phooto'nun anlık bildirimlerde yerel dilleri nasıl kullandığına dair bu vaka çalışmasını okuyun.
#4. Bildirim Büyük Resmi
Büyük resim, topun güzeli ve herhangi bir bildirimin ilk fark ettiğiniz şeyidir. Genellikle bir anlık bildirimin en çekici kısmı olarak hizmet veren 360x180 bir resimdir.
Bildirim resmi de tamamen isteğe bağlıdır. İsterseniz kullanmamayı seçebilirsiniz. Bir bildirim resmi kullanmak, anlık bildiriminizi bir reklama benzetebilir. Bu, bildirimin birçok abone tarafından göz ardı edilmesine neden olabilir.
Ancak doğru yaparsanız, resimler TBM'yi (tıklama oranlarını) %62'ye kadar artırabilir. Sektöre göre anlık bildirimlerde resimlerin etkisine ilişkin çalışmamıza göz atın.
Büyük bir resim kullanıp kullanmamanızdan emin değilseniz, resimli ve resimsiz bildirimi A/B testi yapmanızı öneririz.
#5. Anlık Bildirim Simgesi
The push notification icon is like the site icon on your website, but for your push campaigns. It’s an image that’s 192×192 or larger to represent your business. Typically, this will be your site icon and you can only set this one time for all your push notifications.
Profesyonel İpucu: Herhangi bir zamanda yeniden markalaşırsanız, PushEngage'deki anlık bildirim simgesini de değiştirmeyi unutmayın. Ayrıca, simgeniz için animasyonlu resimler kullanamayacağınızı unutmayın. Yani GIF'ler burada işe yaramaz.
#6. Harekete Geçirici Mesaj Düğmeleri
Every push notification supports up to 2 buttons. We recommend using customized call-to-action buttons for your campaigns. You can even add separate URLs and button icons for each CTA.
Check out this list of web push notification tricks for some nice CTA ideas.
#7. Tarayıcı Simgesi
The smallest part of the push notification is the browser icon that denotes which browser your subscriber is using currently. It’s one of the most overlooked parts because you can’t change this in any way and for the most part, a subscriber won’t notice the browser icon either.
#8. Tarayıcı Etiketi
The browser label is just the text version of a browser icon. Like the icon, you can’t change the browser name label.
#9. Time Stamp
The timestamp is a simple way for your subscribers to know when the message was received. It’s system generated and you can’t change this either.
Farklı Anlık Bildirim İzin Türleri
Every push campaign begins with consent. It’s an extension of Seth Godin’s idea of permission marketing. The idea is very simple: before you send your web visitors any content that they may or may not want to see, ask for permission.
The process of getting permission to send push campaigns is called “opting in”. So, before you can send out a push notification campaign, you first need your website visitors to opt-in and subscribe to your notifications.
If you’re a content creator on YouTube, then you’re already familiar with how subscribers work. The only difference is that you don’t own the list of your YouTube subscribers and you can’t control the notifications you send them.
With PushEngage, you do own that list because that information is stored on your domain. Now, there are two types of opt-ins you can use for your website based on the opt-in process:
- Single Opt-ins
- Double Opt-ins
The primary difference between them is very clear. Single opt-ins ask for permission to send notifications only once. Double opt-ins ask each subscriber to confirm their decision. So, which one should you choose?
We’ve observed that single opt-ins can get up to 150% more subscribers than double opt-ins. Check out our article on how to increase your opt-in rates if you’re struggling with this.
From a legal point of view, GDPR requires you to only have a single opt-in. But with double opt-ins, you get way better engagement because your subscribers actually want more of your content. In terms of sheer opt-in numbers, though, single-step opt-ins are way more effective.
Another point to consider is that you NEED to install an SSL certificate on your website to be able to use single opt-ins. But you can install two-step opt-ins even without a secure website.
So, if you have an SSL certificate installed, use single opt-ins. If not, check out this article on how to install an SSL certificate on WordPress websites.
Improve Push Notification Engagement Rates by Personalizing
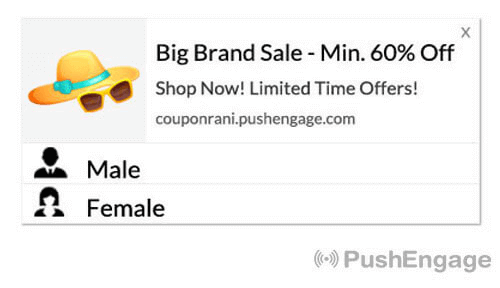
Before you create a campaign, you should set up segments and audience groups to send personalized push messages.
Anlık bildirim aboneleriniz için segmentler ve kitle grupları oluşturarak elde edebileceğiniz kişiselleştirme düzeyini hiçbir şey geçemez. PushEngage » Kitle'ye gidin ve hemen segmentler ve kitle grupları oluşturmaya başlayın.
Segmentler sekmesi altında yeni segmentler oluşturabilir veya mevcut olanları düzenleyebilirsiniz:

Ve daha derin kişiselleştirmeye ihtiyacınız varsa, Kitle Grupları sekmesinde bir kitle grubu oluşturun:

If you’re new to push notification segments and personalized push notifications, you should check out our article on how to create segments and how to use audience grouping to target user behavior.
Create Targeted Web Push Notifications for Better Engagement
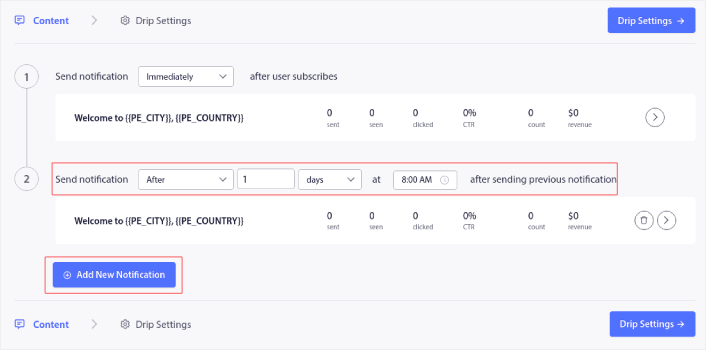
PushEngage kontrol paneline gidin ve Kampanya » Otomatik Yanıtlayıcılar bölümüne gidin ve Yeni Otomatik Yanıtlayıcı Oluştur'a tıklayın:

Ardından, kampanyanıza bir ad verin (Hoş Geldin Drip gibi bir şey öneririz) ve Content altında, “Kullanıcı abone olduktan hemen sonra bildirim gönder“ seçeneğini seçin):

Bu noktada, bildirimin içeriğini düzenlemek için bildirimin yanındaki oka tıklayabilirsiniz.
If you have a Premium or Enterprise plan with PushEngage, you’ll be able to add more than one notification to create a sequence of automated welcome messages. Just click on Add New Notification and edit the content. Once you’re done, click on Drip Settings and select the option to send your welcome campaign to all subscribers:

Ardından, anlık bildirimleri izlemek için kendi UTM parametrelerinizi ayarlamak üzere aşağı kaydırın:

Ve işiniz bittiğinde, yukarı kaydırın ve Otomatik Yanıtlayıcıyı Etkinleştir düğmesine tıklayın:

Ve işte bu kadar!
How to Send Web Push Broadcasts
PushEngage kontrol panelinize gidin ve Campaign » Push Broadcasts bölümüne gidin ve Create a New Push Broadcast düğmesine tıklayın:

Content sekmesi altında, anlık bildirim içeriğinizi ekleyin:

Ve tıklama oranlarınızı artırmak için A/B testi kurabilir veya daha fazla görüntüleme elde etmek için anlık bildirim yayınlarınızı zamanlayabilirsiniz. Her iki durumda da, en iyi sonuçlar için anlık bildirim en iyi uygulamalarımızı incelemelisiniz.
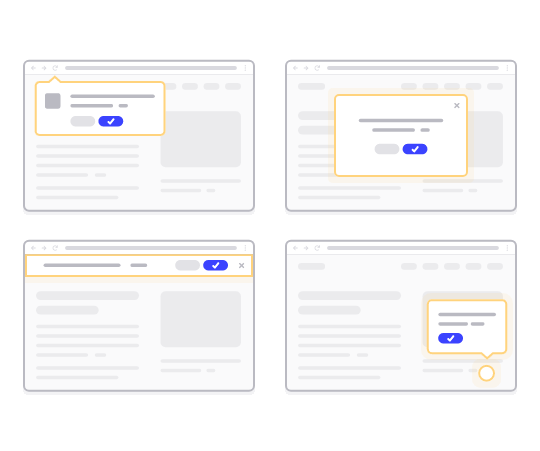
How to Create Engaging Web Push Popup Modals
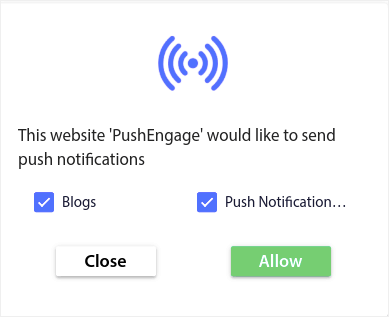
A push notification popup modal is a small window that appears on top of a website or mobile app interface to display a message or notification to the website visitor. The popup modal can be triggered by various events. You can set up popups to get triggered on page visit, on scroll depth, and even on custom actions such as button click.
Usually, you’ll see a call to action on the popup modal such as “Subscribe” or “Allow” to get consent from visitors to send them push broadcasts or drip campaigns. If you follow this tutorial, you can create a popup like this one:
Aboneleri doğrudan segmentleyebilen açılır pencere modalleri oluşturabilir veya coğrafi konum ve tarayıcı gibi varsayılan özniteliklerle yalnızca aboneleri toplayan normal açılır pencereler oluşturabilirsiniz.
WordPress kontrol panelinize geri dönün. PushEngage » Tasarım'a gidin:
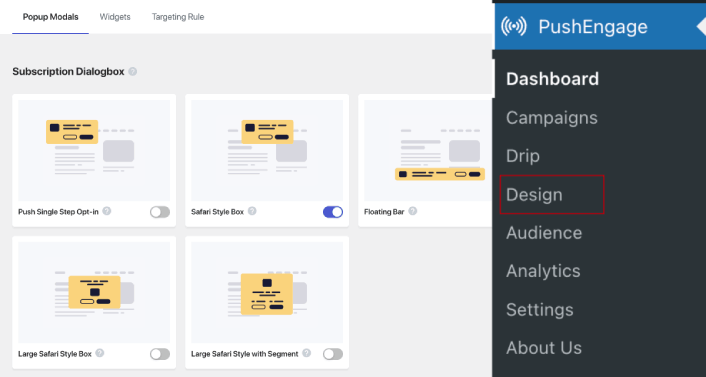
Ve istediğiniz kadar açılır pencere modülü ayarlayabilirsiniz. Elbette, her açılır pencere modülü için Görüntüleme Seçenekleri altında farklı zamanlarda tetikleneceklerinden emin olabilirsiniz.
Buradaki fikir, ziyaretçilerinize abone olmaları için sağlam bir neden vermektir. Bu konuda yardıma ihtiyacınız varsa, özel bir anlık bildirim kayıt formu nasıl oluşturulur hakkındaki makalemize göz atın.
Ve daha hedeflenmiş açılır pencere modülleri oluşturmak istiyorsanız, Hedefleme Kuralı sekmesi altındaki hedefleme kurallarını kullanabilirsiniz:
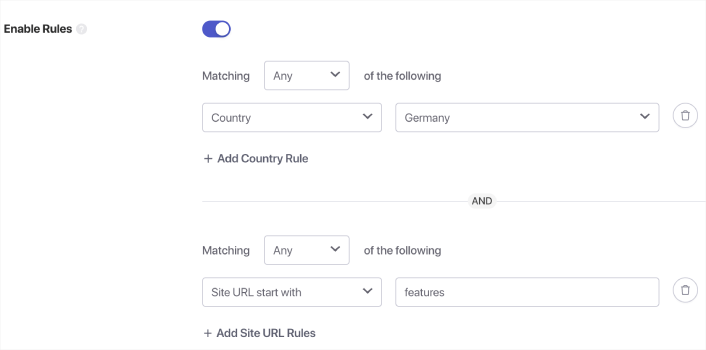
Bunlar genel hedefleme kurallarıdır ve bireysel açılır pencere modülleri için hedefleme kurallarına göre önceliklendirilir. Ancak isterseniz, bunları düzenleyerek her modül için sağlam hedefleme kuralları oluşturabilirsiniz.
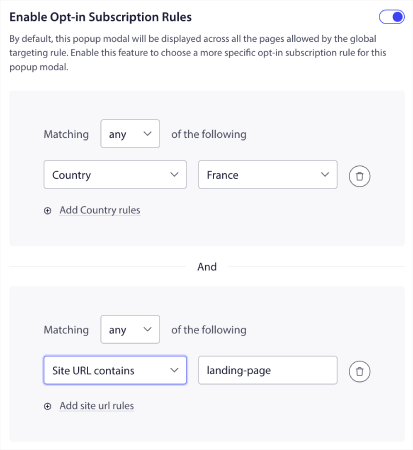
Örneğin, farklı ülkelerden ziyaretçileri hedeflemek için farklı dillerde açılır pencere modelleri oluşturabilirsiniz.
Ve başlamak için yüksek tıklama oranına sahip bazı şablonlar istiyorsanız, yüksek dönüşümlü anlık bildirim kayıt formları hakkındaki bu makaleye göz atmalısınız.
What to Do Before You Send Targeted Web Push Notifications
You’re almost done. Before you start sending push broadcasts or drip campaigns, you’ll need to set up a subscription opt-in for your website. Your opt-in will convert web visitors into push notification subscribers. So, this is a critical element. If you need some inspiration, you can check out this article on high-converting push notification opt-ins. Once you’re done setting up the opt-in, your site can collect subscribers. But how do you even know that your opt-in is working properly?
Bu nedenle, mantıklı olan bir hoş geldin anlık bildirimi ayarlamaktır.
Pro-Tip: You should spend some time on a full-scale test of your push notifications. This will troubleshoot the most common problems and you won’t waste your time trying to resolve issues later on. Also, you need a proper user engagement strategy or a push campaign strategy before you launch a bunch of campaigns.
What to Do Now That You Know What is Web Push Notifications
Now that you know what is web push notifications, it’s time to set up your own push campaigns.
If you’re just getting started with web push, check out how to create your first welcome message using PushEngage. A welcome message is great for re-engagement and repeat visitors to your website.
Also, if you’ve already started using web push, we realize that it can be difficult to come up with campaign ideas. The longer you use a traffic source, the harder it becomes to come up with new ideas. Check out some push campaign ideas that our customers are already using. You might just get the inspiration you need!
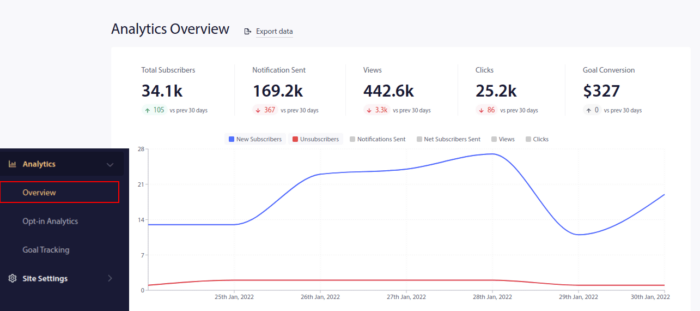
Getting started with segmentation can seem intimidating. But if you keep an eye on goal tracking and analytics, you should be fine. More importantly, you’ll make a lot more profit with the help of push notification campaigns. Here are a few cool resources to get you started:
- Gelirinizi 2 Katına Çıkarmak İçin Yeniden Hedefleme Anlık Bildirimleri Nasıl Kullanılır
- Anlık Bildirimlerinizi Nasıl Sıralarsınız ve Kazanan Kampanyaları Bulursunuz
- Anlık Bildirim Aboneli Listelerini Temizleme (Kolay)
- Otomatik Olarak RSS Anlık Bildirimleri Gönderme
- Bir Haber Sitesini Tanıtmak İçin Anlık Bildirimleri Kullanma
- Satışlarınızı 2 Katına Çıkarmak İçin Çapraz Satış Anlık Bildirimlerini Kullanma
- Göz Atma Terk Etme Anlık Bildirimlerini Kullanma (4 Adım)
If you’re an eCommerce website, check out cart abandonment campaigns next. If not, send out your first drip push campaign. These are some of the highest converting campaigns for most of our customers.
Ve henüz yapmadıysanız, bugün PushEngage ile başlayın!


Thank you for sharing good information. Very Nice Article it helps me a lot to how to use Push Notification in our blog.
This is a great information you have share, As I’m newbie into Blogging, it can surely make a difference. Thank you so much
can i send web push notifications when a user hits a specific site? for ex. my website sells socks; when a web push opted-in user visits amazon i trigger a web push notification to them. i think not, but thought i’d check anyway.
also i thought a site needs be be https to enable web push notifications. can i still enable web push notifications on a http site by creating a https page?
IOS does not support web push notifications. Please correct me if I am wrong
Yes, you are correct. iOS still does not support web push notifications.
Done everything but still I’m not getting this things for my blogger’s blog.
Can you drop a mail to [email protected] or on live chat? The team will help you to solve the issue.
you’re actually a just right webmaster. The website loading speed is amazing.
It kind of feels that you’re doing any distinctive
trick. Moreover, The contents are masterwork. you have performed a wonderful task in this subject!