Do you want to know the push notification hacks to double your engagements? We will show you the proven hacks of push notifications that can double your engagements in a very short period. The best part is that it works in every industry.

One of the best ways to reduce cost and increase conversions is customer engagement. Push Notification is the best tool for customer engagement. It allows you to re-engage customers in the most effective way that leads to higher conversion and engagement. Push notifications are super cost-effective. So, you can easily scale your engagement campaigns.
The best thing about using push notifications for engagement is the ease of use. You can install push notifications in less than 10 minutes. Most of the features are can be enabled with just 1 click. Moreover, you can easily integrate push notifications on different platforms.
However, to get the maximum out of push notifications, you need to use them the right way. In this article, we will share the top hacks that can shoot up your revenue and engagement.
9 proven Push Notification hacks to double your engagement
Sending In The Subscriber Time Zone
To understand this, let’s take two scenarios:
You have subscribers from different parts of the world. In the event of New Year, you are running a sale event.
Scenario 1
You sent out a push notification to all your subscribers. The notification gets delivered instantly. However, many of your subscribers are in different time zone. The notification will be delivered to your subscriber based on your time zone. Will every subscriber receive the notification when they are active?
Scenario 2
To ensure push notification is delivered according to the local time of the subscriber, you have created multiple push notifications. These will be delivered at different times based on the geo-targeting. Is creating multiple copies of the same notification an ideal solution?
In both the above scenarios, your engagement rate will be low. The reason is that the notifications will not be delivered when the subscriber is active. The solution to this is the Subscriber Time Zone.
Subscriber Time Zone allows you to send the same notification to be delivered to a subscriber based on their local time zone. You do not need to create multiple copies. Based on each geo, the same notification will be delivered. This small hack will surely increase the engagement rate for your push notification campaigns.
How to send notifications in the subscriber time zone?
It’s a very simple process. The option is available when sending push notifications. You have to just tick the checkbox for subscriber time zone. The notifications will then be delivered as per the subscriber time zone.
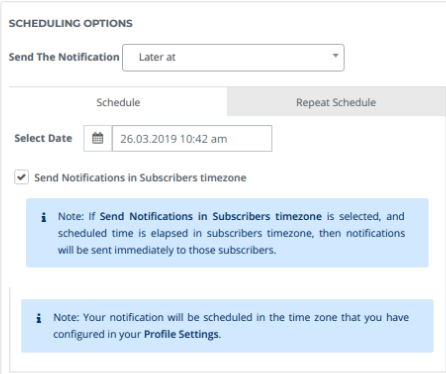
Before sending notifications in the subscriber time zone, make sure to set your time zone settings correctly. For more details, check out the detailed post on sending push notifications in the subscriber time zone.
Using Large Image
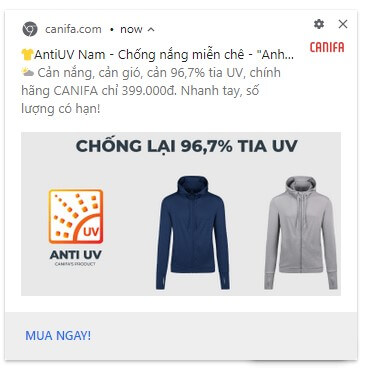
We all know that pictures more powerful than words. PushEngage allows you to add a large image in the notification. This allows you to deliver the message visually.
A large image allows you to stand out among other notifications. Vegis, an eCommerce site, shared that – As compared to the regular notification, large image notification resulted in a 37% increase in CTR for Vegis.
So start using large images in push notifications to increase engagement.
How to use large images in push notifications?
When you create push notifications, you have the option to upload a large image. By default, it’s in off mode. You have to slide the button to on.
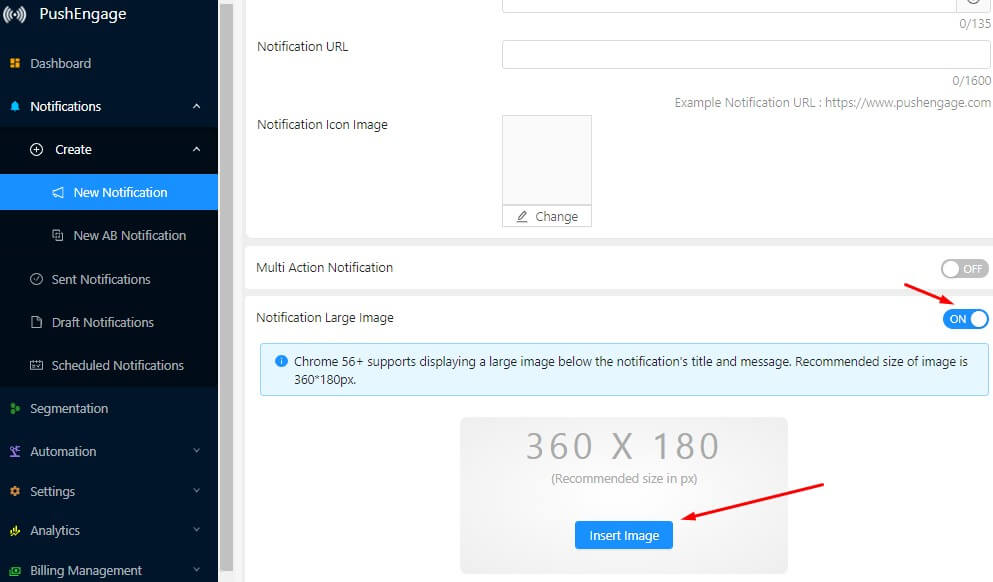
Create an image of the size of 360×180 pixels. Click on ‘Insert Image’ to upload the image.
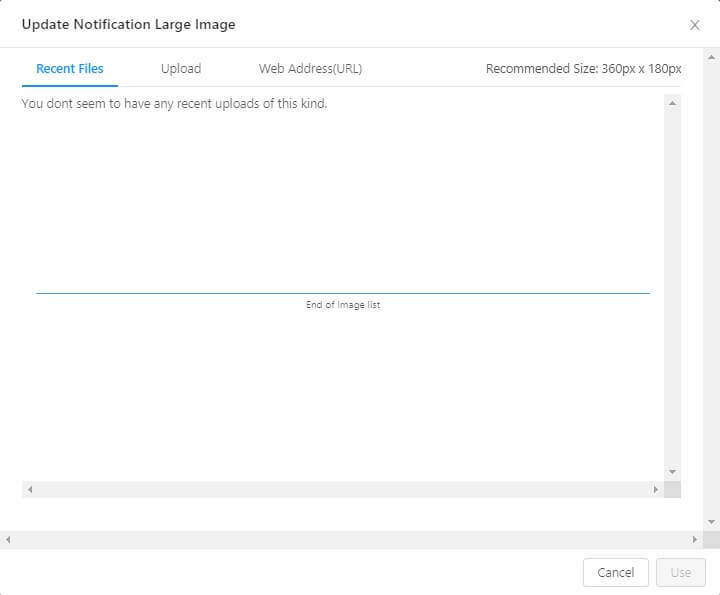
You have multiple options to upload an image. PushEngage also has an image library feature. It allows you to use the previously used image in the notification.
Once the image is selected, click on use. It will now appear in your notification. Start using a large image to see the impact on the performance of push notifications.
A/B Testi
You may not know whether the web push notification you are sending will be effective or not. You may go with a hunch that the push notification will work. The best way to confirm is to run AB testing on push notifications.
It allows you to test different parameters of push notifications. You can select a specific audience to test the notification. Once you know which notification has performed well, you can use that notification and send it to all.
How to do AB testing on push notifications?
At PushEngage, you can easily perform AB testing on push notifications. To do AB testing, go to PushEngage dashboard->Notifications->Create->AB Testing.

There are 7 different parameters you can test in AB testing. For more details, you can follow the article on AB testing in the push notification.
Send Targeted Notifications
What happens if you send irrelevant notifications to subscribers? It will lead to an increase in unsubscribe and decrease the engagement rate.
PushEngage allows you to make segment push subscribers based on different parameters. Segment subscribers based on geo, device, actions, purchase, and many other parameters. You can also use the advanced segmentation option that allows combining multiple segments for better targeting.
How to send notifications to targeted notifications
You can use segments in all the push notification campaigns to send targeted push notifications.
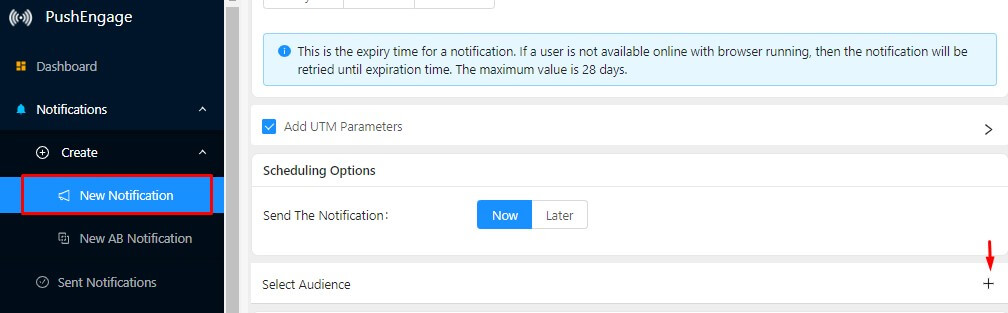
1> Sending single notification
You can select a segment when sending a single push notification. Scroll down on the ‘New Notification’ section; you will see an option ‘Select Audience’. Click on that and you will see the segment option.
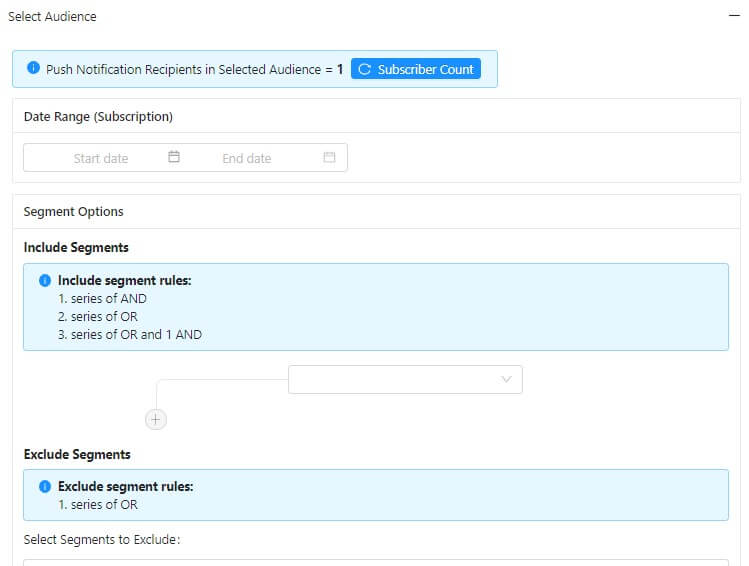
You can then send targeted push notifications to each segment.
2> Select segment in push notification campaign
Kampanyalarda bir segmenti nasıl seçeceğinizi görmek için bir damla anlık bildirim örneği alın. Diğer kampanyalar (sepet ve göz atma hariç) için de aynı adımları izleyebilirsiniz.
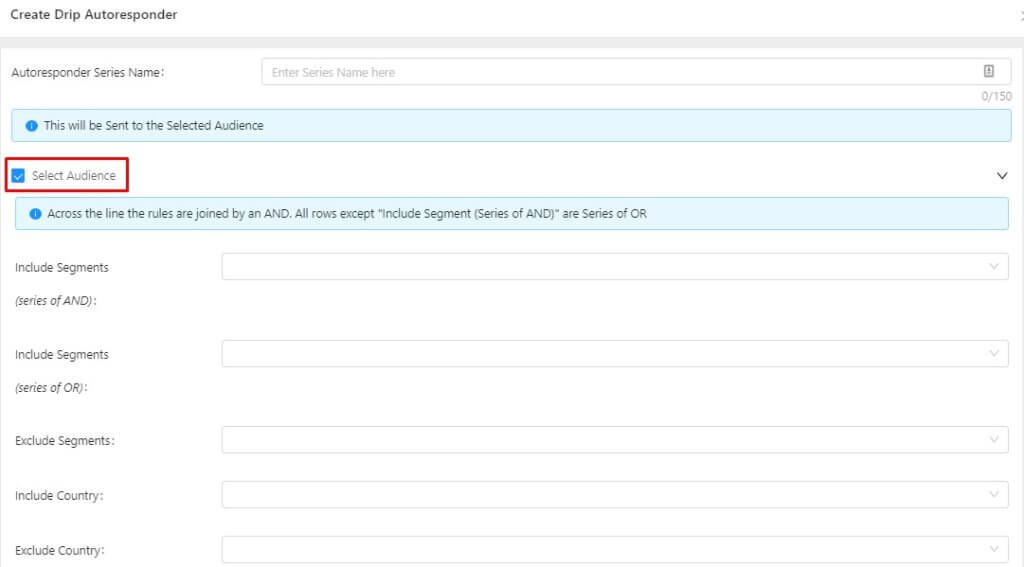
Otomasyon->Damla Kampanyası'na gidin. 'Damla Otomatik Yanıtlayıcısı Oluştur'a tıklayın. Damla kampanyası ayarları açılacaktır. 'Kitle Seç' seçeneğini işaretleyin. Farklı hedefleme seçenekleri görüntülenecektir. Anlık bildirim göndermek istediğiniz segmenti seçin.
Anlık bildirim gönderirken segmentasyonu kullanmaya başlayın. Çalışmaya göre, segmentlere gönderilen bildirimler, herkese gönderilen bildirimlere kıyasla tıklama oranlarında 2 kat artış sağlıyor.
Sepet Terk Kampanyaları
Etkileşimi ve dönüşümü artırmak için kanıtlanmış anlık bildirim hilelerinden biri sepet terk kampanyasıdır. Kullanıcılar genellikle tek bir ziyarette satın almazlar. Onları müşteriye dönüştürmek için yeniden etkileşim kurmanız gerekir.
Sepet terk kampanyasını kullanarak tüm süreci otomatikleştirebilirsiniz. Sepet terk eden kullanıcılara otomatik olarak anlık bildirim gönderecektir.
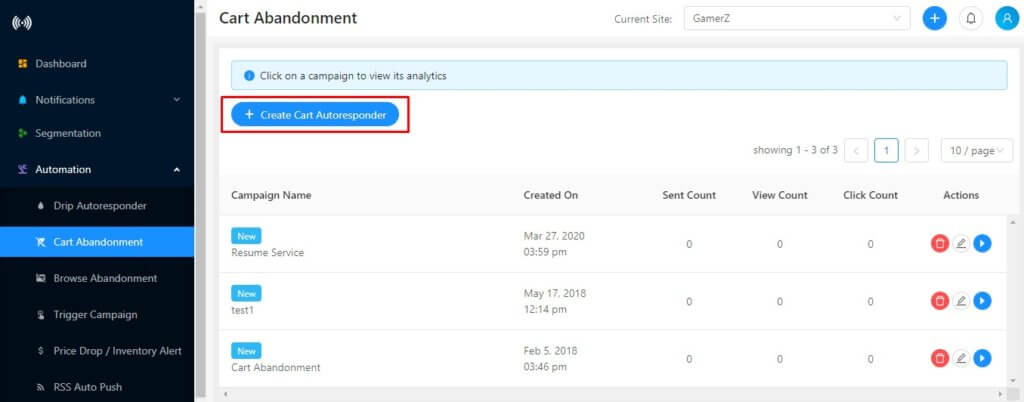
Sepet terk kampanyaları nasıl kurulur?
Otomasyon->Sepet Terk'e gidin. 'Sepet Otomatik Yanıtlayıcısı Oluştur'a tıklayın. Sepet terk ayarları açılacaktır. Tüm değişiklikleri yapın ve sepet terk ile yayına geçin.
Bir sepet terk kampanyası kurma adımları hakkındaki makaleye göz atın. İşte kampanyanız için en çok dönüşüm sağlayan sepet terk şablonları.
Shopify'da sepet terk kurulumu farklıdır. Tek bir tıklamayla kampanyayı etkinleştirebilirsiniz. Shopify'da sepet terk kampanyası kurma hakkında bu makaleyi takip edin. Shopify'a PushEngage uygulamasını yükleyin ve sepet terk kampanyasına başlayın.
Damla Kampanyaları
Yeni bir kullanıcı anlık bildiriminize abone olduğunda, markanız ve ürününüz hakkında bilgi sahibi olmayabilir. Onları beslemeniz ve markanızla etkileşimde olmanın faydalarını göstermeniz gerekir.
Damla kampanyalarını kullanarak tüm süreci otomatikleştirebilirsiniz. Damla özelliğinin en yaygın kullanımı Onboarding kampanyalarında görülür. Damla'da bir Onboarding kampanyası oluşturun. Kullanıcıları markanız, ürününüz, incelemeleriniz, faydalarınız ve onları etkileşimde tutacak daha birçok şey hakkında beslemek ve eğitmek için bir dizi anlık bildirim ekleyin. Yeni bir kullanıcı abone olduğunda, otomatik olarak bir anlık bildirim gönderecektir.
Damla özelliğini kullanarak birden çok kampanya oluşturabilirsiniz:
- Onboarding kampanyası: Yeni kullanıcıları beslemek için.
- Kategori Kampanyası: Kullanıcının satın aldığı ürüne göre, aynı kategorideki diğer ürünleri sergilemek için bir dizi bildirim oluşturun.
- İlgi Alanı Tabanlı Kampanya: Aboneleri ilgi alanlarına göre segmentlere ayırın. Müşteri ilgisine göre farklı kampanyalar yürütün.
Damla, dönüşümleri de artırabilen çok güçlü bir özelliktir. Önde gelen bloglardan biri olan ShoutMeLoud, Damla kullanarak dönüşümü %10 artırdı.
Damla Kampanyası Nasıl Yürütülür?
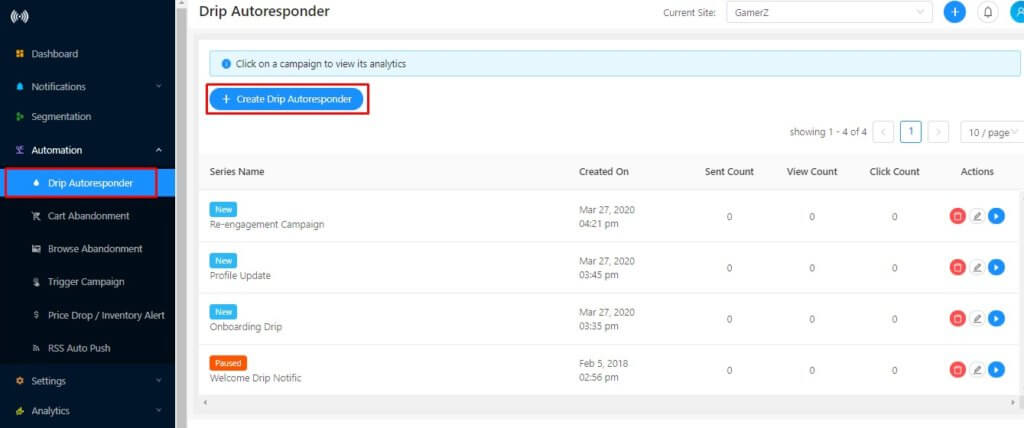
Bir damla kampanyası yürütmek için öncelikle segmentler oluşturmanız gerekir. Bir segment oluşturulduktan sonra Otomasyon->Damla Otomatik Yanıtlayıcısı'na gidin. Damla Otomatik Yanıtlayıcısı'na tıklayın
Şimdi damla kampanyası için segmenti seçin.

Kitleyi seçtikten sonra kampanyaya bir dizi bildirim ekleyebilirsiniz. Yeni aboneler o segmente her girdiğinde bildirim gönderilecektir.
Anlık bildirim damla kampanyası kurma hakkında ayrıntılı talimatlar için bu makaleye göz atın. Daha iyi sonuçlar için damla kampanyasındaki en iyi uygulamaları izleyin.
Coğrafi Tabanlı Kayıt
Bir web sitesi olarak, işletmeniz için hangi coğrafi bölgelerin iyi performans gösterdiğini ve hangilerinin göstermediğini bilirsiniz. Performansı düşük coğrafi bölgelerden aboneleriniz olduğunda ne olur? Sadece etkileşim kurmayacak aboneler için ödeme yapıyorsunuz demektir.
Ayrıca, genel etkileşiminiz de etkilenir. Kampanyaların iyi performans gösterip göstermediği konusunda size net bir resim vermez.
PushEngage kullanarak bu coğrafi bölgeleri kolayca hariç tutabilirsiniz. Anlık Bildirim kaydı bu coğrafi bölgelerde görünmeyecektir. Bu, yalnızca performans gösteren coğrafi bölgelerden abone almanıza yardımcı olacaktır.
Coğrafi tabanlı kayıt nasıl kurulur?
Coğrafi tabanlı kayıt kurmak çok basittir.
Adım 1> PushEngage paneline gidin->Ayarlar->Abonelik Ayarları->Kayıt Yönetimi.
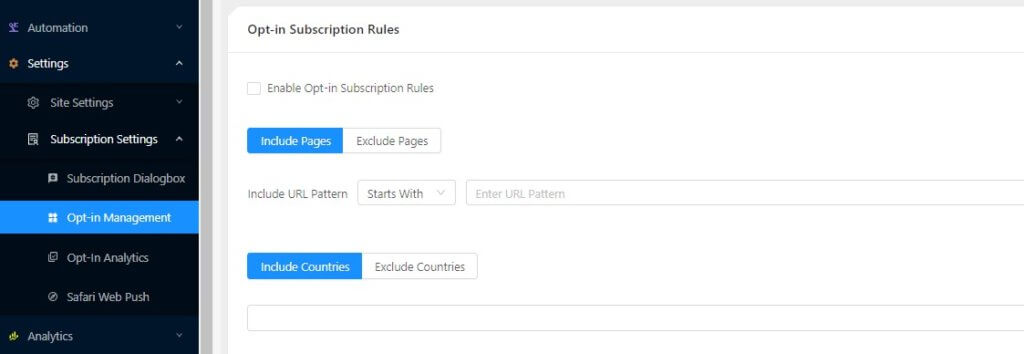
Adım 2> ‘Kayıt Abonelik Kurallarını Etkinleştir’ onay kutusunu seçin. Şimdi, hariç tutma seçeneğini seçin ve hariç tutmak istediğiniz coğrafi bölgeyi ekleyin.
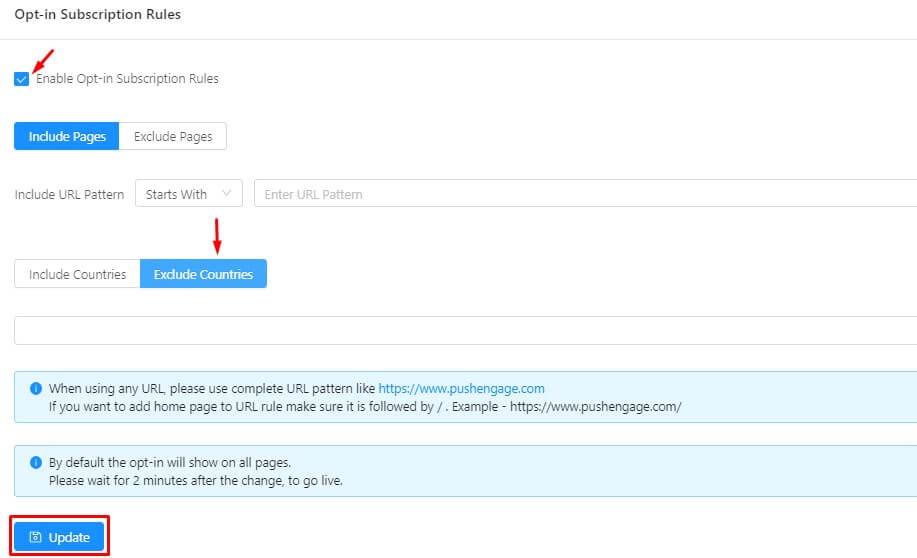
Değişikliklerin yansıması için güncelle düğmesine tıklayın.
Kayıt bu coğrafi bölgelerde görünmeyecektir.
Tarayıcı Terk Etme Kampanyaları
İnsanların herhangi bir işlem yapmadan sadece ürünlere göz attığı zamanlar olur. Çevrimiçi dünyada vitrin alışverişi gibidir. Kullanıcıların ürüne ilgi gösterdiğini gösterir.
PushEngage kullanarak, bu tür abonelerle kolayca etkileşim kurabilir ve onları müşteriye dönüştürebilirsiniz. Tarama Terk Etme Kampanyası, bu tür aboneleri hedeflemenize yardımcı olur.
Tarama terk etme kampanyası nasıl kurulur?
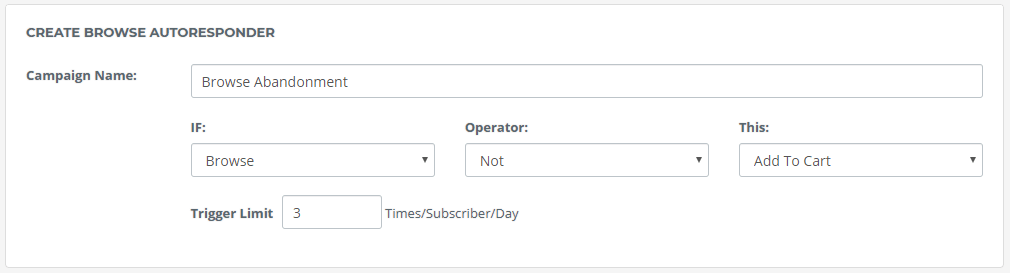
Otomasyon->Tarama Terk Etme'ye gidin. ‘Tarama Otomatik Yanıtlayıcısı Oluştur’ düğmesine tıklayın. Tarama terk etme ayarlarını açacaktır. Varsayılan ayarlar yerindedir. Bildirim şablonunda değişiklik yapabilir ve tarama terk etme kampanyasıyla yayına girebilirsiniz.
Ayrıntılı kurulum için tarayıcı terk etme kampanyası hakkındaki bu makaleyi izleyin.
Aboneler genellikle bir web sitesini ziyaret ettiklerinde birçok ürüne göz atarlar. Her seferinde tarama bildirimi göndermek, abone için çok fazla bildirimle sonuçlanacaktır. Bu nedenle, yayına girmeden önce tarama terk etme kampanyaları için doğru stratejileri kullanın.
Çoklu Dil ve Emoji Desteği
Etkileşimi artırmak için kişiselleştirme çok önemlidir. Kişiselleştirilmiş herhangi bir kampanya etkileşim oranınızı artırabilir. Kişiselleştirme, yukarıdaki tüm kampanyalar için de geçerlidir.
Bildirimi kişiselleştirmenin en iyi yollarından biri yerel dili kullanmaktır. İnsanlar kendi dillerinde konuştuğunuzda etkileşim kurarlar. Daha kişisel hissettirir. Aynı şey Anlık Bildirimler ile de yapılabilir. Anlık bildirimleri yerel dilde de gönderebilirsiniz.
PushEngage, UTF 8 karakterleri kullanılarak yakalanabilen tüm dilleri destekler. Çalıştığını görmek için yerel dilde yazmanız yeterlidir. Aşağıdaki yerel dilde gönderilen bildirimi görün.
Bildirimleri kişiselleştirmenin bir başka yolu da emojiler kullanmaktır. PushEngage'ı kullanarak bildiriminize kolayca emoji ekleyebilirsiniz. Bir bildirim oluştururken emoji simgesini seçin.
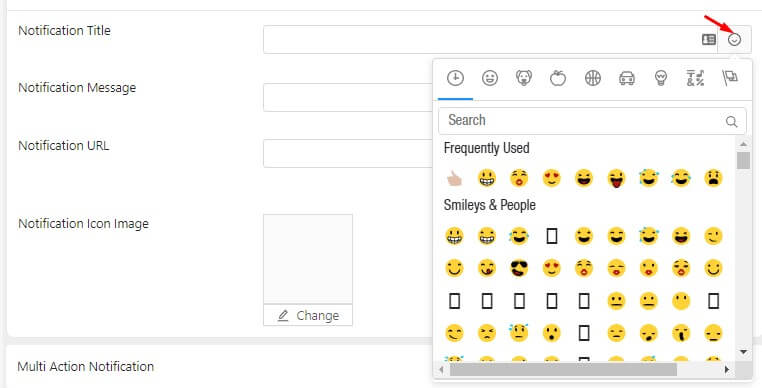
Tüm emoji seçeneklerini gösterecektir. Bildirim başlığına ve açıklamasına emoji ekleyebilirsiniz. Seçenek, sepet terk etme, göz atma terk etme, damla gibi tüm kampanyalarda mevcuttur. Şimdi etkileşiminizi ikiye katlamak için kanıtlanmış Anlık Bildirim hilelerini biliyorsunuz. Bu her sektörde işe yarar. Etkileşimdeki bir artış, dönüşümlerde de bir artışa yol açacaktır. Yukarıdakileri uygulamada yardıma ihtiyacınız olursa, [email protected] ile iletişime geçin.


