Looking for an easy way to add push notification action buttons that actually work?
The biggest challenge isn’t to add a button to your push notification. What’s most challenging is creating buttons that get clicks. Unlike your website, you don’t have unlimited characters to craft compelling buttons.
So, you need to keep your buttons simple, relevant, and focused.
In this article, we’ll show you how to add multiple push notification action buttons, how to optimize them for clicks, and some cool ways to use them. And yes, there will be some real examples as well.
Låt oss dyka in.
How to Add Multiple Push Notification Action Buttons
Before we get started, it’s always best to choose a push notification service to send push notifications. The right push notification service will make it super easy to create powerful campaigns with little to no code.
If you’ve been using Firebase Cloud Messaging (FCM) to send push messages, then it’s time to switch up right away. Check out this article to get a better understanding of why FCM is not the best option for you.
We recommend using PushEngage to create and send your push notifications.

PushEngage is the #1 push notification service in the world.
Pushnotiser hjälper dig att öka din webbplatstrafik och engagemang automatiskt. Och om du driver en onlinebutik hjälper PushEngage dig också att öka din försäljning genom att hjälpa dig att skapa automatiserade e-handelspushnotiser.
Du kan komma igång gratis, men om du menar allvar med att växa ditt företag bör du köpa en betald plan. Innan du köper någon pushmeddelandetjänst bör du också kolla in den här guiden till kostnader för pushmeddelanden.
Här är en snabb överblick över vad du får med PushEngage:
- Automatiserade kampanjer med hög konvertering
- Flera alternativ för målinriktning och kampanjschemaläggning
- Målspårning och avancerad analys
- Smart A/B-testning
- En dedikerad framgångschef
Du kommer att se att PushEngage är utan tvekan det bästa valet om du vill bygga trafik, engagemang och försäljning för ditt företag. Och om du har en budget kan du alltid vara lite kreativ med dina pushmeddelanden.
Gå till din PushEngage-instrumentpanel och gå till Kampanj » Push-sändningar och klicka på knappen Skapa en ny push-sändning:

Under fliken Innehåll, lägg till ditt push-meddelandeinnehåll:

Then, scroll down to Multi Action Notification and enable it:
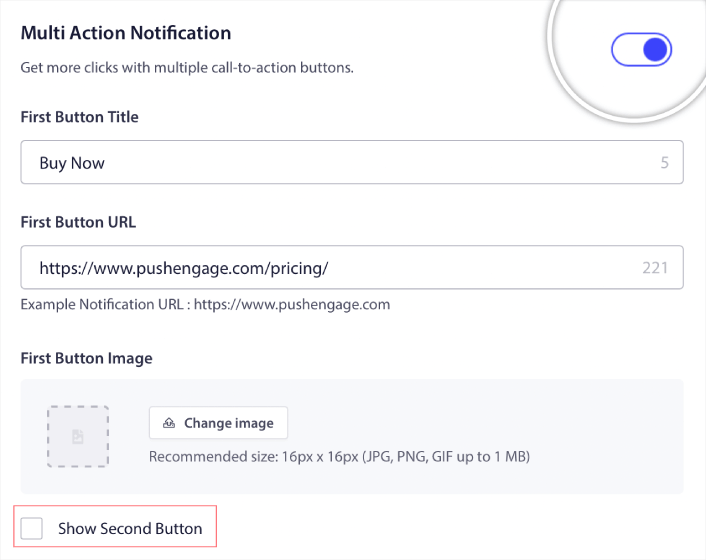
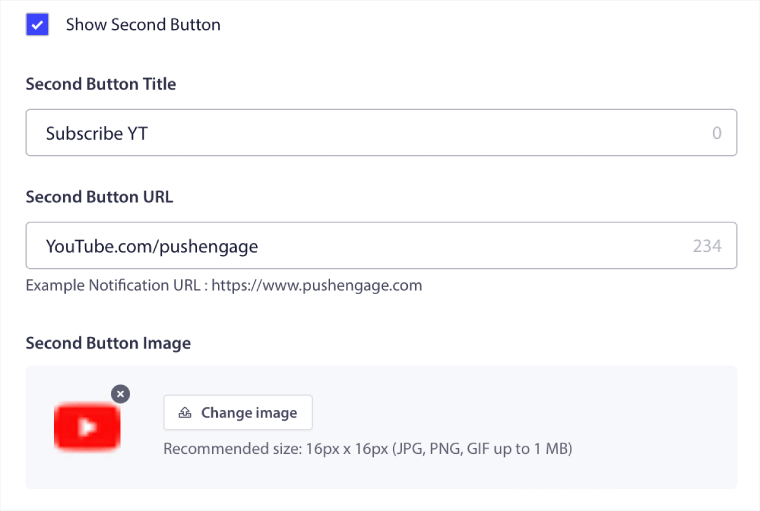
You can click the Show Second Button option to create a second push notification action button.
Since you can only use 12 characters for your button label, it can be difficult to write compelling copy sometimes.
For instance, you can ask your push notification subscribers to subscribe to your email newsletter or your YouTube channel. But how do you let them know what to subscribe to without using so many words? A cool hack is to use the button images to add more context to your button.
You can only use a maximum of two push notification action buttons. So, you need to make them both count. Before you send your notification, be super clear on what you want from your push campaign. An easier way to get better results would be to use drip push notifications.
PushEngage allows you to create push notification action buttons for your drip campaigns as well. This way, you can send out targeted push notifications to get focused results.
Let’s check out some cool ways to use push notification action buttons now.
How to Use Push Notification Buttons to Get More Traffic
If you’re running a blog or a news site or even an agency site, repeat traffic is super important. The only issue is getting clicks on your push notification action buttons.
You can’t really use power words in your button copy like you can in an email.
So, what do you do?
A simple way to increase your repeat traffic is to use your push notification action buttons to give them more options to click. For instance, if you’re running an eCommerce site, you’re likely going to use a browse abandonment campaign. You can use one button to ask your visitors to complete the purchase and another to get them to browse a category page.
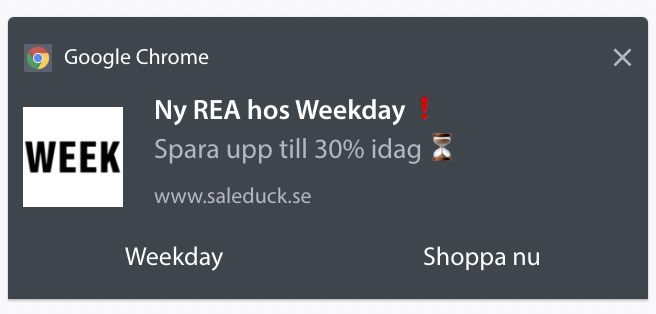
By giving them two options, you get a much better chance of your visitors clicking through to your site.
How to Add a Click to Subscribe Button to Your Popup
Pushnotiser hjälper dig att öka din webbplatstrafik och engagemang automatiskt. Och om du driver en onlinebutik hjälper PushEngage dig också att öka din försäljning genom att hjälpa dig att skapa automatiserade e-handelspushnotiser.
Du kan komma igång gratis, men om du menar allvar med att växa ditt företag bör du köpa en betald plan. Innan du köper någon pushmeddelandetjänst bör du också kolla in den här guiden till kostnader för pushmeddelanden.
Här är en snabb överblick över vad du får med PushEngage:
- Automatiserade kampanjer med hög konvertering
- Flera alternativ för målinriktning och kampanjschemaläggning
- Målspårning och avancerad analys
- Smart A/B-testning
- En dedikerad framgångschef
Du kommer att se att PushEngage är utan tvekan det bästa valet om du vill bygga trafik, engagemang och försäljning för ditt företag. Och om du har en budget kan du alltid vara lite kreativ med dina pushmeddelanden.
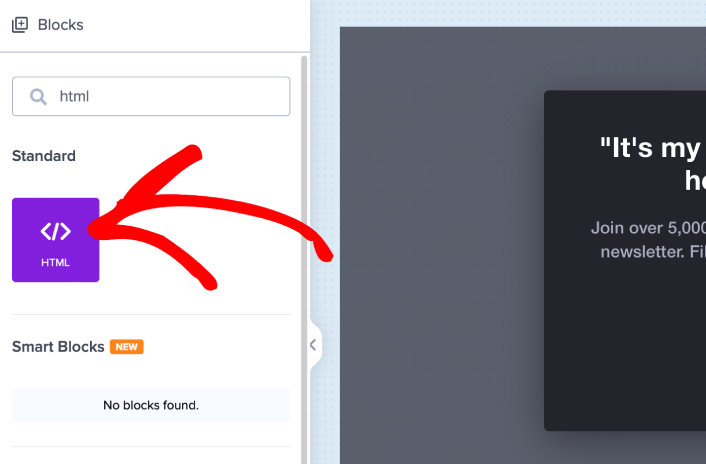
Lägg först till ett HTML-block i ditt popupfönster från sidofältet i OptinMonster.
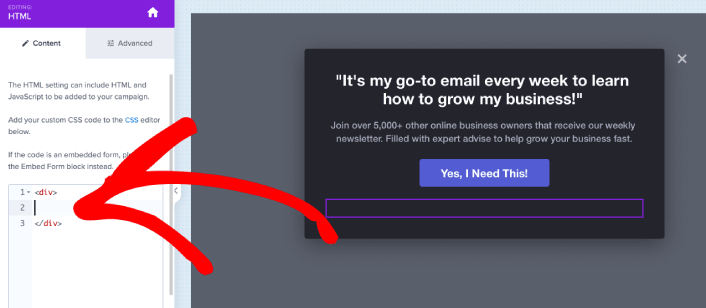
Det här är där vi kommer att lägga till koden för att samla prenumeranter på push-notiser. Klistra först in följande kod för att skapa en klickbar knapp:
<button onclick="subscribeOnClickButton()" style="border: none; width: 100%; padding-left: 15%; padding-right:15%; text-align: center; display: inline-block; color: white;">Get Updates via Push Notifications</button>Klistra in koden där det står att du kan lägga till HTML:
Naturligtvis kan du leka med stilarna för att göra det mer tilltalande. Därefter ska vi göra knappen för att samla prenumeranter på push-notiser när den klickas på.
Gå till PushEngage startsida och klicka på knappen Kom igång :

Sedan vill du välja gratisplanen för att prova PushEngage eller välja en betald plan om du menar allvar med att växa din verksamhet. De betalda planerna kommer med fler kampanjalternativ och möjligheten att bygga ännu större prenumerantlistor.
I din PushEngage-instrumentpanel, gå till Webbplatsinställningar » Webbplatsdetaljer och klicka på knappen Klicka här för installationsinstruktioner. Under Valfri webbplats, får du din installationskod:

VARNING: Du måste kopiera koden du får från din instrumentpanel. Koden är unik för varje PushEngage-användare. Du kan inte kopiera koden i bilden och samla prenumeranter på push-notiser.
När du har koden i din PushEngage-instrumentpanel, ta det andra skriptet och lägg till lite extra kod. Din slutliga kod bör se ut ungefär så här:
<script src="https://clientcdn.pushengage.com/core/02a6e92667ae2279fcba8932356c1d93.js" async></script>
<script> window._peq = window._peq || [];
function subscribeOnClickButton(){
window._peq.push(['subscribe',{}.pe,function(res){
console.log(res);
}]);
}
</script>
Lägg till den här koden i HTML-blocket i OptinMonster direkt efter koden för din knapp och mellan kodblocket <div></div> och du är klar!
How to Use Push Notification Buttons to Get More Sales
Sales keep your business alive. And you can use push notifications to get a ton of extra sales. Let’s check out how you can use your push notification action buttons to get more sales.
Think of a simple cart abandonment campaign. The point is to get your customers to buy what’s in their cart. But instead of using a straightforward cart abandonment campaign, you can also use personalized recommendations for other products and get them to revisit your store. Chances are that they’ll add the new product to their cart and actually make a purchase.
It’s super easy to do using push notification segments. And if this sounds like a new idea to you, it’s not. Thousands of our customers already use this idea. It’s called cross-selling.
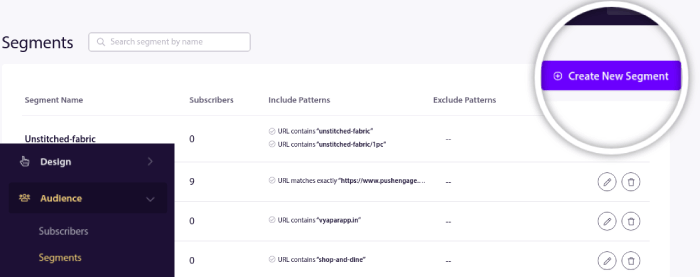
Cross-selling push notifications help you increase sales as you’re 60-70% more likely to sell to an existing customer. Head over to your PushEngage dashboard and go to Audience » Segments and create your segments:
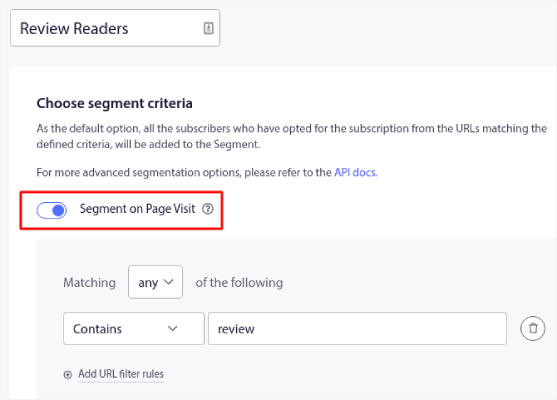
Du vill segmentera dina besökare när de besöker en produkt i en specifik kategori:
Then, just pair a product with each of your segments. Not all your customers will be interested in the exact same product. You’ll want to find products that are interesting to each customer segment.
Once that’s done, create a drip autoresponder to promote it.
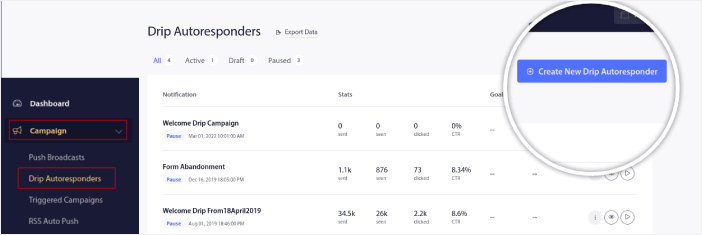
Gå till din PushEngage-instrumentpanel och gå till Kampanj » Drip-autosvarare » Skapa ny drip-autosvarare:
Go ahead and create separate drips for each segment. If you’re new to push notifications, you should check out our article on how to use eCommerce push notifications for epic campaign ideas.
What to do After You Learn to Use Push Notification Action Buttons
Det var allt för den här gången, gott folk!
Once you’ve created a click-on-subscribe button for your site, you should check out our advanced segmentation rules.
Creating granular segments can help you personalize your push notifications to a great extent. This means more engagement, higher clicks, and more sales from your push notification campaigns. Check out these epic resources to get started:
- Hur man konverterar prenumeranter till köpare med hjälp av webb push-notiser
- Bästa praxis för push-notiser
- Varför välkomstpush-notiser är viktiga
And if you’re new to push notifications, you should try out PushEngage. PushEngage offers some of the most powerful and flexible push notification campaigns anywhere. So, if you’re serious about growing your business, get started with PushEngage today!


