
Looking for a quick and easy way to create a Kickstarter landing page in WordPress?
Running a Kickstarter campaign is tough. It’s not just about going live and writing the content for your Kickstarter campaign. You have to promote your funding campaign as much as possible. And your business depends on how many people sign up to support you financially.
Sure, you get some funding by posting on LinkedIn and Twitter and creating auto DMs. But that’s difficult to manage and you have very little command over the features. Not to mention, social media platforms usually only promote organic content that won’t take users to some other website.
This is where having a Kickstarter landing page in WordPress can help you out. But how do you build a Kickstarter landing page? Do you need developers to do it for you? How easy is that page to modify and customize if you need last-minute changes?
Fortunately, there’s an easy way to create a landing page in WordPress. In this article, we’re going to help you launch your Kickstarter campaign in less than 15 minutes.
هل أنت مستعد؟ دعنا نبدأ.
What’s a Kickstarter Landing Page?
A Kickstarter landing page is a fully customizable web page that’s focused on giving your visitors a reason to signup for your campaign. Unlike a social media site, the landing page is entirely focused on getting people to sign up. And the best part is that you can embed an advertising video that you can keep promoting till kingdom come!
The cool bit about a Kickstarter landing page in WordPress is that you can customize it any way you want. You can include and control elements in your landing page that you can’t really do with a social media profile page.
Here’s the best part: You can convert your signups into paying customers in SO many ways.
اعتمادًا على مقدار الوقت المتاح لديك ومقدار المال الذي تتوقع كسبه من المشتركين، يمكنك:
- تقديم خصومات وعروض
- استضافة هبة
- إنشاء دليل مجاني أو قائمة مرجعية كـ مغناطيس للعملاء المحتملين
- قبول التبرعات من المعجبين
وأكثر من ذلك بكثير!
ولكن قبل أن تبدأ، تذكر أن يكون لديك هدف واضح ومحدد جدًا لصفحة الهبوط الخاصة بك. لمجرد أنه يمكنك القيام بالكثير من الأشياء لا يعني أنه يجب عليك القيام بها جميعًا في صفحة واحدة. في كثير من الأحيان، إذا أعطيت زوارك الكثير من الأشياء للنقر عليها، فلن ينقروا على أي شيء على الإطلاق.
What do All Successful Kickstarter Landing Pages Have?
Now that you know what a Kickstarter landing page in WordPress does and why you should build one, it’s time to create a blueprint for your landing page. If you check out any successful landing pages, you’ll notice that they all have some very basic common elements:
- العنوان الرئيسي: العنوان الرئيسي هو المكان الذي تجذب فيه انتباه الناس وتجعلهم يرغبون في التمرير لأسفل ومعرفة المزيد عنك.
- Description: Just below the headline, you should have a description of what your viewers should expect from the rest of the page. This is a great place to convince readers to subscribe to your campaign as well.
- Promotional Videos: Once people know what to expect from your brand, give them a taste of your product using a promo videos. We recommend mentioning your call to action in your video as well to get better conversions.
- Donation button: Follow up with a donation button so that your visitors can become campaign subscribers. This is known as the call to action (CTA) button. It’s how you nudge your visitors to take action on your page. Depending on your goal for the landing page, your CTA will vary.
- الدليل الاجتماعي: طريقة رائعة لمنح القراء سببًا قويًا للاشتراك هي تقديم دليل اجتماعي. يخبر الدليل الاجتماعي زوارك ببساطة أن هناك أشخاصًا آخرين يتخذون بالفعل نفس الإجراء الذي تريد منهم اتخاذه.
- الاشتراك في النشرة الإخبارية: بمجرد أن تعرض على زوارك العرض الأساسي، يمكنك أيضًا أن تطلب منهم أن يصبحوا مشتركين عبر البريد الإلكتروني. يمكنك أيضًا أن تطلب منهم أن يصبحوا مشتركين في الإشعارات الفورية باستخدام زر النقر للاشتراك. من الأفضل دائمًا إذا قدمت شيئًا ذا قيمة في المقابل.
- أزرار المشاركة الاجتماعية: كلما تحدث المزيد من الأشخاص عنك على وسائل التواصل الاجتماعي، زادت فرصك في زيادة عدد المشتركين لديك بشكل كبير. لذا، ضع أزرار المشاركة الاجتماعية على صفحة الهبوط الخاصة بك لتشجيع الأشخاص على مشاركتها على وسائل التواصل الاجتماعي.
تذكر، هذه هي الأجزاء الأساسية فقط لأي صفحة هبوط ناجحة. بالنسبة لصفحتك، يمكنك إضافة العديد من الأقسام الأخرى وإنشاء عروض مخصصة لزيادة تحويلاتك.
How to Create a Kickstarter Landing Page in WordPress
Now that you know what to create, it’s time to launch your Kickstarter landing page in WordPress. For this tutorial, we highly recommend using SeedProd to create your landing pages.

SeedProd هو أفضل منشئ صفحات هبوط لووردبريس. إنه مثالي للشركات والمدونين وأصحاب المواقع الذين يتطلعون إلى بناء صفحات هبوط عالية التحويل دون أي مهارات تطوير.
With SeedPreed, you get pre-built templates for high-converting landing pages that you can publish instantly. This includes templates for:
- صفحات المبيعات
- صفحات قريباً
- صفحات 404
- صفحات الصيانة
- صفحات الضغط
- App landing page
- صفحات الشكر
- صفحات الندوات عبر الإنترنت
- صفحات هبوط البودكاست
وغيرها الكثير!
الخطوة #1: تثبيت وتفعيل SeedProd
أولاً، ستحتاج إلى الحصول على إضافة SeedProd Pro وتفعيلها. إذا لم تكن متأكدًا من كيفية القيام بذلك، فراجع هذه المقالة حول كيفية تثبيت إضافة ووردبريس. بعد ذلك، انتقل إلى SeedProd » Settings في لوحة تحكم ووردبريس الخاصة بك وقم بتفعيل الإصدار الاحترافي:

بعد ذلك، انتقل إلى SeedProd » Pages للحصول على نظرة عامة على لوحة تحكم صفحات الهبوط في SeedProd. هذا هو المكان الذي يمكنك فيه رؤية الأنواع المختلفة من صفحات الهبوط التي يمكنك إنشاؤها باستخدام SeedProd:

Keep in mind that these are all special pages with pre-built functionality and design templates. For a campaign landing page, you don’t want to use ANY of these special landing pages. Instead, you’re going to create a custom landing page.
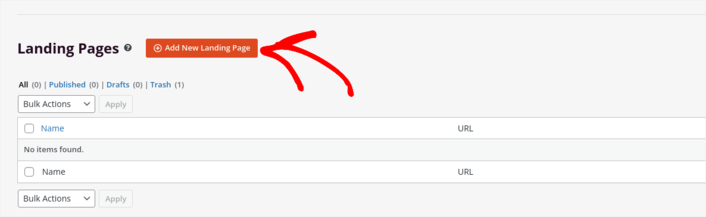
مرر لأسفل وانقر على زر إضافة صفحة هبوط جديدة للبدء:
الخطوة رقم 2: إنشاء صفحة هبوط جديدة
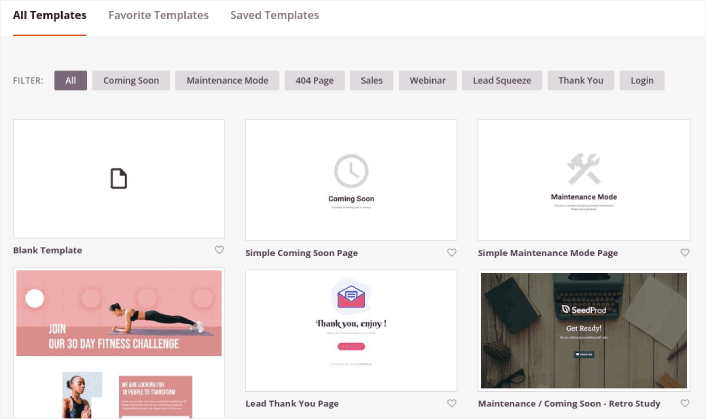
بعد النقر على زر إضافة صفحة هبوط جديدة، سترى مكتبة SeedProd لقوالب صفحات الهبوط. هذه قوالب صفحات هبوط مصممة باحترافية ومتجاوبة بالكامل.
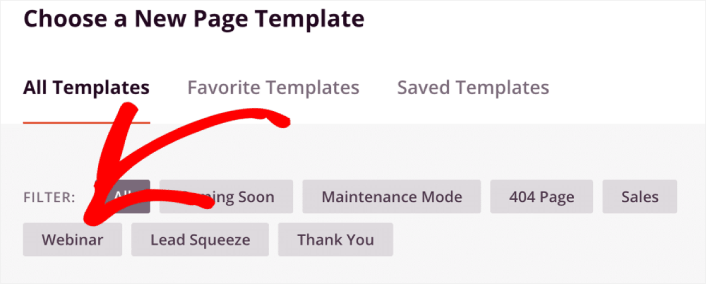
Next, you can select one of these templates to help you get started. Remember, the template is just a starting point. you can customize everything about the page later on. For now, find a template that you think will fit. When the templates page opens, you can click Webinar to filter the list:
For this guide, we’re going to customize the Webinar 3 Page template. Go ahead and click on it now.
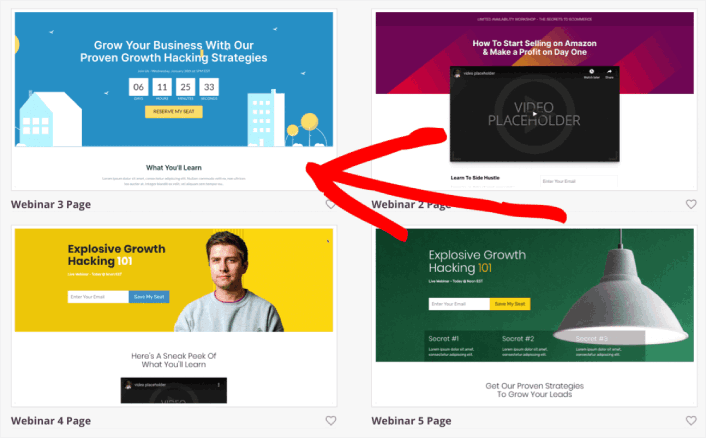
We’re using a webinar template because it has the most amount of similarities with a Kickstarter campaign. But you can choose whatever template makes the most sense for you. Remember, you can customize everything about your landing page. So, doesn’t really matter what template you start with.
Step #3: Customize Your Kickstarter Landing Page Design
يتيح لك منشئ SeedProd المرئي تخصيص صفحة الهبوط الخاصة بك باستخدام كتل محتوى بالسحب والإفلات.
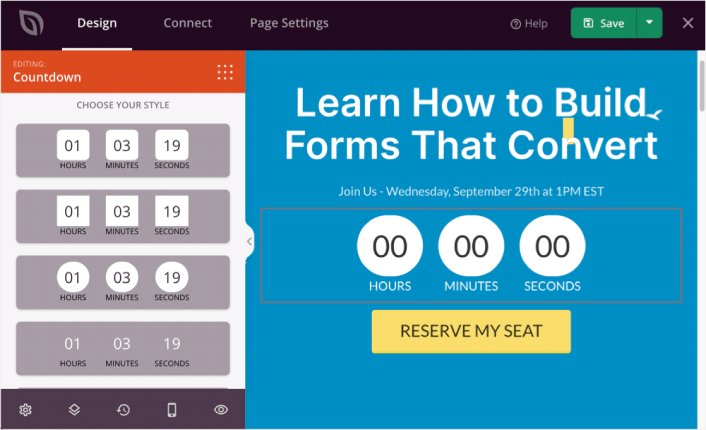
You can create a fully customized header for your landing page in a matter of minutes. You can even add custom elements to convince and convert your traffic. For instance, you can create a video module and embed a YouTube video to convince your visitors to sign up for your campaign.
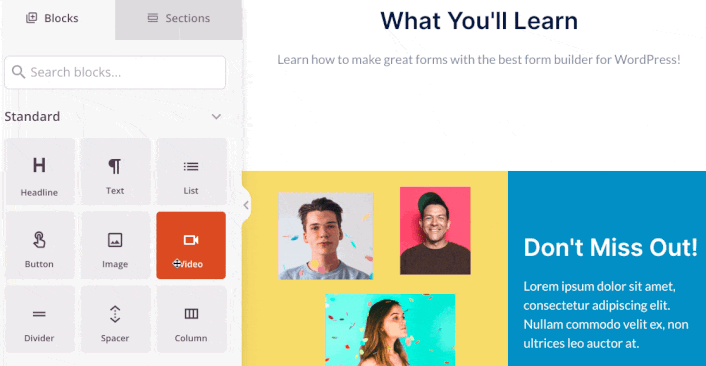
It’s also super easy to add a section with a brief description of your campaign . Head over to the Sections tab in the visual builder and under the Hero section, you’ll find several pre-built templates that you can import with a single click.
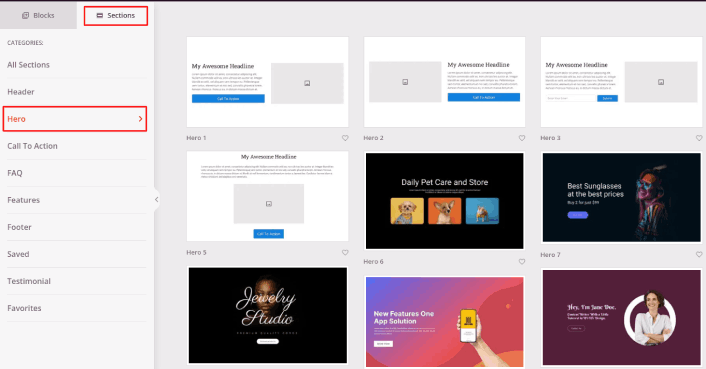
انتقل واختر واحدًا يعجبك. لا تقلق بشأن الألوان أو المحتوى. يمكنك تعديل كل ذلك. ما يجب أن تبحث عنه هو تخطيط يتناسب جيدًا مع قالبك.
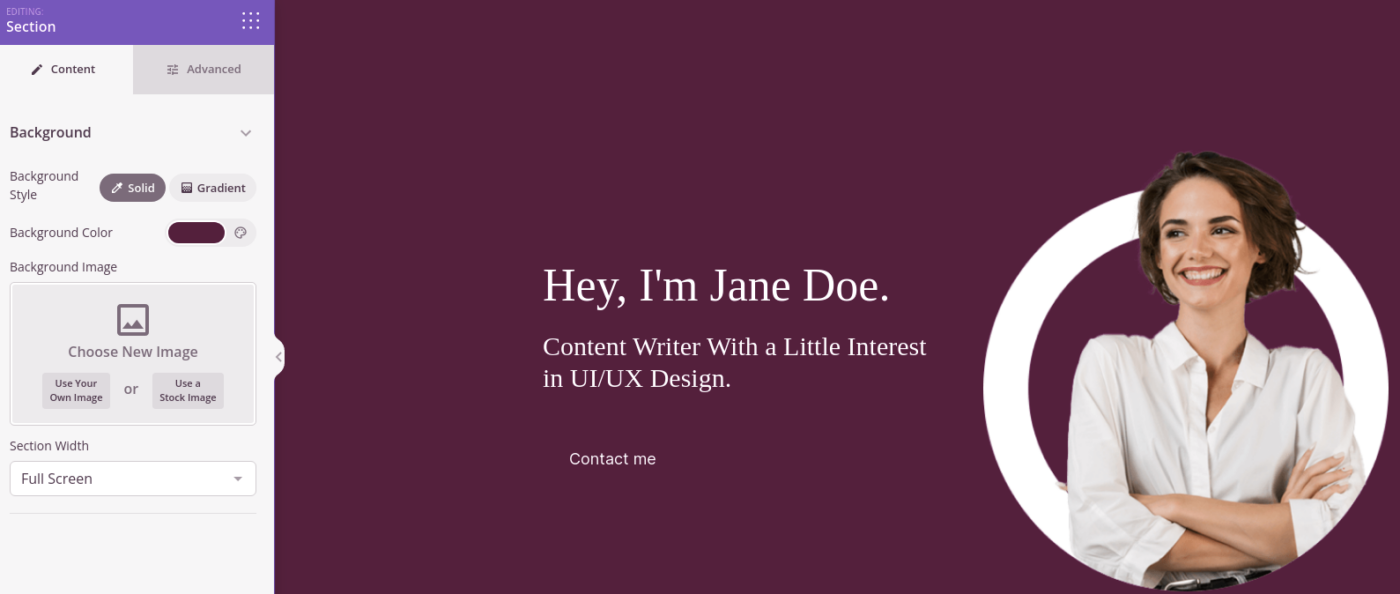
You can customize the hero section the same way we did earlier by choosing a different image and changing the headline and description. While you’re at it, add a call-to-action button that nudges viewers to subscribe to your Kickstarter campaign as well.
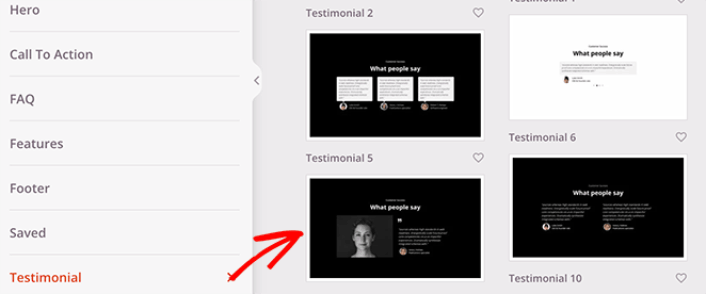
بعد ذلك، من علامة التبويب الأقسام، حدد عنوان الشهادات، واختر تصميمًا يعجبك. وبهذه البساطة، لديك قسم شهادات في صفحة الهبوط الخاصة بك.
إنه بسيط للغاية!
Step #4: Add a Click to Subscribe Button to Your Kickstarter Landing Page
يمكنك أيضًا إضافة زر انقر للاشتراك لجمع مشتركين في الإشعارات الفورية. تعد الإشعارات الفورية طريقة رائعة لزيادة حركة المرور المتكررة، والحصول على المزيد من التفاعل، وحتى بيع البضائع الرسمية إذا كان لديك بعض منها.
في SeedProd، قم فقط بسحب وإفلات وحدة HTML المخصصة من الشريط الجانبي.
لقد وضعنا زر الاشتراك مباشرة أسفل نموذج الاشتراك عبر البريد الإلكتروني في الطية الأولى.

ولكن يمكنك إدراج الزر في أي مكان تريده.
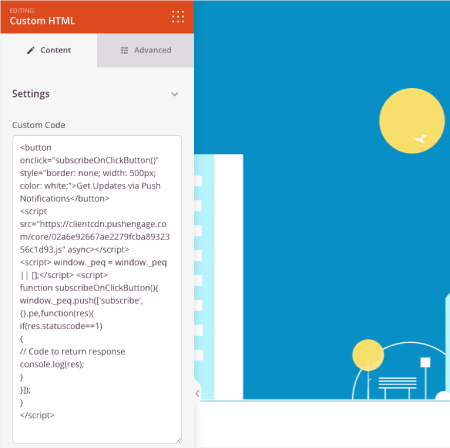
لهذا الجزء، تحتاج إلى بعض الخبرة في HTML و CSS. أو، يمكنك نسخ هذا الكود ولصقه في كتلة HTML المخصصة الخاصة بك:
<button onclick="subscribeOnClickButton()" style="border: none; padding-left: 5%; padding-right:5%; text-align: center; display: inline-block; color: blue;">Get Updates via Push Notifications</button>هذا زر قياسي في HTML مع القليل جدًا من التنسيق. الشيء الوحيد المميز هو وظيفة onclick في الكود. هذا يعني بشكل أساسي أنه يمكن لزوارك النقر على الزر للاشتراك في شيء ما. الآن، نحتاج إلى إضافة بعض الأكواد الإضافية للزر للسماح لزوارك بالاشتراك في إشعارات الدفع.
توجه إلى الصفحة الرئيسية لـ PushEngage وانقر على زر البدء:

بعد ذلك، ستحتاج إلى تحديد الخطة المجانية لتجربة PushEngage أو اختيار خطة مدفوعة إذا كنت جادًا بشأن تنمية عملك. تأتي الخطط المدفوعة مع المزيد من خيارات الحملات والقدرة على بناء قوائم مشتركين أكبر.
في لوحة تحكم PushEngage الخاصة بك، انتقل إلى إعدادات الموقع » تفاصيل الموقع وانقر على زر انقر هنا لتعليمات الإعداد. ضمن أي موقع، ستحصل على كود التثبيت الخاص بك:

تحذير: تحتاج إلى نسخ الكود الذي تحصل عليه من لوحة التحكم الخاصة بك. الكود فريد لكل مستخدم PushEngage. لن تتمكن من نسخ الكود الموجود في الصورة وجمع المشتركين في إشعارات الدفع.
بمجرد حصولك على الكود في لوحة تحكم PushEngage الخاصة بك، أضف هذا المقتطف إلى الكود الخاص بك:
<script> window._peq = window._peq || [];</script> <script>
function subscribeOnClickButton(){
window._peq.push(['subscribe',{}.pe,function(res){
if(res.statuscode==1)
{
// Code to return response
console.log(res);
}
}]);
}
</script>
يجب أن يبدو الكود النهائي الخاص بك شيئًا كهذا:
<script src="https://clientcdn.pushengage.com/core/02a6e92667ae2279fcba8932356c1d93.js" async></script>
<script> window._peq = window._peq || [];</script> <script>
function subscribeOnClickButton(){
window._peq.push(['subscribe',{}.pe,function(res){
if(res.statuscode==1)
{
// Code to return response
console.log(res);
}
}]);
}
</script>
ستحتاج إلى إضافة هذا الكود إلى كتلة HTML في صفحة الهبوط الخاصة بك بعد الكود الخاص بالزر. يجب أن يبدو شيئًا كهذا:
Feel free to customize the styles for the button any way you please. When you’re done customizing your Kickstarter landing page, go ahead and hit the Save button.
الخطوة رقم 5: تكوين إعدادات صفحتك
After you’re done designing your landing page, click the Connect tab at the top of your page builder, and select your email marketing provider to collect leads on your site.

بعد ذلك، انقر فوق علامة التبويب إعدادات الصفحة في أعلى شاشتك.

هنا، يمكنك إضافة إضافة تحسين محركات البحث و إضافة تحليلات جوجل إلى صفحة الهبوط الخاصة بك. يمكنك حتى إعداد رموز تتبع مخصصة مثل Facebook Pixel أو Pinterest pixel لتتبع أداء الإعلانات.
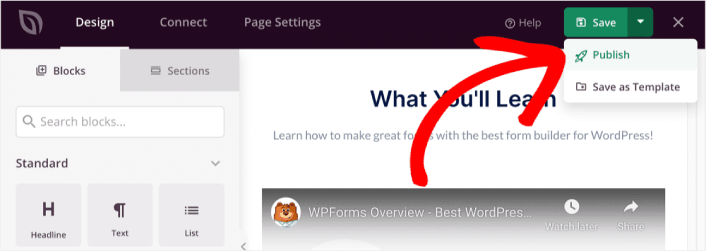
Step #6: Publish Your Kickstarter Landing Page in WordPress
Now let’s go ahead and publish your design. To do this, click the dropdown arrow next to the save button and click Publish.
يمكنك بعد ذلك النقر فوق زر عرض الصفحة المباشرة لرؤية كيف تبدو.
Congratulations! You just published your very first Kickstarter landing page.
What to do After You Build a Kickstarter Landing Page
Now that your Kickstarter landing page is live, it’s time to work on your traffic, engagement, and sales. You should try using push notifications on your site. Push notifications are a great marketing tool that can help you grow your business.
ألقِ نظرة على هذه الموارد الرائعة وستعرف ما نعنيه:
- 7 استراتيجيات ذكية لزيادة تفاعل العملاء
- هل إشعارات الدفع فعالة؟ 7 إحصائيات + 3 نصائح خبراء
- كيفية إعداد إشعارات الدفع للسلات المتروكة (دليل سهل)
نوصي باستخدام PushEngage لإنشاء حملات إشعارات الدفع الخاصة بك. PushEngage هو البرنامج رقم 1 لإشعارات الدفع في العالم. لذا، إذا لم تكن قد قمت بذلك بالفعل، ابدأ مع PushEngage اليوم!


