
Looking for a tutorial on how to create an expense approval form in WordPress?
An expense approval form is a superb tool to streamline and monitor company expenditures. But, you might wonder, how do you craft one? Is it worth designing an expense form from the ground up?
The straightforward scoop? Probably not. You can whip up a WordPress expense approval form with a form plugin in significantly less time than starting from zero. And if you’re no tech whiz, leaning on a plugin is will likely be much kinder on your wallet too.
But hold on! The plugin universe is vast. So, which one should you choose?
In this article, we’re going to show you step by step how to create your own expense approval form in WordPress. The best part? You’ll be done in 10 minutes and you don’t need to write a single line of code.
دعنا نتعمق.
Why You Need an Expense Approval Form in WordPress
Incorporating an expense approval form into your WordPress website streamlines the way you manage, monitor, and authorize company expenditures. It becomes an essential tool for maintaining financial discipline and transparency in your organization.
PushEngage هو المكون الإضافي رقم 1 للإشعارات الفورية في العالم. احصل عليه مجانًا!
Through a clear format like, “What’s the purpose of this expense?” or “Attach your expense receipt here”, you can maintain a consistent record of every penny spent. Expense forms can categorize expenses based on their nature like travel, supplies, or entertainment, ensuring clarity in documentation.
Often, expense approval forms also allow a section for notes or clarifications. This section provides valuable context to approvers, making sure there are no ambiguities when it’s decision time.
By routinely processing expenses through this system, you’re creating a clear financial trail. This periodic review ensures that expenses align with company policies and budgets. Plus, it’s a quick way to spot any irregularities or misuse.
The insights you gather can lead to tangible policy improvements. Over time, you might spot patterns – maybe your team frequently overspends in one area or there are recurrent unjustified expenses. This can guide policy updates or staff training.
To integrate an expense approval form into your WordPress platform, you can use specific plugins or incorporate forms from external finance tools. Ensure your form is straightforward, intuitive, and easily accessible to those who need it.
In essence, expense approval forms in WordPress help synchronize company spending with financial guidelines, ensuring budget adherence and fiscal responsibility.
How to Create an Expense Approval Form in WordPress
Now that you know why you should be creating your expense approval form, it’s time to start building one for your site. To create your expense approval form, we’re going to use a super popular form builder plugin for WordPress called WPForms.
لنبدأ.
الخطوة #1: إنشاء نموذج ووردبريس جديد
أول شيء ستحتاج إلى القيام به هو تثبيت وتفعيل WPForms.

WPForms هو المكون الإضافي الأول لبناء النماذج في ووردبريس في العالم. إذا لم تكن متأكدًا من كيفية تثبيت WPForms، فيجب عليك الاطلاع على هذا الدليل خطوة بخطوة حول كيفية تثبيت مكون إضافي في ووردبريس.
بعد ذلك، توجه إلى لوحة تحكم WPForms وانتقل إلى التنزيلات للحصول على المكون الإضافي الخاص بك:
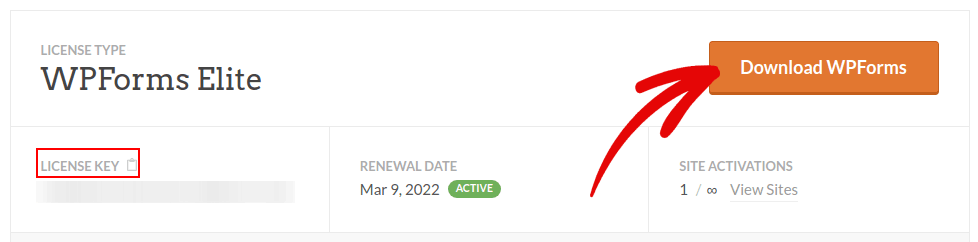
بعد ذلك، قم بتثبيت وتفعيل المكون الإضافي على موقعك. وانسخ مفتاح الترخيص الخاص بك في نفس علامة التبويب.
أخيرًا، انتقل إلى لوحة تحكم ووردبريس الخاصة بك وتوجه إلى WPForms » الإعدادات والصق مفتاح الترخيص الخاص بك:
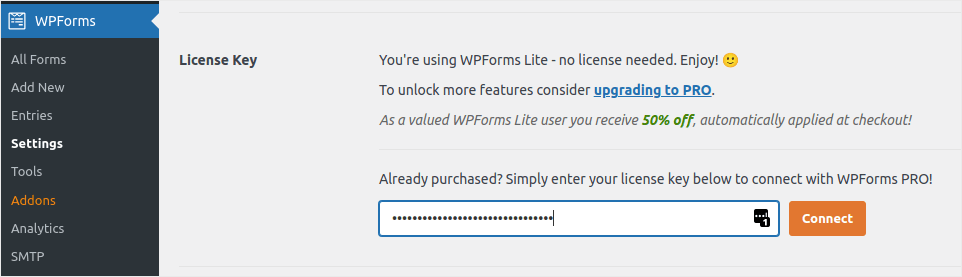
عند الانتهاء، انقر فوق اتصال.
Step #2: Add the Right WPForms Addons
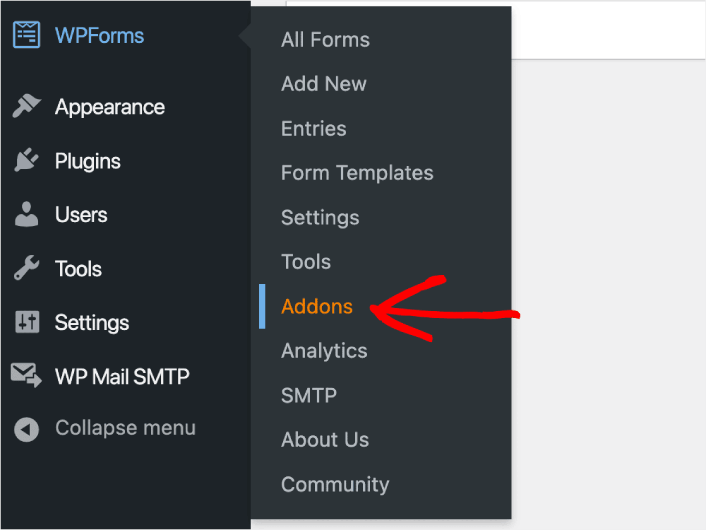
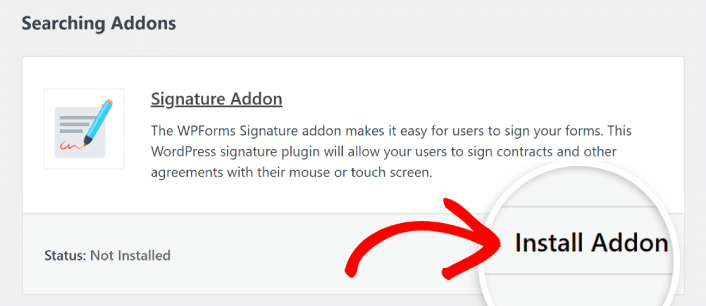
من لوحة تحكم ووردبريس الخاصة بك، انتقل إلى WPForms » الإضافات.
Now, search for the Save and Resume Addon by typing its name in the Search Addons field. Next, click on Install Addon.
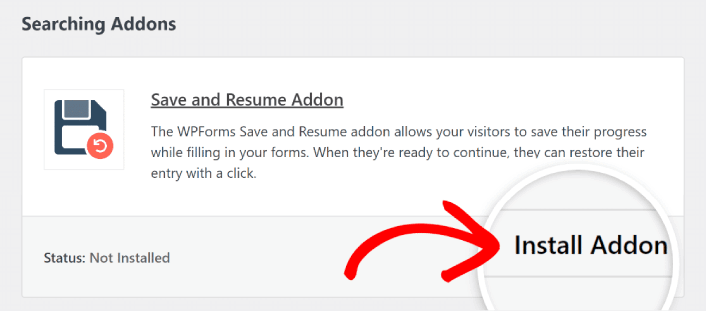
After the addon has been installed successfully, press the same button again to Activate it. And do the same thing for the Signature Addon.
الآن بعد تثبيت وتفعيل WPForms، حان الوقت لإنشاء نموذجك الأول. توجه إلى WPForms » إضافة جديد:

سيؤدي هذا إلى فتح أداة بناء النماذج بالسحب والإفلات من WPForms.
Step #3: Select Expense Approval Form Template
لإنشاء نموذج جديد، قم بتسميته وحدد قالب النموذج الخاص بك:
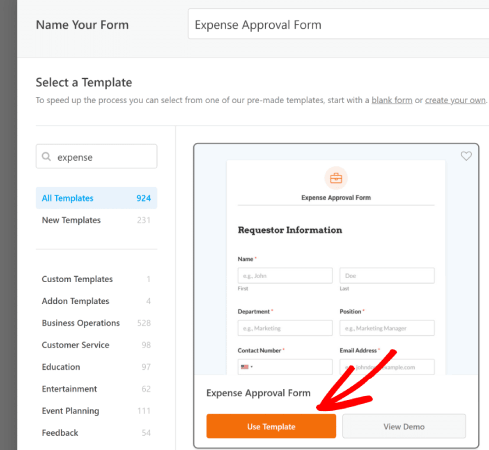
مع WPForms، تحصل على الكثير من قوالب النماذج المصممة مسبقًا والتي يمكنك ببساطة استيرادها بنقرة واحدة ثم تخصيصها حسب رغبتك. لإلقاء نظرة أقرب على القائمة الكاملة للميزات، يجب عليك الاطلاع على مراجعتنا لـ WPForms.
Step #4: Customize Your Expense Form
بعد ذلك، سيتم نقلك إلى منشئ النماذج مع تحميل القالب الخاص بك.
يمكنك استخدام القالب الجاهز لجمع التعليقات من عملائك. ولكن لديك الحرية في إجراء تغييرات على هذا القالب إذا كنت ترغب في إضافة حقول إضافية لجمع المزيد من التفاصيل والرؤى من عملائك.
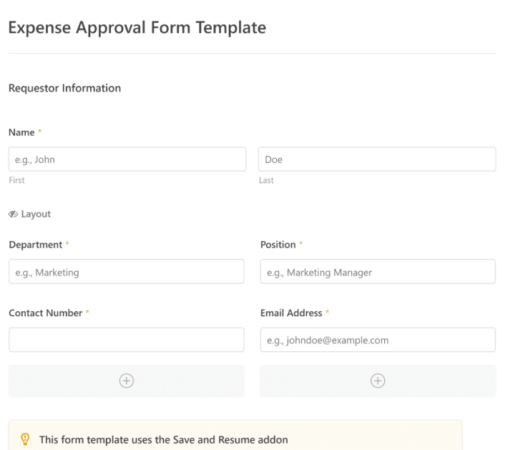
You’ll notice that this template is built with fields that automate capturing the requestor’s information, expense details, and approval via Signature.
If required, you can use WPForms’ intuitive form builder to easily add, modify, and arrange fields to tailor the form to your liking.
يمكنك أيضًا جعل النماذج تبدو رائعة باتباع الخطوات الموجودة في منشورنا حول كيفية إنشاء نموذج متعدد الخطوات في ووردبريس. إنها طريقة رائعة لتحسين تجربة المستخدم و تقليل معدلات التخلي عن سلة التسوق. لكننا سنلتزم بصفحة واحدة لهذا البرنامج التعليمي.
Step #4: Enable Save and Resume Settings
First, you’ll want to add the Save and Resume feature to your expense approval form. Go to Settings » Save and Resume from the form builder. To turn on save and resume functionality, toggle on the Enable Save and Resume option.
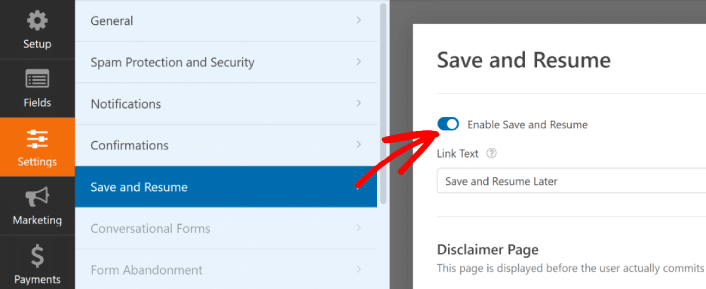
To begin, you can personalize the wording on the link that users will click to save their progress in your form.
You can change the text in the supplied field. By default, it says Save and Resume Later, but you can change it to anything you like.
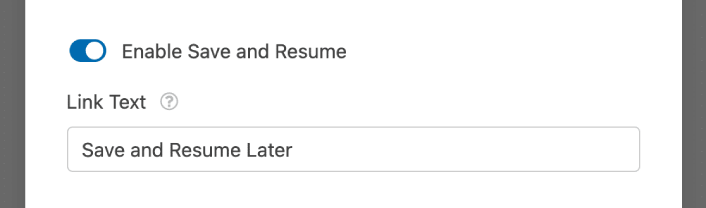
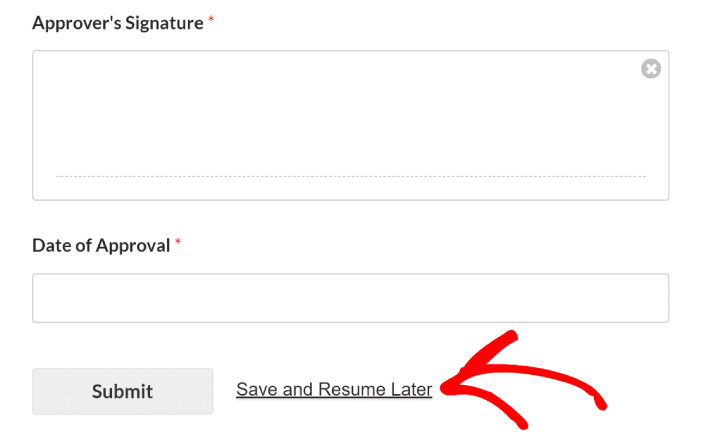
This link will show up at the bottom of your form, next to the button labeled Submit.
NOTE: The resume URLs will stop working after 30 days. So, make sure to add a disclaimer on your form that mentions this fact.
Step #5: Configure Your WordPress Expense Approval Form Settings
بعد ذلك، سترغب في إعداد الإشعارات والتأكيدات.
الإشعارات هي رسائل بريد إلكتروني تتلقاها عندما يملأ شخص ما النموذج. التأكيدات مخصصة لتنبيه المستخدم بأنه قد ملأ النموذج بنجاح. عادةً ما تكون هذه رسالة "شكرًا لك"، ولكن يمكنك أيضًا إعادة توجيه المستخدمين إلى صفحة مخصصة.
توجه إلى الإعدادات » التأكيدات لتكوين إعدادات التأكيد:

ثم، في نفس القائمة، انتقل إلى الإشعارات لتكوين رسائل الإشعارات الخاصة بك:

بشكل افتراضي، يتم إرسال الإشعارات إلى البريد الإلكتروني الخاص بمسؤول ووردبريس. لذا، إذا كنت ترغب في إرسال رسائل البريد الإلكتروني إلى مكان آخر، مثل عنوان البريد الإلكتروني لرئيس قسم المبيعات الخاص بك، فيمكنك القيام بذلك هنا.
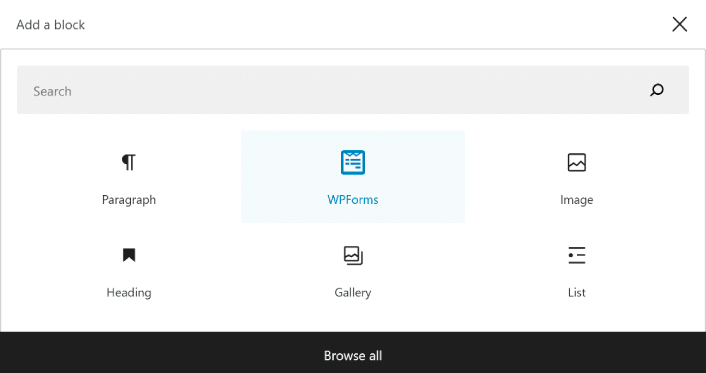
Step #6: Add the Expense Approval Form to Your Site
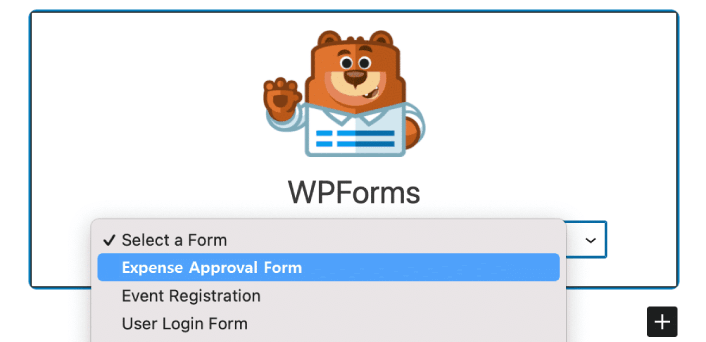
You can add the expense approval form on your site using the WPForms Gutenberg block:
All you need to do is select your expense approval form.
If you’re satisfied with the way your form looks, hit the Update or Publish button, and your form will go live.

وأنت انتهيت!
How to Promote Your Expense Approval Form
هذا كل شيء لهذا اليوم أيها الأصدقاء!
By now, you’ve learned how to create expense approval form in WordPress. Next, you should set up form abandonment tracking to reduce your form abandonment rates.
بعد ذلك، كل ما تبقى هو إنشاء حركة مرور إلى موقعك حتى يتمكن نموذجك من البدء في العمل وتحويل الزوار. طريقة بسيطة للقيام بذلك هي البدء في استخدام الإشعارات الفورية. يعد إرسال الإشعارات الفورية طريقة رائعة لتوليد حركة مرور متكررة لموقعك. إذا كان هذا شيئًا تهتم به، فيجب عليك أيضًا الاطلاع على هذه المقالات:
- تكلفة إشعارات الدفع: هل هي مجانية حقًا؟ (تحليل الأسعار)
- كيفية الحصول على المزيد من حركة المرور إلى مدونة ووردبريس الخاصة بك (9 طرق سهلة)
- كيفية زيادة معدل الاشتراك في إشعارات الدفع على الويب (7 طرق)
- كيفية إضافة إضافة إشعارات الويب لـ WordPress إلى موقعك
نوصي باستخدام PushEngage لإرسال إشعارات الدفع الخاصة بك. PushEngage هو البرنامج رقم 1 لإشعارات الدفع في العالم. لذا، إذا لم تكن قد قمت بذلك بالفعل، ابدأ مع PushEngage اليوم.


