
Want to build an app landing page in WordPress?
Building a mobile app is hard enough. Now you have to figure out how to get installs. As it turns out, even if you do build something extraordinary, you won’t necessarily get a lot of users.
Creating an app landing page is a really great way to convince and convert your site visitors into app users. But how do you do it? The simplest way to create a landing page is to create a WordPress site to promote your app. Then, use a landing page builder to quickly launch a high-converting app landing page.
In this article, we’re going to show you how to quickly launch a WordPress app landing page. And you don’t need any previous marketing or coding experience to do it.
دعنا نتعمق.
What Is an App Landing Page?
An app landing page is a standalone web page meant to convince site visitors to download your app.
Landing pages are extremely focused on getting conversions. So, your app landing page doesn’t have to be the prettiest of them all. As long as it does a good job of explaining the benefits of your app and why people should download it, you’re all set.
Creating a WordPress landing page for your app can have many benefits for your business:
- Promote brand awareness
- Increase conversions
- Collect marketing data
- Improve credibility through social proof
- Collect leads to promote future campaigns
You can do a lot with a really simple page, too.
But the one thing that you have to remember is that all successful landing pages have a similar structure and flow. This means that there are specific elements on any landing page to make it successful.
What Makes a Successful App Landing Page Successful?
Now that you know what an app landing page is and why you should create one, it’s time to check out the most critical elements of any landing page. We’ve put together some real examples to showcase how successful app landing pages use these elements.
دعنا نلقي نظرة.
#1. Call to Action
A call to action or CTA is a button or link that pushes visitors to take some action. Your app landing page is meant to get downloads for your app. And that’s the most fundamental goal for your landing page.
So, your app landing page could have three calls to action:
- A direct download button
- A QR code for a scannable download
- A contact form to collect leads for email marketing
Of the three, a contact form is the least popular. You would use a contact form to collect leads if your app hasn’t been launched yet. For mobile apps, a QR code is super popular for desktop versions of your site. For a responsive site, a direct download button is the most popular choice.
Here’s an example of a great call to action by Slack:
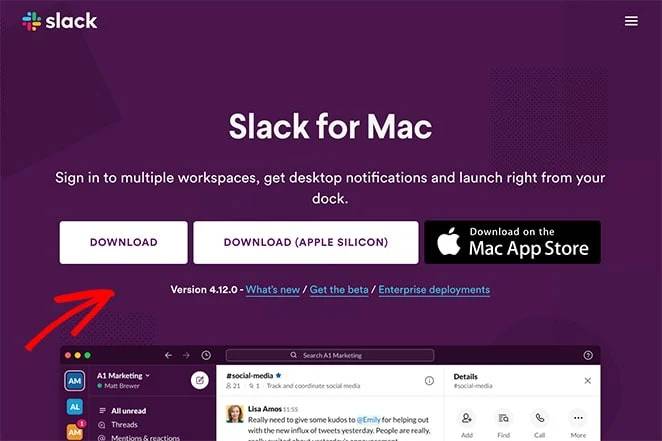
See how the entire page supports that single intent to get visitors to download? The entire focus of the page is the download button and that’s what makes this a high-converting app landing page.
#2. Headline
Your landing page headline is the first thing that your visitors will see. You don’t have to be witty with your headlines. In fact, if you’re not a professional copywriter, stick to making your headline about the biggest benefit of downloading your app.
Take a look at this great example of a landing page headline by IFTTT:
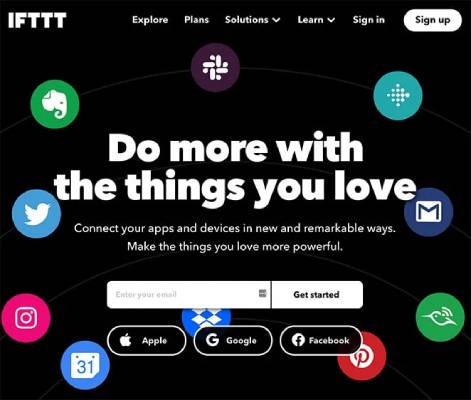
IFTTT doesn’t even list out the apps it can integrate with using the headline. You can see all the apps in the banner image. And when you read the headline, it just makes sense immediately.
Typically, your headline is the first push towards the download button. So, make it count!
#3. Body Copy
Of course, there are going to be multiple great things about your app that you can’t stuff into the headline. A detailed explanation of the benefits goes into your body copy.
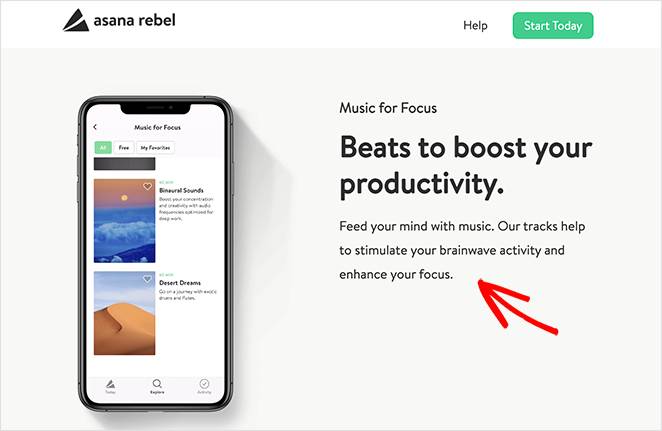
The body copy is meant to convince and convert your casual visitors into users. Here’s an example from Asana Rebel:
A great copywriting template you can use is to evoke curiosity in the headline and satisfy that curiosity in the body copy. That sense of satisfaction will make people scroll down to your CTA.
#4. Social Proof
Including social proof on your landing page shows users that your app is trustworthy. Social proof is an assumption that you lead your visitors to so that they know the correct behavior in that instance. It’s like getting a drink at a party where everyone’s drinking even though you’re not a drinker.
There are primarily 6 ways to use social proof on your landing pages:
- Expert recommendations (like how 9/10 dentists recommend every other toothpaste brand)
- Celebrity endorsements (like Kevin Hart using Car Finder)
- User reviews and testimonials (more on this soon)
- Showcasing a huge number of existing users (like the 10,000+ smart business owners who use PushEngage)
- Industry certification and awards (like the Editor’s Choice badge in Google Play or getting into Shark Tank)
Out of all these types of social proof, the easiest to get are user reviews and testimonials. Check out this example from Aura:

It uses the strength in huge numbers along with reviews and testimonials to lead beautifully to their CTA button.
#5. Engaging Visuals
Before we start this section: The goal of your app landing page in WordPress is NOT to look pretty. It just has to answer the right questions in the right order and give your visitors a reason to convert.
That said, a beautiful-looking landing page doesn’t hurt. If your app landing page offers an engaging visual style, people automatically think that the overall quality of your product is going to be high. Take a look at this really cool app landing page by Acorn:
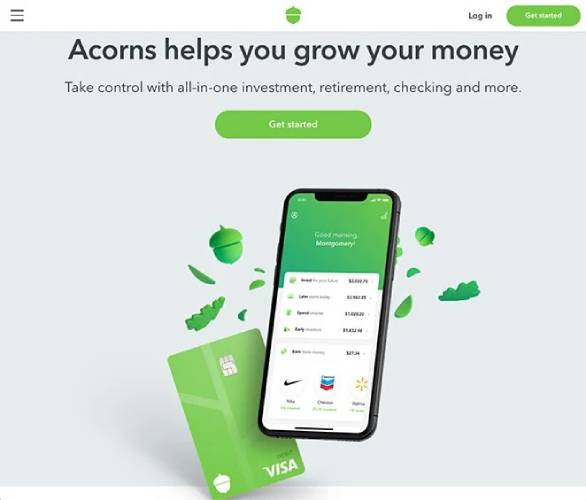
You can do that same thing using high-quality stock images without having to hire a designer.
How to Build an App Landing Page in WordPress
By now, you know what an app landing page is, why you should create one, and what elements of the page deserve most of your attention.
So, it’s time to build your first app landing page in WordPress. Before we start, you should know that there are TONS of WordPress themes, theme builders, and landing page builders out there. But we recommend using SeedProd.

SeedProd هو منشئ صفحات هبوط مرئي يساعدك على إنشاء صفحات هبوط تحقق تحويلات جيدة جدًا.
SeedProd isn’t a website builder or a webpage builder. It’s a landing page builder. A web page builder relies heavily on your theme and it simply takes on the default styles of your theme. And consequently, it’s really difficult to modify your headers, footers, and page elements beyond a certain point using a website builder.
أداة إنشاء الصفحات المقصودة مستقلة تمامًا عن القالب.
Want to remove your navigation menu so that your visitors are focused entirely on one thing? No problem!
Need a custom footer to help your visitors convert more easily? Just one click and it’s done.
ربما ترغب في إنشاء صفحات مقصودة مختلفة حيث يكون لمصادر حركة المرور المختلفة أزرار دعوة لاتخاذ إجراء (CTA) مخصصة؟
في كل هذه الحالات، تحتاج إلى أداة إنشاء صفحات مقصودة وليس أداة إنشاء مواقع ويب. إذا كنت بحاجة إلى صفحة مقصودة تحقق التحويل ولا تملك فريق تطوير كبير، فإن SeedProd استثمار رائع حقًا.
We use SeedProd ourselves and we wrote a full review. You can check that out for more details on the top features. Or, you can dive straight into building your app landing page on WordPress.
Step #1: Install SeedProd Landing Page Builder
First, you’ll need to visit the SeedProd website and purchase the plugin. Then, you can download the plugin file to your computer. Then, copy the plugin license key from your SeedProd dashboard.
Next, you’ll have to log into your WordPress dashboard and install the plugin. If you need detailed instructions, check out this step-by-step guide to installing a WordPress plugin. Head over to the SeedProd plugin welcome screen on WordPress and verify your license key:

After your account is verified, you’re ready to create a landing page.
الخطوة رقم 2: إنشاء صفحة هبوط جديدة
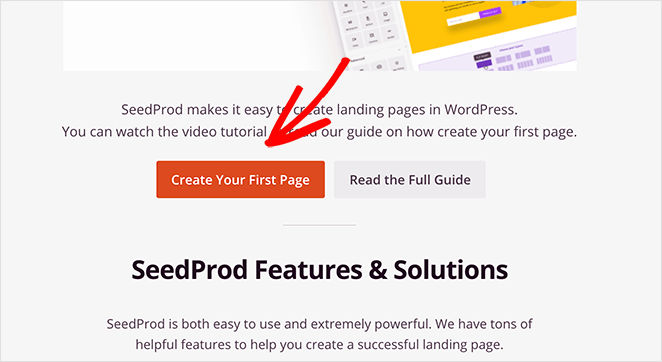
In the SeedProd welcome screen, scroll further down and click on Create Your First Page button:
Then, you’ll see 5 different types of landing pages that you can create:

Using SeedProd’s templates, you can quickly launch complicated pages such as:
- Coming Soon and Maintenace Mode Pages
- Login Pages
- 404 Pages
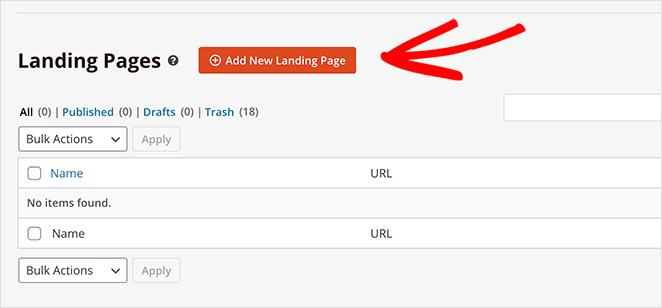
And if you scroll down a little further, you can launch a custom landing page from pre-built templates. Click on Add New Landing Page:
We’re going to use one of SeedProd’s powerful pre-built landing page templates next.
Step #3: Choose a Landing Page Template
Choose a landing page template from the pre-built landing pages listed in SeedProd’s builder:
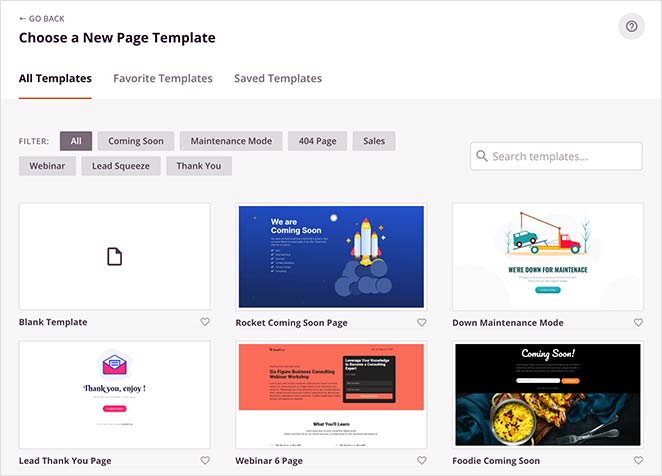
Take your time and select the right template for you. To select a template, just click the checkmark icon on the template.
Remember, the template is just a starting point. In the next section, we’ll see how to customize your landing page easily using SeedProd’s drag-and-drop builder.
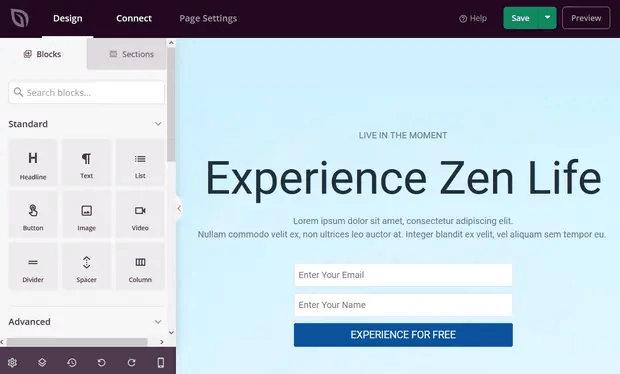
Step #4: Add Your Landing Page Content
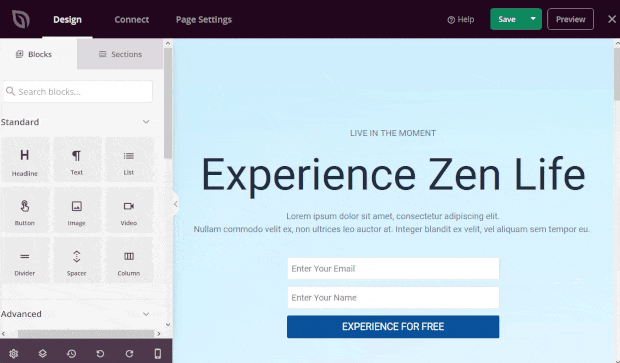
After choosing your landing page template, you’ll be redirected to SeedProd’s visual drag and drop builder where you can customize your landing page. On the left-hand side of the editor you get a list of the design elements that you can use to customize your landing page:
Click on any of the text elements to edit the copy directly in the frontend builder:
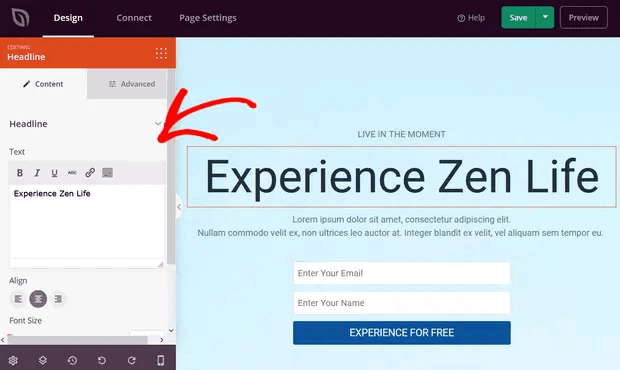
You can change the text, its style, color, alignment, and layout to fit your product or overall brand.
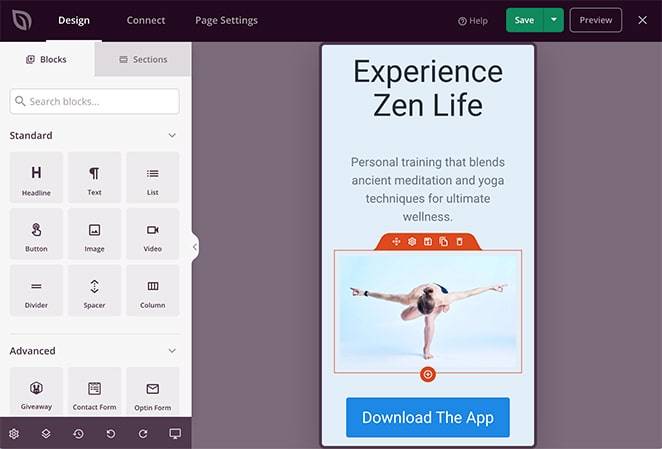
Step #5. Customize Your App Landing Page
Next, you’ll want to customize your app landing page. The cool thing is that you can easily add new blocks such as buttons, optin forms, contact forms, social profiles, and more to your landing page template.
The content elements in SeedProd are called landing page blocks. They include Standard blocks, which provide basic design and functionality, and Advanced blocks for lead generating page elements like:
- Social Media buttons
- Optin Forms
- Giveaways
- Countdown Timers
- تقييمات النجوم
- Contact Forms
And LOTS more. For instance, you can drag and drop a countdown timer to increase urgency:
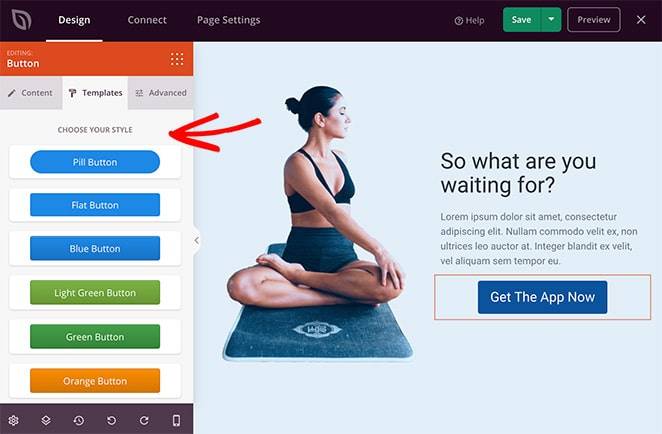
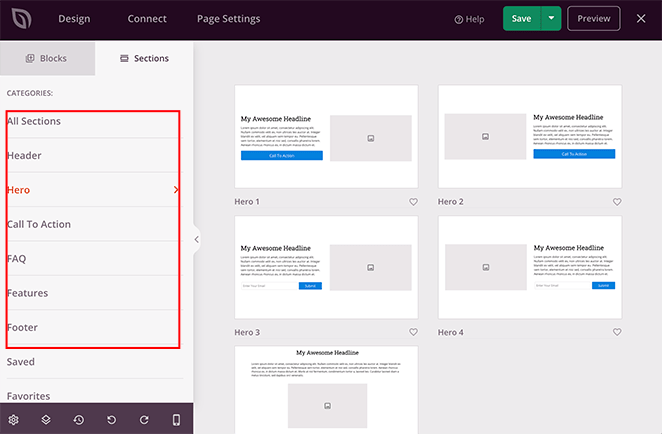
You’ll find that many of SeedProd’s landing page blocks also come with ready-made templates. Just click the Templates tab to see a variety of styles you can implement with a single click.
These are complete page sections, including:
- Call to action areas
- ميزات
- عناوين
- Footers
- أسئلة متكررة
- Hero areas
The great thing about these sections is that you don’t have to create them block-by-block. You can simply import a section with a single click.
Customize everything about your landing page until it looks exactly like you want it to. When you’re done, click on Save.
Step #6: Add a Click to Subscribe Button to Your Landing Page
يمكنك أيضًا إضافة زر انقر للاشتراك لجمع مشتركين في الإشعارات الفورية. تعد الإشعارات الفورية طريقة رائعة لزيادة حركة المرور المتكررة، والحصول على المزيد من التفاعل، وحتى بيع البضائع الرسمية إذا كان لديك بعض منها.
في SeedProd، قم فقط بسحب وإفلات وحدة HTML المخصصة من الشريط الجانبي.
لقد وضعنا زر الاشتراك مباشرة أسفل نموذج الاشتراك عبر البريد الإلكتروني في الطية الأولى.

ولكن يمكنك إدراج الزر في أي مكان تريده.
لهذا الجزء، تحتاج إلى بعض الخبرة في HTML و CSS. أو، يمكنك نسخ هذا الكود ولصقه في كتلة HTML المخصصة الخاصة بك:
<button onclick="subscribeOnClickButton()" style="border: none; padding-left: 5%; padding-right:5%; text-align: center; display: inline-block; color: blue;">Get Updates via Push Notifications</button>هذا زر قياسي في HTML مع القليل جدًا من التنسيق. الشيء الوحيد المميز هو وظيفة onclick في الكود. هذا يعني بشكل أساسي أنه يمكن لزوارك النقر على الزر للاشتراك في شيء ما. الآن، نحتاج إلى إضافة بعض الأكواد الإضافية للزر للسماح لزوارك بالاشتراك في إشعارات الدفع.
توجه إلى الصفحة الرئيسية لـ PushEngage وانقر على زر البدء:

بعد ذلك، ستحتاج إلى تحديد الخطة المجانية لتجربة PushEngage أو اختيار خطة مدفوعة إذا كنت جادًا بشأن تنمية عملك. تأتي الخطط المدفوعة مع المزيد من خيارات الحملات والقدرة على بناء قوائم مشتركين أكبر.
في لوحة تحكم PushEngage الخاصة بك، انتقل إلى إعدادات الموقع » تفاصيل الموقع وانقر على زر انقر هنا لتعليمات الإعداد. ضمن أي موقع، ستحصل على كود التثبيت الخاص بك:

تحذير: تحتاج إلى نسخ الكود الذي تحصل عليه من لوحة التحكم الخاصة بك. الكود فريد لكل مستخدم PushEngage. لن تتمكن من نسخ الكود الموجود في الصورة وجمع المشتركين في إشعارات الدفع.
بمجرد حصولك على الكود في لوحة تحكم PushEngage الخاصة بك، أضف هذا المقتطف إلى الكود الخاص بك:
<script> window._peq = window._peq || [];</script> <script>
function subscribeOnClickButton(){
window._peq.push(['subscribe',{}.pe,function(res){
if(res.statuscode==1)
{
// Code to return response
console.log(res);
}
}]);
}
</script>
يجب أن يبدو الكود النهائي الخاص بك شيئًا كهذا:
<script src="https://clientcdn.pushengage.com/core/02a6e92667ae2279fcba8932356c1d93.js" async></script>
<script> window._peq = window._peq || [];</script> <script>
function subscribeOnClickButton(){
window._peq.push(['subscribe',{}.pe,function(res){
if(res.statuscode==1)
{
// Code to return response
console.log(res);
}
}]);
}
</script>
ستحتاج إلى إضافة هذا الكود إلى كتلة HTML في صفحة الهبوط الخاصة بك بعد الكود الخاص بالزر. يجب أن يبدو شيئًا كهذا:

Feel free to customize the styles for the button any way you please. When you’re done customizing your app landing page, go ahead and hit the Save button.
Step #7: Connect Your Email Marketing Service
This step isn’t mandatory unless you’re using your app landing page to collect leads. But we highly recommend collecting email addresses even for direct app downloads. The only time we’d recommend against it is if your app directly collects emails during a signup process.
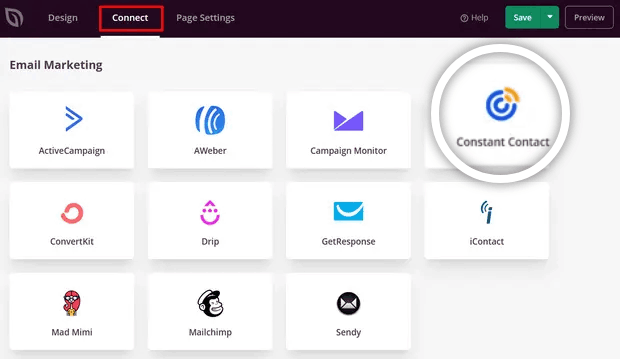
If you’re creating a landing page to collect leads on your site, then you’ll want to create an optin. Then, connect your optin to an email service provider such as Constant Contact.
To do this, go to the Connect tab on the SeedProd builder and select your email service provider from the list:
Next, click Connect New Account:
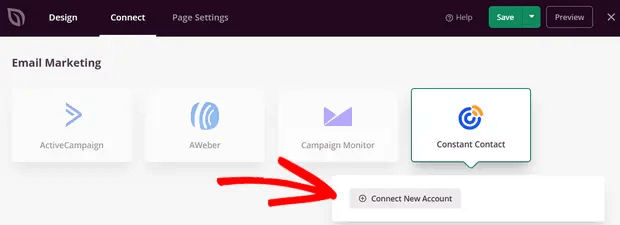
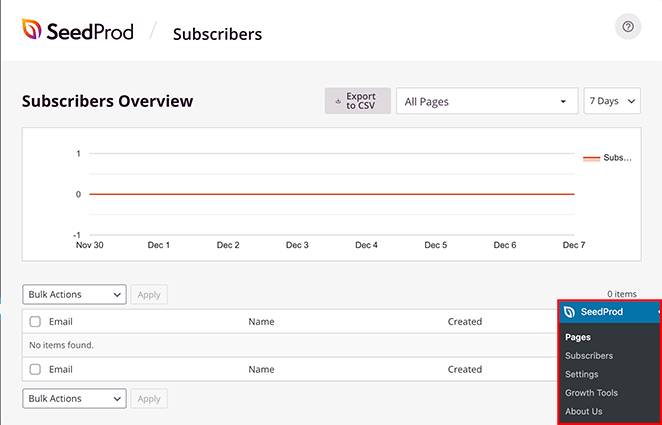
Once that’s done, you’ll need to configure your email service to collect leads. If you don’t have an email service provider or can’t afford to get one right away, don’t worry. SeedProd saves your email leads on WordPress by default. Head over to SeedProd » Subscribers from your WordPress dashboard to see your email list.
Step #8: Configure Your Landing Page Settings
The next step is to adjust your app landing page settings. You can view them by clicking the Page Settings tab at the top of the page builder.
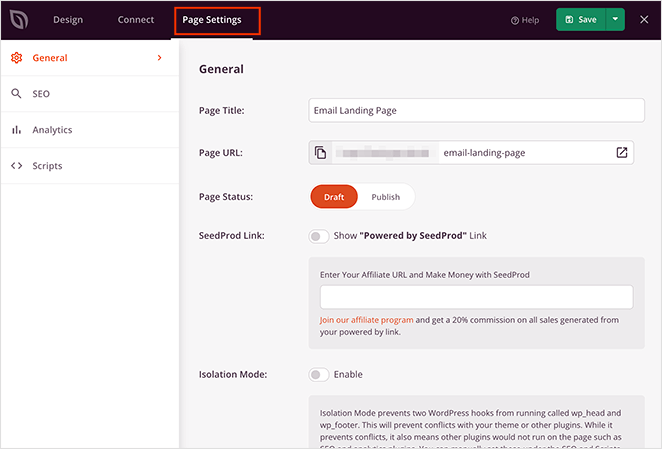
In the settings area, you can edit your pages, General, SEO, Analytics, and Scripts settings. From the General tab, you can choose a name and URL. If you’re seeing issues with your landing page, it’s likely that your WordPress theme or some other plugin is conflicting with SeedProd. Use the Isolation Mode if that’s the case.
Step #9: Check Your Page is Mobile Friendly
We’re almost done. Next, you’ll want to check out how your landing page looks on a mobile. One way to do this would be to publish your app landing page and check the live version from a mobile device.
But that’s quite tedious since you’ll have to go back and edit changes manually and check each time if that fixed your problem.
SeedProd has a much simpler way to check the mobile version of an app landing page. Just click the mobile phone icon in the bottom-right of your screen.

And you’ll see a preview of the mobile version right from your landing page builder:
You can edit your settings exactly as you would for the desktop version. Any changes you make are applied automatically to both desktop and mobile views.
Step #10: Publish Your App Landing Page in WordPress
Once you’re done, change your page status from draft to published.
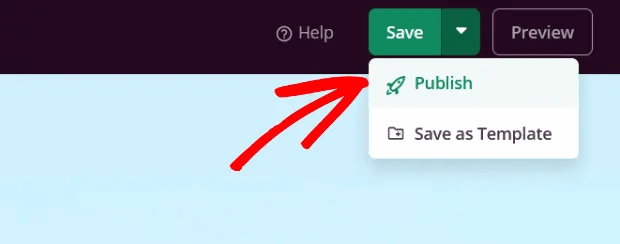
You should see a success message on publishing your page that looks something like this:
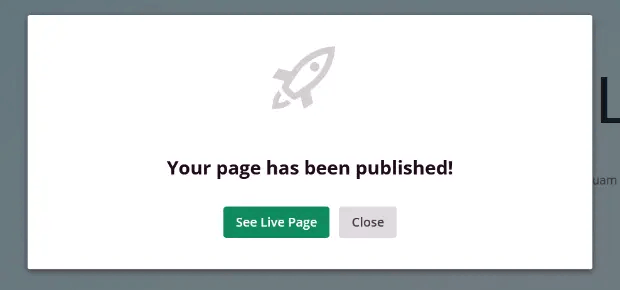
You can click on the See Live Page button to view your landing page. And you’re all done!
What to Do After Building an App Landing Page in WordPress
هذا كل شيء لهذا اليوم أيها الأصدقاء!
Now that your landing page is live, the only challenge you have left is to send traffic to your landing page.
وإذا كنت تبحث عن طريقة ميسورة التكلفة لزيادة زياراتك، نوصي باستخدام إشعارات الدفع. يمكن أن تساعدك إشعارات الدفع في جلب المزيد من الزيارات المتكررة وتفاعل الموقع. يمكنك أيضًا إنشاء حملات إشعارات دفع آلية تولد مبيعات.
غير مقتنع؟ تحقق من هذه الموارد:
- 7 استراتيجيات ذكية لزيادة تفاعل العملاء
- هل إشعارات الدفع فعالة؟ 7 إحصائيات + 3 نصائح خبراء
- كيفية إعداد إشعارات الدفع للسلات المتروكة (دليل سهل)
- كيفية إضافة إضافة إشعارات الويب لـ WordPress إلى موقعك
نوصي باستخدام PushEngage لإنشاء حملات إشعارات الدفع الخاصة بك. PushEngage هو البرنامج رقم 1 لإشعارات الدفع في العالم. لذا، إذا لم تكن قد قمت بذلك بالفعل، ابدأ مع PushEngage اليوم!


