Looking for a resource on how to track push notifications with Google Analytics?
推送通知分析可能有点令人不知所措。首先,您必须确保可以在 Google Analytics 上正确跟踪它们,以便更好地报告。然后,您必须了解这些数字的实际含义以及您是否走在正确的轨道上。
There are too many questions and the internet is full of mediocre resources with no real answers.
Don’t worry. In this article, we’re going to show you how to look at push notification analytics the right way. You’re about to get answers to all these questions and more.
让我们开始吧。
Types of Push Notification Analytics Data
Push notification analytics can be pretty confusing when you see them for the first time. So, before we get into advanced topics such as goal tracking and revenue mapping, let’s understand the different types of push notification analytics data and how to interpret them.
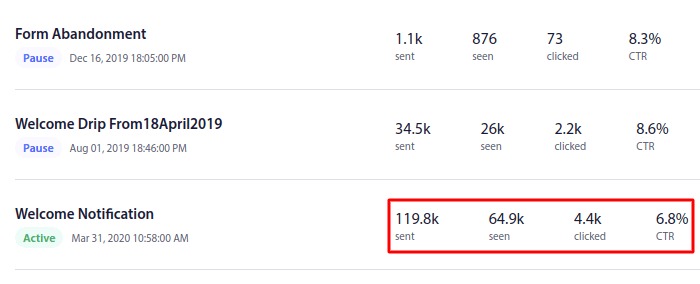
Push Notification Analytics for Campaigns
每个推送通知活动或单次广播都有其自己的分析数据。您需要关注的是:
- Click through rate (CTR): The CTR is the percentage of people who saw your push notification and then clicked on it.
- Goal count: Your goal count is the number of people who took the action you wanted after clicking on your notification.
- Revenue: We highly recommend having a revenue goal for your push campaigns, especially is you’re running an eCommerce store.
还有一些其他指标可以关注:
But if you’re just focusing on your CTR, your goal counts, and your revenue, that’s good enough. We’ll talk more about creating goals soon. Keep reading.
推送通知选择加入分析
推送通知选择加入也有非常具体的分析。
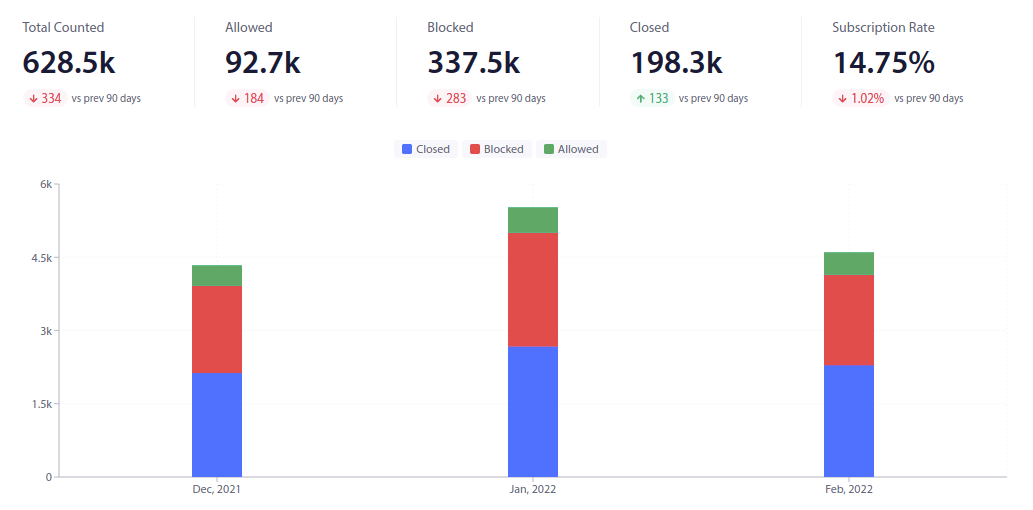
What you want to focus on is your subscription rate. The rest of the numbers can be a distraction if you’re a complete startup.
But once you start to grow, you also want to have a clear picture of how many times people saw your opt-in, how many times your web visitors allowed the opt-in to show up, and how many times the popup got blocked. Knowing these numbers will help you get a clear picture of how effective your spending on push notifications really is.
Goal Tracking for Push Notifications
Goal tracking is one of the most powerful features any push notification service can offer you. Goal tracking enables you to create a goal for your campaigns. Every time your subscribers take the action you want them to, the goal counter automatically attributes success for easy reporting.
Let’s break this down in simpler terms.
通过目标跟踪,您可以跟踪活动的投资回报率。例如,如果我们为网站上的购买设置了收入目标,那么通过推送通知进行的目标跟踪可以跟踪:
- 转化次数
- 以及美元价值
对于通过推送通知活动进行的每一次销售!
根据此报告,您可以计算活动的投资回报率 (ROI)。
Similarly, if your goal is to increase leads on your site, goal-tracking a form abandonment notification campaign will assign a value per lead to identify how many leads you’ve generated from push notifications and how much they’re worth.
If you’re running several triggered campaigns at a time and you want to test which of them is working best, Goal Tracking will help you get a clear picture.
Let’s say you have coupons for extra discounts in one of your cart abandonment campaigns and a coupon code for free delivery in another one. Looking at the revenue metrics for both campaigns will tell you what’s working better.
This will give clarity on which campaign is working best for your website.
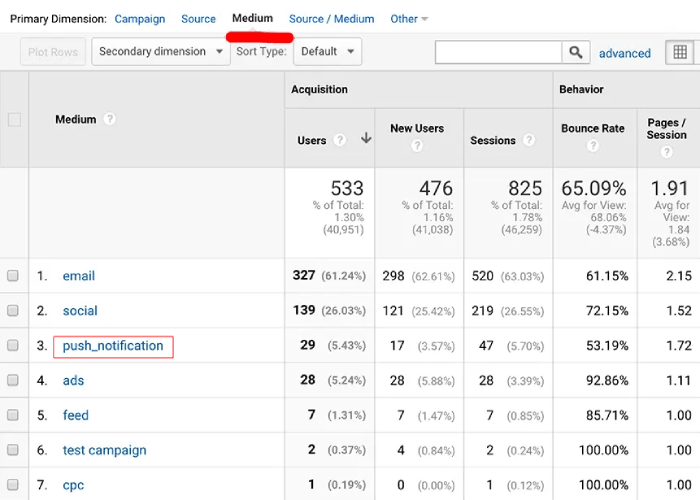
How to Track Push Notifications Using UTM Parameters
By now, you understand what metrics to look at for different parts of your entire push notification campaign. But how do you report it effectively? Seeing the goal tracking reports on your push notification dashboard is great. But you’d need to compare your push notification performance with other marketing channels.
We’re going to check out how you can track your push notifications on Google Analytics using UTM parameters. And we’re going to do it on PushEngage. PushEngage is the #1 push notification software in the world. It’s super easy to track push notification campaign performance on PushEngage and you can use UTM parameters as well.
Step #1: Get Started with PushEngage
If you haven’t yet, go ahead and install PushEngage to your site.

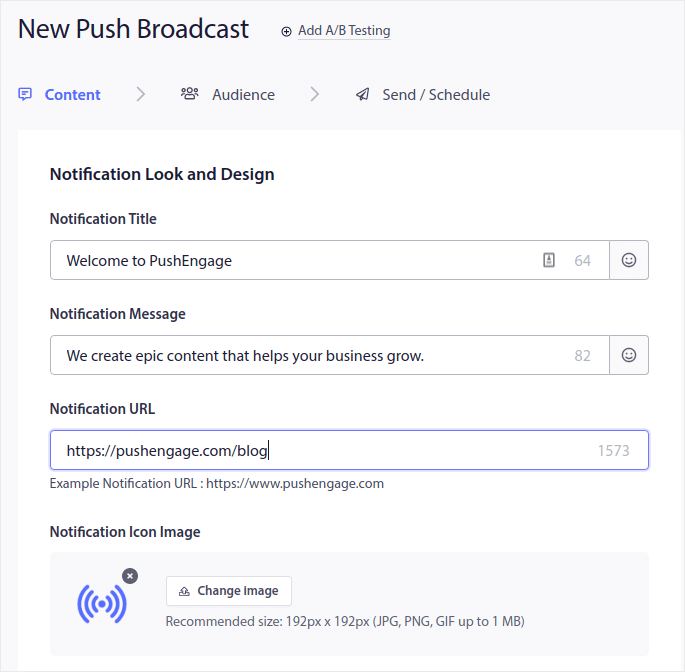
Step #2: Create a Push Broadcast
Once you’re done signing up, head over to your PushEngage dashboard and go to Campaign » Push Broadcasts. Then, click on Create New Push Broadcast:

In the next screen, you’ll be able to create your push notification:
Step #3: Add UTM Parameters
Under the Content tab, scroll further down to the section called UTM Parameters and enable it:

You can keep the default values for the UTM parameters or change them as you see fit. For instance, we’d probably set more descriptive tags for the UTM Campaign and UTM Content parameters.
If you’re not sure what these parameters are, here’s a quick rundown:
- UTM Source: Helps you identify which site sent the traffic
- UTM Medium: Identifies which type of link was used
- UTM Campaign: Specifies the specific product or campaign promotion
- UTM Terms: Help identify search terms for your content
- UTM Content: Helps you track what the user clicked that redirected him to the site
The more detailed your UTM parameters are, the more you can track push notifications.
If you’d like to see how your push notifications are performing on Google Analytics, check out this beginner’s guide to UTM tracking.
Pro Tip: UTM parameters aren’t just meant for push broadcasts. You can head over to your automated push notification campaigns and set UTM parameters for each notification in an automated campaign as well.
How to Set Up Conversion Goals for Push Notifications
We’ve already talked about why setting up goal tracking for your push notifications is super important. but how do you actually do it?
Step #1: Configure Goal Tracking Settings
Head over to your PushEngage dashboard and go to Analytics » Goal Tracking:
Start by clicking on Enable Goal Tracking. If you like, you can change the Tracking Method as well. There are two types of attributions you can use here:
- Last View: Counts the number of views your notification recieved. Perfect for campaigns that raise awareness and increase engagement.
- Last Click: Counts the number of clicks on your push notification and then the clicks on your site. Perfect for conversion campaigns.
Then, if you want, you can always set a custom tracking time for your cookies to count your goals. But we recommend keeping the default value.
The default goal PushEngage provides is the revenue goal. And if you want to change your currency, you can now change your currency to anything you like. The default currency is USD, but you can change it to your local currency from the dropdown.
Once you’re done customizing the goal tracking settings, click on Update.
Step #2: Add the Tracking Code
Then, copy the tracking code on the right and paste it in the HTML <body> of the page you’re tracking for conversions. Typically, this would be the checkout page on your site. Don’t worry if you don’t know how to do that. The same screen will take you detailed instructions.
Just select the CMS you’re using to run your site and click on See detailed instructions:
您就完成了!
下一步是什么?
好了,各位,本次分享就到这里!
如果您是推送通知的新手,在上线之前,您应该遵循一个完整的 推送通知测试 流程。这将帮助您在访问者看到它们并开始抱怨糟糕的用户体验之前解决常见问题。
Or, you could check out one of these epic resources to get more value from your push notification campaigns:
如果您还没有尝试过PushEngage,现在就去试试吧。PushEngage是全球排名第一的推送通知服务。所以,如果您想认真发展您的业务,就应该投资PushEngage。


