
Looking for a simple guide to iOS push alert campaigns? iOS push alerts, those handy little messages that pop up on your screen, can be a real game-changer for your business if used properly.
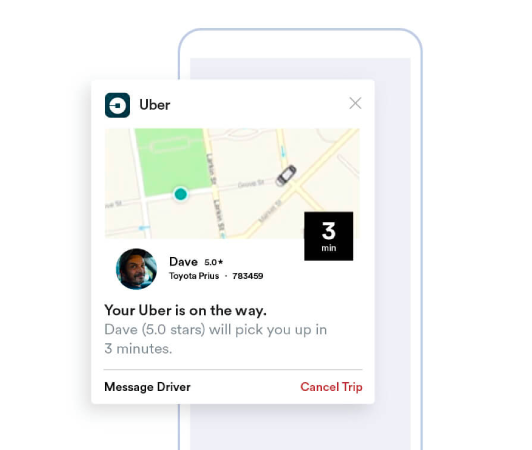
Now picture this: You’re a business owner and you’ve just launched a flash sale on your website and app. How do you get customers to immediately flock to your site? Simple, by sending out an iOS push alert. Just like that, shoppers receive a timely notification about the sale, and your website and app traffic shoots through the roof.
But what is an iOS push alert exactly? Think of it as your personal, pocket-sized billboard. It’s a brief message or notification pushed to iOS devices (iPhones, iPads) from apps installed on the device.
The best part is that you can get all this set up super fast! Sounds interesting, right? Let’s dive in.
What is an iOS Push Alert?
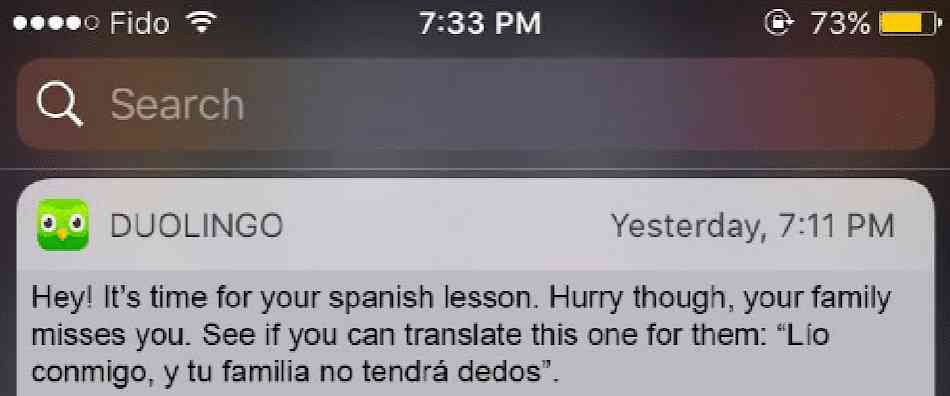
An iOS push alert is akin to a small digital memo that shows up on your Apple mobile devices. It could be from your favorite social media platforms, news distributors, or online shopping apps – all aiming to keep you in the loop, engaged, and connected.
Think of these mini-messages as gentle taps on your iOS device’s shoulder sent via the Apple Push Notification service (APNs). It’s almost as if the app is whispering to your device, requesting for your attention. The remarkable aspect of iOS push alerts is that you don’t even need to have the app active, or be using it. As if by a stroke of wizardry, notifications pop-up even on your locked screen, assuring you never bypass essential updates or prompts.
iOS push alerts offer a wealth of benefits. First and foremost, they are an exceptional tool for keeping you informed with up-to-the-minute information. Picture an alert from an online shopping app informing you about a current sale.

Additionally, they can save you precious time. Imagine your banking app sending an alert confirming a successful transaction, negating the need to login and check manually. On top of these pragmatic benefits, iOS push alerts enhance your overall app experience by making it more lively and interactive.
Navigating these notifications is made user-friendly by platforms such as PushEngage. Empowered with sophisticated features, PushEngage ensures these bite-sized information pieces serving your interests, reach you timely and are streamlined according to your preferences. Whether it’s notification frequency or the type of alerts; PushEngage places the control in your hands.
Armed with a basic understanding of what iOS push alerts are and their mechanics, let’s delve deeper into the variety of notifications and unravel how apps harness them to engage and convert their users.
Types of iOS Push Alert Campaigns You Can Use
There are many types of iOS push alerts that can be used to increase interaction with your audience. By understanding these different types, you can improve their effectiveness and create a more personalized and interactive user experience.
- In-App Alerts: These alerts can be sent when a user is actively using your app. For example, an e-commerce app can send an alert about a special discount on an item that the user is interested in. With PushEngage, businesses can easily send these relevant and timely messages to increase user engagement.
- Location-Based Notifications: These alerts are sent based on the user’s geographical location. They are great for businesses like retail outlets or events that want to inform nearby users about exclusive offers. PushEngage makes geo-targeting simple, ensuring businesses can effectively reach their target audience no matter where they are.
- Behavior-Based Alerts: These notifications are sent in response to specific actions taken (or not taken) by the user in the app. For example, if a user adds an item to their cart but doesn’t buy it, a behavior-based alert could remind them. With PushEngage, businesses can precisely manage these types of notifications.
- Timed Notifications: These push alerts are set to be sent at predetermined times and can be used for recurring events or notifications. With PushEngage, these notifications can be scheduled ahead of time, ensuring users stay informed about important updates or events.
A successful push alert campaign needs the right type of notification for its goals. So, if you’re looking to boost your business using iOS push alert campaigns, you need an iOS push notification service with many choices available to optimize your strategy for maximum engagement.
How Does an iOS Push Alert Work?
An iOS push alert is generated when the specific app on your iOS device communicates with the APNs. Once the notification is crafted and sent, APNs routes it to the intended device – all within the space of a few microseconds.
Now let’s dive deeper into the world of iOS push alerts. Consider checking your phone and you immediately see a notification from your favorite news app telling you about breaking news, or your go-to shopping app alerting you about a flash sale. These are the moments when iOS push alerts come into play. These notifications are small messages that apps send to appear on the device’s home or lock screen, even when the app is not currently in use.
iOS push alerts are vital parts of our day-to-day digital interaction. They are powered by Apple’s push notification service, known as APNs. This service coordinates the delivery of notifications from the servers of your apps to your Apple devices. This process ensures that you’re always in the loop, receiving real-time updates from your apps without having to check them manually.
These alerts not only provide information, but also save you time and keep you connected. Using our partner, PushEngage, businesses can send targeted iOS push alerts that enhance user dopamine and engagement levels. For instance, PushEngage-driven notifications can intelligently remind you about the items left in your e-commerce cart or alert you about the arrival of a much-awaited product. In this sense, they enrich the overall user experience by providing optimized and personalized notifications.
Think of it this way: iOS push notifications are like friendly gatekeepers, providing helpful updates right at the doorsteps of your device. And what’s more, their roles are becoming increasingly diverse and exciting with passing time. So, by using a powerful tool like PushEngage, both businesses and users can derive significant benefits from these sophisticated alert systems.
How to Add iOS Push Alerts to Your App
There are fundamentally two types of iOS push alert campaigns:
- An iOS web push alert
- An iOS app push alert
Based on your business, you might be able to send both web and app push notifications. And we highly recommend sending both types of push alerts. But before you create an iOS push alert, you need to select a push notification service. A push notification service is a software that allows you to create push campaigns without any coding.
PushEngage kullanmanızı öneririz.

PushEngage, dünyadaki 1 numaralı anlık bildirim eklentisidir.
Anlık bildirimler, web sitesi trafiğinizi ve etkileşiminizi otomatik olarak artırmanıza yardımcı olur. Ve bir çevrimiçi mağaza işletiyorsanız, PushEngage ayrıca otomatik e-ticaret anlık bildirimleri oluşturmanıza yardımcı olarak satışlarınızı artırmanıza da yardımcı olur.
Ücretsiz başlayabilirsiniz, ancak işletmenizi büyütme konusunda ciddiyseniz, ücretli bir plan satın almalısınız. Ayrıca, herhangi bir anlık bildirim hizmeti satın almadan önce, anlık bildirim maliyetleri hakkındaki bu kılavuza göz atmalısınız.
PushEngage ile nelerin geldiğine hızlı bir bakış:
- Yüksek dönüşüm sağlayan otomatik kampanyalar
- Birden fazla hedefleme ve kampanya zamanlama seçeneği
- Hedef takibi ve gelişmiş analizler
- Akıllı A/B Testi
- Proven push notification templates to help you get more traffic and conversions
- Özel Bir Başarı Yöneticisi
İşletmeniz için trafik, etkileşim ve satış oluşturmak istiyorsanız, PushEngage'in tartışmasız en iyi seçenek olduğunu göreceksiniz. Ve bütçeniz kısıtlıysa, anlık bildirimlerinizle biraz yaratıcı olabilirsiniz.
How to Create a Free PushEngage Account
PushEngage'a gidin ve Şimdi Ücretsiz Başlayın:'a tıklayın
Ücretsiz planla başlayabilirsiniz. Ancak en güçlü tarayıcı bildirimlerini arıyorsanız, işletmenizin ihtiyaçlarına göre ücretli bir plan seçmelisiniz. Hangi planı istediğinizi bildiğinizde, PushEngage hesabınızı oluşturmak için Başlayın'a tıklayın.
Sign Up for PushEngage
Şimdi PushEngage hesabınızı oluşturma zamanı. Bir e-posta adresi veya Gmail kimliği ile kaydolarak başlayın:

Ardından, hesap bilgilerinizi doldurun:

Ve planınızı satın almak için kredi kartı bilgilerinizi ekleyin:

Ücretsiz hesabı seçtiyseniz, planınızı yükseltmeyi seçene kadar kredi kartınızdan hiçbir ücret alınmayacaktır. Ve şimdi, PushEngage kontrol panelinize erişmek için hazırsınız. Sadece Kaydı Tamamlayın ve Anında Erişim Sağlayın'a tıklayın.
Daha önce OneSignal veya PushAlert kullandıysanız, PushEngage'ın kontrol panelinden çok daha temiz bir deneyim sunduğunu göreceksiniz. OneSignal kontrol paneli gelişmiş kampanyalar için tasarlanmamıştır. Bunun için OneSignal eklentisinden çok API'ye ihtiyacınız olacak.
How to Add Web App iOS Push Alert Campaigns to Your Website
Let’s start by setting up iOS push alerts from your website. The idea behind this is simple. We turn your website into a simple web app that can send iOS and iPadOS push notifications. This approach is ideal for sending web app push notifications.
Step #1: Add a Web App Manifest to Your Website to Send Web Push Notifications
Think of a web app manifest as a special file that acts like a guidebook for your website when it’s installed on someone’s phone or computer. It’s written in a language called JSON, but you don’t have to worry about that part.
The manifest file contains important information about your Progressive Web App (PWA), like its name, description, icons, and colors. So, when someone adds your website to their home screen or installs it on their device, the browser uses this manifest to know how your app should look and behave. This allows you to send PWA push notifications.
For example, the manifest tells the browser what icon to use for your app on the home screen or app drawer, so it looks nice and recognizable. It also specifies the colors and theme of your app to give it a consistent and appealing appearance.
Additionally, the manifest includes the URL that should be opened when someone launches your app. This way, the browser knows which page or section of your website to show them first.
Creating a manifest file can be done quickly with online tools that do the hard work for you. We recommend using this free app manifest generator to build your web app manifest in a few clicks and zero coding.
Once you have the manifest ready, you usually name it “manifest.json” and upload it to the root folder of your website.
In a nutshell, the web app manifest is like a manual that makes your web app look and feel just right when people use it on their devices. It’s an essential part of creating a great user experience for your website visitors.
Tipik bir manifest şuna benzer:
{
	"name": "PushEngage",
	"short_name": "PushEngage",
	"start_url": "/",
	"display": "standalone",
	"theme_color": "#3b43ff",
	"background_color": "#ffffff",
	"icons": [
		{
			"src": "icon/icon-128x128.png",
				"sizes": "128x128",
				"type": "image/png"
		},
		{
			"src": "img/icon-192x192.png",
			"sizes": "192x192",
			"type": "image/png"
		},
		{
			"src": "img/icon-512x512.png",
			"sizes": "512x512",
			"type": "image/png"
		}
 	]
}
Once you add your manifest file to the root folder of your website server, you need to add a code snippet in the HTML head of your website. The snippet would look something like this:
<link rel="manifest" href="/manifest.json">If you’re using WordPress and need help adding this code snippet to your site’s header, you can use WPCode to upload the manifest file. It’s one of the best code snippet plugins for WordPress.
Step #2: Install PushEngage to Your WordPress Site
You’re done creating your account. So, head over to the PushEngage dashboard and follow along.
NOTE: If you’re not running a WordPress site, you should check out our other installation guides.

Site Ayarları » Site Detayları'na tıklayın ve Kurulum Talimatları İçin Buraya Tıklayın düğmesine tıklayın:

WordPress sekmesine tıklayın ve eklentiyi web sitenize yüklemek için PushEngage WordPress Eklentisini Yükle düğmesine tıklayın.

Here’s the cool part: When you created your PushEngage account, you already synced your website with your PushEngage account. So, click on the installation link in the PushEngage dashboard to automatically install the PushEngage WordPress plugin to your website.
Adım #3: WordPress Sitenizi PushEngage ile Bağlayın
When you’re done installing and activating the PushEngage WordPress plugin, you’ll see the PushEngage onboarding wizard:

Sihirbaz oldukça basittir. Yeni bir kullanıcıysanız, Yeni mi? Ücretsiz Hesabınızı Talep Edin'e tıklayın. Zaten kaydolduysanız, Mevcut Hesabınızı Bağlayın'a tıklayın.
Ardından, kayıt sırasında bir site kaydettiyseniz, Kayıtlı bir site bağla altında Bir Site Seçin açılır menüsünden sitenizi seçebilirsiniz:

Veya, Premium fiyatlandırma planınız veya daha üstü varsa yeni bir site eklemek için Yeni bir site kaydet'e tıklayabilirsiniz. Bir sonraki adımda, karşılama sihirbazı sizi diğer mutlaka sahip olunması gereken WordPress eklentilerini yüklemeniz için yönlendirecektir.

Her adımı doğru bir şekilde takip ettiyseniz, sihirbazdan bu başarı mesajını göreceksiniz:

Artık kampanyalar oluşturmaya ve anlık bildirim açılır pencereleri göndermeye hazırsınız.
Step #4: Test Your Website Manifest
Alright, let’s walk through the steps to test your web app and make sure everything is working smoothly.
First, open your website using the Safari browser on your iPhone or iPad. Make sure your device is running iOS 16.4 or a newer version. Once your website is loaded, you’ll see a Share button. It looks like a square with an arrow pointing up. Tap on that button to open the sharing menu.
In the sharing menu, you should find an option called Add to Home Screen. Click on that option.
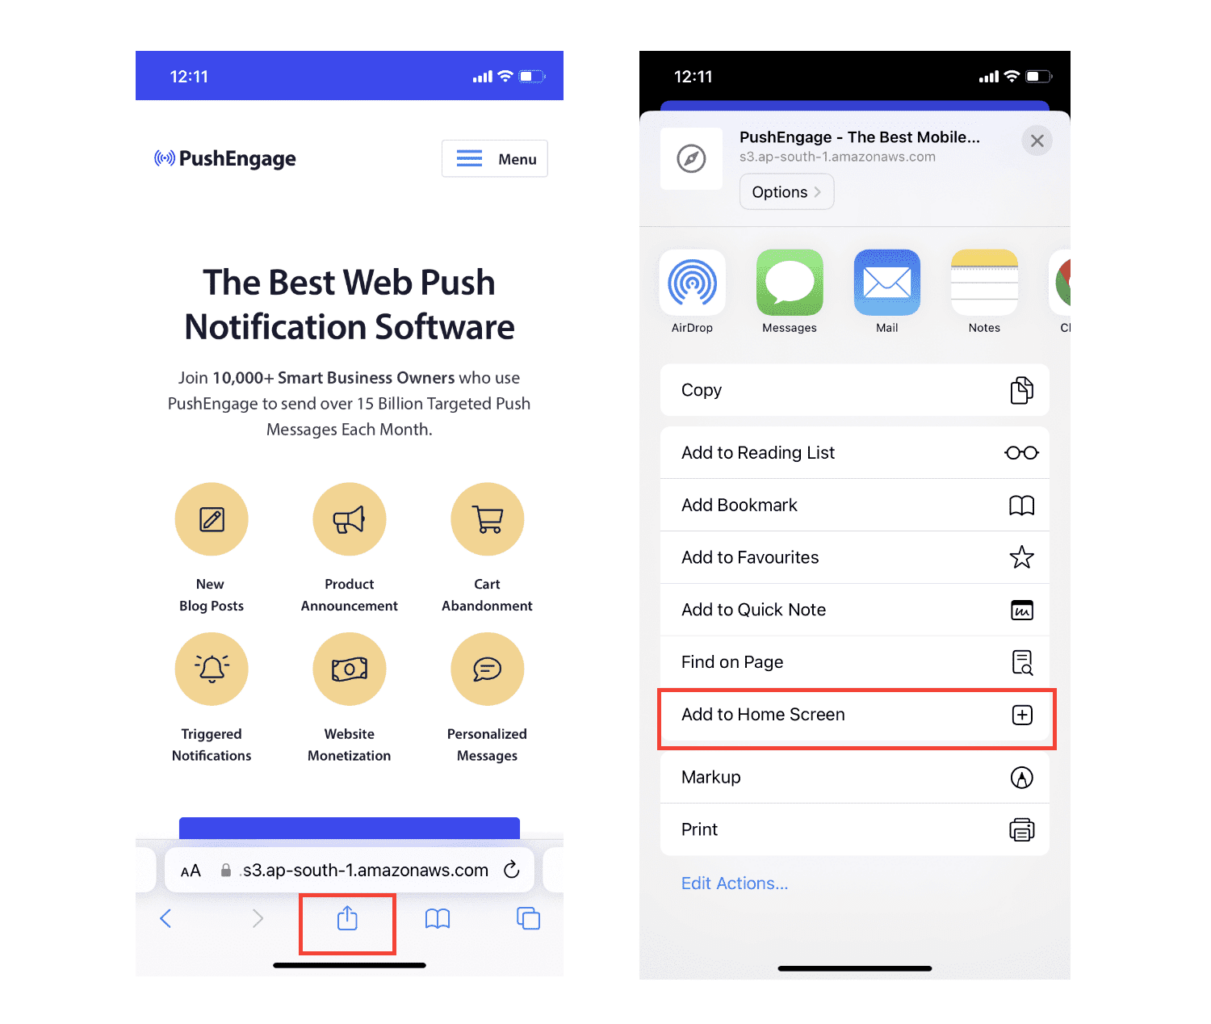
Now, the web app will be saved to your device’s Home Screen, just like any other app you download from the App Store.
If everything has been set up correctly, when you open the app from your Home Screen, it won’t open in the Safari browser anymore. Instead, it will feel like using a regular app on your iPhone or iPad.
To let your users know that they can get web push notifications from your app, you can show them a banner on the screen. This banner will prompt them to add your app to their Home Screen and subscribe to the web push notifications. It’s a handy way to keep your users engaged with your app and receive important updates.
So, follow these steps, and you’ll be all set to provide a smooth and app-like experience to your users on iOS devices! For a full walkthrough on testing your push notifications, check out our documentation on iOS web push notifications.
How to Add Mobile App iOS Push Alert Campaigns to Your App
The easiest way to send mobile iOS mobile app push alerts from your native iOS app is to use the PushEngage iOS SDK. Right till now, you had to use skeleton SDKs to send app push notifications. The problem with using those SDKs is that they are pretty bare bones.
Teorik olarak, onlarla her türlü mobil uygulama anlık bildirim kampanyasını gönderebilirsiniz. Ancak o zaman, şunları da oluşturmanız gerekir:
- Kampanyalarınızı yönetmek için bir arayüz
- Kampanya performansınızı izlemek için bir analiz paketi
- Zengin medya ve uygulama içi yönlendirme bağlantıları (veya derin bağlantılar) için daha iyi destek
- Hem pazarlama hem de geliştirme ekiplerini koordine etmek için süreçler
Tüm bunlar, tek bir büyüme kanalı tanıtmak uğruna. Mobil uygulama anlık bildirimleri göndermek için eski araçları kullanmak sıkıcı, pahalı, kaynak yoğun ve zaman alıcıdır. Ve tabii ki, oluşturduğunuz her şeyi geliştirmek ve yönetmek için ekibinizde derin kodlama becerileri gerektirir.
PushEngage Android ve iOS SDK'ları ile, harika teslimat oranları için aynı güvenilir yazılımı kullanarak mobil uygulama anlık bildirimleri gönderebilirsiniz. Ancak, uygulamanızla özel entegrasyonlar oluşturmayı çok kolaylaştıran birkaç katman ekledik. Ve PushEngage tüm SDK'yı yönetir. Bu nedenle, entegrasyonlarınızı yönetmek için çok fazla zaman ve para harcamanıza bile gerek kalmaz.
Tek yapmanız gereken oluşturmak!
Uygulamanızı PushEngage'in SDK'sını kullanarak mobil uygulama anlık bildirimleri gönderecek şekilde ayarladıktan sonra, yayın bildirimlerini doğrudan PushEngage kontrol panelinizden gönderebilirsiniz. Evet, uygulamanıza kod eklemeniz ve uygulamanız ile PushEngage API'si arasındaki bağlayıcıları geliştirmeniz hala gereklidir. Ancak bu yapıldıktan sonra, aşağıdakilere de sahip olan önceden oluşturulmuş bir yazılım arayüzünden kolayca mobil uygulama anlık bildirim kampanyaları oluşturabilirsiniz:
- Yüksek etkileşimli anlık bildirim kampanyası türleri
- Yüksek dönüşüm oranlarına sahip kanıtlanmış kampanya şablonları
- İçeriğinizi yayınladığınızda tanıtmak için otomatik kampanyalar
- Birden fazla hedefleme ve kampanya zamanlama seçeneği
- Tamamlayıcı bir büyüme kanalı olarak web anlık bildirim kampanyaları
- Veriye dayalı kişiselleştirme kullanarak artırılmış kitle tutma
- Hedef takibi ve gelişmiş analizler
- Akıllı A/B testi
- Özel Bir Başarı Yöneticisi
And so much more. PushEngage takes the pain out of developing Android and iOS mobile push campaigns for your app.
We created a detailed step-by-step guide to setting up iOS app push notifications for PushEngage. Go check that out to start sending iOS app push alerts right away.
Kampanyalarınızı Kişiselleştirme
Before you create a campaign, you should set up segments and audience groups to send personalized push messages.
Anlık bildirim aboneleriniz için segmentler ve kitle grupları oluşturarak elde edebileceğiniz kişiselleştirme düzeyini hiçbir şey geçemez. PushEngage » Kitle'ye gidin ve hemen segmentler ve kitle grupları oluşturmaya başlayın.
Segmentler sekmesi altında yeni segmentler oluşturabilir veya mevcut olanları düzenleyebilirsiniz:

Ve daha derin kişiselleştirmeye ihtiyacınız varsa, Kitle Grupları sekmesinde bir kitle grubu oluşturun:

Anlık bildirim segmentleri ve kişiselleştirilmiş anlık bildirimler konusunda yeniyseniz, segment oluşturma hakkındaki makalemizi ve gelişmiş kitle gruplama duyurumuzu incelemelisiniz.
The coolest bit is that you can create targeted push campaigns by creating an Audience Group for just your iOS and iPadOS users:
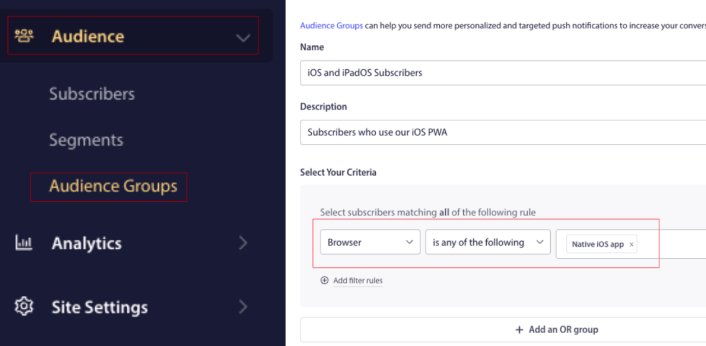
And you can use this Audience Group for your drip campaigns and broadcasts.
Anlık Bildirim Drip Kampanyası Oluşturma
PushEngage kontrol paneline gidin ve Kampanya » Otomatik Yanıtlayıcılar bölümüne gidin ve Yeni Otomatik Yanıtlayıcı Oluştur'a tıklayın:

Ardından, kampanyanıza bir ad verin (Hoş Geldin Drip gibi bir şey öneririz) ve Content altında, “Kullanıcı abone olduktan hemen sonra bildirim gönder“ seçeneğini seçin):

Bu noktada, bildirimin içeriğini düzenlemek için bildirimin yanındaki oka tıklayabilirsiniz.
PushEngage'in Premium veya Enterprise planına sahipseniz, bir dizi otomatik karşılama mesajı oluşturmak için birden fazla bildirim ekleyebilirsiniz. Yeni Bildirim Ekle'ye tıklamanız ve içeriği düzenlemeniz yeterlidir.
İşiniz bittiğinde, Drip Ayarları'na tıklayın ve karşılama kampanyasını tüm abonelere gönderme seçeneğini belirleyin:

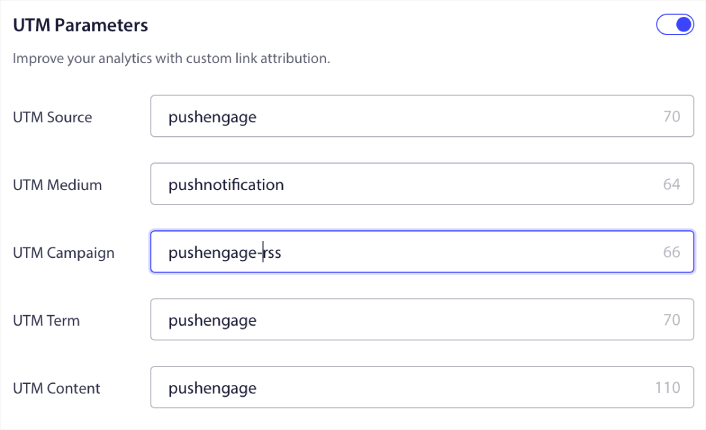
Ardından, anlık bildirimleri izlemek için kendi UTM parametrelerinizi ayarlamak üzere aşağı kaydırın:
Ve işiniz bittiğinde, yukarı kaydırın ve Otomatik Yanıtlayıcıyı Etkinleştir düğmesine tıklayın:

Ve işte bu kadar!
How to Send a iOS Web Push Broadcast
PushEngage kontrol panelinize gidin ve Campaign » Push Broadcasts bölümüne gidin ve Create a New Push Broadcast düğmesine tıklayın:

Content sekmesi altında, anlık bildirim içeriğinizi ekleyin:

Ve tıklama oranlarınızı artırmak için A/B testi kurabilir veya daha fazla görüntüleme elde etmek için anlık bildirim yayınlarınızı zamanlayabilirsiniz. Her iki durumda da, en iyi sonuçlar için anlık bildirim en iyi uygulamalarımızı incelemelisiniz.
How to Create a iOS Push Notification Popup Modal
Anlık bildirim açılır penceresi, web sitesi ziyaretçisine bir mesaj veya bildirim göstermek için bir web sitesi veya mobil uygulama arayüzünün üzerine çıkan küçük bir penceredir.
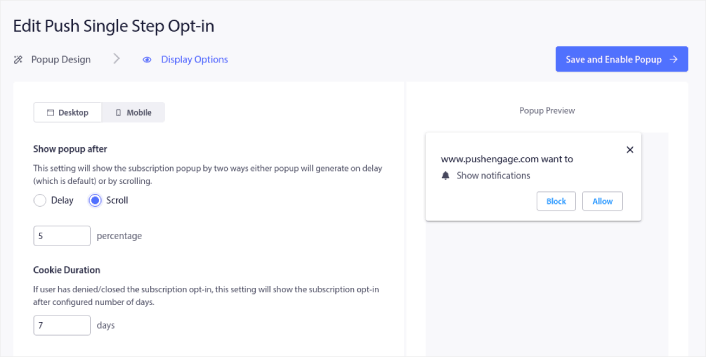
Açılır pencere, çeşitli olaylarla tetiklenebilir. Sayfa ziyareti, kaydırma derinliği ve hatta düğme tıklaması gibi özel eylemlerle tetiklenecek açılır pencereler ayarlayabilirsiniz.
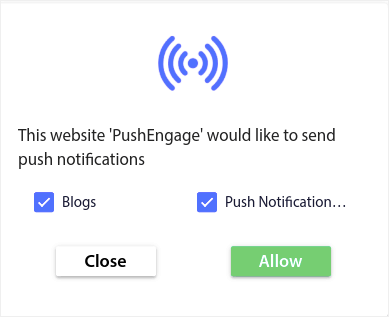
Genellikle, ziyaretçilerden anlık bildirim gönderme izni almak için açılır pencere modallerinde "Abone Ol" veya "İzin Ver" gibi bir harekete geçirici mesaj görürsünüz. Bu öğreticiyi takip ederseniz, buna benzer bir açılır pencere oluşturabilirsiniz:
Aboneleri doğrudan segmentleyebilen açılır pencere modalleri oluşturabilir veya coğrafi konum ve tarayıcı gibi varsayılan özniteliklerle yalnızca aboneleri toplayan normal açılır pencereler oluşturabilirsiniz.
WordPress kontrol panelinize geri dönün. PushEngage » Tasarım'a gidin:
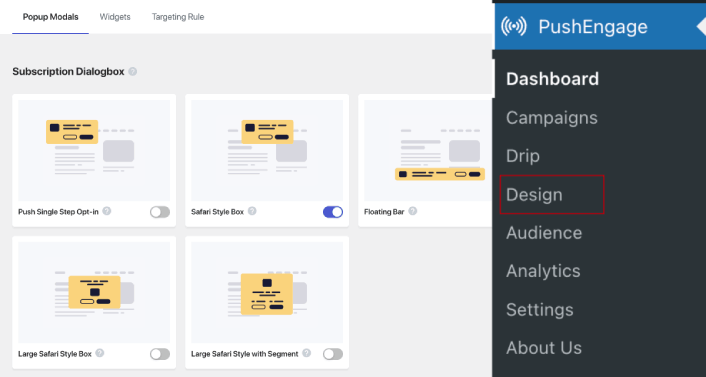
Ve istediğiniz kadar açılır pencere modülü ayarlayabilirsiniz. Elbette, her açılır pencere modülü için Görüntüleme Seçenekleri altında farklı zamanlarda tetikleneceklerinden emin olabilirsiniz.
Buradaki fikir, ziyaretçilerinize abone olmaları için sağlam bir neden vermektir. Bu konuda yardıma ihtiyacınız varsa, özel bir anlık bildirim kayıt formu nasıl oluşturulur hakkındaki makalemize göz atın.
Ve daha hedeflenmiş açılır pencere modülleri oluşturmak istiyorsanız, Hedefleme Kuralı sekmesi altındaki hedefleme kurallarını kullanabilirsiniz:
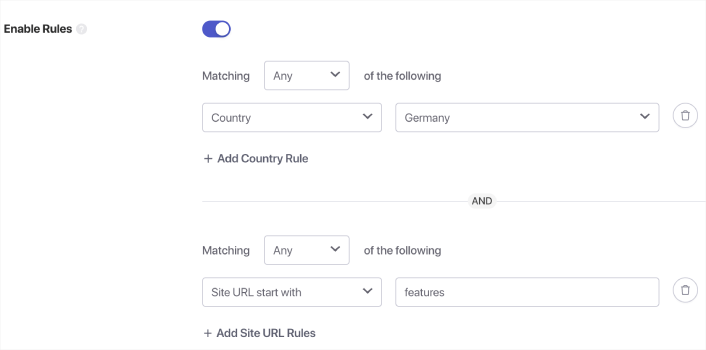
Bunlar genel hedefleme kurallarıdır ve bireysel açılır pencere modülleri için hedefleme kurallarına göre önceliklendirilir. Ancak isterseniz, bunları düzenleyerek her modül için sağlam hedefleme kuralları oluşturabilirsiniz.
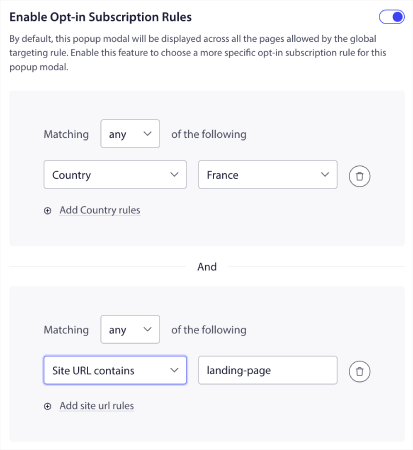
Örneğin, farklı ülkelerden ziyaretçileri hedeflemek için farklı dillerde açılır pencere modelleri oluşturabilirsiniz.
Ve başlamak için yüksek tıklama oranına sahip bazı şablonlar istiyorsanız, yüksek dönüşümlü anlık bildirim kayıt formları hakkındaki bu makaleye göz atmalısınız.
What to Do Before You Send iOS Push Alerts
Neredeyse bitti.
Before you start sending web push notifications for iOS and iPadOS, you’ll need to set up a subscription opt-in for your website. Your opt-in will convert web visitors into push notification subscribers. So, this is a critical element.
İlham almak isterseniz, yüksek dönüşüm sağlayan anlık bildirim kayıtları hakkındaki bu makaleye göz atabilirsiniz. Kayıt seçeneğini ayarlamayı bitirdikten sonra, siteniz aboneleri toplayabilir. Peki, kaydınızın düzgün çalıştığını nasıl anlarsınız?
Bu nedenle, mantıklı olan bir hoş geldin anlık bildirimi ayarlamaktır.
İpucu: Anında iletme bildirimlerinizi tam ölçekli bir testten geçirmek için biraz zaman ayırmalısınız. Bu, en yaygın sorunları gidermenize yardımcı olacak ve daha sonra sorunları çözmeye çalışırken zaman kaybetmenizi önleyecektir.
What to Do After You Send iOS Push Alerts
Bu kadar, millet!
Bu makaleyi faydalı bulduysanız, aşağıya bir yorum bırakmayı unutmayın.
Anlık bildirimlerle başlamak göz korkutucu görünebilir. Ancak hedef takibi ve analitik özelliklerine dikkat ederseniz, iyi olursunuz. Daha da önemlisi, anlık bildirim kampanyalarının yardımıyla çok daha fazla kar edeceksiniz. İşte başlamanıza yardımcı olacak birkaç harika kaynak:
- Gelirinizi 2 Katına Çıkarmak İçin Yeniden Hedefleme Anlık Bildirimleri Nasıl Kullanılır
- Anlık Bildirimlerinizi Nasıl Sıralarsınız ve Kazanan Kampanyaları Bulursunuz
- Anlık Bildirim Aboneli Listelerini Temizleme (Kolay)
- Otomatik Olarak RSS Anlık Bildirimleri Gönderme
- Bir Haber Sitesini Tanıtmak İçin Anlık Bildirimleri Kullanma
- Satışlarınızı 2 Katına Çıkarmak İçin Çapraz Satış Anlık Bildirimlerini Kullanma
- Göz Atma Terk Etme Anlık Bildirimlerini Kullanma (4 Adım)
Anlık bildirimlere yeni başlıyorsanız, PushEngage'i denemelisiniz. PushEngage, piyasadaki 1 numaralı anlık bildirim yazılımıdır. Ve kampanyalarınız güvende olacaktır.
Bu yüzden, henüz yapmadıysanız, bugün PushEngage ile başlayın!


