
Looking for a way to add push notifications to the AMP version of your site? Adding AMP push notifications can be a little technical. But we’re going to help you do it the easy way.
AMP or Accelerated Mobile Pages are essentially a mobile version of your site. So, if you’re not setting up web push on your AMP site, then you’re going to lose a bunch of subscribers because a huge part of your audience will use mobile devices to visit your site.
In this article, we’re going to use PushEngage to install AMP push notifications because it’s way easier than doing things manually.
Hadi başlayalım.
How to Install AMP Push Notifications
Installing AMP push notifications is a really quick and easy process. Just follow these steps and by the end of this article, you should be able to send push campaigns from your site like this one:

Looks good, doesn’t it? Let’s dive in.
Adım #1: PushEngage Hesabınızı Kurun
PushEngage ana sayfasına gidin ve Başlayın düğmesine tıklayın:

PushEngage'ı denemek için ücretsiz planı seçebilir veya işletmenizi büyütme konusunda ciddiyseniz ücretli bir planı tercih edebilirsiniz. Ücretli planlar daha fazla kampanya seçeneği ve daha büyük abone listeleri oluşturma olanağı ile birlikte gelir.
PushEngage hesabınıza kaydolduktan sonra, PushEngage kontrol panelinize gidin ve Site Ayarları » Site Detayları bölümüne gidin:

Burada logonuzu, site adınızı ve site URL'nizi ayarlayabilirsiniz. Tüm kurulumunuzu daha sonra test edebilmeniz için bu şeyleri şimdi halletmeniz gerçekten önemlidir.
Step #2: Get the AMP Push Notifications Installation Code
To install web push on your AMP site, you’ll need to get an installation code. In your Site Settings screen, scroll down and click on the Click Here For Setup Instruction button:

Head over to the AMP tab to get installation settings.
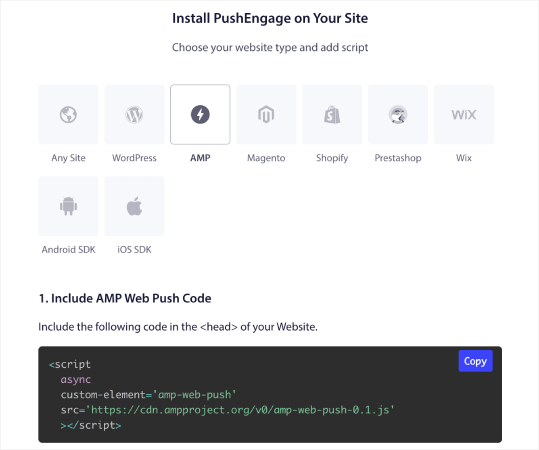
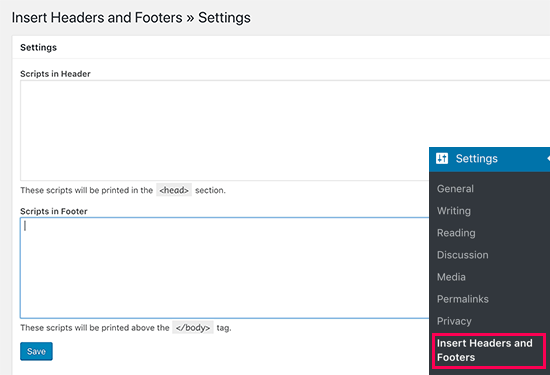
Copy this code. You’ll need to paste this code in the HTML <head> of your site. If you’re running a WordPress site with an AMP version, the simplest way to do this is to use the Insert Headers and Footers plugin. It’s a free plugin where you can paste in the AMP installation code without having to go into the actual HTML of your site:
Step #3: Install Service Worker on Your AMP Site
Next, download the package file that includes the service worker.

Bunlar şunları içerir:
- service-worker.js
- amp-helper-frame.html
- amp-permission-dialog.html
Unzip the package and place these files in the root folder of your server. This part is super important. If you skip this step, your site won’t be able to collect push subscribers.
Pro Tip: If you’re not sure what the root folder is and how you can upload files there, you should check out this article on the WordPress File and Directory Structure. It’s a really simple guide for beginners and you get a lot of insight into how WordPress works.
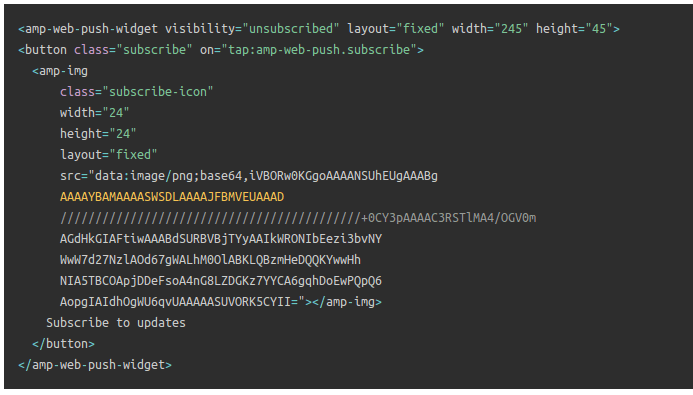
Step #4: Add the AMP Push HTML Code to Your Site
Next, add the HTML code to enable a subscribe on click button and a button to unsubscribe from push campaigns.
This code enables the service worker file you uploaded and allows your site to display subscribe and unsubscribe buttons. To collect subscribers, you need to give your visitors a simple way to subscribe to your push campaigns. The unsubscribe button will give your active subscribers a way to opt out if they’re not interested in your content. Both are pretty important.
Add the `Subscribe to updates’ button where you want it to show up on your site:
And add an ‘Unsubscribe from updates’ button:
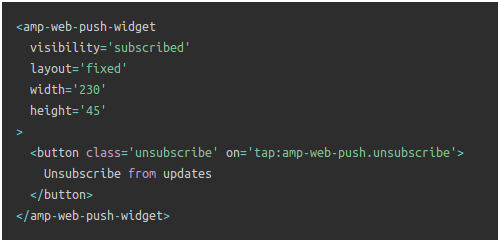
The Unsubscribe button is going to be a simple ‘tap to unsubscribe’ button. You get a lot more customization options for the non-AMP version of your site on both mobile and desktop devices. So, we recommend that you add AMP CSS to your <body> section.
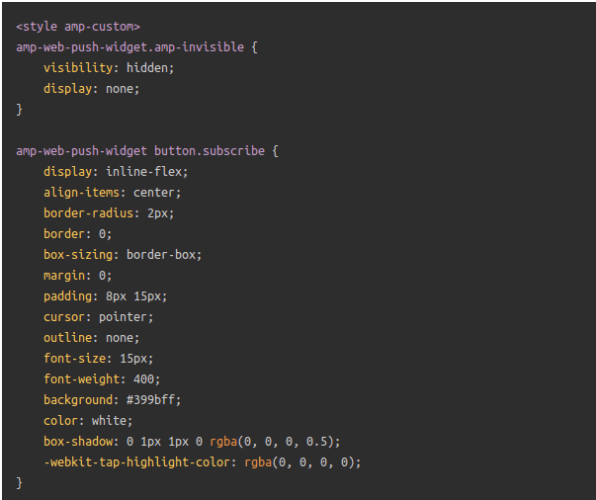
This code snippet is meant to customize the look and feel of both Subscribe and Unsubscribe buttons. If you’d like to play around with these styles, go for it. Just make sure that you don’t change the AMP HTML tags that the code is styling.
And that’s it. You’re done.
Step #5: Configuring the PushEngage Opt-In
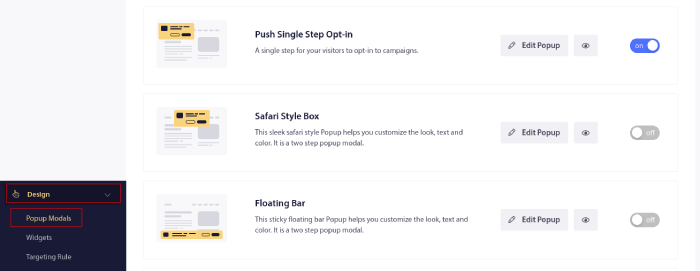
Şimdi PushEngage kontrol panelinize geri dönün. Tasarım » Açılır Modallar bölümüne gidin ve istediğiniz kaydolma seçeneğini belirleyin:
Buradaki fikir, ziyaretçilerinize abone olmaları için sağlam bir neden vermektir. Bu konuda yardıma ihtiyacınız varsa, özel bir anlık bildirim kayıt formu nasıl oluşturulur hakkındaki makalemize göz atın.
Ve başlamanız için bazı şablonlar isterseniz, yüksek dönüşüm sağlayan anlık bildirim kaydolma seçenekleri hakkındaki bu makaleye göz atmalısınız.
BONUS Step: Create a Welcome Campaign
İsteğe bağlıyı ayarlamayı bitirdiğinizde siteniz abone toplayabilir.
But how do you know if your push campaigns are working properly?
We recommend that you create a welcome push notification to test if your setup went smoothly. A welcome notification is a web push notification you send a new subscriber to confirm their subscription and welcome them on board.
PushEngage kontrol paneline gidin ve Kampanya » Otomatik Yanıtlayıcılar bölümüne gidin ve Yeni Otomatik Yanıtlayıcı Oluştur'a tıklayın:

Ardından, kampanyanıza bir ad verin (Hoş Geldin Drip gibi bir şey öneririz) ve Content altında, “Kullanıcı abone olduktan hemen sonra bildirim gönder“ seçeneğini seçin):

Bu noktada, bildiriminizin içeriğini düzenlemek için bildirim yanındaki oka tıklayabilirsiniz. PushEngage ile Premium veya Enterprise planınız varsa, bir dizi otomatik hoş geldin mesajı oluşturmak için birden fazla bildirim ekleyebileceksiniz. Sadece Add New Notification'a tıklayın ve içeriği düzenleyin.
İşiniz bittiğinde, Drip Ayarları'na tıklayın ve karşılama kampanyasını tüm abonelere gönderme seçeneğini belirleyin:

Then, scroll down to set your own UTM parameters to track the push campaigns:

Ve işiniz bittiğinde, yukarı kaydırın ve Otomatik Yanıtlayıcıyı Etkinleştir düğmesine tıklayın:

Ve hepsi bu kadar!
You have successfully set up AMP web push notifications on your website. It’s time to head back to your PushEngage dashboard and start creating your push campaigns.
What to do After You Add AMP Push Notifications to Your Site
Bu kadar, millet!
If you’re new to push campaigns, you should follow a full-blown push notification testing process before you go live. It’ll help you troubleshoot common issues before your visitors see them and start complaining about a broken user experience.
Ayrıca aşağıdaki gibi daha fazla otomatik anlık bildirim kampanyasına da göz atmalısınız:
Bu konularda takılırsanız, Müşteri Başarı Yöneticilerimizle iletişime geçmenizi öneririz. Herhangi bir konuda size yardımcı olmaktan mutluluk duyarız.
Ve henüz yapmadıysanız, PushEngage'ı deneyin. PushEngage, dünyada 1 numaralı anlık bildirim hizmetidir. Bu nedenle, işinizi büyütme konusunda ciddiyseniz, PushEngage doğru seçenektir.


Thanks for this tips & information. Its very easy to understand.
good explanation