Looking for a guide to create waterfall push campaigns?
Waterfall notifications are gaining a lot of popularity these days. For a long time, you could only send waterfall email campaigns. But now, you can recreate the same effective campaigns and use the targeting options in push notification software to send waterfall push notifications.
But how do you get started? Do you need experience with waterfall campaigns? Do you need any experience setting up push notification campaigns?
In this article, we’re going to help you create waterfall push campaigns using an example. We’ll also answer all your questions about waterfall push notifications.
Kulağa hoş geliyor? Hadi dalalım.
What Are Waterfall Push Campaigns?
A waterfall push campaign is a type of ad campaign for mobile devices. It works like this: you send push notifications to a group of people, but not all at once. Instead, you send the notification first to the people who are most likely to engage with the notification and take the action you want them to take.
If those people don’t respond, you move on to the next group of people, and so on.
The idea is to get as many people as possible to engage with the notification while spending the least amount of money. It’s called a “waterfall” because it’s like a series of steps that the network goes through, targeting different groups of people at each step.
Let me explain.
With any business your run, you’ll see a group of subscribers who are extremely engaged. They buy anything you sell, happily offer testimonials and reviews, and refer new customers to you.
And then again, you’ll see subscribers who simply aren’t interested in anything about your business.
Push notification campaigns come with detailed analytics. So, you can see both groups pretty clearly in your subscriber list. And the cool thing is that you can create Audience Groups in PushEngage to retarget both types of subscribers.
Then, you can create targeting options for your push notifications to retarget specific behavior on each notification you send. Once we get into our example, you’ll see more clearly how behavior targeting impacts a waterfall push campaign. For now, you should know that all push waterfall campaigns have two core components:
- A set of push notifications with a common goal
- Audience groups to retarget different types of subscribers
Let’s check out why waterfall push campaigns are so effective next.
Why Send Waterfall Push Campaigns?
There are several advantages of using waterfall push campaigns to grow your brand:
- Efficient use of advertising budget: By targeting the most valuable users first, and then moving down the priority list, a waterfall push campaign can help to maximize the return on investment (ROI) for your advertising spend. This ensures that your advertising budget is being used as effectively as possible.
- Higher engagement rates: By targeting users who are more likely to engage with the ad, you increase the chances of getting a higher click-through rate and conversion rate, which can lead to increased revenue.
- Customizable targeting: With a waterfall push campaign, you can create different segments of users based on their demographics, behavior, and other factors. This allows you to tailor your messaging to each group and increase the likelihood of success.
- Real-time optimization: With a waterfall push campaign, you can track the performance of each segment in real-time and adjust your targeting strategy accordingly. This ensures that you are always optimizing for the best possible results.
Overall, waterfall push campaigns can be an effective way to reach your target audience and drive engagement and conversions, while minimizing wasted ad spend.
How to Send Waterfall Push Notifications
Now that we know what a waterfall push campaign is and why you should create them, let’s take a look at a real example with step-by-step instructions to create one.
Before you get started with sending waterfall push notifications, you need to select a push notification service. We recommend using PushEngage.
Adım #1: Ücretsiz Bir PushEngage Hesabı Oluşturun
PushEngage adresine gidin ve Şimdi Ücretsiz Başlayın:'a tıklayın.

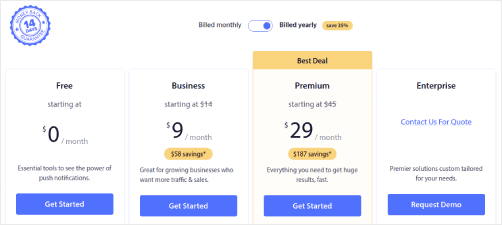
Ücretsiz planla başlayabilirsiniz. Ancak en güçlü tarayıcı bildirimlerini arıyorsanız, iş ihtiyaçlarınıza göre ücretli bir plan seçmelisiniz:
Hangi planı istediğinizi bildiğinizde, PushEngage hesabınızı oluşturmak için Başlayın'a tıklayın.
Adım #2: PushEngage'a Kaydolun
Şimdi PushEngage hesabınızı oluşturma zamanı. Bir e-posta adresi veya Gmail kimliği ile kaydolarak başlayın:

Ardından, hesap bilgilerinizi doldurun:

Ve planınızı satın almak için kredi kartı bilgilerinizi ekleyin:

Ücretsiz hesabı seçtiyseniz, planınızı yükseltmeyi seçene kadar kredi kartınızdan asla para çekilmeyecektir. Ve şimdi, PushEngage kontrol panelinize erişmek için hazırsınız. Sadece Kaydı Tamamlayın ve Anında Erişim Sağlayın'a tıklayın.
Daha önce OneSignal veya PushAlert kullandıysanız, PushEngage'ın kontrol panelinden çok daha temiz bir deneyim sunduğunu göreceksiniz. OneSignal kontrol paneli gelişmiş kampanyalar için tasarlanmamıştır. Bunun için OneSignal eklentisinden çok API'ye ihtiyacınız olacak.
Adım #3: Web Bildirimleri WordPress Eklentisini Yükleyin
Hesabınızı oluşturmayı bitirdiniz. Bu yüzden PushEngage kontrol paneline gidin ve takip edin:

Site Ayarları » Site Detayları'na tıklayın ve Kurulum Talimatları İçin Buraya Tıklayın düğmesine tıklayın:

WordPress sekmesine tıklayın ve eklentiyi web sitenize yüklemek için PushEngage WordPress Eklentisini Yükle düğmesine tıklayın.

İşte harika kısım: PushEngage hesabınızı oluşturduğunuzda, web sitenizi zaten PushEngage hesabınızla senkronize etmişsinizdir. Bu nedenle, PushEngage WordPress eklentisini web sitenize otomatik olarak yüklemek için PushEngage kontrol panelindeki yükleme bağlantısına tıklayın.
Adım #4: WordPress Sitenizi PushEngage ile Bağlayın
PushEngage WordPress eklentisini yükleyip etkinleştirmeyi bitirdiğinizde, PushEngage karşılama sihirbazını göreceksiniz:

Sihirbaz oldukça basittir. Yeni bir kullanıcıysanız, Yeni mi? Ücretsiz Hesabınızı Talep Edin'e tıklayın. Zaten kaydolduysanız, Mevcut Hesabınızı Bağlayın'a tıklayın.
Ardından, kayıt sırasında bir site kaydettiyseniz, Kayıtlı bir site bağlayın altındaki Site Seçin açılır menüsünden sitenizi seçebilirsiniz:

Veya, Premium fiyatlandırma planınız veya daha üstü varsa yeni bir site eklemek için Yeni bir site kaydedin'e tıklayabilirsiniz. Bir sonraki adımda, karşılama sihirbazı diğer olmazsa olmaz WordPress eklentilerini yüklemenizi isteyecektir.

Her adımı doğru bir şekilde takip ettiyseniz, sihirbazdan bu başarı mesajını göreceksiniz:

You are now ready to create campaigns.
Step #5: Create Waterfall Push Campaigns
Finally, it’s time for our example. To show you a real use case for waterfall push campaigns, we’re going to take the example of Black Friday promotions. Our objective is to maximize the conversions on our Black Friday offer.
To retarget our subscribers based on their behavior, we’re going to send a broadcast to all our subscribers. Then, based on their engagement levels, we’re going to create different Audience Groups for retargeting.
Bildiriminizi Tüm Abonelere Gönderme
3 bildirim için maksimum erişim istiyoruz:
- Erken Black Friday Duyurusu
- Black Friday Flaş Satış
- Cyber Monday İndirimi
Bu nedenle, bu 3 bildirimi herkese gönderiyoruz. Hedef Kitle sekmesinde, Tüm Abonelere Gönder'i seçin:

Herkese Yayınlanan Bildirime Tıklamayan Aboneleri Yeniden Hedefleme
If you’re not sending the notification to all subscribers, you’ll need to create an Audience Group. For instance, if you want to target the subscribers who didn’t click on the broadcast to everyone, you’ll need to create a new Audience Group.
In your WordPress dashboard, go to Audience » Audience Groups and click Create New Audience Group:

Son bildirime tıklamayan aboneleri hedeflemek için Son tıklama tarihine göre filtrelemeniz gerekecektir:
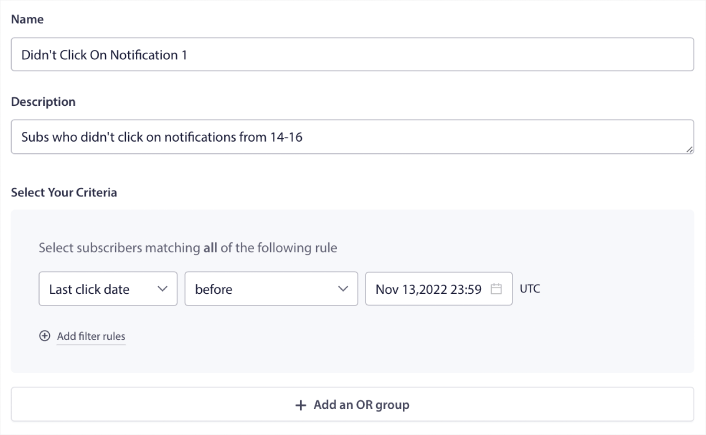
Önceki bildiriminizi gönderdiğiniz tarihten önceki son tıklama tarihine göre filtreleyin. Yani, son anlık bildirimi 14 Kasım'da gönderdiyseniz, yalnızca 13 Kasım gece yarısından önceki bildirimlere tıklayan aboneler için filtreleyin.
NOT: E-posta kampanyasının aksine, son bildirime göre tıklama oranına göre filtreleme yapamazsınız. En yakın yaklaşım, bir tarih aralığındaki tıklamalar için filtrelemektir.
İşiniz bittiğinde, Bildirimi Kaydet'e tıklayın.
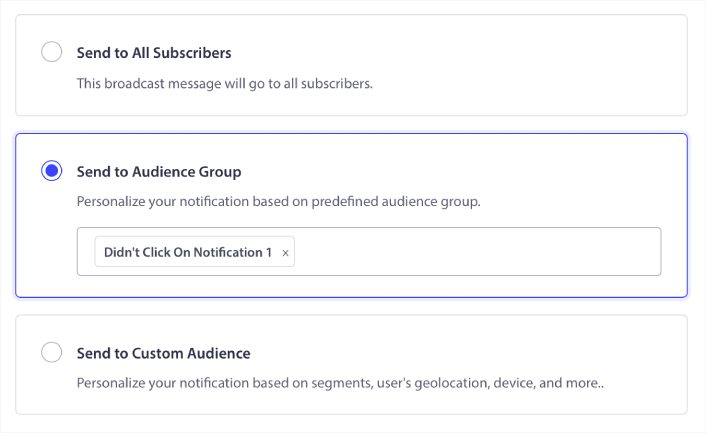
Ardından, anlık bildirim yayınınınıza geri dönün ve Hedef Kitle Grubuna Gönder'i seçin. Açılır menüden Grubunuzu seçin:
Herkese Yayınlanan Bildirime Tıklayan Aboneleri Yeniden Hedefleme
Son bildiriminize tıklayan aboneleri hedeflemek istiyorsanız, başka bir Kitle Grubu oluşturabilirsiniz.
Abonelerinizi, önceki bildiriminizi gönderdiğiniz tarihten sonra VE bir sonraki bildiriminizi göndermek istediğiniz tarihten önce olarak filtreleyin:
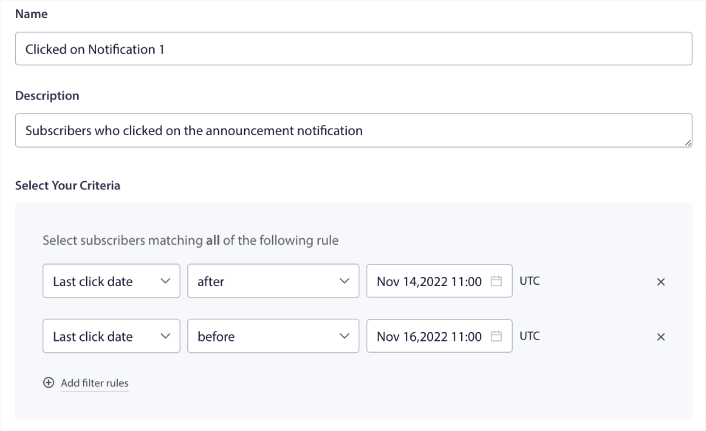
Filtre kuralları ekle'ye tıklayarak filtrenize VE kriterleri ekleyebilirsiniz. Bunun gibi bir filtre, çapraz satış yapan anlık bildirimler için harikadır.
The outcome of these Audience Groups is more granular targeting. So, each time, you can send different offers to improve your conversion rates.
What to do After You Create Waterfall Push Campaigns
One of the most important things to remember about waterfall push campaigns is that you can only use this methodology on broadcast push notifications. Drip campaigns in push notifications don’t have targeting options that granular yet.
So, make sure to A/B test your push notifications. We also suggest that you take some time to read our articles and learn how to supercharge your automated push notifications. Start with our article on push notification best practices.
If you’re new to push notifications, you should follow a full-blown push notification testing process before you go live. It’ll help you troubleshoot common issues before your visitors see them and start complaining about a broken user experience. And most definitely you should set up Google Analytics to track push notifications.
Tıklayan veya tıklamayan aboneleri hedeflemek için anlık bildirimleri yeniden hedefleme. Bunun sizin için nasıl çalıştığını bize bildirin. Bu arada, bu kaynaklara göz atın:
- Merak Uyandırarak Anlık Bildirimlerinizdeki Tıklamaları Nasıl Artırırsınız
- Her Anlık Bildirimi Nasıl Kişiselleştirirsiniz
- Anlık Bildirimlerinizde Zengin Medya ile Nasıl Öne Çıkarsınız
- Dormant Anlık Bildirim Abonelerini Nasıl Yeniden Aktifleştirirsiniz
- Müşterileri Bilgilendirmek İçin Anlık Bildirimleri Nasıl Kullanırsınız
- Daha Yüksek Tıklama Oranları İçin Anlık Bildirimlerinizde Emojileri Nasıl Kullanırsınız
- Aciliyet Hissi Yaratarak Dönüşümleri Nasıl Artırırsınız
And if you haven’t already, get started with PushEngage.


