Looking for a guide to creating drip campaigns to boost your sales?
Marketing is incomplete today without automation. Sure, you can collect subscribers and send out push notifications and emails. What then? Keep selling them on your business with every newsletter and hope that your subscribers convert?
There’s no way to:
- Personalize your campaigns
- Get new customers on autopilot
- Retain existing customers with your content
- Upsell or cross-sell products
- Recover lost sales
Unless… you use drip campaigns that convert.
In this article, we’ll show you how to set up drip campaigns and make the most of them. The best part? You don’t need any previous experience.
Kulağa hoş geliyor? Hadi dalalım.
What Are Drip Campaigns?
Think of drip campaigns like setting up a bunch of emails or even push notifications to be sent out automatically, sort of like a sprinkler system for your garden. Instead of watering plants, you’re sending out messages to people who are interested in what you’ve got to say or sell.
Nasıl çalıştığı aşağıda açıklanmıştır:
- It’s not magic, it’s automated: Once you set it up, these messages keep going out on their own. You don’t have to keep sending them manually.
- You can talk to the right people: You can send different messages to different groups of people. For example, someone who just signed up might get a friendly “hello” message, while someone else who’s been around for a while might get special deals or updates.
- It’s personal: These messages can use the person’s name or talk about things they’ve shown interest in. It makes them feel like you’re really talking to them, not just sending the same thing to everyone.
- Timing is everything: The messages are sent at times that make the most sense – like right after someone signs up or looks at something on your site.
- Each message has a job: Every email or notification is meant to do something specific, like help people get to know your product better or remind them about something they looked at but didn’t buy.
- You can see how it’s doing: You can check out things like how many people open the messages or click on links inside them. This helps you know if your messages are working well.
Drip campaigns aren’t just for emails – they work app push notifications and web push notifications as well. They’re great for keeping in touch with people who are interested in your stuff, without overwhelming them. It’s a smart way to keep people engaged and interested in what you’re doing.
Types of Drip Campaigns
Let’s dive into the different types of drip campaigns. Just like ice cream comes in all sorts of varieties, drip campaigns have different types too. Each kind is tailored for a specific purpose or audience. Here are some of the most common ones:
- Welcome Series: This is like saying “Hi!” to someone new. When someone signs up for your emails or notifications, you send them a few friendly messages to introduce them to your brand or service. It’s like rolling out the red carpet for your new guests.
- Onboarding Campaigns: Think of this as a helpful guide. When someone buys a product or signs up for a service, these messages walk them through how to use it, offer helpful tips, or show them things they might not know about. It’s like giving a tour to someone new in town.
- Abandoned Cart Reminders: Ever put something in your online shopping cart and then forget about it? These campaigns are little nudges to remind people about stuff they were interested in but didn’t buy. It’s like a gentle tap on the shoulder saying, “Hey, did you forget about this?”
- Re-engagement Campaigns: These are for reaching out to people who used to interact with your brand but haven’t in a while. It’s like calling up an old friend and saying, “Hey, let’s catch up!” You might offer them a special deal or just remind them about your brand.
- Educational Content: Here, the goal is to teach your audience something valuable related to your product or industry. It’s like a mini-course, delivered in small, digestible messages. Think of it as a series of fun and informative lessons.
- Product Updates: Got something new or improved? This type of campaign keeps your audience in the loop about new features, products, or services. It’s like showing off your latest gadget to friends.
- Event Invites: Hosting a webinar, workshop, or another event? These campaigns are all about getting people excited and signed up for your events. It’s like sending out cool invitations to a party.
- Seasonal Campaigns: These are tied to specific times of the year, like holidays, seasons, or special events. It’s like decorating your store for Christmas or having a summer sale.
Each type of drip campaign has its own charm and purpose. By matching the right type of campaign with your audience and goals, you can create meaningful connections and keep your audience engaged in a way that feels natural and not too sales-y.
How to Create Push Notification Drip Campaigns
Installing push notifications to a website isn’t difficult. But it does have a few steps and you’ll want to follow along with this guide step-by-step.
Hiçbir zaman zamanın önüne geçmeyin ve iyi olacaksınız.
Before you create a welcome push notification campaign, you need to select a push notification service. A push notification service is a software that allows you to create push campaigns without any coding.
We recommend using PushEngage.

PushEngage, dünyadaki 1 numaralı anlık bildirim eklentisidir.
Anlık bildirimler, web sitesi trafiğinizi ve etkileşiminizi otomatik olarak artırmanıza yardımcı olur. Ve bir çevrimiçi mağaza işletiyorsanız, PushEngage ayrıca otomatik e-ticaret anlık bildirimleri oluşturmanıza yardımcı olarak satışlarınızı artırmanıza da yardımcı olur.
Ücretsiz başlayabilirsiniz, ancak işletmenizi büyütme konusunda ciddiyseniz, ücretli bir plan satın almalısınız. Ayrıca, herhangi bir anlık bildirim hizmeti satın almadan önce, anlık bildirim maliyetleri hakkındaki bu kılavuza göz atmalısınız.
PushEngage ile nelerin geldiğine hızlı bir bakış:
- Yüksek dönüşüm sağlayan otomatik kampanyalar
- Birden fazla hedefleme ve kampanya zamanlama seçeneği
- Hedef takibi ve gelişmiş analizler
- Akıllı A/B testi
- Özel Bir Başarı Yöneticisi
İşletmeniz için trafik, etkileşim ve satış oluşturmak istiyorsanız, PushEngage'in tartışmasız en iyi seçenek olduğunu göreceksiniz. Ve bütçeniz kısıtlıysa, anlık bildirimlerinizle biraz yaratıcı olabilirsiniz.
NOT: WordPress siteniz varsa, PushEngage WordPress eklentisini kurmalı ve etkinleştirmelisiniz.
Hadi gidelim!
Adım #1: Ücretsiz Bir PushEngage Hesabı Oluşturun
PushEngage'a gidin ve Şimdi Ücretsiz Başlayın:'a tıklayın
Ücretsiz planla başlayabilirsiniz. Ancak hedefli anlık bildirimler göndermek istiyorsanız, Büyüme Planını seçmelisiniz. Hangi planı istediğinizi bildiğinizde, PushEngage hesabınızı oluşturmak için Başla'ya tıklayın.
Adım #2: PushEngage'a Kaydolun
Şimdi PushEngage hesabınızı oluşturma zamanı. Bir e-posta adresi veya Gmail kimliği ile kaydolarak başlayın:

Ardından, hesap bilgilerinizi doldurun:

Ve planınızı satın almak için kredi kartı bilgilerinizi ekleyin:

Ücretsiz hesabı seçtiyseniz, planınızı yükseltmeyi seçene kadar kredi kartınızdan hiçbir ücret alınmayacaktır. Ve şimdi, PushEngage kontrol panelinize erişmek için hazırsınız. Sadece Kaydı Tamamlayın ve Anında Erişim Sağlayın'a tıklayın.
Daha önce OneSignal veya PushAlert kullandıysanız, PushEngage'ın kontrol panelinden çok daha temiz bir deneyim sunduğunu göreceksiniz. OneSignal kontrol paneli gelişmiş kampanyalar için tasarlanmamıştır. Bunun için OneSignal eklentisinden çok API'ye ihtiyacınız olacak.
Adım #3: Web Bildirimleri WordPress Eklentisini Yükleyin
NOTE: If you’re not running a WordPress site, you should check out our installation guides to get started.
Hesabınızı oluşturdunuz. Bu nedenle, PushEngage kontrol paneline gidin ve takip edin:

Site Ayarları » Site Detayları'na tıklayın ve Kurulum Talimatları İçin Buraya Tıklayın düğmesine tıklayın:

WordPress sekmesine tıklayın ve eklentiyi web sitenize yüklemek için PushEngage WordPress Eklentisini Yükle düğmesine tıklayın.

İşte harika kısım: PushEngage hesabınızı oluşturduğunuzda, web sitenizi zaten PushEngage hesabınızla senkronize ettiniz. Bu nedenle, PushEngage WordPress eklentisini web sitenize otomatik olarak yüklemek için PushEngage kontrol panelindeki kurulum bağlantısına tıklayın.
Adım #4: WordPress Sitenizi PushEngage ile Bağlayın
PushEngage WordPress eklentisini yükleyip etkinleştirmeyi bitirdiğinizde, PushEngage karşılama sihirbazını göreceksiniz:

Sihirbaz oldukça basittir. Yeni bir kullanıcıysanız, Yeni mi? Ücretsiz Hesabınızı Talep Edin'e tıklayın. Zaten kaydolduysanız, Mevcut Hesabınızı Bağlayın'a tıklayın.
Ardından, kayıt sırasında bir site kaydettiyseniz, Kayıtlı bir site bağla altında Bir Site Seçin açılır menüsünden sitenizi seçebilirsiniz:

Veya, Premium fiyatlandırma planınız veya daha üstü varsa yeni bir site eklemek için Yeni bir site kaydet'e tıklayabilirsiniz. Bir sonraki adımda, karşılama sihirbazı sizi diğer mutlaka sahip olunması gereken WordPress eklentilerini yüklemeniz için yönlendirecektir.

Her adımı doğru bir şekilde takip ettiyseniz, sihirbazdan bu başarı mesajını göreceksiniz:

Artık kampanyalar oluşturmaya ve anlık bildirim açılır pencereleri göndermeye hazırsınız.
Step #4: Send Personalized Drip Campaigns
Before you create a campaign, you should set up segments and audience groups to send personalized push messages.
Anlık bildirim aboneleriniz için segmentler ve kitle grupları oluşturarak elde edebileceğiniz kişiselleştirme düzeyini hiçbir şey geçemez. PushEngage » Kitle'ye gidin ve hemen segmentler ve kitle grupları oluşturmaya başlayın.
Segmentler sekmesi altında yeni segmentler oluşturabilir veya mevcut olanları düzenleyebilirsiniz:

Ve daha derin kişiselleştirmeye ihtiyacınız varsa, Kitle Grupları sekmesinde bir kitle grubu oluşturun:

Anlık bildirim segmentleri ve kişiselleştirilmiş anlık bildirimler konusunda yeniyseniz, segment oluşturma hakkındaki makalemizi ve gelişmiş kitle gruplama duyurumuzu incelemelisiniz.
Step #5: Create Your Drip Push Notifications Campaign
Go to PushEngage dashboard and head over to Campaign » Drip Autoresponders and click on Create New Drip Autoresponder:

Ardından, kampanyanıza bir ad verin (Hoş Geldiniz Damlası gibi bir şey öneririz) ve İçerik altında, “Kullanıcı abone olduktan hemen sonra bildirim gönder“ seçeneğini seçin):

Bu noktada, bildirimin içeriğini düzenlemek için bildirimin yanındaki oka tıklayabilirsiniz.
PushEngage ile Premium veya Enterprise planınız varsa, otomatik karşılama mesajları dizisi oluşturmak için birden fazla bildirim ekleyebileceksiniz. Yalnızca Yeni Bildirim Ekle'ye tıklayın ve içeriği düzenleyin.
Once you’re done, click on Drip Settings and select the option to send your welcome campaign to all subscribers:

Ardından, anında iletme bildirimlerini takip etmek için kendi UTM parametrelerinizi ayarlamak üzere aşağı kaydırın:

And when you’re done, scroll back up and click the Activate Autoresponder button:

Ve işte bu kadar!
How to Create Email Drip Campaigns
Setting up those nifty automated drip campaigns in WordPress? You can do that easily with an email marketing tool. Follow along with the rest of this guide and you’re all set!
Step #1: Select an Email Drip Service
We suggest giving Constant Contact a whirl. It’s like the superstar of email marketing services. Super user-friendly and it comes with a cool drag-and-drop feature for crafting emails.

Constant Contact işletmeniz için otomatik yanıtlayıcılar ayarlamak üzere en iyi e-posta pazarlama hizmetidir. Kullanımı çok kolaydır ve e-posta kampanyalarınızı iyileştirmek için tonlarca otomasyon özelliği sunar.
Constant Contact'ı e-posta pazarlama kampanyaları ayarlamak için bu kadar harika bir seçim yapan şey şunlardır:
- E-postalar oluşturmak için kolay sürükle ve bırak oluşturucu
- Yüzlerce önceden tasarlanmış e-posta şablonu
- Hoş geldiniz mesajları, doğum günü teklifleri ve terk edilmiş sepet otomatik yanıtlayıcıları
- Kitlenizi büyütmek için liste oluşturma araçları ve kayıt formları
- Hedefli e-postalar için bölünmüş test
- CRM'ler ve üçüncü taraf hizmetlerle entegrasyonlar
- Canlı sohbet ve telefon aracılığıyla mükemmel destek
Söz konusu bile, Constant Contact'ın müşteri adayları oluşturmak için kullanabileceğiniz WordPress için bir form eklentisi vardır. Otomatik yanıtlayıcılarla müşteri adaylarınızı besleyebilir ve kapatabilirsiniz.
But hey, this isn’t the only game in town. Most of the big email marketing services, like Brevo (you might know it as Sendinblue), HubSpot, and others, they’ve got this drip email magic too.
With a few clicks, you can get those automated emails rolling out to your subscribers. Plus, Constant Contact plays nice with WordPress plugins like WPForms and OptinMonster. And if you’re into eCommerce, using WooCommerce or Shopify, it’s got you covered for reaching out to new customers or reminding folks about those items they left in their carts.
Ready to give it a go? Pop over to the Constant Contact website, sign up, and guess what? You get to try it out with a 60-day free trial. It’s like test driving a car but for email marketing. This way, you can see if it’s the right fit before you decide to go for a paid plan.
Step #2: Create an Email List
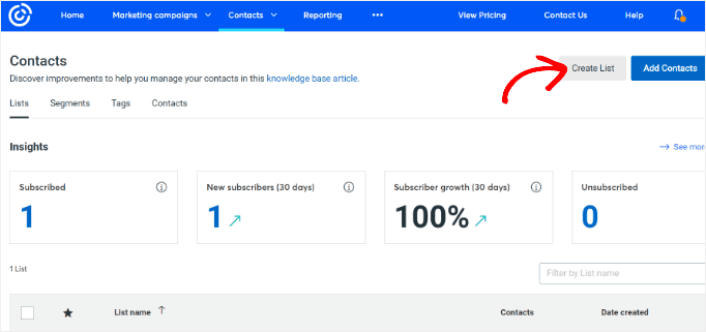
After creating an account, you can visit the Constant Contact dashboard to create a contact list.
Constant Contact will have already created a default list for you. However, you can create your own list by going to the Contacts tab in the top menu and then clicking the Create List button.
You can connect your WordPress newsletter form with Constant Contact and start building an email list. You should also check out our blog post on how to add a WordPress blog subscription widget.
Step #3: Create Marketing Drip Campaigns
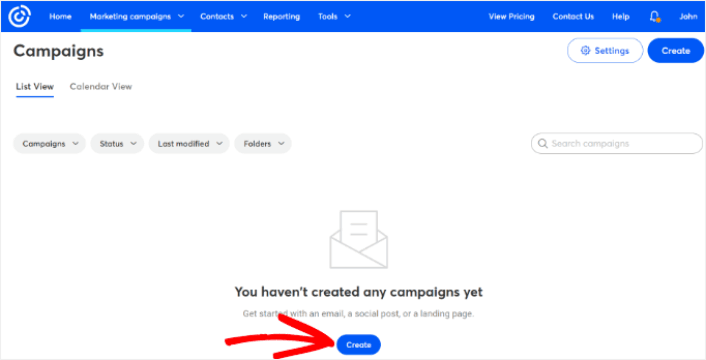
Now that you’ve added subscribers to your Constant Contact list, the next step is to create an automated drip campaign. Head over to the Marketing Campaigns tab and then click the Create button.
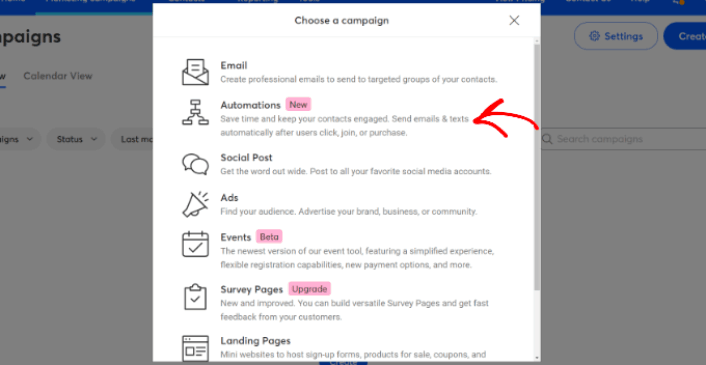
Constant Contact will show you multiple options for creating a campaign. Go ahead and select the Automations campaign.
From here, you can choose from several pre-built campaign templates to set up a drip campaign. You can create a Custom Automation to start from scratch, or you can quickly get started using any of the campaign templates.
For this tutorial, we will select the Create custom path template to get started. Select the Subscribes for email option and then click the Next button.
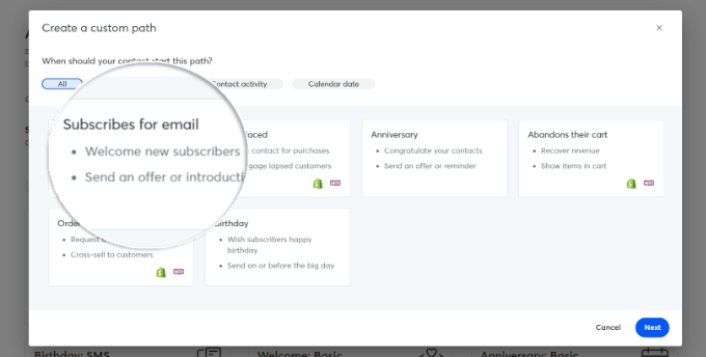
Give your custom path a name and you’re done! This template will trigger a drip campaign any time someone new subscribes to your email list. So, it’s perfect for a welcome campaign. If you’re looking to create an onboarding campaign, you can use tags to put them on a separate drip campaign.
Step #4: Create a Campaign Flow
However, you can simply drag actions and rules from the menu on the left onto the path. For instance, you add different actions like sending an email or sending an SMS to your workflow.
There are also different rules that help you customize your automation. You can add a time delay and specify when the next email should be sent. Similarly, there is a conditional split option that lets you set up Yes and No conditions and split the path.
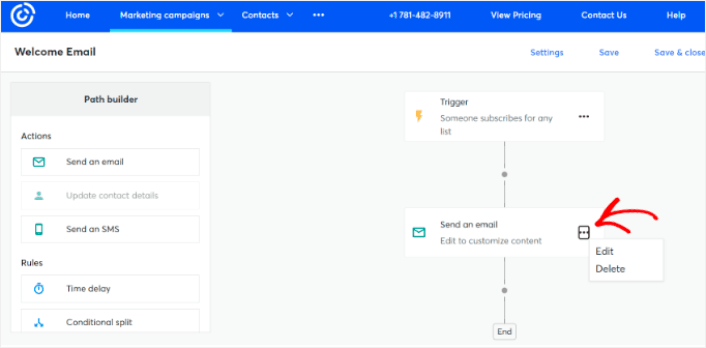
Tweaking your automated workflow is a breeze too. Just spot the three dots icon and give it a click. Choose Edit to make changes. Say you want to change up the Send an email action.
Once you do that, a popup window shows up. Here’s where you can either whip up a brand new email or use one you’ve already made.
Since it’s your first time setting up this workflow, go ahead and pick Create a new email. Put in a cool name for your email, then hit Continue. And just like that, you’re on your way to customizing your email workflow!
Step #5: Creating Your Email Campaign
You can search for a template based on the occasion or use a blank template to create an email from scratch.
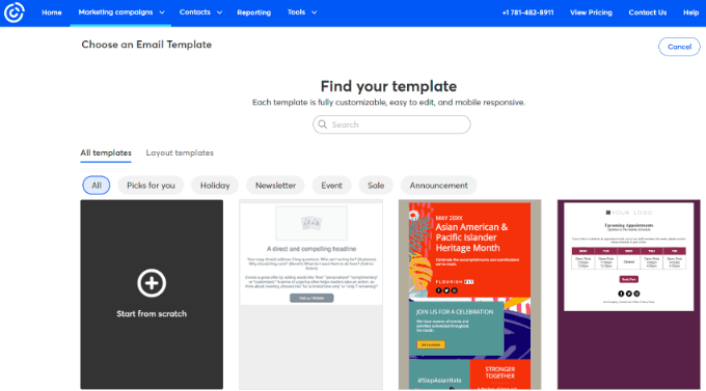
Once you select a template, the email editor will launch.
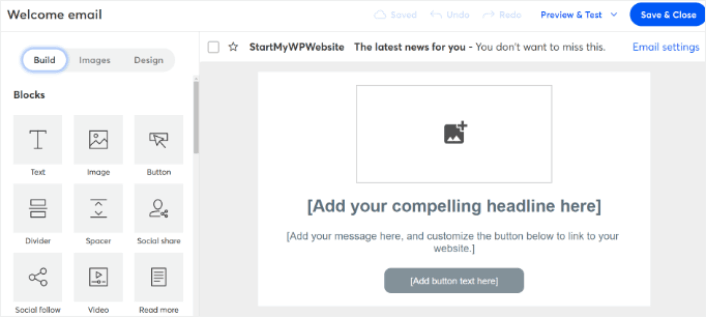
When you are done, hit the Save & Close button at the top. This will take you back to the Path Builder in Constant Contact. Go ahead and finish your automation path by adding as many actions and rules to your path and editing each one of them.
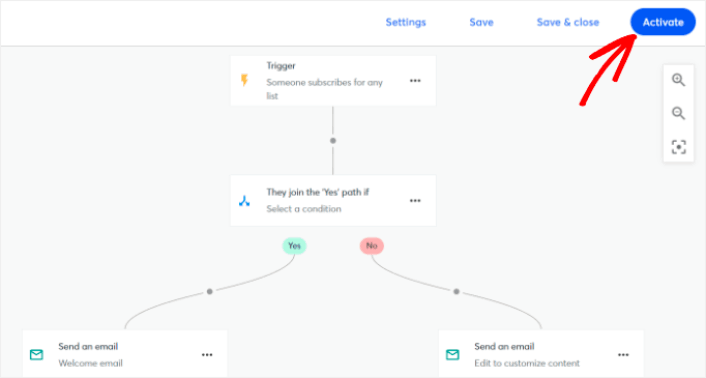
After creating an automated workflow, you can simply click the Activate button at the top. And you’re done!
What to do After You Create a Drip Campaign
Bu kadar, millet!
Bu makaleyi faydalı bulduysanız, aşağıya bir yorum bırakmayı unutmayın.
Getting started with drip campaigns can seem intimidating. But if you keep an eye on goal tracking and analytics, you should be fine. More importantly, you’ll make a lot more profit with the help of push notification campaigns. Here are a few cool resources to get you started:
- Gelirinizi 2 Katına Çıkarmak İçin Yeniden Hedefleme Anlık Bildirimleri Nasıl Kullanılır
- Anlık Bildirimlerinizi Nasıl Sıralarsınız ve Kazanan Kampanyaları Bulursunuz
- Anlık Bildirim Aboneli Listelerini Temizleme (Kolay)
- Otomatik Olarak RSS Anlık Bildirimleri Gönderme
- Bir Haber Sitesini Tanıtmak İçin Anlık Bildirimleri Kullanma
- Satışlarınızı 2 Katına Çıkarmak İçin Çapraz Satış Anlık Bildirimlerini Kullanma
- Göz Atma Terk Etme Anlık Bildirimlerini Kullanma (4 Adım)
Anlık bildirimlere yeni başlıyorsanız, PushEngage'i denemelisiniz. PushEngage, piyasadaki 1 numaralı anlık bildirim yazılımıdır. Ve kampanyalarınız güvende olacaktır.
Bu nedenle, henüz yapmadıysanız, bugün PushEngage ile başlayın!


