Pop-up'larınıza anlık bildirim abonelik düğmesi eklemenin bir yolunu mu arıyorsunuz?
Pop-up'lar, dönüşüm oranlarınızı artırmak ve bir e-posta listesi oluşturmak için harika bir yoldur. Ancak onlarla yapabilecekleriniz bunlarla sınırlı değil. Doğru pop-up oluşturucuyu kullanırsanız, pop-up'larınızla ilgili her şeyi özelleştirebilirsiniz.
Varsayılan olarak, anlık bildirimler pop-up pencereleriyle birlikte gelir. Ancak bir pop-up oluşturucu ile çok daha fazla özelleştirme seçeneği elde edebilirsiniz.
Bu nedenle, pop-up oluşturmak ve anlık bildirim aboneleri toplamak için bir abonelik bağlantısı eklemek üzere bir pop-up oluşturucu kullanacağız.
Pop-up'larınızdan doğrudan anlık bildirim aboneleri toplamak için kolayca bir düğme ekleyebilirsiniz. Ve bunu yapmak çok kolay. Tek ihtiyacınız olan bir pop-up oluşturucu ve anlık bildirim aboneleri toplamak için özel pop-up'lar ayarlamak üzere bir anlık bildirim yazılımıdır.
Hadi başlayalım.
Anlık Bildirim Aboneleri Toplamak İçin Pop-up Oluşturma
Tüm pop-up'larınızı oluşturmak için OptinMonster kullanmanızı öneririz. Hadi bir pop-up oluşturarak başlayalım.
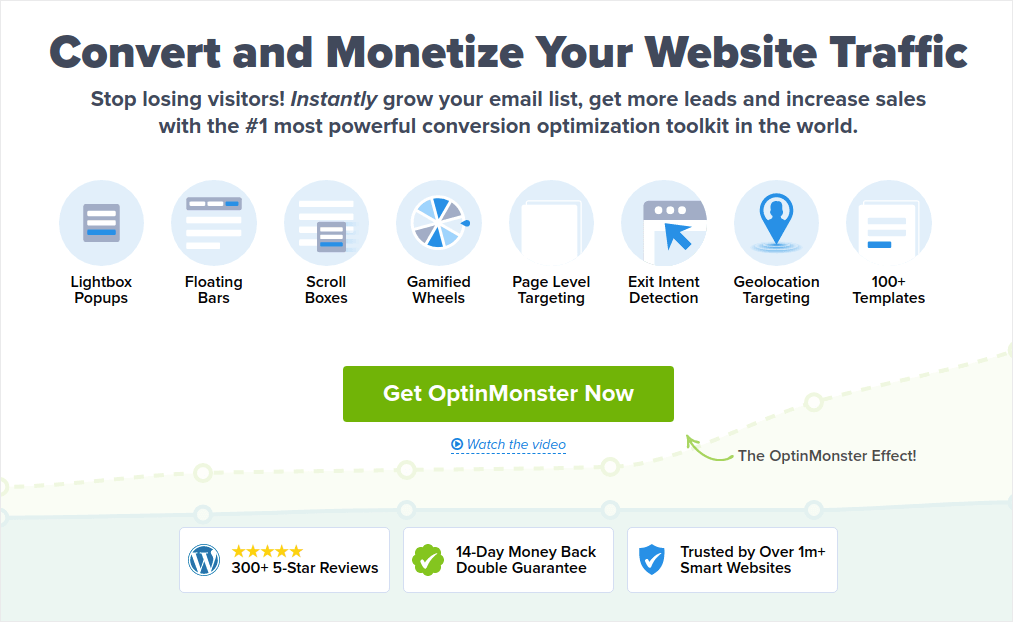
OptinMonster, dünyanın 1 numaralı dönüşüm araç setidir ve biz de kendimiz kullandık. OptinMonster, güçlü ve dönüşüm sağlayan pop-up'lar oluşturmayı çok basit hale getirir. Ve hiç kodlama kullanmanız gerekmez.
OptinMonster, potansiyel müşteri oluşturma sürecinize başlamak, büyütmek ve ölçeklendirmek için ihtiyacınız olan hemen hemen her şeye sahiptir.
Araç setini kullanarak neler yapabileceğinize hızlı bir genel bakış:
- Pop-up kullanarak anlık bildirim aboneleri toplama
- İlk kez gelen ziyaretçileri düzenli okuyuculara dönüştürme
- Sepet terk etme ve göz atma terk etme oranlarını azaltma
- Gerçek geri sayım sayaçlarıyla sınırlı süreli teklifler oluşturma
- E-kitap indirmelerini ve dijital ürün satışlarını artırma
- Canlı etkinlikler için bir hunisi oluşturma
- Oyunlaştırılmış pop-up'lar kullanarak site etkileşimini iyileştirme
- Trafiğinizi size para kazandıran sayfalara ve gönderilere yönlendirme
OptinMonster'ı oldukça sık kullanıyoruz ve hatta tam bir OptinMonster incelemesi yazdık. Bunu inceleyebilir veya kampanyanıza hemen başlayabilirsiniz. Tek yapmanız gereken OptinMonster'a kaydolmak ve bu makalenin geri kalanını takip etmektir.
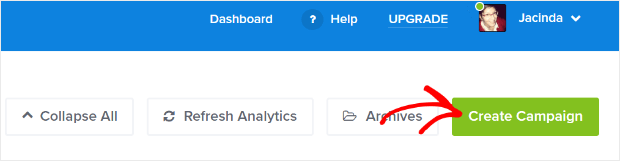
1. Adım: Aboneleri Toplamak İçin Bir Pop-up Kampanyası Oluşturun
OptinMonster kontrol panelinize gidin ve Oluştur düğmesine basın:
Önceden tasarlanmış bir şablon kullanarak bir opt-in oluşturmaya başlamak için Şablon seçeneğini belirleyin:
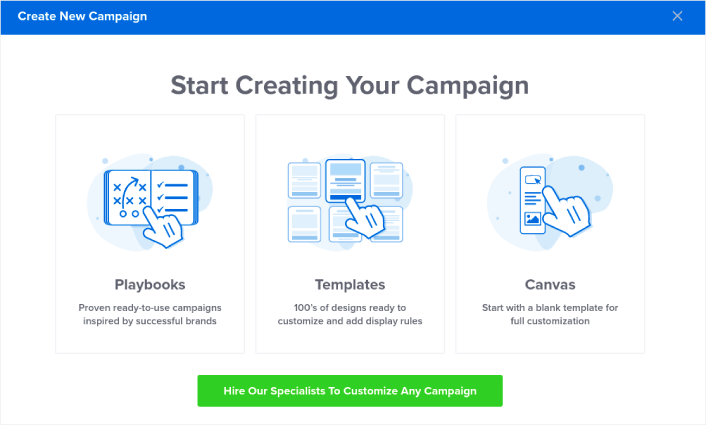
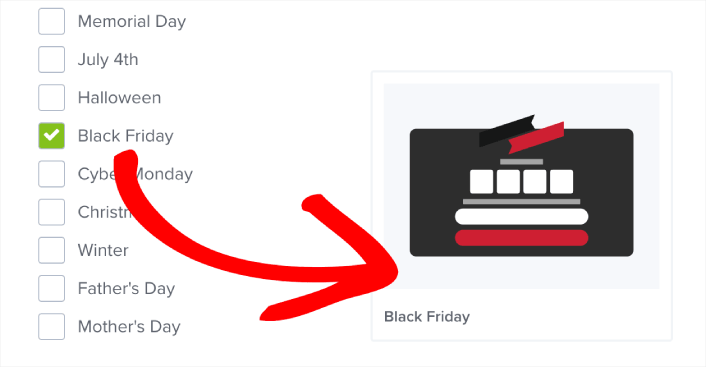
Bu eğitim için Kara Cuma için bir pop-up oluşturacağız. Pop-up kampanya türünü seçin ve bir kampanya şablonu arayın
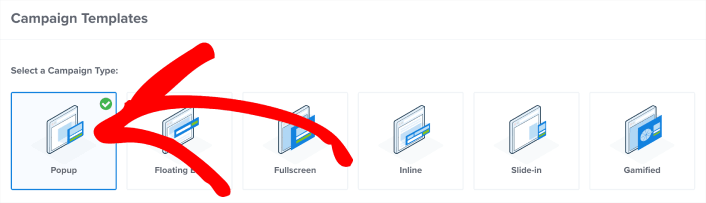
Beğendiğiniz herhangi bir şablonu seçebilirsiniz, ancak bu eğitim için Kara Cuma kampanya şablonunu kullanacağız.
Şablonunuzu seçtikten sonra, kampanyanıza bir ad verin. Unutmayın, bu kampanya adı sizin içindir ve muhtemelen farklı hedefleme seçenekleriyle bu pop-up'lardan birçoğunu oluşturacaksınız. Bu nedenle, kampanyaya anlamlı bir ad verin, yoksa daha sonra gerçekten kafanız karışır.
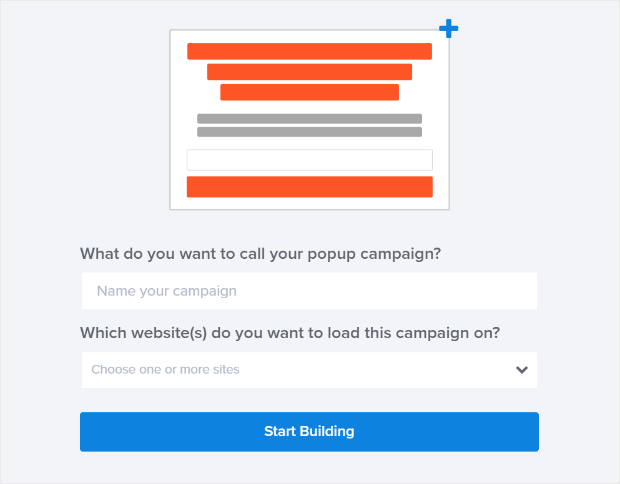
Also, depending on your plan, you can also use OptinMonster on multiple sites. So, select the website where you want to display your campaign as well. Hit Start Building when you’re done.
Step #2: Edit Your Popup to Customize the Look and Feel
With OptinMonster, you’ll get a visual drag and drop popup builder. Once you’re done naming your campaign, you’ll be able to edit even the tiniest details about your popup.
The most amazing part here is that you just click whatever text you want to edit and change it inline. There’s no need to fill out a form or edit any HTML code in the popup.
You can edit everything you want about your popup including images. When you’re happy with the optin’s appearance, you can move on to more advanced settings.
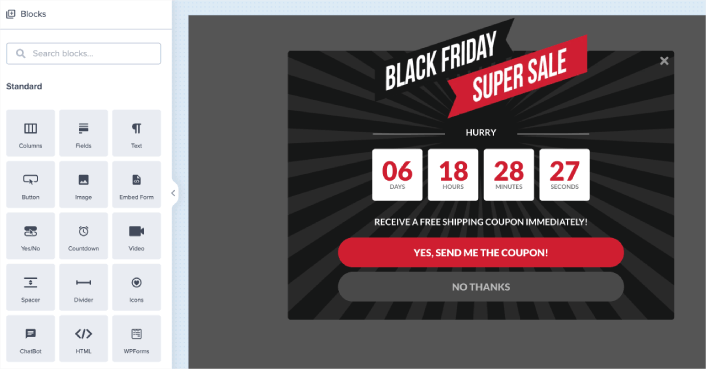
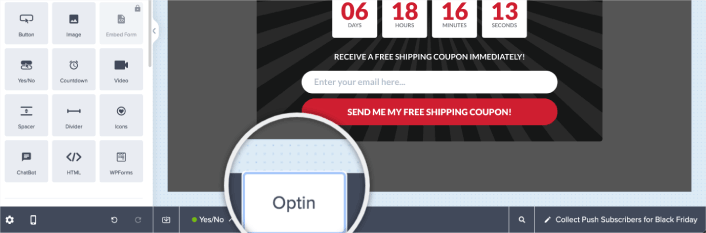
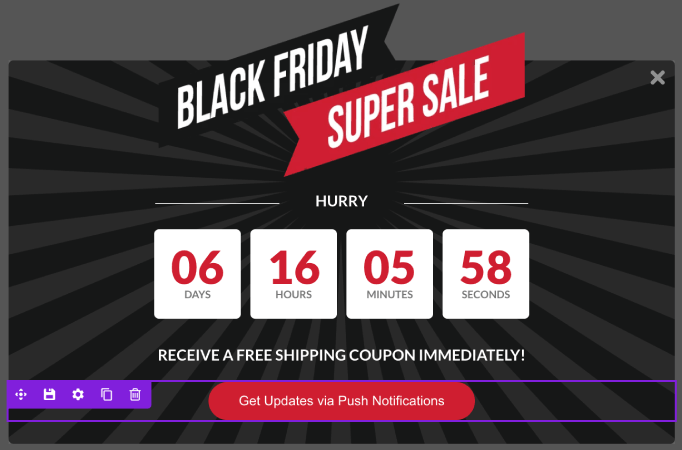
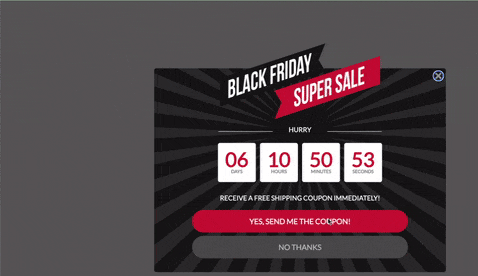
The way this particular template is set up is that there are three parts to the popup. You have an initial Yes/No screen where the visitors opts for a coupon on Black Friday. It’s what you see in the image above. By default, it’s a free shipping coupon. But you can add any offer or coupon you want.
When your visitors click the Yes button on the popup, they get sent to the Optin screen. This is where you would collect subscribers. By default, the optin screen collects emails. We’re going to replace that with a button to collect push subscribers.
Finally, you have a Success screen that shows up when your visitor subscribes.
Let’s do this one step at a time.
Step #3: Remove the Email Optin from the Popup
You can edit any module in the popup you want. Go to the Optin screen in the bottom bar:
Here, you can hover on the email optin module and just click on the delete button to remove it:
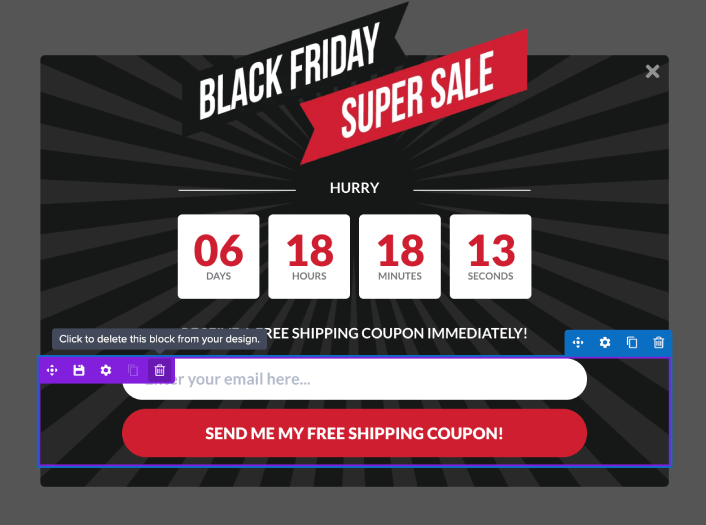
Now that the email optin is gone, we’re going to add a button to it that collects push notification subscribers.
Step #4: Add a Click to Subscribe Button to Your Popup
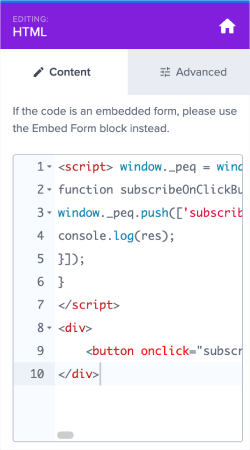
First, add an HTML block to your popup from the sidebar in OptinMonster.
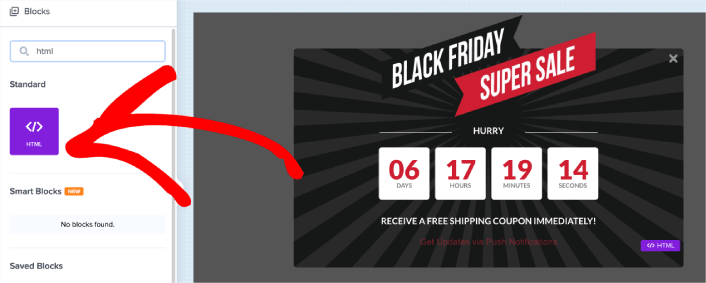
This is where we’re going to add the code to collect push notification subscribers. First, paste in the following code to create a clickable button:
<button class = "btn" onclick="subscribeOnClickButton()">Get Updates via Push Notifications Instead</button>Paste the code where it says you can add HTML. At this point, you should see a new button in your popup:
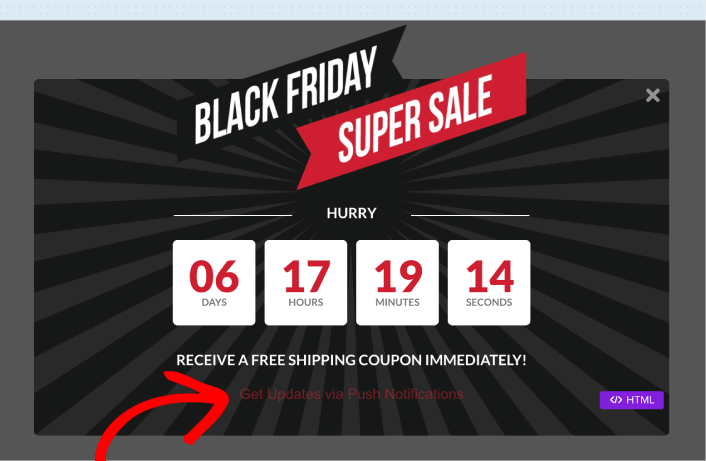
Next, scroll down and paste the following CSS into the CSS container:
html div#om-{{id}} .btn
{
    font-family: Arial, sans-serif;
    font-weight: 0;
    font-size: 14px;
    color: #fff;
    background-color: #cf1f31;
    padding: 10px 30px;
    width: 100%;
    margin: auto;
    border: solid #cf1f31 2px;
    box-shadow: rgb(0, 0, 0) 0px 0px 0px 0px;
    border-radius: 50px;
    transition : 1000ms;
    transform: translateY(0);
    display: grid;
    align-text: center;
    cursor: pointer;
}

html div#om-{{id}} .btn:hover
{
    transition : 1000ms;
    padding: 10px 35px;
    transform : translateY(-0px);
    background-color: #ffffff;
    color: #cf1f31;
    border: solid 2px #ffffff;
}
At this point, you should see a beautiful looking button on your popup:
Step #5: Get Subscription Code from PushEngage
Push notifications help you grow your website traffic and engagement on autopilot. Web push notifications are an effective way to bring back users who may have abandoned their session or left the website. It helps in re-engaging users by notifying them of new content, offers, or events.
Push notifications also include clear and actionable messages and call to action buttons, encouraging users to take specific actions, such as reading an article, completing a purchase, or participating in an event.
You can tailor push notifications based on users’ preferences, behavior, and interests, to make sure that the messages are relevant and valuable to each user. Users have to agree to get web push notifications. This makes sure that the messages are not seen as spam and that they are sent with the users’ permission.
The coolest part is that you can collect push notification subscribers from your email popup. So, just in case your site visitors don’t want to give up their email ID, you can still get them to subscribe using web push notifications.
We recommend using PushEngage to send web push notifications.

Here’s a quick glance at what you get with PushEngage:
- High-converting automated campaigns
- Multiple targeting and campaign scheduling options
- Goal tracking and advanced analytics
- Smart A/B testing
- Özel Bir Başarı Yöneticisi
Ücretsiz başlayabilirsiniz, ancak işletmenizi büyütme konusunda ciddiyseniz, ücretli bir plan satın almalısınız. Ayrıca, herhangi bir anlık bildirim hizmeti satın almadan önce, anlık bildirim maliyetleri hakkındaki bu kılavuza göz atmalısınız.
And if you’re running an online store, PushEngage also helps you grow your sales by helping you create automated eCommerce push notifications.
İşletmeniz için trafik, etkileşim ve satış oluşturmak istiyorsanız, PushEngage'in tartışmasız en iyi seçenek olduğunu göreceksiniz. Ve bütçeniz kısıtlıysa, anlık bildirimlerinizle biraz yaratıcı olabilirsiniz.
Head over to the PushEngage home page and click the Get Started button:

Ardından, PushEngage'i denemek için ücretsiz planı seçmek isteyeceksiniz veya işletmenizi büyütme konusunda ciddiyseniz ücretli bir planı seçin. Ücretli planlar daha fazla kampanya seçeneği ve daha büyük abone listeleri oluşturma olanağı sunar.
In your PushEngage dashboard, head over to Site Settings » Site Details and click the Click Here for Setup Instructions button. Under Any Site, you’ll get your installation code:

WARNING: You need to copy the code you get from your dashboard. The code is unique for each PushEngage user. You won’t be able to copy the code in the image and collect push notification subscribers.
Once you have the code in your PushEngage dashboard, take the second script and add some extra code to it. Your final code should look something like this:
<script src="https://clientcdn.pushengage.com/core/02a6e92667ae2279fcba8932356c1d93.js" async></script>
<script> window._peq = window._peq || [];
function subscribeOnClickButton(){
window._peq.push(['subscribe',{}.pe,function(res){
console.log(res);
}]);
}
</script>
Step #6: Add Your Subscription Code to the HTML Block in Your Popup
Add this code to the HTML block in OptinMonster and you’re done!
When you’re done, just hit the Save and Publish buttons.
Step #7: Add Click Tracking and Campaign Closing
The last bit we need to do is add click tracking code to consider each subscriber as a conversion in OptinMonster. Also, when the visitor subscribes, you’ll either want them to move to the Success screen or exit the campaign.
Inside the Javascript snippet, add the following lines of code:
To enable conversion tracking, add this code:
om{{id}}.Listeners.convert(); //Track submission as a conversion in OptinMonsterTo move your subscriber to the Success screen, add this code:
om{{id}}.changeView('success'); // Show Success view on submissionTo close campaign on subscription, add this code:
om{{id}}.startClose();// Close campaign on submissionYou can add multiple code snippets as well. We recommend that you move subscribers to the Success screen and track the conversion. So, the final code snippet that we recommend using (including the button and all the Javascript) is:
<script src="https://clientcdn.pushengage.com/core/02a6e92667ae2279fcba8932356c1d93.js" async></script>
<script> window._peq = window._peq || [];
function subscribeOnClickButton(){
window._peq.push(['subscribe',{}.pe,function(res){
console.log(res);
om{{id}}.Listeners.convert(); //Track submission as a conversion in OptinMonster
om{{id}}.startClose();// Close campaign on submission
}]);
}
</script>
<div>
	<button class="btn" onclick="subscribeOnClickButton()">Get Updates via Push Notifications</button>
</div>
Or, you can use this code instead to close the campaign directly:
<script src="https://clientcdn.pushengage.com/core/02a6e92667ae2279fcba8932356c1d93.js" async></script>
<script> window._peq = window._peq || [];
function subscribeOnClickButton(){
window._peq.push(['subscribe',{}.pe,function(res){
console.log(res);
om{{id}}.Listeners.convert(); //Track submission as a conversion in OptinMonster
om{{id}}.changeView('success'); // Show Success view on submission
}]);
}
</script>
<div>
	<button onclick="subscribeOnClickButton()">Get Updates via Push Notifications</button>
</div>
Just copy and paste the code into the HMTL block of your OptinMonster popup.
And for either code snippet, remember to add the following CSS in the CSS section of your HTML block:
html div#om-{{id}} .btn
{
    font-family: Arial, sans-serif;
    font-weight: 0;
    font-size: 14px;
    color: #fff;
    background-color: #cf1f31;
    padding: 10px 30px;
    width: 100%;
    margin: auto;
    border: solid #cf1f31 2px;
    box-shadow: rgb(0, 0, 0) 0px 0px 0px 0px;
    border-radius: 50px;
    transition : 1000ms;
    transform: translateY(0);
    display: grid;
    align-text: center;
    cursor: pointer;
}

html div#om-{{id}} .btn:hover
{
    transition : 1000ms;
    padding: 10px 35px;
    transform : translateY(-0px);
    background-color: #ffffff;
    color: #cf1f31;
    border: solid 2px #ffffff;
}
When you’re done, click Save. If you check your website, you should now see the popup collecting both email and push notification subscribers:
And just like that, you’re collecting push subscribers from your popup. Push notifications come with their own popup modals. But they’re a bit difficult to customize. So, you can create beautiful popups using OptinMonster and then use them as your push notification popups.
Step #8: Publish Your Exit Intent Popup in WordPress
When you create a new campaign, it’s Paused by default.
Go to the Publish tab from the top menu to see the Publish Options. Then, set the status to Publish and select the website platform:
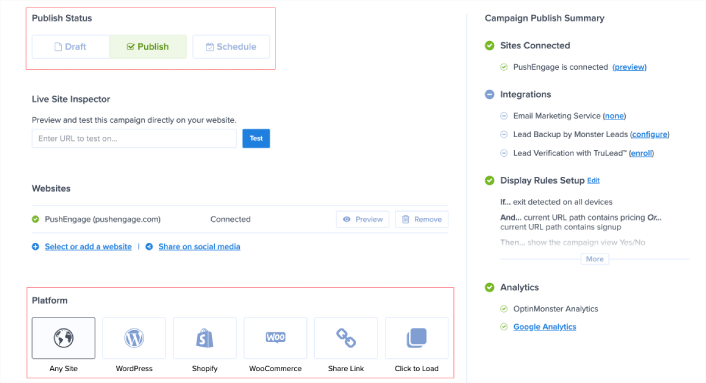
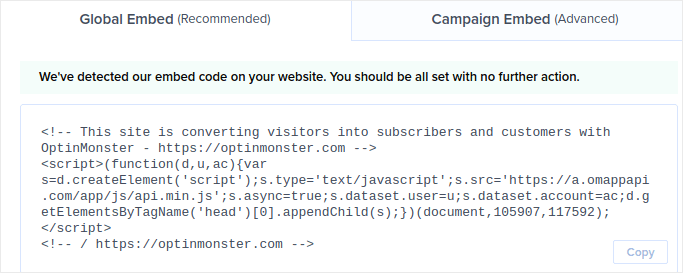
If you’re running a WordPress site, the OptinMonster plugin handles the rest of the setup automatically. It’s the same for Shopify and BigCommerce. For any other site, click on Any Site and paste the embed code in your website’s head:
Ve işte bu kadar!
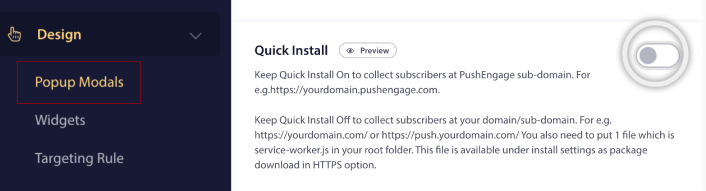
Bonus Step: Disable Quick Install in PushEngage
Quick Install is a method of adding push notification subscribers to a website without an SSL certificate. Nowadays, almost all sites have an SSL certificate, but just in case you don’t have one installed, we highly recommend that you get one installed right away. Check out this article on how to install an SSL certificate in WordPress.
So, before you start collecting subscribers on your site, we recommend disabling Quick Install as well. Head over to the PushEngage dashboard and go to Design » Popup Modals. Then, disable Quick Install:
And now, you’re ready to promote your website and collect more subscribers for Black Friday!
What to do After You Start Collecting Push Subscribers
Bu kadar, millet!
Let us know if this article helped. Creating popups on your site can help you convert your traffic into push subscribers and genuine business leads. And we highly recommend that you start creating exit intent popups right away.
And if you’re looking for an affordable way to grow your traffic, we recommend using push notifications. Push notifications can help you bring in more repeat traffic and site engagement. You can also create automated push notification campaigns that generate sales.
Not convinced? Check out these resources:
- Müşteri Etkileşimini Artırmak İçin 7 Akıllı Strateji
- Anlık Bildirimler Etkili mi? 7 İstatistik + 3 Uzman İpucu
- Terk Edilmiş Sepet Anlık Bildirimleri Nasıl Ayarlanır (Kolay Eğitim)
- How to Add a Web Notifications WordPress Plugin to Your Site
We recommend using PushEngage to create your push notification campaigns. PushEngage is the #1 push notification software in the world. So, if you haven’t already, get started with PushEngage today!


