
Looking for a way to create an exit intent popup for your WordPress site?
An exit intent popup can be incredibly effective for capturing leads. They’re designed to convince and convert by pulling the visitor’s entire focus on themselves.
But having to code one from scratch is a real pain. For one thing, you’d have to know enough HTML, CSS, and Javascript to create the popup along with trigger rules for when to show it. Then, you’d have to create a manual integration with your email service provider. And finally, you’d have to deal with any privacy and security issues.
Good news: there’s a much simpler way.
In this article, we’re going to show you how to launch a full screen popup in WordPress with zero coding in less than 10 minutes.
Hadi başlayalım.
What is an Exit Intent Popup?
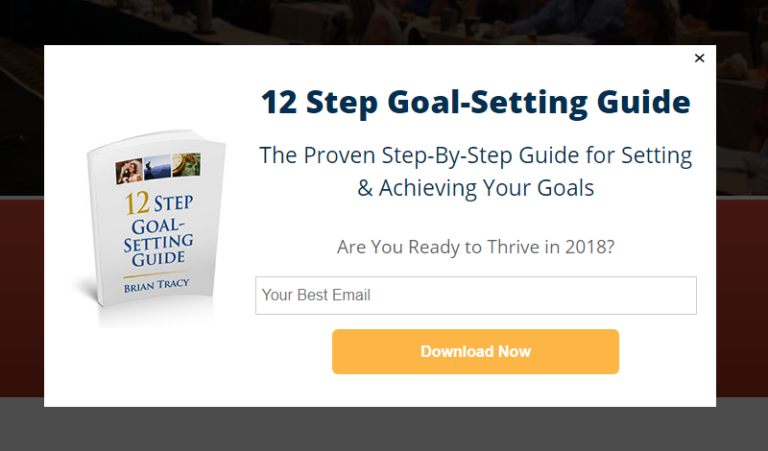
An exit intent popup is an opt-in form that pops up when your visitors try to leave your site. Your exit intent popup typically gives any abandoning visitors an offer in exchange for their email address. But if you want, you can also redirect them to a product with a discount code or even your most high-converting content.
In short: an exit intent popup is built to convert visitors who would have otherwise left without converting.
İşte bir örnek:
You can use exit intent popups to:
- Welcome new visitors
- Offer a discount coupon
- Point visitors to your best content
- Send visitors to your social media profiles
And more. You can even create popup contact forms. Popups are super flexible and as long as you’re creative, you can set up high-converting ones easily.
How to Create an Exit Intent Popup in WordPress
Now that you understand what an exit intent popup is and why you’d want to create one, how do you create one? We recommend using OptinMonster to create all your popups.
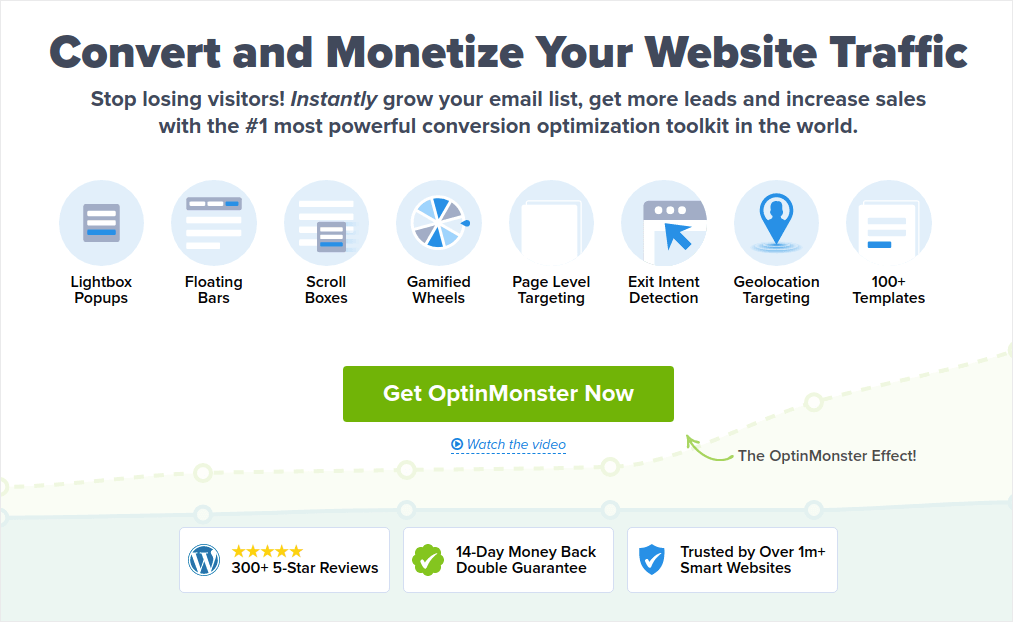
OptinMonster, dünyanın 1 numaralı dönüşüm araç setidir ve biz de kendimiz kullandık. OptinMonster, güçlü ve dönüşüm sağlayan pop-up'lar oluşturmayı çok basit hale getirir. Ve hiç kodlama kullanmanız gerekmez.
OptinMonster, e-posta müşteri adayı oluşturma sürecinizi başlatmak, büyütmek ve ölçeklendirmek için ihtiyacınız olan hemen hemen her şeye sahiptir.
Araç setini kullanarak neler yapabileceğinize hızlı bir genel bakış:
- Yeniden pazarlama için e-posta listenizi sorunsuz bir şekilde büyütün
- İlk kez gelen ziyaretçileri düzenli okuyuculara dönüştürme
- Sepet terk etme ve göz atma terk etme oranlarını azaltın
- Gerçek geri sayım sayaçlarıyla sınırlı süreli teklifler oluşturma
- eKitap indirmelerini ve dijital ürün satışlarını artırın
- Canlı etkinlikler için bir huni oluşturun
- Oyunlaştırılmış pop-up'lar kullanarak site etkileşimini iyileştirme
- Trafiğinizi size para kazandıran sayfalara ve gönderilere yönlendirme
- İki adımlı kayıt formları kullanarak gerçek potansiyel müşterilerden oluşan bir liste oluşturun ve sahte e-postaları kaldırın
OptinMonster'ı oldukça sık kullanıyoruz ve hatta tam bir OptinMonster incelemesi yazdık. Bunu inceleyebilir veya kampanyanıza hemen başlayabilirsiniz. Tek yapmanız gereken OptinMonster'a kaydolmak ve bu makalenin geri kalanını takip etmektir.
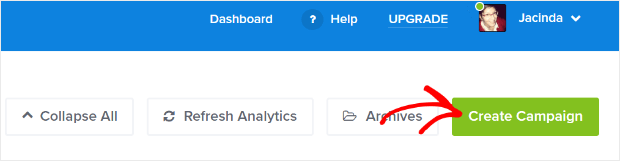
Step #1: Create a Campaign
OptinMonster kontrol panelinize gidin ve Oluştur düğmesine basın:
Önceden tasarlanmış bir şablon kullanarak bir opt-in oluşturmaya başlamak için Şablon seçeneğini belirleyin:
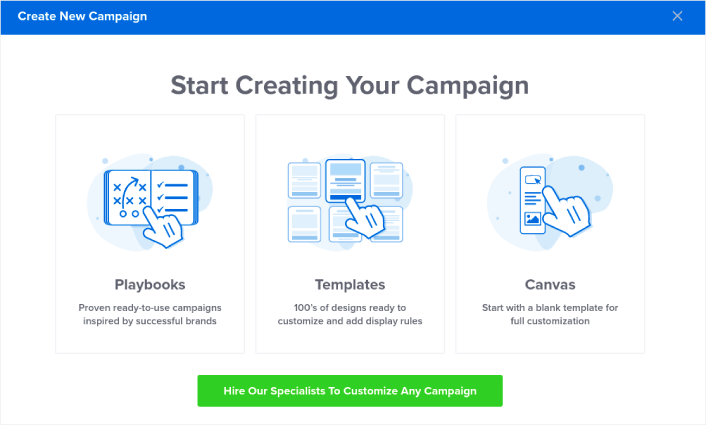
For this tutorial, we’re going to create a full screen popup. Select the Fullscreen to get started with full screen popup templates:
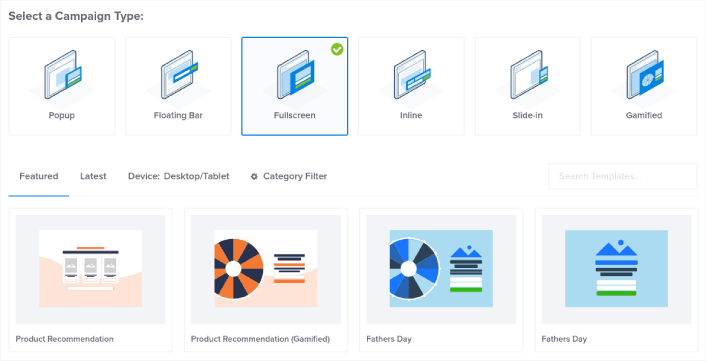
Then, choose a campaign template. You can choose whatever template you like, but we’re going with the Product Recommendation (Gamified) campaign template for this tutorial.
Şablonunuzu seçtikten sonra, kampanyanıza bir ad verin. Unutmayın, bu kampanya adı sizin içindir ve muhtemelen farklı hedefleme seçenekleriyle bu pop-up'lardan birçoğunu oluşturacaksınız. Bu nedenle, kampanyaya anlamlı bir ad verin, yoksa daha sonra gerçekten kafanız karışır.
Also, depending on your plan, you can also use OptinMonster on multiple sites. So, select the website where you want to display your campaign as well.
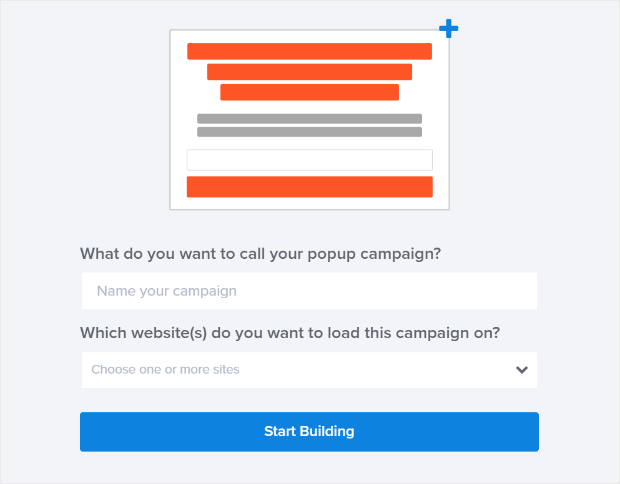
İşiniz bittiğinde Oluşturmaya Başla düğmesine basın.
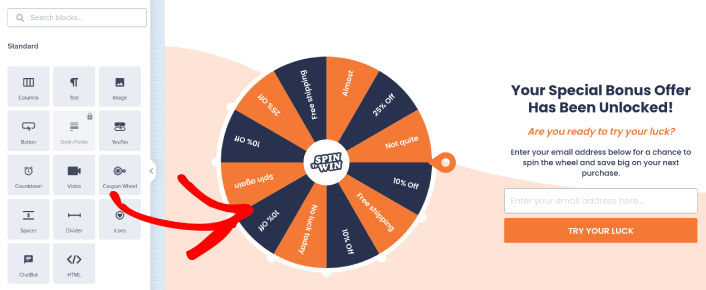
Step #2: Edit Your Popup
With OptinMonster, you’ll get a visual drag and drop popup builder. Once you’re done creating your campaign, you’ll be able to edit even the tiniest details about your popup. Start by editing your popup headline:
The most amazing part here is that you just click whatever text you want to edit and change it inline. There’s no need to fill out a form or edit any HTML code in the popup.
You can edit everything you want about your popup. When you’re happy with the optin’s appearance, you can move on to more advanced settings.
Step #3: Add a Click to Subscribe Button to Your Popup
Anlık bildirimler, web sitesi trafiğinizi ve etkileşiminizi otomatik olarak artırmanıza yardımcı olur. Ve bir çevrimiçi mağaza işletiyorsanız, PushEngage ayrıca otomatik e-ticaret anlık bildirimleri oluşturmanıza yardımcı olarak satışlarınızı artırmanıza da yardımcı olur.
Ücretsiz başlayabilirsiniz, ancak işletmenizi büyütme konusunda ciddiyseniz, ücretli bir plan satın almalısınız. Ayrıca, herhangi bir anlık bildirim hizmeti satın almadan önce, anlık bildirim maliyetleri hakkındaki bu kılavuza göz atmalısınız.
PushEngage ile nelerin geldiğine hızlı bir bakış:
- Yüksek dönüşüm sağlayan otomatik kampanyalar
- Birden fazla hedefleme ve kampanya zamanlama seçeneği
- Hedef takibi ve gelişmiş analizler
- Akıllı A/B testi
- Özel Bir Başarı Yöneticisi
İşletmeniz için trafik, etkileşim ve satış oluşturmak istiyorsanız, PushEngage'in tartışmasız en iyi seçenek olduğunu göreceksiniz. Ve bütçeniz kısıtlıysa, anlık bildirimlerinizle biraz yaratıcı olabilirsiniz.
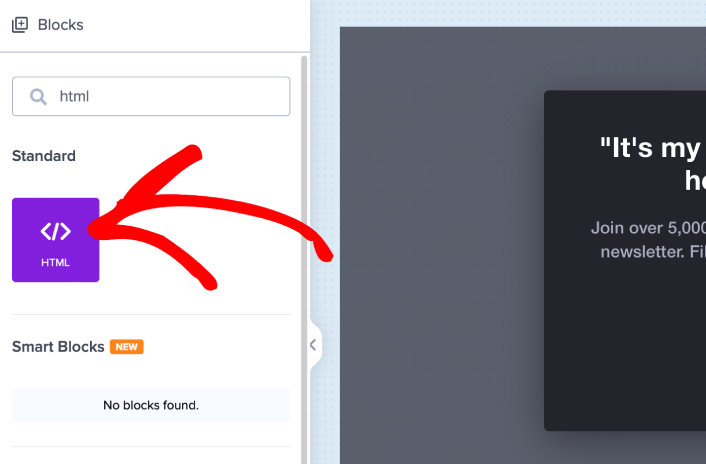
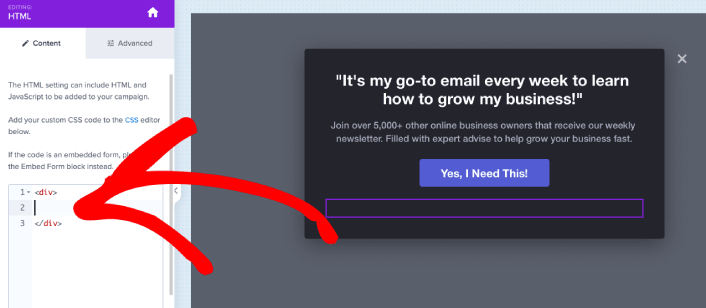
Öncelikle, OptinMonster'daki kenar çubuğundan açılır pencerenize bir HTML bloğu ekleyin.
Burada anlık bildirim abonelerini toplamak için kodu ekleyeceğiz. Öncelikle, tıklanabilir bir düğme oluşturmak için aşağıdaki kodu yapıştırın:
<button onclick="subscribeOnClickButton()" style="border: none; width: 100%; padding-left: 15%; padding-right:15%; text-align: center; display: inline-block; color: white;">Get Updates via Push Notifications</button>Kodu, HTML ekleyebileceğinizi söylediği yere yapıştırın:
Elbette, daha çekici görünmesini sağlamak için stillerle oynayabilirsiniz. Ardından, düğmeye tıklandığında anlık bildirim abonelerini toplayacağız.
PushEngage ana sayfasına gidin ve Başlayın düğmesine tıklayın:

Ardından, PushEngage'i denemek için ücretsiz planı seçmek isteyeceksiniz veya işletmenizi büyütme konusunda ciddiyseniz ücretli bir planı seçin. Ücretli planlar daha fazla kampanya seçeneği ve daha büyük abone listeleri oluşturma olanağı sunar.
PushEngage kontrol panelinizde, Site Ayarları » Site Detayları bölümüne gidin ve Kurulum Talimatları İçin Buraya Tıklayın düğmesine tıklayın. Herhangi Bir Site altında, kurulum kodunuzu alacaksınız:

UYARI: Kontrol panelinizden aldığınız kodu kopyalamanız gerekir. Kod, her PushEngage kullanıcısı için benzersizdir. Görüntüdeki kodu kopyalayarak anlık bildirim aboneleri toplayamazsınız.
Kodunuzu PushEngage kontrol panelinizde aldıktan sonra, ikinci betiği alın ve ona ek kod ekleyin. Nihai kodunuz şuna benzer olmalıdır:
<script src="https://clientcdn.pushengage.com/core/02a6e92667ae2279fcba8932356c1d93.js" async></script>
<script> window._peq = window._peq || [];
function subscribeOnClickButton(){
window._peq.push(['subscribe',{}.pe,function(res){
console.log(res);
}]);
}
</script>
Bu kodu, düğmeniz için olan kodun hemen ardından ve <div></div> kod bloğunun arasına OptinMonster'daki HTML bloğuna ekleyin ve işiniz bitti!
Step #4: Set Exit Intent Popup Display Rules
Display rules are meant to define when your campaign shows up on your site and who sees it.
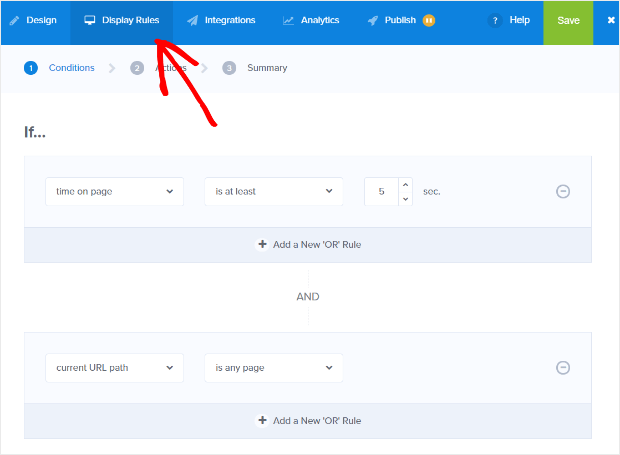
Our recommendation is that you set the popup to display if exit detected:
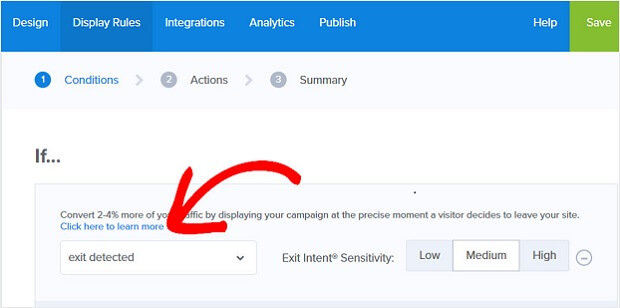
This creates an exit intent popup. Your popup doesn’t have to be a full screen popup to get triggered by exit intent. Simply by changing the display rules, you can convert any popup into an exit intent popup.
Click Next Step to choose the Action. Here, we recommend that you set Show the campaign view to Optin View, set the show with MonsterEffect to any entry animation you like, and play sound effect to any sound effect for your popup.
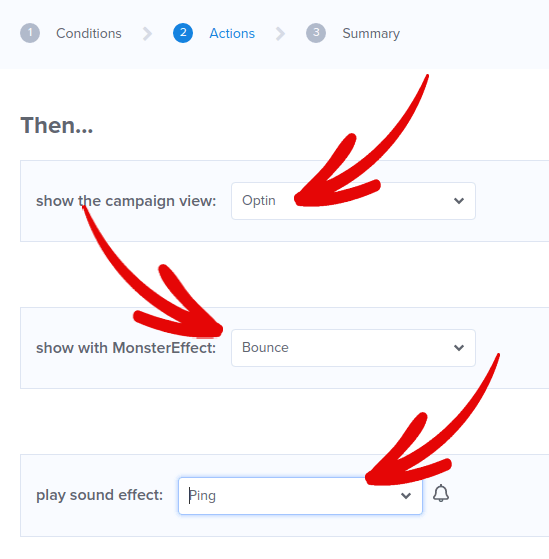
And then, click the Next Step button. You can see the full extent of your settings in the Summary tab.
Step #5: Setup Your Email Integration
The next step is to set up your email integration. Click Add New Integration from the Integrations tab and select your email service provider:
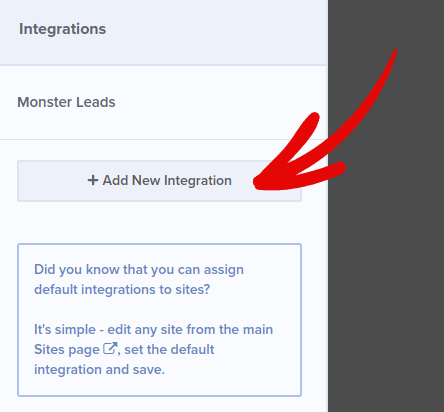
We recommend using Drip for your email marketing if you don’t already have an email service provider.
Step #6: Publish Your Exit Intent Popup in WordPress
When you create a new campaign, it’s Paused by default.
Go to the Publish tab from the top menu to see the Publish Options. Then, set the status to Publish and select the website platform:
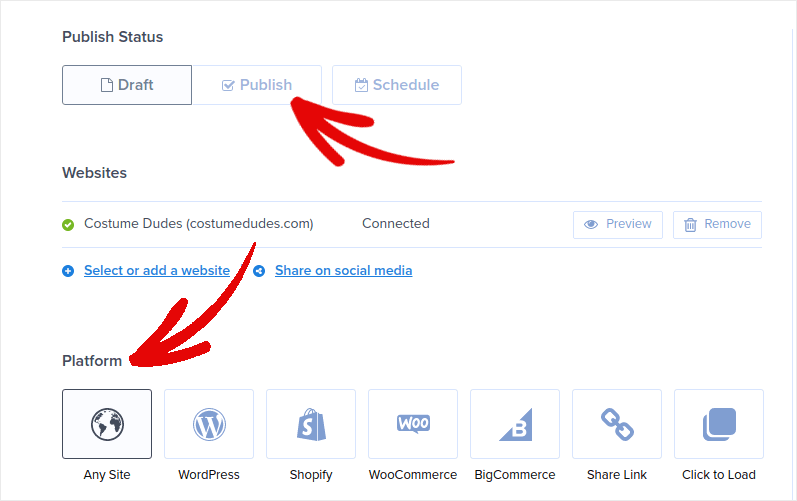
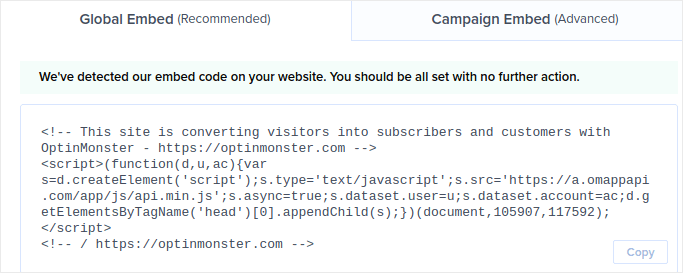
If you’re running a WordPress site, the OptinMonster plugin handles the rest of the setup automatically. It’s the same for Shopify and BigCommerce. For any other site, click on Any Site and paste the embed code in your website’s head:
Ve işte bu kadar!
What to do After Creating an Exit Intent Popup in WordPress
Bu kadar, millet!
Let us know if this article helped. Creating popups on your site can help you convert your traffic into email subscribers and genuine business leads. And we highly recommend that you start creating exit intent popups right away.
Ve trafiğinizi artırmak için uygun fiyatlı bir yol arıyorsanız, anlık bildirimleri kullanmanızı öneririz. Anlık bildirimler, daha fazla tekrar eden trafik ve site etkileşimi getirmenize yardımcı olabilir. Ayrıca satış üreten otomatik anlık bildirim kampanyaları da oluşturabilirsiniz.
İkna olmadınız mı? Bu kaynaklara göz atın:
- Müşteri Etkileşimini Artırmak İçin 7 Akıllı Strateji
- Anlık Bildirimler Etkili mi? 7 İstatistik + 3 Uzman İpucu
- Terk Edilmiş Sepet Anlık Bildirimleri Nasıl Ayarlanır (Kolay Eğitim)
- Sitenize Bir Web Bildirimleri WordPress Eklentisi Nasıl Eklenir
We recommend using PushEngage to create your push notification campaigns. PushEngage is the #1 push notification software in the world. So, if you haven’t already, get started with PushEngage today!


