Looking for a quick way to add and edit your push notification icon?
It’s actually super easy. The notification icon tells your subscribers who you are. It’s a brand mark on each push notification you send. And that can be priceless because it helps your audience remember your brand.
The cost of making sure that each push notification you send helps you become more memorable? Less than 5 minutes.
In this article, we’re going to show you how to add and edit your push notification icon. And like we said, it’s super easy.
Låt oss dyka in.
Why Add a Push Notification Icon?
A push notification icon is a small, distinctive image that represents an app on a user’s device. It appears alongside push notifications to visually identify the source app of the message or alert.
This icon helps users quickly recognize which app or website is communicating with them without having to read the notification’s text.
Adding a push notification icon is a smart move for a few reasons:
- Recognition: Just like seeing a familiar face in a crowd, we instantly recognize icons. When your app sends a notification, the icon acts like a little wave, saying, “Hey, it’s me!” This helps users quickly identify which app is calling for their attention.
- Branding: Your icon is like a tiny billboard for your app. It’s a part of your brand identity. Each time users see it, they’re reminded of your app. This can help keep your app top-of-mind.
- User Experience: Users often have many apps installed, and it can be a real jumble. A unique icon helps them manage their notifications more efficiently. They can see at a glance which notifications they want to check out first.
- Professionalism: An app with its own notification icon looks more polished and professional. It shows that you’ve put thought into even the small details, which can improve overall user satisfaction.
- Functionality: Sometimes, the icon can also convey additional information. For example, a messaging app might show different icons for a new message vs. a missed call. This adds an extra layer of functionality and user convenience.
So, a push notification icon might be small, but it plays a big role in how users interact with your app and perceive it!
Så här lägger du till en ikon för pushmeddelanden
Now that we understand what a push notification icon is and why you should add it, let’s check out how you can add it easily without any coding at all.
Steg #1: Välj en push-notistjänst
Push notifications are a marketing tool that helps you to connect with web visitors even after they leave your website. You can send targeted notifications to your push subscribers and even personalize your notifications for difference customer segments. But which push notification service should you choose?
We recommend using PushEngage to send push notification campaigns.

PushEngage är den bästa push-aviseringstjänsten i världen. Och vi pratar inte bara om gratisversionen. Den låter dig ansluta med besökare efter att de har lämnat din webbplats med riktade push-meddelanden.
PushEngage är vårt förstahandsval för push-tjänster och verktyg eftersom det är:
- Den är så enkel att använda
- Effektivt på HTTP- och HTTPS-webbplatser
- Levereras med en visuell byggare som kräver lite eller ingen kodning för att ställa in
- Ställ enkelt in helt automatiserade pushnotiskampanjer för alla typer av webbplatser
- Har flera alternativ för att skicka personliga push-meddelanden för högre klickfrekvens
- Utrustad med anpassad målföljning, UTM-parametrar och avancerad analys
Och detta är knappt ytan. Kolla in PushEngages fullständiga lista över funktioner innan du går vidare.
Den mest otroliga delen med PushEngage är att det har en evigt gratis plan som du kan prova innan du fattar ett köpbeslut.
Proffstips: Läs vår artikel om kostnadsanalys för push-meddelanden innan du köper någon tjänst.
Step #2: Install the PushEngage Plugin
När du har skapat ditt konto, gå till PushEngage-instrumentpanelen och följ med:

Klicka på Webbplatsinställningar » Webbplatsdetaljer och klicka på knappen Klicka här för installationsinstruktioner:

Klicka på fliken WordPress och klicka på knappen Installera PushEngage WordPress-plugin för att installera pluginet på din webbplats.

Här är den coola delen: När du skapade ditt PushEngage-konto synkroniserade du redan din webbplats med ditt PushEngage-konto. Så klicka på installationslänken i PushEngage-instrumentpanelen för att automatiskt installera PushEngage WordPress-pluginet på din webbplats.
And you’re done! You have successfully set up a web notifications WordPress plugin on your website. You don’t have to login to your WordPress admin panel at all. For a more detailed guide, check out our article on how to install web notifications on WordPress.
Step #3: Add or Edit Your Push Notification Icon
Go back to your PushEngage dashboard. Click on Site Settings » Site Details and under Upload Your Site Icon, you can upload an image:
The image you upload is your push notification icon. Keep the dimensions of the image at 192px x192px for the best results and make sure that the image size is less than 1MB. You can use a JPG, PNG, or even a GIF for animated brand marks. Just makes sure that the icon is consistent with brand marks that you use on social network sites.
Om du behöver redigera din ikon senare är det här du gör det. Ladda bara upp en annan bild och du är klar!
Step #4: Send a Test Notification to Check Your Notification Icon
We recommend creating a website welcome message to test your push notifications. Welcome push notifications are great for:
- Bekräftelse: Du vill bekräfta att din nya prenumerant faktiskt är prenumererad på dina webb push-notiser.
- Återengagemang: Välkomstkampanjer är ett utmärkt sätt att få dina prenumeranter att komma tillbaka till din webbplats.
- Försäljning: Du kan ge dina nya prenumeranter ett välkomsterbjudande med rabatter, gratis gåvor och kuponger.
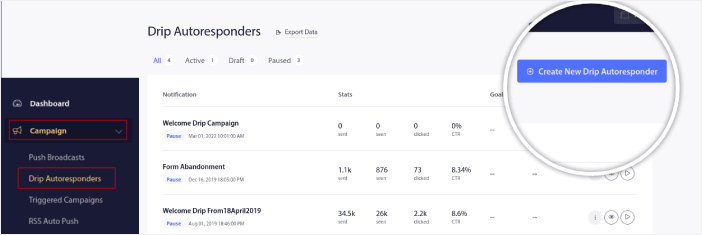
Låt oss skapa en välkomstkampanj för push-notiser nu. Gå till din PushEngage-instrumentpanel och navigera till Kampanj » Drip Autoresponders » Skapa ny Drip Autoresponder:
Ge din drip-kampanj ett namn som du lätt kan komma ihåg. Ställ sedan in den första push-notisen att skickas omedelbart efter att en besökare prenumererar på dina push-notiser.

Du kan redigera notisen för att skapa anpassat innehåll för ditt välkomstmeddelande. När du är klar klickar du på knappen Lägg till ny notis för att lägga till fler notiser i sekvensen. Du kan redigera de nya notiserna och ställa in en anpassad fördröjning mellan varje notis.
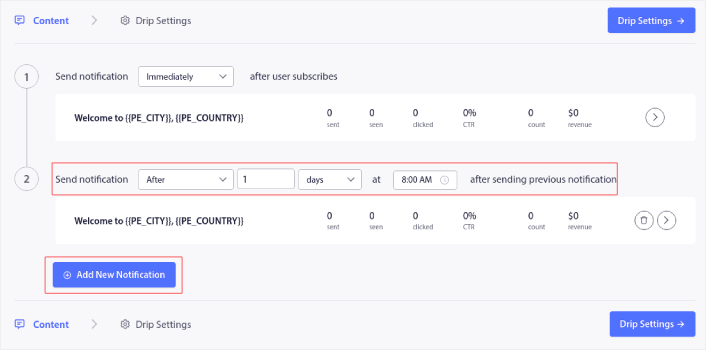
Du kan lägga till så många notiser som du vill, men vi rekommenderar att skapa en välkomst-drip med 5-7 notiser.
Välj därefter din målgrupp i Drip-inställningar:
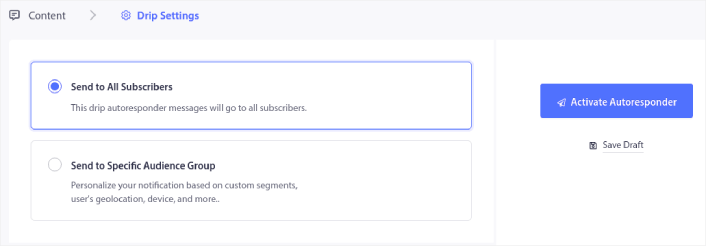
You can send different welcome drips for different segments by using the Send to Specific Audience Group option. This is especially useful when you’re segmenting visitors when they opt for push notifications.
When you’re happy with your targeting, click on the Activate Autoresponder button.
Och du är klar!
If your push notifications were installed correctly, you should see a welcome notification like this one:

And as you can see, the notification icon is pretty prominent in our example!
If you’re new to push notifications, you should follow a full-blown push notification testing process before you go live. It’ll help you troubleshoot common issues with the functionality before your visitors see them and start complaining about a broken user experience.
What to do After You Add a Notifications Icon
Now that you know how to add a push notification icon, it’s time for you to start creating your own campaigns. But before you get started with the campaigns, you should study some great push notification examples first.
Och om du är nybörjare på push-notiser bör du kolla in vår artikel om bästa praxis för push-notiser innan du börjar skapa kampanjer. Några av de bästa praxis som vi aktivt rekommenderar inkluderar:
- Öka klick med nyfikenhet
- Personifiera varje push-notis
- Stick ut med rikt media
- Återaktivera inaktiva push-prenumeranter
- Håll kunderna informerade
- Använd emojis där du kan
- Skapa en känsla av brådska
Vi rekommenderar att använda PushEngage för att skapa dina push-notiskampanjer. PushEngage är den främsta mjukvaran för push-notiser på marknaden och dina kampanjer kommer att vara i trygga händer.
Så, om du inte redan har gjort det, kom igång med PushEngage idag.


