Sanningen är att du kan använda nästan alla olika kampanjer på varierande sätt för att växa nästan vilken verksamhet som helst. Men det kräver lite erfarenhet och expertis inom marknadsföring för att känna till dessa användningsfall.
Exciting news: We just updated our Shopify app pricing and included some exciting new features. And it’s easier than ever to grow your eCommerce business at super affordable rates!
Sounds exciting? There’s a lot to unpack here. So, let’s dive in.
What’s The New Shopify Pricing for PushEngage?
We now have two pricing plans: A Free plan and a Growth plan.
The Free plan is perfect for new eCommerce businesses who are making less than $100/month in profits. It’s also fine for testing the PushEngage dashboard experience.
The Growth plan, on the other hand, starts at only $4/month for 5,000 subscribers and you can upgrade your account up to 100,000 subscribers. For anything beyond 100,000 subscribers, you can talk to us for an Enterprise account.
But there’s way more to unpack here. For one thing, we charge you based on your subscriber list and not on your clicks and push message sends. And that’s a big difference because with PushEngage, you get:
- Predictable Costs: With a subscriber-based pricing model, you know exactly how much you’ll be paying based on the size of your subscriber list. This makes budgeting and cost forecasting much easier compared to an impressions-based model where costs can fluctuate unpredictably.
- Focus on Quality Over Quantity: When you pay per impression, there’s an incentive to send as many notifications as possible, even to disengaged or inactive users, to get more value. With subscriber-based pricing, the focus shifts to building a high-quality, engaged subscriber base rather than saturating users with notifications.
- Better Alignment with Goals: The primary goal of push notifications is to reach and engage your subscriber base effectively. Paying per subscriber aligns the pricing model directly with this goal, rather than basing costs on the nebulous metric of impressions.
- Avoid Overcharging: With impression-based pricing, you may end up paying for notifications that are never actually seen or engaged with by users, leading to wasted spend. Subscriber-based pricing ensures you only pay for your active, consenting audience.
- Transparency and Control: Knowing your costs are based solely on your subscriber count gives you more transparency and control over your push notification spending, rather than having costs determined by a metric (impressions) that can be influenced by many external factors.
This besides, you can also clean up your subscriber list to remove inactive subscribers to pay less and maximize your sending volume (more on this later).
How to Create Shopify Push Campaigns
Once you’re done installing the PushEngage Shopify app, go ahead and search for it in the Shopify search bar:

Click on PushEngage Push Notifications to go to the PushEngage dashboard.

Here, you can create any eCommerce push notification campaign you like.
How to Send High-Converting Shopify Campaigns
eCommerce campaigns is where the Shopify integration really shines. It’s super simple and easy. Head over to your PushEngage dashboard and go to Campaigns » Triggered Campaigns:
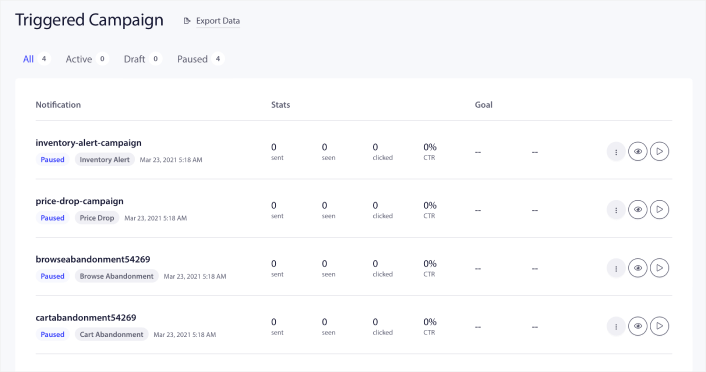
You’ll see that your account comes with 4 pre-built triggered campaigns by default:
- Meddelande om prissänkning
- Inventory alert
- Kampanj vid övergiven surfning
- Cart abandonment campaign
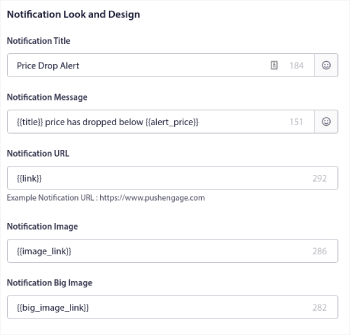
All you need to do is edit each campaign and fill out the Content section and activate them. Your pre-built campaign templates already come with fairly high-converting copy. But we ask all our customers to edit the content to suit their marketing strategy.
När du klickar på något av push-meddelandena i sekvensen kan du anpassa meddelandet i vilken grad du vill:
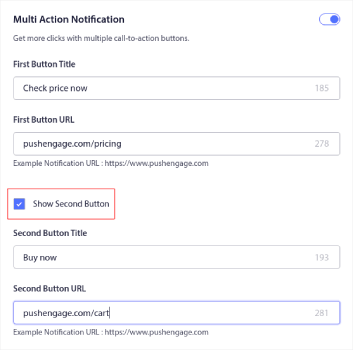
You can also add multiple buttons for a smoother conversion:
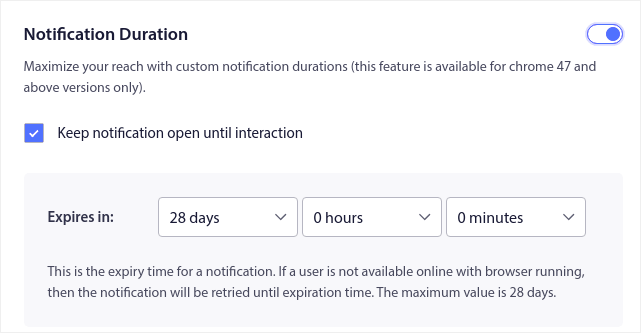
And you can set a custom notification duration under Notification Duration:
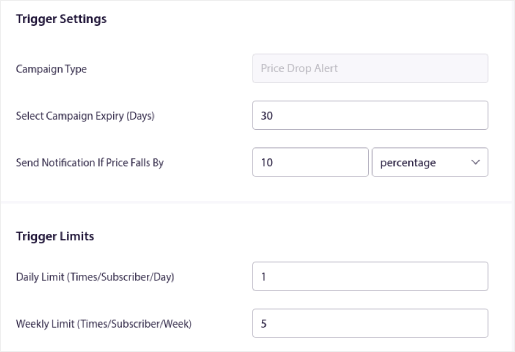
When you’re done with the Content tab, click on the Trigger Settings button and configure when your push notifications get sent.
This process is the same for all the eCommerce campaigns. All you need to do is customize your campaign and activate it. No API keys, no manual code integrations, and no barriers to getting started in 10 minutes or less!
NOTE: For your cart abandonment campaign, you also get a pre-built revenue tracker that will report conversions and revenue generated from your campaign. You don’t have to do anything to enable this feature. Just run your cart abandonment campaign.
How to Send Push Broadcasts
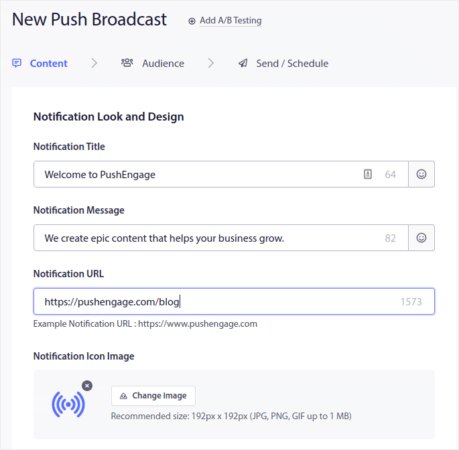
Sometimes, you’ll want to start is to send a push broadcast to announce specific time-limited offers and promos. Head over to Campaigns » Broadcast and click on Create New Push Broadcast:

Then, create a new push notification to send. Customize the content under the Content tab:
Next, select your audience under Audience:
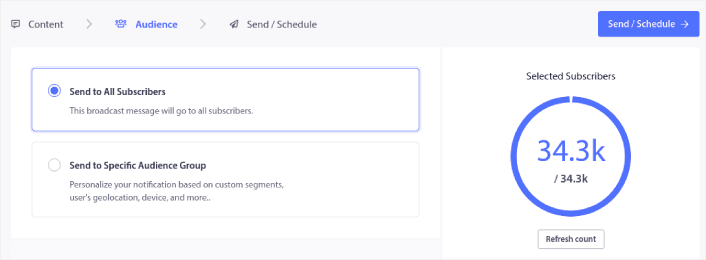
And finally, under Send/Schedule, you can schedule the notification as a recurring push notification:
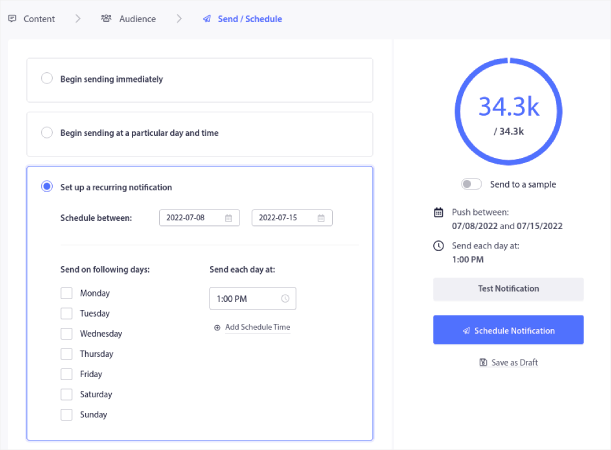
Du kan enkelt skapa vilket schema du vill för dina push-notiser inklusive anpassade dagar, datum och tider.
How to Set Up RSS Auto Push Campaigns
Constantly creating content and managing a blog is hard work. But if you’re running a serious business, you know that just creating content isn’t good enough. You have to be able to promote your content as well. But how to scale eCommerce business revenue by promoting content automatically?
And push notifications are a great way to gain subscribers in a cost-effective way. What makes push notifications so good as a marketing tool is that they can be completely automated. That’s where RSS push notifications come into the picture.
Gå till din PushEngage-instrumentpanel och navigera till Kampanj » RSS Auto Push:
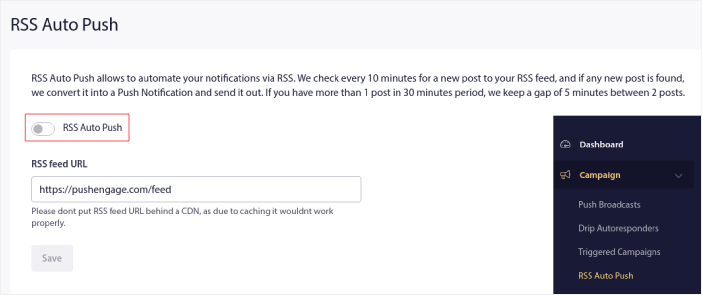
Klicka på växlingsknappen för att aktivera RSS Auto Push och klistra in din RSS-flödes URL. När det är gjort, klicka på Verifiera RSS för att bekräfta att ditt RSS-flöde har accepterats. När du är klar, tryck helt enkelt på Spara.
Nu, varje gång du publicerar ett nytt inlägg, kommer dina push-notisprenumeranter automatiskt att få en push-notis om ditt nya innehåll.
How to Reduce Your Subscriber Costs in Shopify
You can reduce your PushEngage plan costs in Shopify by deleting your inactive subscribers. Since you pay per subscriber, we wanted to also give you the option to remove unwanted subscribers so that you don’t end up inflating your costs without any reason.
Simply go to the PushEngage dashboard and go to Audience » Subscribers to get the same options. You can remove subscribers who didn’t receive, view, or click on your notifications for any number of days.
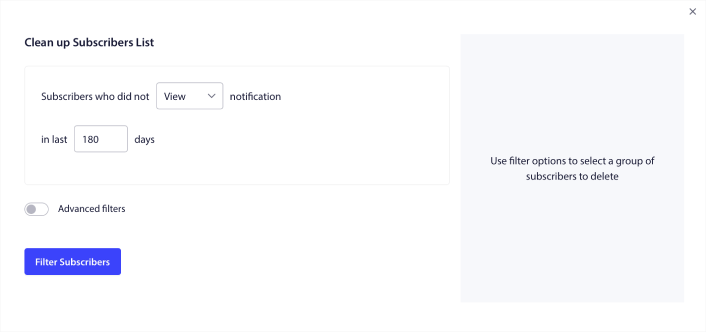
Vi rekommenderar att radera prenumeranter som inte har sett dina meddelanden på 240 dagar. Du kan också använda avancerade filter för ännu mer specifika borttagningar.
Avancerade filter inkluderar:
- Attribut: Radera prenumeranter med specifika attribut som plattform eller annan identifierande data.
- Segment: Radera ett helt segment eller en uppsättning segment
- Webbläsare: Radera prenumeranter från en specifik webbläsare.
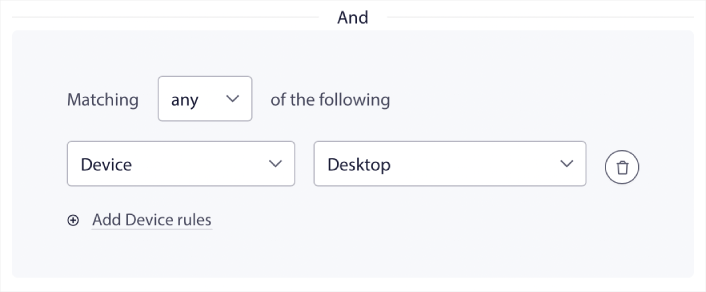
- Enhet: Radera prenumeranter som interagerar från stationära eller mobila enheter.
- Land: Radera prenumeranter från ett specifikt land.
- Stat: Radera prenumeranter från en specifik stat.
- Stad: Radera prenumeranter från en specifik stad.
- Prenumerationsdatum: Rikta in dig på de som prenumererade före eller efter ett visst datum. Perfekt för att återinrikta nya prenumeranter som inte är engagerade.
- Senast skickat: Rikta in dig på prenumeranter som senast mottog ett meddelande före en viss tidsgräns.
- Senast visad: Rikta in dig på prenumeranter som senast såg ett meddelande före en viss tidsgräns.
- Senast klickad: Rikta in dig på prenumeranter som senast klickade på ett meddelande före en viss tidsgräns.
- Totalt antal skickade: Rikta in dig på prenumeranter vars totala antal mottagna meddelanden under livstiden är mindre än eller lika med ett visst antal. Perfekt för att rikta in sig på prenumeranter som inte ens längre mottar dina push-meddelanden
- Totalt antal visningar: Rikta in dig på prenumeranter vars totala antal visade meddelanden under livstiden är mindre än eller lika med ett visst antal. Avsett för att rikta in sig på prenumeranter som mottar dina meddelanden, men inte ens kollar på dem.
- Totalt antal klick: Rikta in dig på prenumeranter vars totala antal klickade meddelanden under livstiden är mindre än eller lika med ett visst antal. Filtrera prenumeranter som inte klickar på dina meddelanden alls.
- Subscriber hash: Meant to remove a particular subscriber from your list. It’s similar to deleting an email from a list.
Individually, these filters may not make a ton of sense. But, you can combine multiple filters to select specific audience members. For instance, let’s say you want to remove subscribers who have been subscribed for over a year but never once clicked on your notifications. You can combine the Subscription date filter with the Total click count filter.
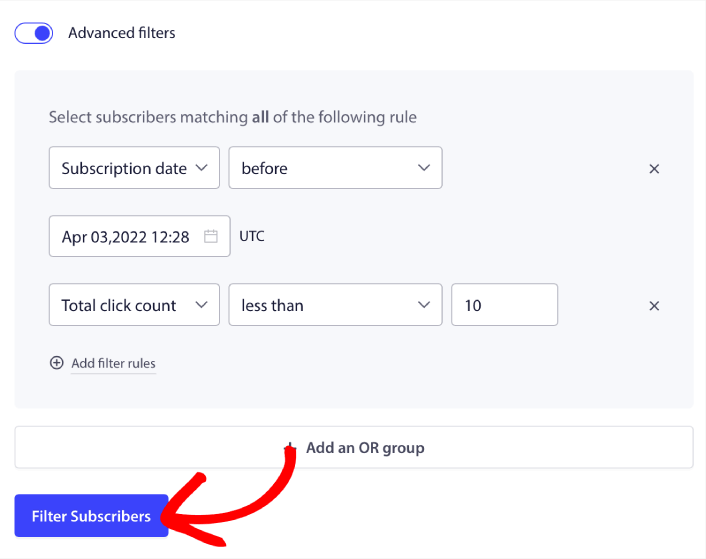
And if you want to filter multiple types of inactive users, you can click on the + Add an OR group button and target multiple types of users.
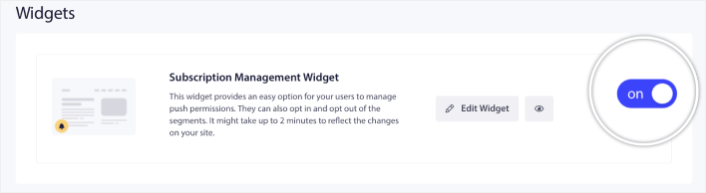
How to Create a Subscription Management Widget in Shopify
The subscription management widget is a unique feature in PushEngage that allows your subscribers and web traffic to select what kind of notifications they want to receive.
Gå till PushEngage-instrumentpanelen och gå till Design » Widgets och aktivera Prenumerationshanteringswidgeten:
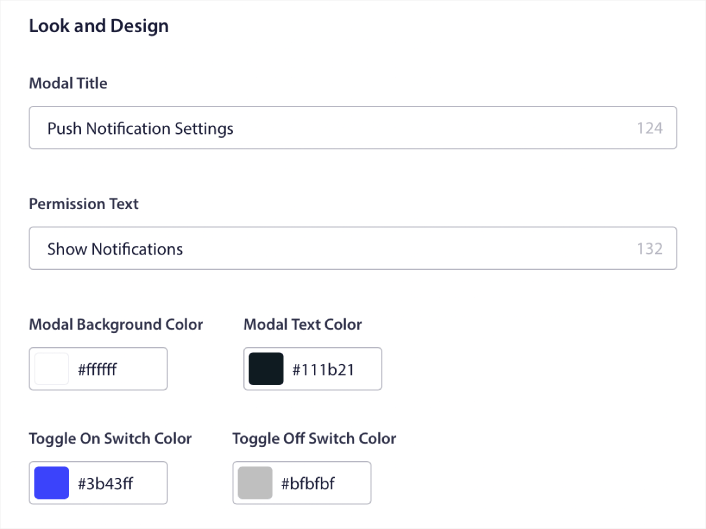
Click the Edit Widget button to customize your widget. Start by customising the look and feel of your widget to match your brand’s design language under Look and Design:
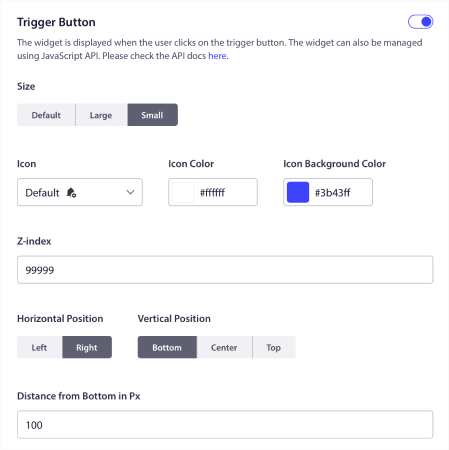
You can create a completely custom popup modal that sticks around even when your visitors don’t subscribe from your default popup modal. If the sizing of the popup trigger button feels off to you, you can customise that as well under Trigger Button:
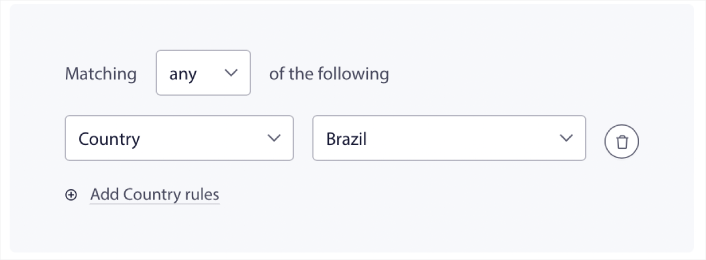
And the coolest bit is that you can also select specific pages to display the widget under Trigger Button Display Rules:

Som standard visas knappen på alla sidor. Men du kan skapa anpassade målinriktningsregler för att visa specifika versioner av widgeten genom att rikta in dig på specifika:
Platser:
Enheter:
Och URL:er på din webbplats:

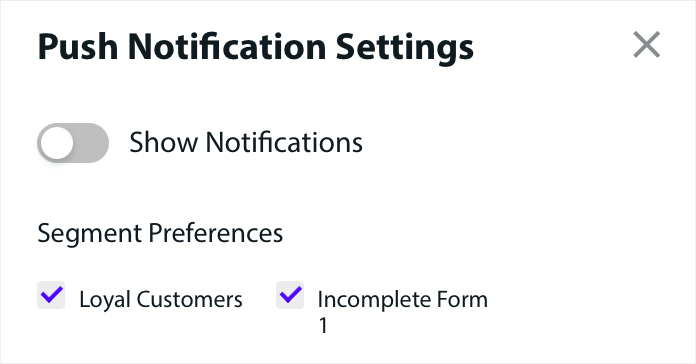
To take things to the next level, you can also allow your subscribers to select what types of notifications they want to receive under Segment Preferences:
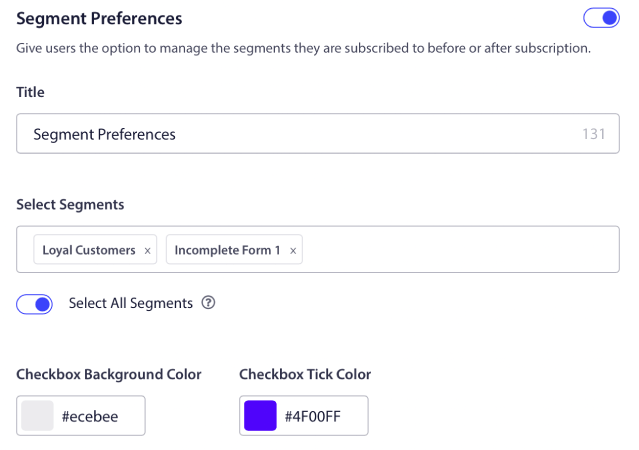
If you enable Select All Segments, then your subscribers will get automatically added to all the selected segments by default:
This is an amazing way to build a retargeting list.
If you’re running any eCommerce push notifications on your site, a lot of those are going to be triggered push notifications. This includes:
- Push-aviseringar för övergivna webbläsningar
- Push-aviseringar för övergiven kundvagn
- Prisfallsmeddelanden
- Meddelanden om åter i lager
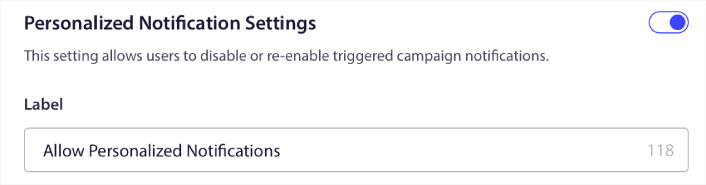
And even custom triggered push notification campaigns. With our Subscription Management Widget, you can now allow your subscribers to choose if they want to see personalised notifications:
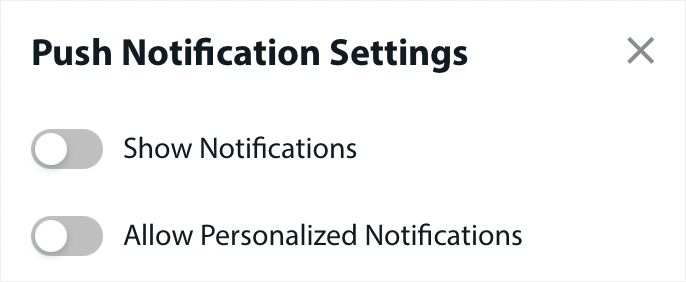
Just enable the option under Personalized Notification Settings:
How to Grow Your Business With App Push Notifications
If you’re also running an Android or iOS app or even a web app for your store, then you can grow your sales even faster using mobile app push notifications and web app push notifications.
NOTE: You can add mobile push notifications to your Android and iOS apps using PushEngage’s powerful SDKs as well. There’s no need to build and manage an interface to send and manage your campaigns. And you can do it all from the same dashboard.
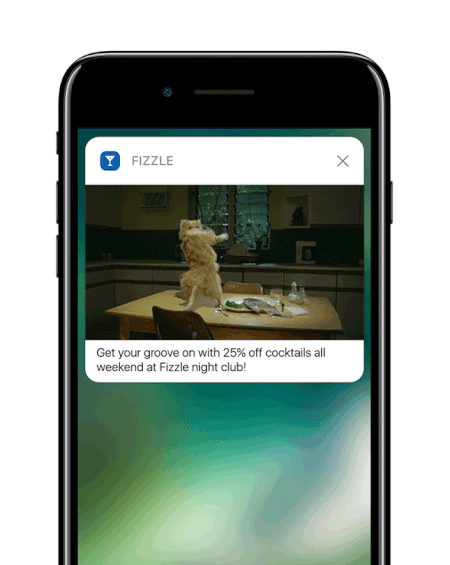
Mobile app push notifications are messages sent from an app directly to a user’s mobile device, providing updates, reminders, or personalized content, even when the app is not actively in use. They enhance user engagement by delivering timely and relevant information right to the user’s fingertips.
Of course, this is only helpful for you if have an app or are in the process of releasing a mobile app for your business in the future. If you’re been on the fence about releasing an app to grow your business, this might just be the right time for you. One of the biggest challenges that apps face is customer engagement. And PushEngage can now help you take away that pain completely.
For deeper, more frequent engagement, app pushes are preferable. For occasional updates or alerts, web pushes are effective. To this end, app notification campaigns offer better rich media and interactive content. App push notifications rely on data that web push notifications simply can’t use most of the time.
To be fair: You can create personalized web push notifications. But app push can go WAY deeper into personalization.
Push-meddelanden för mobilappar går utöver att bara vara ett verktyg för kommunikation; de är en kraftfull mekanism för att förbättra användarupplevelsen, driva engagemang och bygga en personlig koppling med användarna.
They allow for a level of interactivity and personalization that can significantly contribute to the effectiveness of an app in retaining and engaging its users.
- Enhanced User Engagement:
- Contextual Relevance: App push notifications can be incredibly context-sensitive. They utilize user data like location, behavior, and preferences to send timely and relevant notifications. For example, a fitness app might send a motivational message right when you usually go for a run.
- Beteendebaserade utlösare: Aviseringar kan utlösas av specifika användaråtgärder eller underlåtenheter. Detta gör dem mycket effektiva för att uppmuntra önskade beteenden, som att påminna en användare om att slutföra ett köp som de lämnat i sin kundvagn.
- Rik användarupplevelse:
- Multimedia-integration: Till skillnad från grundläggande textmeddelanden kan appaviseringar inkludera bilder, ljud och till och med video. Denna integration av rik media gör dem mer engagerande och njutbara.
- Interaktiva element: Vissa aviseringar tillåter användare att interagera direkt från låsskärmen eller aviseringsområdet. Detta kan inkludera åtgärder som att svara på ett meddelande, gilla ett inlägg eller till och med styra musikuppspelning.
- Personlig kommunikation:
- Skräddarsytt innehåll: Genom att använda dataanalys kan appar skicka aviseringar som är mycket personliga. Detta kan vara så enkelt som att använda ditt namn eller så komplext som att rekommendera produkter baserat på din webbhistorik.
- Segmentering och inriktning: Appar kan segmentera sina användare baserat på olika kriterier och skicka riktade aviseringar. Detta säkerställer att användarna får aviseringar som är relevanta för deras intressen och behov.
- Kundlojalitet och retention:
- Regelbundet engagemang: Genom att hålla användarna informerade och engagerade kan appaviseringar avsevärt förbättra kundretentionen.
- Lojalitetsbelöningar: Aviseringar är ett effektivt sätt att informera användare om lojalitetsprogram, specialerbjudanden och belöningar, vilket därigenom ökar kundlojaliteten.
- Analytiska insikter:
- Användarsvarsdata: Appar kan spåra hur användare interagerar med aviseringar, vilket ger värdefulla insikter om användarnas preferenser och beteenden.
- A/B-testning: Dessa data kan användas för att A/B-testa olika aviseringsstrategier för att se vad som fungerar bäst, vilket leder till mer effektiv kommunikation.
- Drifteffektivitet:
- Automatiserad kommunikation: Aviseringar kan automatiseras baserat på vissa kriterier, vilket minskar behovet av manuell intervention och säkerställer tidig kommunikation.
Genom att utnyttja användardata och beteende kan push-meddelanden för appar transformera hur företag interagerar med sina kunder, vilket gör kommunikationen mer relevant, aktuell och effektiv. Denna djupgående engagemang och personalisering är vad som skiljer push-meddelanden för appar åt och gör dem till en värdefull tillgång i den digitala kommunikationsstrategin för alla mobilapplikationer.
And if you need a more detailed guide, you should check out our documentation on how to set up iOS app push notifications and how to set up Android app push notifications.
Vad mer?
Vi vet att det är hårt arbete att växa ett företag. På PushEngage strävar vi alltid efter att förbättra vår produkt och din upplevelse. Vi lanserade den här nya funktionen för att hjälpa dig att få ännu mer värde ur din PushEngage-prenumeration.
Tack så mycket för att du läste detta meddelande.
Om du har några frågor finns vårt Customer Success-team här för att hjälpa dig. Starta bara en konversation på Live Chat eller kolla in vår kontaktsida.
And thank you for using PushEngage. Whether you’re using the free version or the Enterprise version, you’re just as important to us. The new code snippets are meant to help you succeed and we wish you all the very best.
We’re coming up with even more epic integrations to make your life simpler. So, let us know your thoughts in the comments below. You can request specific integrations that you’d like to see in the future.
And if you haven’t already, get started with PushEngage today!


