
Want to build an app landing page in WordPress?
Building a mobile app is hard enough. Now you have to figure out how to get installs. As it turns out, even if you do build something extraordinary, you won’t necessarily get a lot of users.
Creating an app landing page is a really great way to convince and convert your site visitors into app users. But how do you do it? The simplest way to create a landing page is to create a WordPress site to promote your app. Then, use a landing page builder to quickly launch a high-converting app landing page.
In this article, we’re going to show you how to quickly launch a WordPress app landing page. And you don’t need any previous marketing or coding experience to do it.
Lad os dykke ned.
What Is an App Landing Page?
An app landing page is a standalone web page meant to convince site visitors to download your app.
Landing pages are extremely focused on getting conversions. So, your app landing page doesn’t have to be the prettiest of them all. As long as it does a good job of explaining the benefits of your app and why people should download it, you’re all set.
Creating a WordPress landing page for your app can have many benefits for your business:
- Promote brand awareness
- Increase conversions
- Collect marketing data
- Improve credibility through social proof
- Collect leads to promote future campaigns
You can do a lot with a really simple page, too.
But the one thing that you have to remember is that all successful landing pages have a similar structure and flow. This means that there are specific elements on any landing page to make it successful.
What Makes a Successful App Landing Page Successful?
Now that you know what an app landing page is and why you should create one, it’s time to check out the most critical elements of any landing page. We’ve put together some real examples to showcase how successful app landing pages use these elements.
Lad os tage et kig.
#1. Call to Action
A call to action or CTA is a button or link that pushes visitors to take some action. Your app landing page is meant to get downloads for your app. And that’s the most fundamental goal for your landing page.
So, your app landing page could have three calls to action:
- A direct download button
- A QR code for a scannable download
- A contact form to collect leads for email marketing
Of the three, a contact form is the least popular. You would use a contact form to collect leads if your app hasn’t been launched yet. For mobile apps, a QR code is super popular for desktop versions of your site. For a responsive site, a direct download button is the most popular choice.
Here’s an example of a great call to action by Slack:
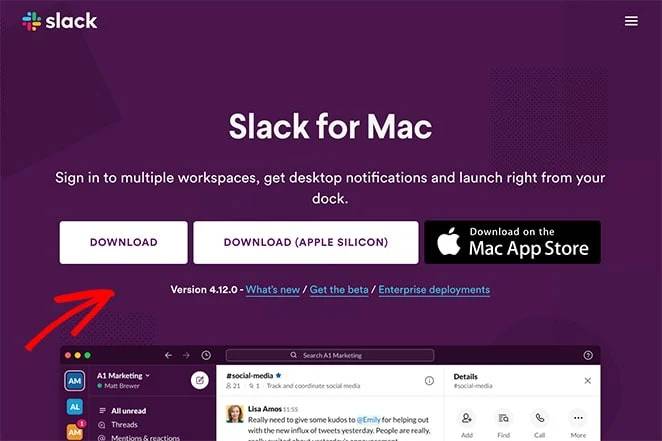
See how the entire page supports that single intent to get visitors to download? The entire focus of the page is the download button and that’s what makes this a high-converting app landing page.
#2. Headline
Your landing page headline is the first thing that your visitors will see. You don’t have to be witty with your headlines. In fact, if you’re not a professional copywriter, stick to making your headline about the biggest benefit of downloading your app.
Take a look at this great example of a landing page headline by IFTTT:
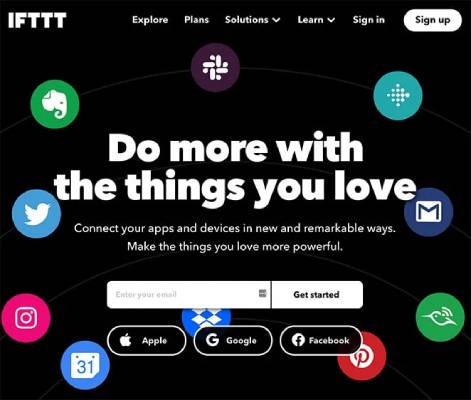
IFTTT doesn’t even list out the apps it can integrate with using the headline. You can see all the apps in the banner image. And when you read the headline, it just makes sense immediately.
Typically, your headline is the first push towards the download button. So, make it count!
#3. Body Copy
Of course, there are going to be multiple great things about your app that you can’t stuff into the headline. A detailed explanation of the benefits goes into your body copy.
The body copy is meant to convince and convert your casual visitors into users. Here’s an example from Asana Rebel:
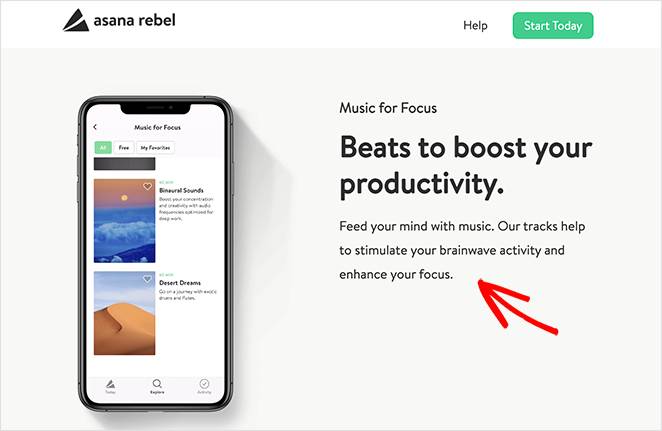
A great copywriting template you can use is to evoke curiosity in the headline and satisfy that curiosity in the body copy. That sense of satisfaction will make people scroll down to your CTA.
#4. Social Proof
Including social proof on your landing page shows users that your app is trustworthy. Social proof is an assumption that you lead your visitors to so that they know the correct behavior in that instance. It’s like getting a drink at a party where everyone’s drinking even though you’re not a drinker.
There are primarily 6 ways to use social proof on your landing pages:
- Expert recommendations (like how 9/10 dentists recommend every other toothpaste brand)
- Celebrity endorsements (like Kevin Hart using Car Finder)
- User reviews and testimonials (more on this soon)
- Showcasing a huge number of existing users (like the 10,000+ smart business owners who use PushEngage)
- Industry certification and awards (like the Editor’s Choice badge in Google Play or getting into Shark Tank)
Out of all these types of social proof, the easiest to get are user reviews and testimonials. Check out this example from Aura:

It uses the strength in huge numbers along with reviews and testimonials to lead beautifully to their CTA button.
#5. Engaging Visuals
Before we start this section: The goal of your app landing page in WordPress is NOT to look pretty. It just has to answer the right questions in the right order and give your visitors a reason to convert.
That said, a beautiful-looking landing page doesn’t hurt. If your app landing page offers an engaging visual style, people automatically think that the overall quality of your product is going to be high. Take a look at this really cool app landing page by Acorn:
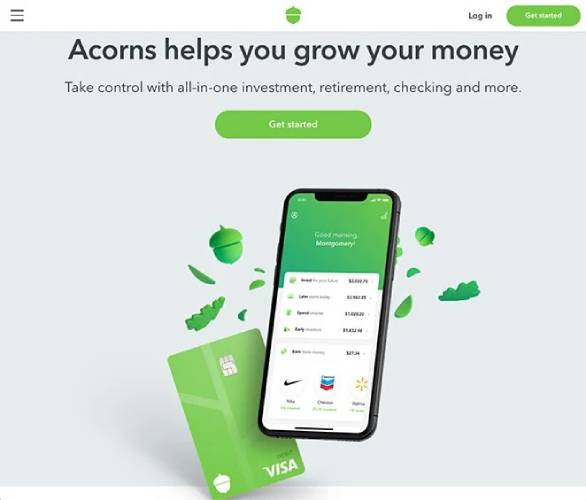
You can do that same thing using high-quality stock images without having to hire a designer.
How to Build an App Landing Page in WordPress
By now, you know what an app landing page is, why you should create one, and what elements of the page deserve most of your attention.
So, it’s time to build your first app landing page in WordPress. Before we start, you should know that there are TONS of WordPress themes, theme builders, and landing page builders out there. But we recommend using SeedProd.

SeedProd is a visual landing page builder that helps you create landing pages that convert really well.
SeedProd isn’t a website builder or a webpage builder. It’s a landing page builder. A web page builder relies heavily on your theme and it simply takes on the default styles of your theme. And consequently, it’s really difficult to modify your headers, footers, and page elements beyond a certain point using a website builder.
En landingssidebygger er helt uafhængig af temaet.
Want to remove your navigation menu so that your visitors are focused entirely on one thing? No problem!
Need a custom footer to help your visitors convert more easily? Just one click and it’s done.
Måske vil du oprette forskellige landingssider, hvor forskellige trafik-kilder har brugerdefinerede call-to-action (CTA) knapper?
I alle disse tilfælde har du brug for en landingssidebygger og ikke en hjemmesidebygger. Hvis du har brug for en landingsside, der konverterer, og du ikke har et stort udviklingsteam, er SeedProd en rigtig god investering.
We use SeedProd ourselves and we wrote a full review. You can check that out for more details on the top features. Or, you can dive straight into building your app landing page on WordPress.
Step #1: Install SeedProd Landing Page Builder
Først skal du besøge SeedProd-webstedet og købe pluginnet. Derefter kan du downloade pluginfilen til din computer. Kopier derefter plugin-licensnøglen fra dit SeedProd-dashboard.
Dernæst skal du logge ind på dit WordPress-dashboard og installere pluginnet. Hvis du har brug for detaljerede instruktioner, kan du se denne trin-for-trin-guide til installation af et WordPress-plugin. Gå til SeedProd-pluginnets velkomstskærm på WordPress, og bekræft din licensnøgle:

Efter at din konto er verificeret, er du klar til at oprette en landingsside.
Step #2: Create a New Landing Page
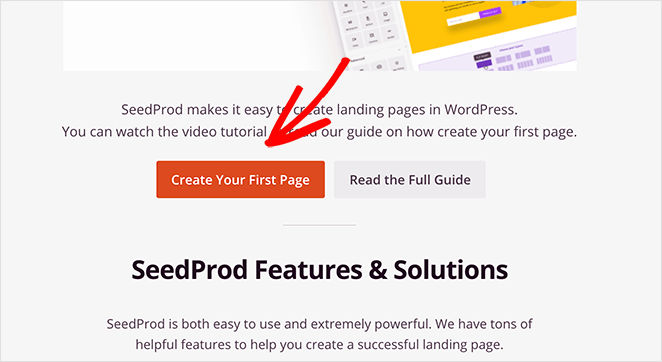
In the SeedProd welcome screen, scroll further down and click on Create Your First Page button:
Derefter vil du se 5 forskellige typer landingssider, som du kan oprette:

Ved hjælp af SeedProd's skabeloner kan du hurtigt lancere komplicerede sider som:
- Kommende og vedligeholdelsestilstandssider
- Login-sider
- 404-sider
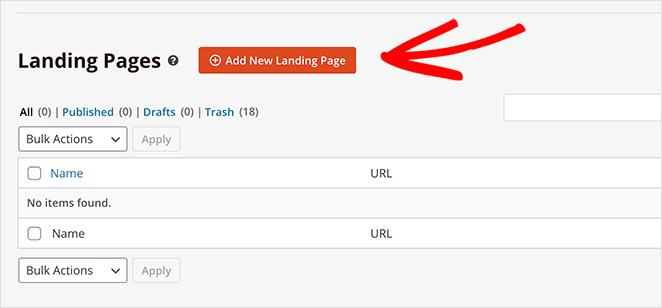
And if you scroll down a little further, you can launch a custom landing page from pre-built templates. Click on Add New Landing Page:
We’re going to use one of SeedProd’s powerful pre-built landing page templates next.
Step #3: Choose a Landing Page Template
Choose a landing page template from the pre-built landing pages listed in SeedProd’s builder:
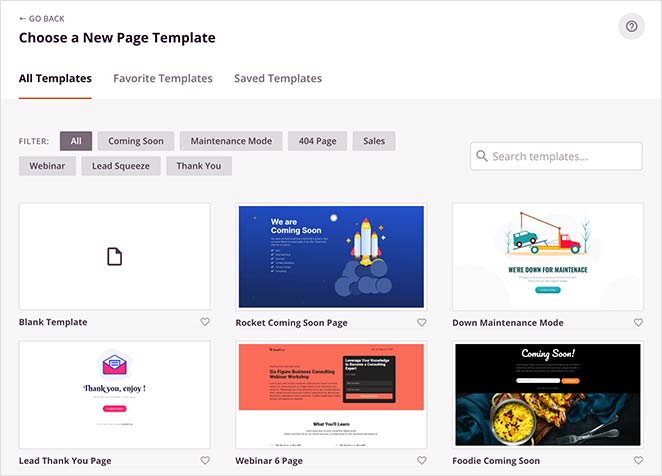
Tag dig tid og vælg den rigtige skabelon til dig. For at vælge en skabelon skal du blot klikke på flueben-ikonet på skabelonen.
Husk, at skabelonen kun er et udgangspunkt. I det næste afsnit vil vi se, hvordan du nemt kan tilpasse din landingsside ved hjælp af SeedProd's træk-og-slip-builder.
Step #4: Add Your Landing Page Content
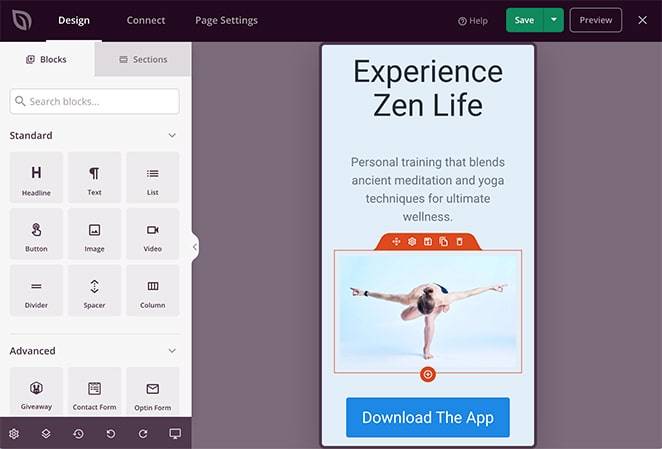
After choosing your landing page template, you’ll be redirected to SeedProd’s visual drag and drop builder where you can customize your landing page. On the left-hand side of the editor you get a list of the design elements that you can use to customize your landing page:
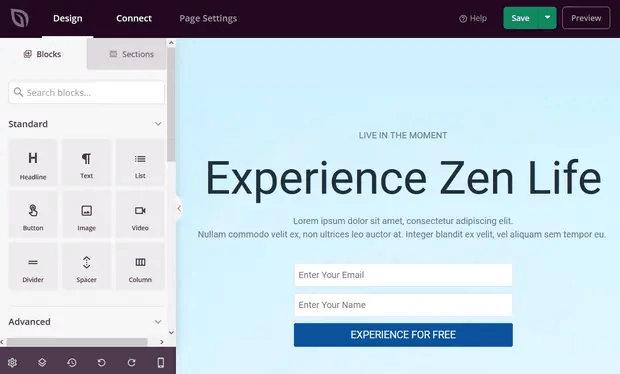
Click on any of the text elements to edit the copy directly in the frontend builder:
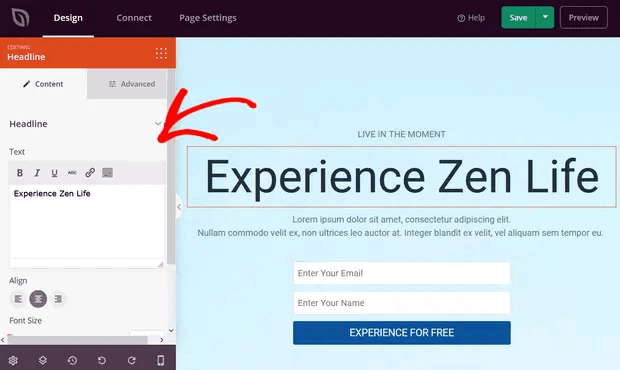
You can change the text, its style, color, alignment, and layout to fit your product or overall brand.
Step #5. Customize Your App Landing Page
Next, you’ll want to customize your app landing page. The cool thing is that you can easily add new blocks such as buttons, optin forms, contact forms, social profiles, and more to your landing page template.
The content elements in SeedProd are called landing page blocks. They include Standard blocks, which provide basic design and functionality, and Advanced blocks for lead generating page elements like:
- Social Media buttons
- Optin Forms
- Giveaways
- Countdown Timers
- Stjernebedømmelser
- Contact Forms
And LOTS more. For instance, you can drag and drop a countdown timer to increase urgency:
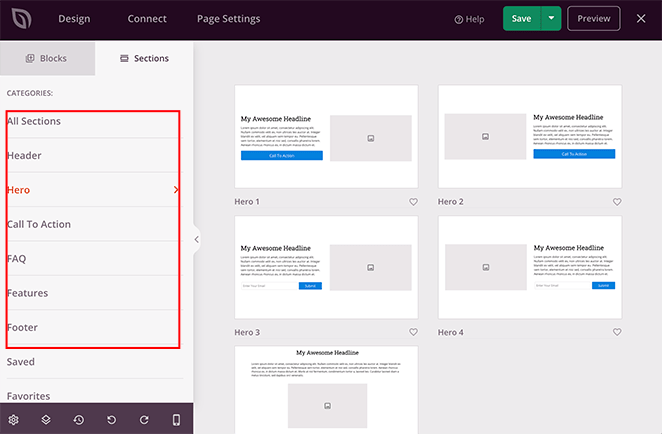
You’ll find that many of SeedProd’s landing page blocks also come with ready-made templates. Just click the Templates tab to see a variety of styles you can implement with a single click.
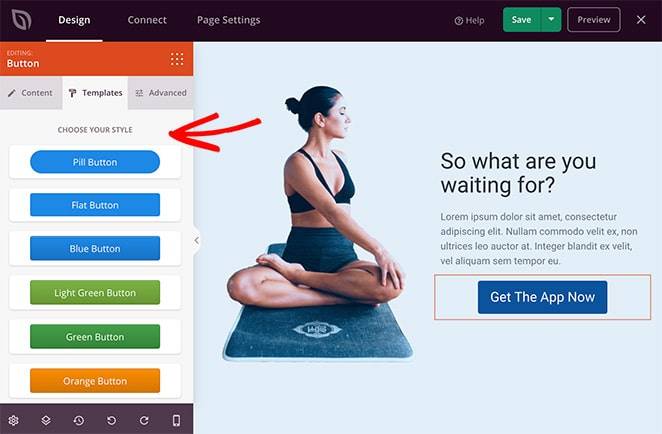
These are complete page sections, including:
- Call to action areas
- Funktioner
- Headers
- Footers
- Ofte stillede spørgsmål
- Hero areas
The great thing about these sections is that you don’t have to create them block-by-block. You can simply import a section with a single click.
Customize everything about your landing page until it looks exactly like you want it to. When you’re done, click on Save.
Trin #6: Tilføj en Klik for at abonnere-knap til din landingsside
Du kan også tilføje en klik for at abonnere-knap for at indsamle push-notifikationsabonnenter. Push-notifikationer er en god måde at øge din gentagne trafik på, få mere engagement og endda sælge officielle merchandise, hvis du har noget.
I SeedProd skal du blot trække og slippe modulet Brugerdefineret HTML fra sidebjælken.
Vi har placeret abonnementsknappen lige under e-mail-tilmeldingsformularen i den øverste del.

Men du kan indsætte knappen hvor som helst du vil.
Til denne del skal du have lidt erfaring med HTML og CSS. Eller du kan kopiere denne kode og indsætte den i din Brugerdefineret HTML-blok:
<button onclick="subscribeOnClickButton()" style="border: none; padding-left: 5%; padding-right:5%; text-align: center; display: inline-block; color: blue;">Get Updates via Push Notifications</button>Det er en standardknap i HTML med meget lidt styling. Det eneste smarte er onclick-funktionen i koden. Det betyder grundlæggende, at dine besøgende kan klikke på knappen for at abonnere på noget. Nu skal vi give knappen lidt ekstra kode for at give dine besøgende mulighed for at abonnere på push-notifikationer.
Gå til PushEngage hjemmeside og klik på knappen Kom i gang :

Vælg derefter gratisplanen for at prøve PushEngage, eller vælg en betalt plan, hvis du er seriøs omkring at udvide din virksomhed. De betalte planer kommer med flere kampagnemuligheder og muligheden for at opbygge endnu større abonnentlister.
På dit PushEngage dashboard skal du gå til Sideindstillinger » Sideoplysninger og klikke på knappen Klik her for opsætningsinstruktioner. Under Enhver side får du din installationskode:

ADVARSEL: Du skal kopiere den kode, du får fra dit dashboard. Koden er unik for hver PushEngage-bruger. Du kan ikke kopiere koden på billedet og indsamle push-notifikationsabonnenter.
Når du har koden i dit PushEngage-dashboard, skal du tilføje dette uddrag til din kode:
<script> window._peq = window._peq || [];</script> <script>
function subscribeOnClickButton(){
window._peq.push(['subscribe',{}.pe,function(res){
if(res.statuscode==1)
{
// Code to return response
console.log(res);
}
}]);
}
</script>
Din endelige kode skal se nogenlunde sådan ud:
<script src="https://clientcdn.pushengage.com/core/02a6e92667ae2279fcba8932356c1d93.js" async></script>
<script> window._peq = window._peq || [];</script> <script>
function subscribeOnClickButton(){
window._peq.push(['subscribe',{}.pe,function(res){
if(res.statuscode==1)
{
// Code to return response
console.log(res);
}
}]);
}
</script>
Du vil gerne tilføje denne kode til HTML-blokken på din landingsside efter koden til knappen. Det skal se nogenlunde sådan ud:

Feel free to customize the styles for the button any way you please. When you’re done customizing your app landing page, go ahead and hit the Save button.
Step #7: Connect Your Email Marketing Service
This step isn’t mandatory unless you’re using your app landing page to collect leads. But we highly recommend collecting email addresses even for direct app downloads. The only time we’d recommend against it is if your app directly collects emails during a signup process.
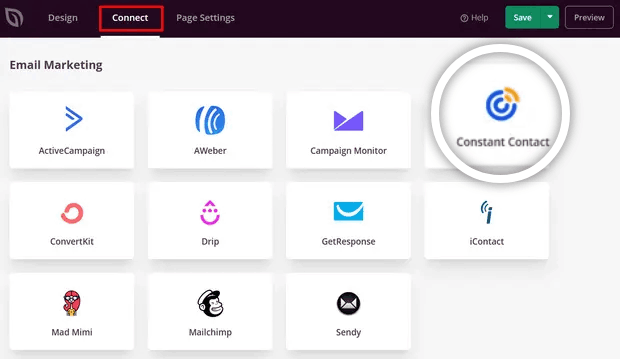
If you’re creating a landing page to collect leads on your site, then you’ll want to create an optin. Then, connect your optin to an email service provider such as Constant Contact.
To do this, go to the Connect tab on the SeedProd builder and select your email service provider from the list:
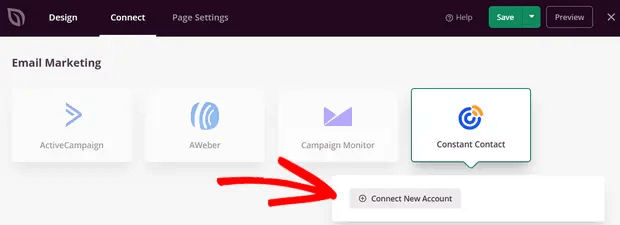
Klik derefter på Tilslut ny konto:
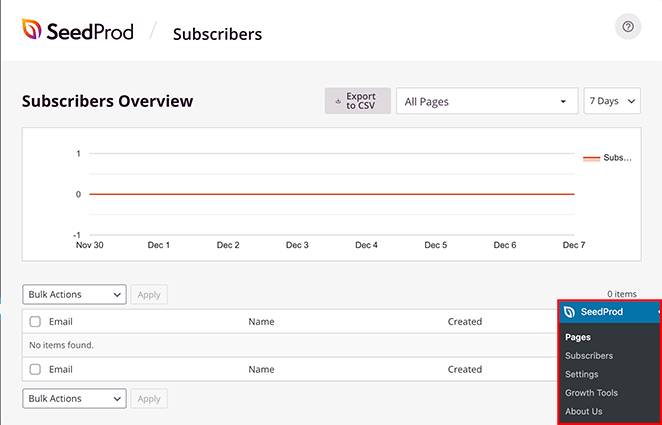
Once that’s done, you’ll need to configure your email service to collect leads. If you don’t have an email service provider or can’t afford to get one right away, don’t worry. SeedProd saves your email leads on WordPress by default. Head over to SeedProd » Subscribers from your WordPress dashboard to see your email list.
Step #8: Configure Your Landing Page Settings
The next step is to adjust your app landing page settings. You can view them by clicking the Page Settings tab at the top of the page builder.
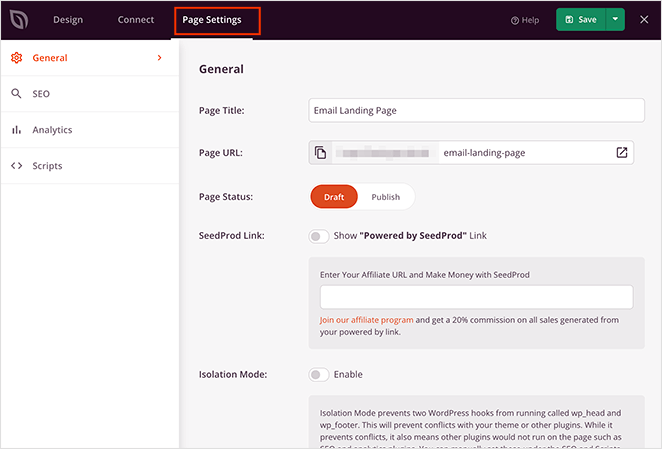
In the settings area, you can edit your pages, General, SEO, Analytics, and Scripts settings. From the General tab, you can choose a name and URL. If you’re seeing issues with your landing page, it’s likely that your WordPress theme or some other plugin is conflicting with SeedProd. Use the Isolation Mode if that’s the case.
Step #9: Check Your Page is Mobile Friendly
We’re almost done. Next, you’ll want to check out how your landing page looks on a mobile. One way to do this would be to publish your app landing page and check the live version from a mobile device.
But that’s quite tedious since you’ll have to go back and edit changes manually and check each time if that fixed your problem.
SeedProd has a much simpler way to check the mobile version of an app landing page. Just click the mobile phone icon in the bottom-right of your screen.

And you’ll see a preview of the mobile version right from your landing page builder:
You can edit your settings exactly as you would for the desktop version. Any changes you make are applied automatically to both desktop and mobile views.
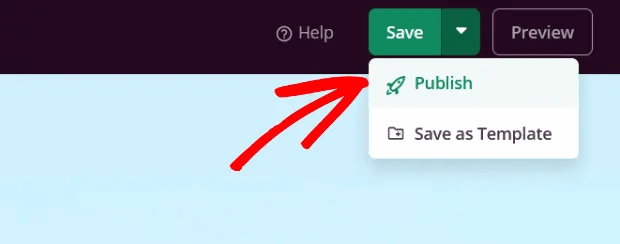
Step #10: Publish Your App Landing Page in WordPress
Once you’re done, change your page status from draft to published.
You should see a success message on publishing your page that looks something like this:
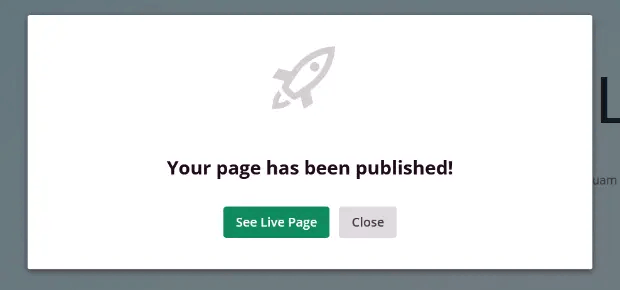
You can click on the See Live Page button to view your landing page. And you’re all done!
What to Do After Building an App Landing Page in WordPress
Det var alt for denne gang, folkens!
Now that your landing page is live, the only challenge you have left is to send traffic to your landing page.
Og hvis du leder efter en overkommelig måde at øge din trafik på, anbefaler vi at bruge push-notifikationer. Push-notifikationer kan hjælpe dig med at tiltrække mere gentagen trafik og engagement på webstedet. Du kan også oprette automatiserede push-notifikationskampagner, der genererer salg.
Ikke overbevist? Tjek disse ressourcer:
- 7 Smarte Strategier til at Øge Kundeengagement
- Er Push-notifikationer Effektive? 7 Statistikker + 3 Eksperttips
- Sådan opsættes push-meddelelser om forladte indkøbskurve (nem vejledning)
- Sådan tilføjer du et Web Notifications WordPress-plugin til dit websted
Vi anbefaler at bruge PushEngage til at oprette dine push-notifikationskampagner. PushEngage er den #1 push-notifikationssoftware i verden. Så hvis du ikke allerede har gjort det, så kom i gang med PushEngage i dag!


