Looking for a simple way to add Webflow push notifications?
That’s a really great idea. Webflow is a powerful website builder that enables you to create instant websites. It’s super easy to create a website and start selling a product or a service.
But once your site is live, how do you get traffic? How do you build engagement? How do get more sales?
That’s where push notifications can be super effective as a marketing tool because they can generate repeat traffic and sales without having to run paid ads. You can also create automated campaigns to boost engagement and sales with very little effort.
But the painful bit is that there are hardly any articles out there that show you how to add Webflow push notifications.
Don’t worry! In this article, we’re going to show you step-by-step how you can add push notifications to a Webflow site in less than 10 minutes.
让我们开始吧。
How to Install Webflow Push Notifications
Adding push notifications to a Webflow site is quite simple. Just follow the steps in this article. If you follow every step, by the end of this article, you should be able to send push notifications like this one:

开始吧!
第 1 步:设置您的 PushEngage 帐户
前往 PushEngage 主页,然后点击“开始使用”按钮:

You can try out PushEngage for free. If you’re running a small blog that needs repeat traffic and engagement, that’s probably good enough. But if you’re serious about sales, you should get the Enterprise package and unlock the automated campaigns.
注册 PushEngage 帐户后,请前往您的 PushEngage 仪表板 并转到 网站设置 » 网站详细信息:

您可以在此处设置您的徽标、网站名称和网站 URL。现在就处理好这些事情非常重要,这样您以后才能测试整个设置。
第 2 步:从 PushEngage 获取安装代码
要安装推送通知,您需要获取安装代码。在您的网站设置屏幕中,向下滚动并单击单击此处获取设置说明按钮:

然后,单击任何网站选项卡:

并复制 Javascript 代码段。您很快就会用到它。
Step #3: Place the Installation Code For Webflow Push Notifications
Log in to your Webflow dashboard and in the site builder, press A to open up the Add Panel and an Embed element:
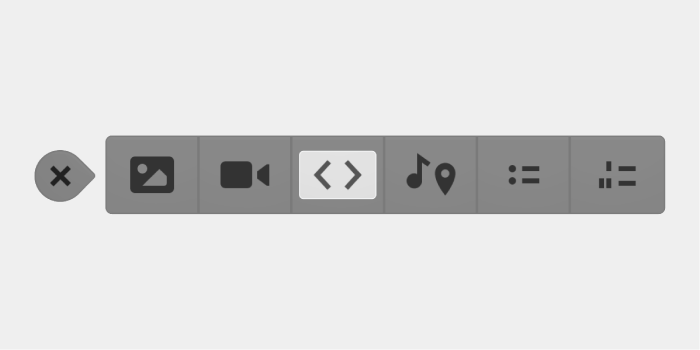
Then, simply paste the code snippet you got from your PushEngage dashboard. This is typically where you would place your Google Analytics code, Facebook Pixel, and other tracking code as well. When you’re done, hit Save.
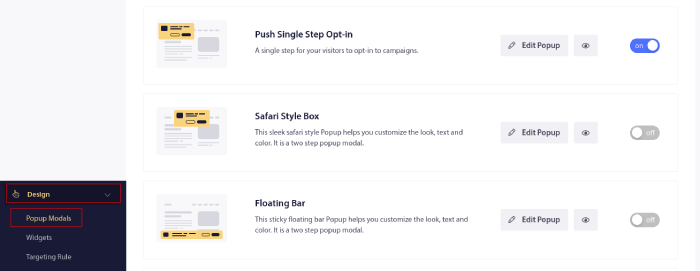
第 4 步:配置 PushEngage 订阅选项
现在,返回您的 PushEngage 仪表板。转到 设计 » 弹出窗口并选择您喜欢的选择加入方式:
这里的想法是为您的访问者提供订阅的充分理由。如果您需要这方面的帮助,请查看我们关于 如何创建自定义推送通知选择加入的文章。
如果您想获取一些入门模板,您应该查看这篇关于 高转化率推送通知订阅选项的文章。
第 5 步:创建您的第一个营销活动
Now that your Webflow site can send push notifications, you should create an actual campaign.
Webflow isn’t really a frivolous free site builder. It’s an advanced builder for custom web development. So, you’re likely going to sell a product on your landing page. If that’s you, you should definitely set up an abandoned cart reminder for your store.
废弃购物车营销活动通过转化废弃的购物车来帮助产生额外收入。这是一个简单的提醒,可以自动销售大量产品。因此,它非常适合支持任何带来直接销售的着陆页。
Just head over to your PushEngage dashboard and go to Campaigns » Triggered Campaigns » Create A New Triggered Campaign:

And then, select the Cart Abandonment campaign template:

如果您是创建自动化营销活动的新手,可以简单地参考我们关于如何设置废弃购物车推送通知营销活动的文章。请遵循每个步骤,您就可以设置像这样的推送通知:
以防您想知道,您的推送通知营销活动不必是家喻户晓的品牌才能有效。事实上,PushEngage 的创建就是为了帮助小型企业通过推送通知实现增长。
But before you start marketing your site, you should fix any issues with your push notification subscription process. Check out this article on testing your push notifications. If everything’s working perfectly, you’re done!
What To Do After Adding Webflow Push Notifications?
好了,各位,本次分享就到这里!
You just added push notifications to your Webflow site. Then, you created a powerful push notification campaign to boost your growth. All that, in less than 10 minutes!
Check out how to create other automated push notification campaigns as well. Most push campaigns are simple and effective. So, we recommend setting up multiple campaigns for your site. Here are a few great ones to start with:
如果您还没有开始,请立即开始使用 PushEngage。PushEngage 是全球排名第一的推送通知软件。因此,您的营销活动是安全的。


