
Looking for a way to add push notifications to the AMP version of your site? Adding AMP push notifications can be a little technical. But we’re going to help you do it the easy way.
AMP or Accelerated Mobile Pages are essentially a mobile version of your site. So, if you’re not setting up web push on your AMP site, then you’re going to lose a bunch of subscribers because a huge part of your audience will use mobile devices to visit your site.
In this article, we’re going to use PushEngage to install AMP push notifications because it’s way easier than doing things manually.
让我们开始吧。
How to Install AMP Push Notifications
Installing AMP push notifications is a really quick and easy process. Just follow these steps and by the end of this article, you should be able to send push campaigns from your site like this one:

Looks good, doesn’t it? Let’s dive in.
第 1 步:设置您的 PushEngage 帐户
访问 PushEngage 主页,然后点击 开始使用 按钮:

您可以选择免费套餐来试用 PushEngage,或者如果您想认真发展您的业务,可以选择付费套餐。付费套餐提供更多广告系列选项,并能够建立更大的订阅者列表。
注册 PushEngage 帐户后,请前往您的 PushEngage 仪表板 并转到 网站设置 » 网站详细信息:

您可以在此处设置您的徽标、网站名称和网站 URL。现在就处理好这些事情非常重要,这样您以后才能测试整个设置。
Step #2: Get the AMP Push Notifications Installation Code
To install web push on your AMP site, you’ll need to get an installation code. In your Site Settings screen, scroll down and click on the Click Here For Setup Instruction button:

Head over to the AMP tab to get installation settings.
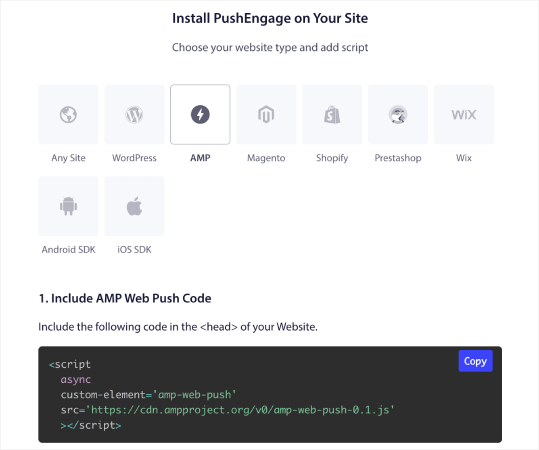
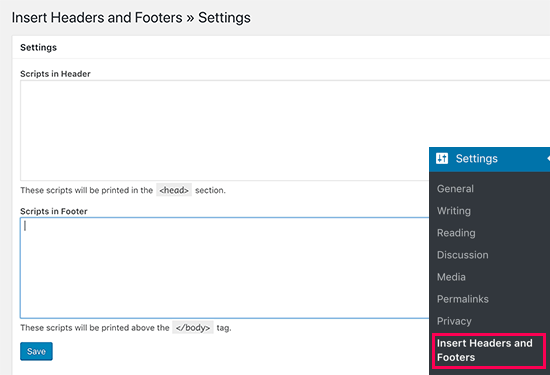
Copy this code. You’ll need to paste this code in the HTML <head> of your site. If you’re running a WordPress site with an AMP version, the simplest way to do this is to use the Insert Headers and Footers plugin. It’s a free plugin where you can paste in the AMP installation code without having to go into the actual HTML of your site:
Step #3: Install Service Worker on Your AMP Site
Next, download the package file that includes the service worker.

这包括:
- service-worker.js
- amp-helper-frame.html
- amp-permission-dialog.html
Unzip the package and place these files in the root folder of your server. This part is super important. If you skip this step, your site won’t be able to collect push subscribers.
Pro Tip: If you’re not sure what the root folder is and how you can upload files there, you should check out this article on the WordPress File and Directory Structure. It’s a really simple guide for beginners and you get a lot of insight into how WordPress works.
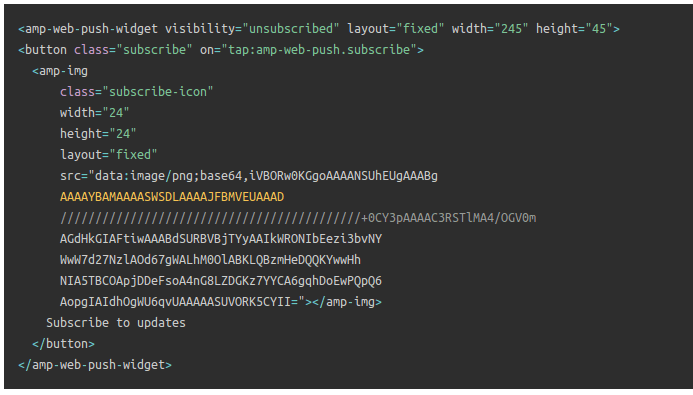
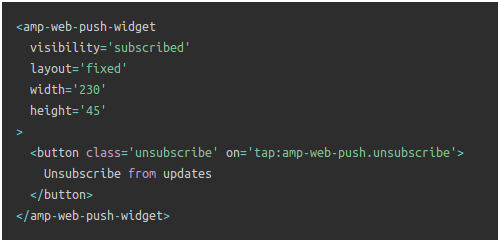
Step #4: Add the AMP Push HTML Code to Your Site
Next, add the HTML code to enable a subscribe on click button and a button to unsubscribe from push campaigns.
This code enables the service worker file you uploaded and allows your site to display subscribe and unsubscribe buttons. To collect subscribers, you need to give your visitors a simple way to subscribe to your push campaigns. The unsubscribe button will give your active subscribers a way to opt out if they’re not interested in your content. Both are pretty important.
Add the `Subscribe to updates’ button where you want it to show up on your site:
And add an ‘Unsubscribe from updates’ button:
The Unsubscribe button is going to be a simple ‘tap to unsubscribe’ button. You get a lot more customization options for the non-AMP version of your site on both mobile and desktop devices. So, we recommend that you add AMP CSS to your <body> section.
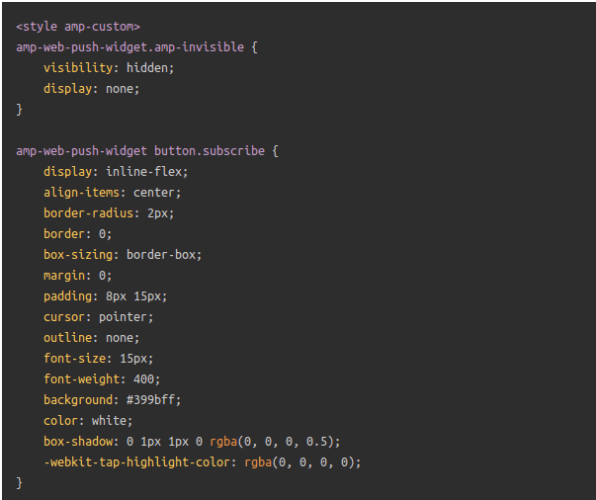
This code snippet is meant to customize the look and feel of both Subscribe and Unsubscribe buttons. If you’d like to play around with these styles, go for it. Just make sure that you don’t change the AMP HTML tags that the code is styling.
And that’s it. You’re done.
Step #5: Configuring the PushEngage Opt-In
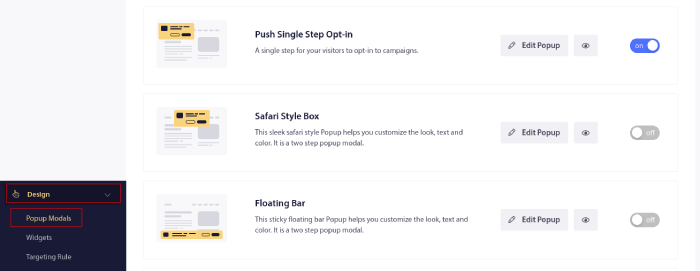
现在,返回您的 PushEngage 仪表板。转到 设计 » 弹出窗口并选择您喜欢的选择加入方式:
这里的想法是为您的访问者提供订阅的充分理由。如果您需要这方面的帮助,请查看我们关于 如何创建自定义推送通知选择加入的文章。
如果您想获取一些入门模板,您应该查看这篇关于 高转化率推送通知订阅选项的文章。
BONUS Step: Create a Welcome Campaign
完成选择加入设置后,您的网站就可以收集订阅者了。
But how do you know if your push campaigns are working properly?
We recommend that you create a welcome push notification to test if your setup went smoothly. A welcome notification is a web push notification you send a new subscriber to confirm their subscription and welcome them on board.
转到PushEngage仪表板,然后导航到广告系列 » 滴灌自动回复器,然后点击创建新的滴灌自动回复器:

然后,为您的广告系列命名(我们建议使用类似“欢迎滴灌”的名称),然后在内容下,选择显示“用户订阅后立即发送通知”的选项):

此时,您可以单击通知旁边的箭头来编辑通知的内容。如果您拥有PushEngage的高级或企业版套餐,您将能够添加多个通知来创建一系列自动欢迎消息。只需点击Add New Notification并编辑内容。
完成后,点击邮件序列设置并选择将您的欢迎广告系列发送给所有订阅者的选项:

Then, scroll down to set your own UTM parameters to track the push campaigns:

完成后,滚动回顶部并点击激活自动回复器按钮:

就这样!
You have successfully set up AMP web push notifications on your website. It’s time to head back to your PushEngage dashboard and start creating your push campaigns.
What to do After You Add AMP Push Notifications to Your Site
好了,各位,本次分享就到这里!
If you’re new to push campaigns, you should follow a full-blown push notification testing process before you go live. It’ll help you troubleshoot common issues before your visitors see them and start complaining about a broken user experience.
您还应该查看一些更自动化的推送通知广告系列,例如:
如果您在以上任何步骤中遇到困难,我们建议您联系我们的客户成功经理。我们非常乐意帮助您解决任何问题。
如果您还没有,请继续尝试 PushEngage。PushEngage 是全球排名第一的推送通知服务。因此,如果您想认真发展您的业务,PushEngage 是您的正确选择。


Thanks for this tips & information. Its very easy to understand.
good explanation