
正在寻找无需插件安装 WordPress 推送通知的指南?
你来对地方了。
在本文中,我们将向你展示如何在不使用推送通知插件的情况下,为 WordPress 安装推送通知:
- 即使……你从未在没有插件的情况下自定义过 WordPress 的任何内容;
- 即使……你从未写过一行代码;
- 即使……你以前尝试过但已经失败了;
我们将把推送通知安装到你的网站上。
听起来不错?让我们开始吧!
如何在不使用插件的情况下安装推送通知
在 WordPress 中不使用插件安装推送通知并不难。但它确实有几个步骤,你需要一步一步地按照本指南进行操作。
在任何时候都不要跳过步骤,您就会没事的。
开始吧!
第一步:设置你的 PushEngage 账户
让我们开始吧。你可以从 PushEngage 主页开始。只需点击 开始使用 按钮:

你可以选择免费套餐来试用 PushEngage,或者如果你想认真发展你的业务,可以选择付费套餐。
注册账户后,请前往 PushEngage 控制面板,然后转到 设置 » 网站设置 » 安装设置:
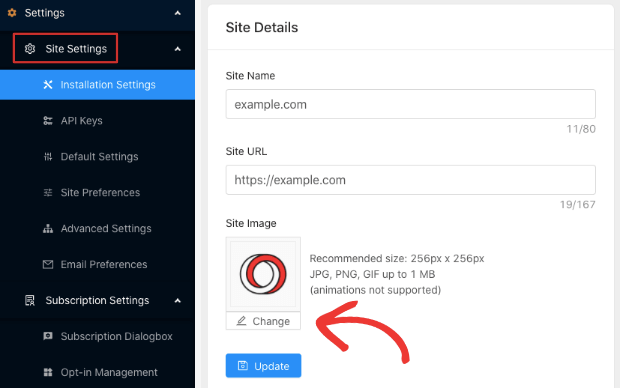
在这里你可以配置你的网站详细信息和品牌。请立即设置你的推送通知的徽标和网站 URL。你应该立即这样做,以便能够正确测试你的推送通知。
第二步:获取安装代码
接下来,你需要前往 PushEngage 控制面板并获取安装代码。转到 设置 » 网站设置 » 安装设置:
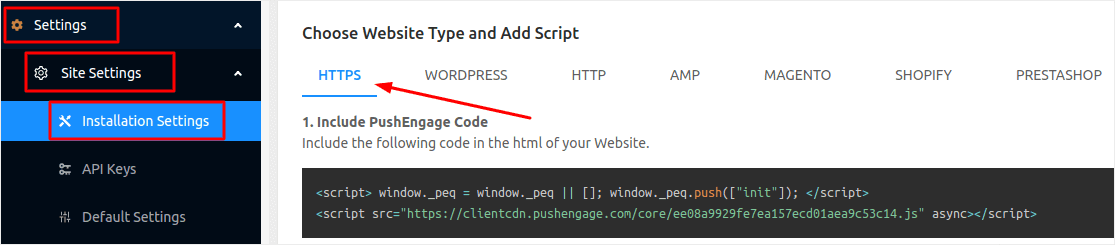
根据你的网站是否安装了 SSL,你将需要转到 HTTPS 或 HTTP 选项卡来获取安装代码。
专业提示: 如果你的网站没有 HTTPS,你应该 安装 SSL 证书。
第三步:添加一个插件将代码插入 WordPress
从上一步获取安装代码后,将其复制。接下来我们将把这段代码插入到你的 WordPress 网站中。
但首先,我们需要一个插件来轻松完成此操作。
你可以通过编辑 WordPress 主题编辑器中的 header.php 文件来插入代码。但如果你不懂代码,这是一种极其危险的方法。一个错误的半冒号就可能彻底搞垮你的网站。
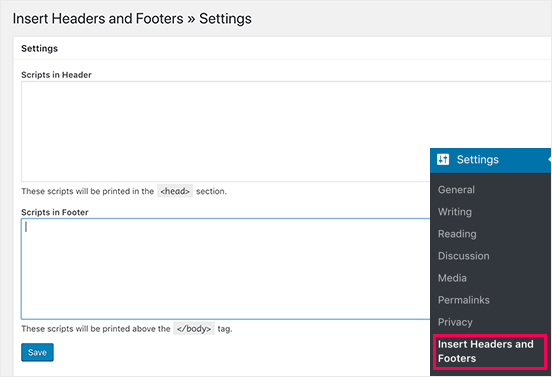
所以,我们将使用 Insert Headers and Footers 插件。它 100% 免费且非常易于使用。
继续安装该插件。如果你不确定如何操作,请按照此分步指南 安装 WordPress 插件。
激活插件后,你将需要将来自 PushEngage 控制面板的代码添加到页眉部分:
您就完成了!
第四步:添加 Service Worker 文件(仅限 HTTPS 网站)
如果你运行的是没有 SSL 证书的网站,请继续并跳过此步骤。
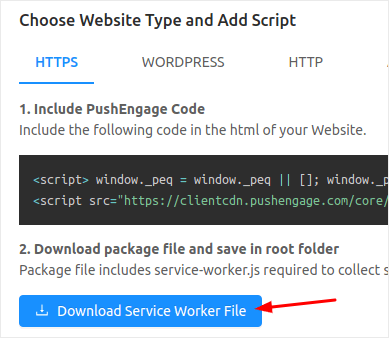
对于 HTTPS 网站,还有一个额外的步骤:将 service-worker.js 文件添加到你的网站根目录。
Head back to your PushEngage dashboard and go to Settings » Site Settings » Installation Settings. Under the HTTPS tab, you’ll see the option to download the service-worker.js file:
Once downloaded, you’ll have to extract the file from the zip folder. Next, you’ll have to upload this to your WordPress site’s root folder. If you’re not sure how to do this, check out this article on how to upload files to WordPress using FTP.
Once you upload the file to WordPress, head over to example.com/service-worker.js in your browser. If everything went well, you’ll be able to access the file from your browser and you should see something like this:

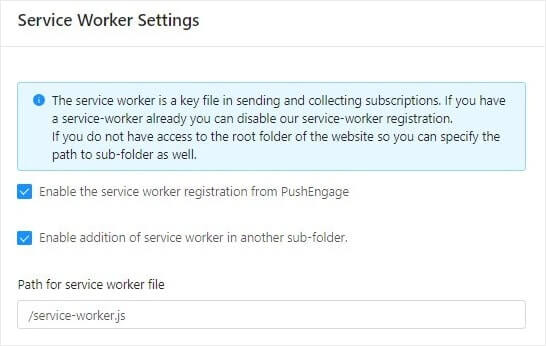
NOTE: If you can’t upload the service-worker file to the root folder, you have the option to upload the file to another folder. Go to PushEngage Dashboard » Settings » Site Settings » Advanced Settings.
Just follow the instruction in the Service Worker Settings and you’re golden:
就这样!
You’ve successfully installed web push notifications to WordPress without using a plugin.
What to Do Before Sending Push Notifications
您已接近完成。
Before you start sending push notifications, you’ll need to set up a subscription opt-in for your website. Your opt-in will convert web visitors into push notification subscribers. So, this is a critical element.
如果您需要一些灵感,可以查看这篇关于高转化率的推送通知选择加入的文章。设置好选择加入后,您的网站就可以收集订阅者了。但您怎么知道您的选择加入是否正常工作呢?
因此,明智的做法是设置欢迎推送通知。
专业提示:您应该花一些时间对推送通知进行全面测试。这将解决最常见的问题,并且您不必浪费时间以后再解决问题。
总结
好了,各位,本次分享就到这里!
如果您觉得这篇文章有帮助,请务必在下方留言。
Getting started with push notifications can seem intimidating. But if you follow the best practices, you should be fine. More importantly, you’ll make a lot more profit with the help of push notification campaigns.
如果您是推送通知的新手,您应该尝试 PushEngage。PushEngage 是市场上排名第一的推送通知软件。您的营销活动将得到妥善处理。
所以,如果您还没有,请立即开始使用 PushEngage!


感谢分享这篇信息丰富的帖子。
感谢分享这篇信息丰富的帖子。