正在寻找创建推送通知受众分组的方法?
创建受众分组是实现营销信息个性化的好方法。如果您曾经设置过 Facebook 或 Instagram 广告,您就会知道,针对受众的兴趣和行为对于转化率至关重要。
您也可以为您的推送活动和广播执行同样的操作。
在本文中,我们将引导您了解创建推送通知受众分组的不同方法。您无需任何编码或营销经验,即可在 10 分钟内完成设置。
听起来不错?
让我们开始吧。
为什么使用受众分组
使用受众分组最常见的方式是作为细分受众群的手段。
推送通知订阅者列表中的细分受众群主要基于订阅者的兴趣和浏览行为。但是,通过受众分组,您可以更进一步。
当然,并非所有推送通知服务都提供创建受众分组的选项。我们建议使用 PushEngage 来创建您的广告系列和推送通知受众分组。

PushEngage 是全球排名第一的推送通知插件。
推送通知可帮助您自动增加网站流量和参与度。如果您经营在线商店,PushEngage 还可以通过帮助您创建自动电子商务推送通知来帮助您增加销售额。
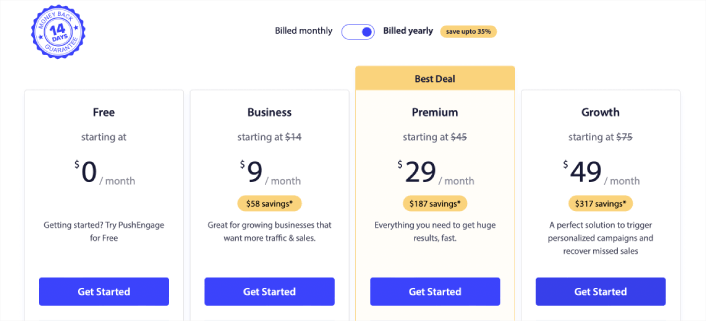
您可以免费开始使用,但如果您想认真发展业务,则应购买付费套餐。此外,在购买任何推送通知服务之前,您应该查看这篇关于 推送通知成本的指南。
PushEngage 提供以下功能,快速概览:
- 高转化率的自动化营销活动
- 多种定位和营销活动调度选项
- 目标跟踪和高级分析
- 智能 A/B 测试
- 专属客户成功经理
您会发现,如果您想为您的业务带来流量、参与度和销售额,PushEngage 绝对是最佳选择。而且,如果您预算有限,您总是可以 在推送通知方面发挥创意。
注意:如果您运行的是 WordPress 网站,则应安装并激活 PushEngage WordPress 插件。
通过受众分组,您可以按以下条件筛选订阅者:
- 兴趣和行为
- 浏览器和设备
- 地理位置
- 互动指标
- 标识符
您可以轻松上手,并在几分钟内创建自定义分组。保存您的受众分组,以便在每次发送推送广播时,使用个性化的推送通知重新定位特定的订阅者。
在深入了解受众分组的细节之前,您应该知道此功能适用于所有 PushEngage 套餐。但只有拥有订阅者细分和 A/B 测试来增长您的受众,您才能充分利用它。这两个功能都包含在 PushEngage 高级套餐 中。
因此,现在是时候 升级您的账户 了。
如何创建推送通知受众分组
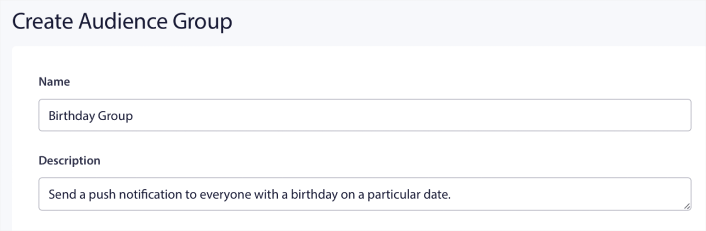
首先,前往您的 PushEngage 控制面板,然后转到 受众 » 受众分组,并点击 创建新的受众分组 按钮:

在使用受众分组发送定向推送广播之前,您需要创建一个带有规则的受众分组来创建该分组。您可以从受众分组的名称和描述开始。
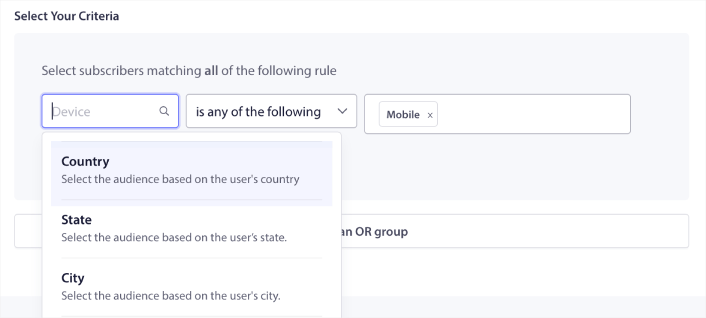
创建选择标准
接下来,创建选择标准以筛选和定位正确的受众:
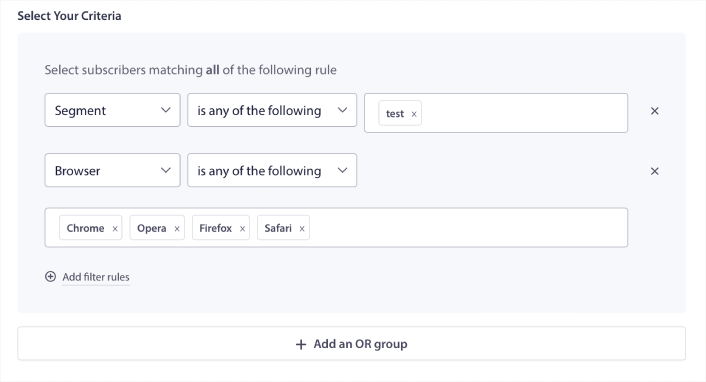
您可以点击 添加筛选规则 来选择符合所有筛选规则的订阅者,或者您可以点击 添加 OR 分组 来创建一个订阅者满足至少一个选择标准的筛选器。
如何按订阅者行为进行筛选
User behavior is the most fundamental way to target your push notification subscribers. As we said before, subscriber segments usually group visitors who like to browse similar content. But even within that group of subscribers who love the same content, there are small personalizations that you can make.
Even more to the point, you can club multiple subscriber segments to send them a common, relevant message.
Filter By Subscriber Segment
If you haven’t already, you should start segmenting your push notification subscribers right away. Otherwise, this filter simply won’t work. But if you already have segments, then you can select multiple segments as the base for your audience group.

After that, you can add other filters to improve your targeting.
Filter By Subscriber Attribute
While attributes are mostly for drip push notifications, you can use them for push broadcasts as well. Now, push notification attributes are mostly useful for eCommerce sites. But you can also use them to send personalized push notifications if you have a Customer Relationship Management (CRM) tool.
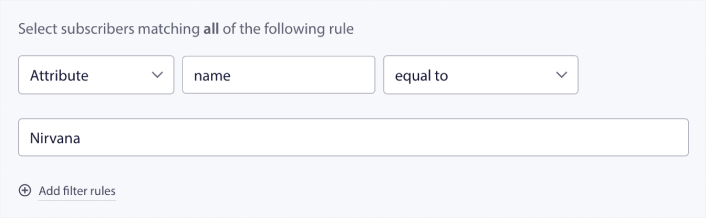
Attributes can hold personal information such as subscriber names, date of birth, any other info that you’d store in your CRM for personalized marketing campaigns.
Filter By Subscriber’s Device and Browser
In many cases, it’s crucial to know how you subscribers receive your messages.
There’s a really great story about Michael Jackson. Every time he recorded a song, he’d listen to it on a radio. Not his million-dollar recording suite in top audio quality, but a cheap radio like most of his audience would later on. If he liked how the song sounded even on the cheapest device on the market, he’d sign off on releasing the song.
No wonder Billie Jean went Platinum 29 times!
For your push notifications, it’s no different.
Filter By Subscriber Browser
Different browsers have different character limits for push notifications. So, when you send a push broadcast you need to be wary of these limits. The cool thing is that you can save different audience groups to retarget different browsers. You don’t need to create segments each time.

Filter By Subscriber Device
There’s a difference in the types of rich push notifications you can send to iOS, Android, and Windows devices. So, not every campaign you send out will look the same on all devices. In fact, many push notification types won’t even show up on all devices. Different devices also have different screen sizes. So, you may want to optimize how your push notifications look before sending them.
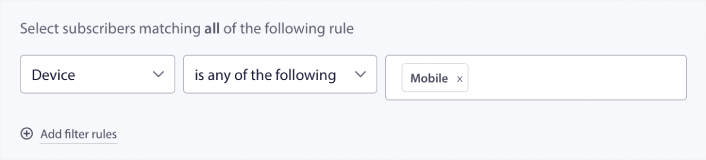
But now that you can filter your audience by their device, that shouldn’t be a problem anymore.
How to Filter By Geolocation
You can also filter by geolocation to personalize your campaigns further. The filter allows you to select an audience group by country, city, and state:
Phooto used geolocation to send push notifications in local languages. And it helped them skyrocket their engagement rates quickly. Read the full case study.
How to Filter By Engagement Metrics
One of the best things about Audience Groups is that it can help you create retargeting campaigns using push notifications. You can filter your audience by:
- Subscription Date
- Last Sent Date
- Last Click Date
- Last View Date
Using these metrics can help you retarget subscribers with low engagement rates or sell to subscribers with high engagement rates.
Or, you can filter the audience by:
- Total Send Count
- Total View Count
- Total Click Count
These numbers can help you find subscribers who get the least messages from you so that you can find better ways to personalize notifications. You can also find the subscribers who interact with your push notifications most often.
Pro Tip: Combine two or more filters to find the best ways to re-engage with your subscribers. For instance, subscribers with a high Total View Count and high Total Click Count will give you the subscribers who have been engaging with you for a while. These are loyal subscribers who deserve a reward.
How to Filter By Identifiers
Identifiers are how PushEngage identifies your subscribers. Since PushEngage is GDPR compliant by default, our software never stores any personally identifying data for any of your subscribers. Instead, we assign each subscriber a profile ID and a subscriber hash.
Keep in mind, you’ll be using profile IDs and subscriber hashes mostly as part of advanced campaigns. In other words, you’ll need to use the PushEngage API to create custom campaigns that use these identifiers.
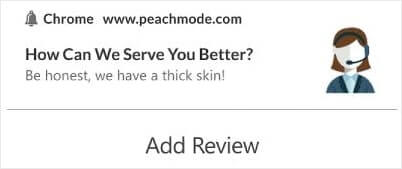
Identifiers are amazing for sending transactional push notifications like this one:
They’re great for custom eCommerce push notifications. So, we don’t really recommend using them for anything besides testing push broadcasts from the dashboard.
Use an Audience Group to Send a Push Broadcast
Once you’ve created an Audience Group, head over to Campaign » Push Broadcasts and click on the Create New Push Broadcast button:

Then, create your push notification:

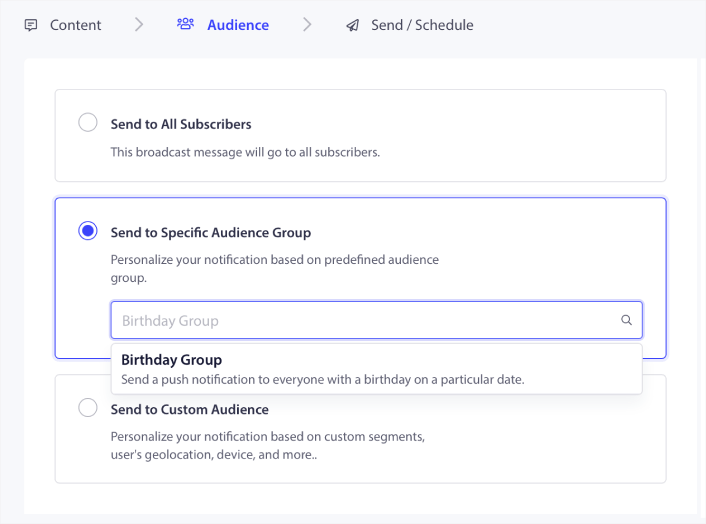
Then, under the Audience tab, click on Send to Specific Audience Group and select your Audience Group from the dropdown menu.
And then send or schedule your push campaigns.
What to Do After Creating a Push Notifications Audience Group
好了,各位,本次分享就到这里!
如果您觉得这篇文章有帮助,请务必在下方留言。
Getting started with push notifications can seem intimidating. But if you keep an eye on goal tracking and analytics, you should be fine. More importantly, you’ll make a lot more profit with the help of push notification campaigns. Here are a few cool resources to get you started:
- 如何使用重定向推送通知将收入翻倍
- 如何对推送通知进行排序并找到成功的营销活动
- 如何清理推送通知订阅者列表(简单方法)
- 如何自动发送 RSS 推送通知
- 如何使用推送通知推广新闻网站
- 如何使用交叉销售推送通知将您的销售额提高一倍
- 如何使用浏览放弃推送通知(4 个步骤)
如果您是推送通知的新手,您应该尝试 PushEngage。PushEngage 是市场上排名第一的推送通知软件。您的营销活动将得到妥善处理。
所以,如果您还没有,请立即开始使用 PushEngage!


