正在寻找一种创建点击订阅链接并收集推送通知订阅用户的方法?
我们明白。有时,在增长订阅用户的方式上拥有一定的灵活性会更加方便。
别担心。我们已经为您准备好了。
在本文中,我们将一步一步地向您展示如何创建自己的订阅按钮或链接。
我们将使用 PushEngage 向您展示如何操作。
但即使您使用的是其他供应商,也不必担心。过程应该大同小异。但如果您想认真发展订阅用户,您应该尝试 PushEngage。PushEngage 是全球排名第一的推送通知软件。
所以,如果您还没有,请立即开始使用 PushEngage。
准备好了吗?让我们开始吧。
如何使用 PushEngage 创建点击订阅按钮
如果您还没有设置 PushEngage,现在是时候去设置一下了。
第 1 步:开始使用 PushEngage
访问 PushEngage 主页,然后点击 开始使用 按钮:

然后,您可以选择免费计划来试用 PushEngage,或者如果您想认真发展您的业务,可以选择付费计划。付费计划提供更多的营销活动选项,并能够建立更大的订阅用户列表。
第 2 步:复制代码段
在您的 PushEngage 仪表板 中,转到 网站设置 » 网站详情,然后点击 点击此处获取设置说明 按钮。在 任何网站 下,您将获得安装代码:

警告:您需要复制从仪表板获取的代码。该代码对于每个 PushEngage 用户都是唯一的。您将无法复制图片中的代码来收集推送通知订阅用户。
在您的 PushEngage 仪表板中获取代码后,将此代码段添加到您的代码中:
<script> window._peq = window._peq || [];</script>您的最终代码应如下所示:
<script src="https://clientcdn.pushengage.com/core/02a6e92667ae2279fcba8932356c1d93.js" async></script>
<script> window._peq = window._peq || [];</script>
第 3 步:创建按钮或链接
如何在 HTML 中创建点击订阅按钮
现在您已经有了代码,大部分困难的工作已经完成。接下来,您需要创建一个按钮,在被点击时触发您的代码。这就是我们所说的“点击事件”。
要创建点击订阅按钮,请使用此 HTML 代码段:
<button onclick="subscribeOnClickButton()">Subscribe</button>订阅按钮可以作为首屏的号召性用语,效果很好。
未经样式设置,它看起来会是这样的:
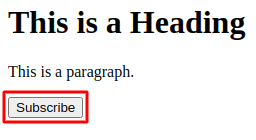
请忽略截图中的标题和段落。它们只是为了向您展示它在网站首屏上可能是什么样子。HTML 代码段不会生成标题和段落。
当然,粘贴代码后,您应该使用 CSS 来设置按钮的样式。如果您不知道如何设置 HTML 元素的样式,这里有一个很好的示例列表供您参考。
如何在 HTML 中创建点击订阅链接
您也可以使用订阅链接来收集订阅用户。在这种情况下,请使用此 HTML 代码段:
<a onclick="subscribeOnClickButton();" href="javascript:void(0)">Subscribe</a>这适用于您创建文本内超链接的情况。如果您想在博文中插入推送通知订阅宣传,这会非常方便。
它看起来应该像这样:
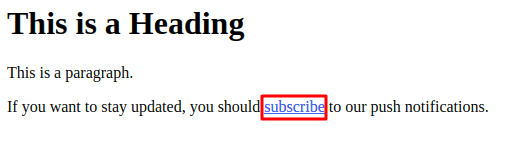
Your HTML snippet will only create a link that says Subscribe. Feel free to add the rest of the content as we did in the image. That way, it will feel way more natural.
And that’s it! Your link’s ready.
Step #4: Embed the Code in WordPress
Done? Let’s get to the rest of the code, then.
Now, if you want only to collect a subscriber when the button gets clicked, paste this code:
<script>
function subscribeOnClickButton() {
window._peq.push(['subscribe']);
}
</script>
There are no fancy bells and whistles here. Just a button that collects subscribers when clicked.
But if you’d like something a little more advanced, you can log the response you get from the PushEngage server to the console as well:
function subscribeOnClickButton(){
window._peq.push(['subscribe',{}.pe,function(res){
if(res.statuscode==1)
{
// Code to return response
console.log(res);
}
}]);
}
If you want to collect subscribers when your button gets clicked and then segment those subscribers automatically, you can use this code instead:
function subscribeOnClickButton(){
window._peq.push(['subscribe','segment_name',function(res){
if(res.statuscode==1)
{
// Code to return response
console.log(res);
}
}]);
}
And you’re done. Pick whichever code snippet suits you the best and paste it into your website’s HTML code.
Now, for the button or the link to work, you’ll need to paste some more Javascript code at the bottom of your page.
If you’re running a WordPress site, then the simplest way to do it is to use a plugin. The best plugin for the job is the Insert Headers and Footers plugin. Install the plugin (it’s free) and head over to Settings » Insert Headers and Footers:
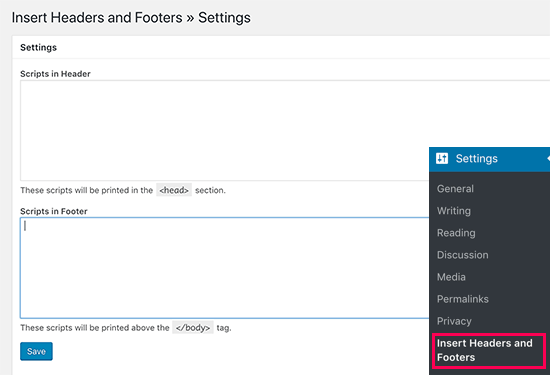
And place your full code in the Scripts in Footer box. You should be pasting in the code you got from the PushEngage dashboard as well as the Javascript code you need to run the button or link properly.
Step #5: Paste the HTML Code for the Button or Link on Your Site
Finally, you’ll need to paste the HTML code for either your button or your link on your pages and posts.
If you’re on WordPress, you can paste HTML code directly onto the article.
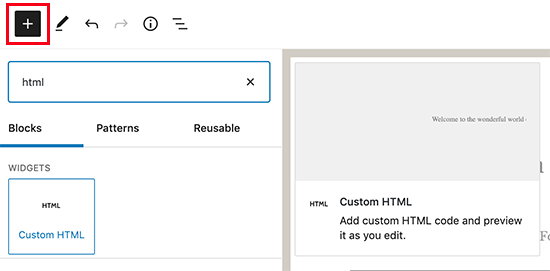
It’s fine if you’ve never done this before.
Here’s an article on how to add HTML code in WordPress with step-by-step instructions.
At this point, we highly recommend that you test your push notifications to check if everything’s working.
If all went well, you will have a button or a link on your site that collects subscribers when clicked. And if something isn’t working, feel free to get in touch with our Customer Success team. We’re more than happy to help.
总结
好了,各位,本次分享就到这里!
Once you’ve created a click-on-subscribe button for your site, you should check out our advanced segmentation rules.
Creating granular segments can help you personalize your push notifications to a great extent. This means more engagement, higher clicks, and more sales from your push notification campaigns.
And if you’re new to push notifications, you should try out PushEngage. PushEngage offers some of the most powerful and flexible push notification campaigns anywhere. So, if you’re serious about growing your business, get started with PushEngage today!


Push Engage is certainly my favorite tool after trying out many out there.