正在寻找指南来测试您的 Web 推送通知是否正常工作?
推送通知是一种相对较新的营销工具。因此,对 Web 推送通知进行故障排除可能有点麻烦,因为很难在网上找到好的教程。
好消息:本文是您测试推送通知所需的唯一指南。它由我们的 Web 推送通知软件专家撰写,将帮助您测试任何浏览器或操作系统上的推送通知。
我们在本文中以 PushEngage 为例,但这些测试是通用的。因此,即使您使用的是其他供应商,也应该没问题。
PushEngage 是市场上最好的推送通知软件。因此,如果您还没有,请立即开始使用 PushEngage。
现在,在您可以测试推送通知之前,还有一些事情需要处理。
别担心。我们在本文开头包含了所有先决条件。只需确保您按部就班地进行操作,一切都会顺利。
听起来不错?太棒了!让我们开始吧。
在测试推送通知之前需要做什么
测试推送通知的 opt-in 或是否正确安装可能很棘手。
如果您订阅了 Web 推送通知,您将不会再次看到订阅弹出窗口。这使得测试 Web 推送通知变得困难。
进行测试的最简单方法是从 Chrome 开始(任何操作系统都可以)。
Google Chrome 是使用最广泛的浏览器之一,并且由于您可以在 Chrome 中创建多个配置文件进行测试,因此测试与 Chrome 的兼容性变得超级简单。
明确一点:只要是 PushEngage 支持的任何浏览器,您也可以在其中进行相同的测试(稍后会详细介绍)。
让我们开始忙碌吧。
第 1 步:创建新的 Google Chrome 配置文件
您可以在 Chrome 浏览器中创建新配置文件,以模拟对您网站的多次独立用户访问。
每次使用不同配置文件访问您的网站时,Chrome 都会自动模拟一个新用户。这样,您就可以在本文的所有测试中为多个用户测试您的推送通知。
那么,现在就在 Chrome 上设置一个新配置文件吧!
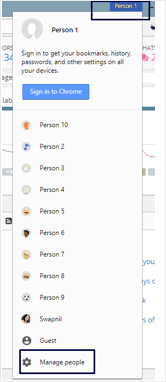
在您的计算机上,打开您的 Chrome 浏览器并登录 Google。在右上角,您会看到一个用户配置文件。选择您的个人资料图片或用户名,然后点击管理用户:
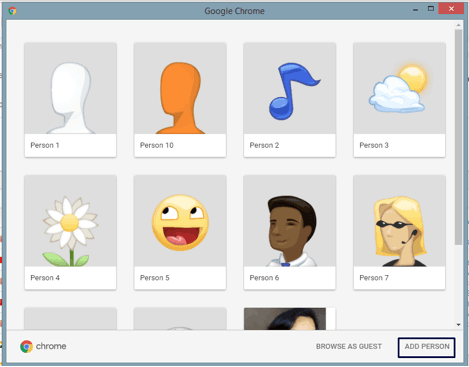
接下来,点击添加用户:
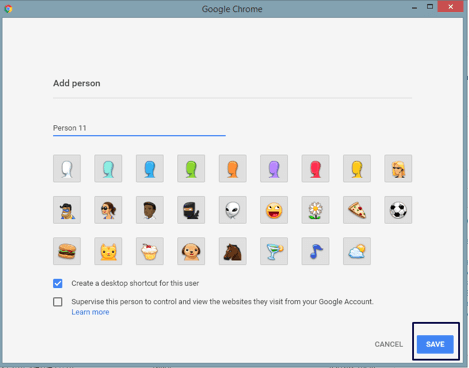
创建一个新帐户并点击保存:
您完成了。现在测试推送通知对您来说会容易得多。
第 2 步:检查浏览器对 Web 推送通知的支持
PushEngage 支持所有主流浏览器以及一系列网站构建平台。您可以查看完整的支持的集成列表,以确保您已涵盖。
You should be getting the same support from any vendor. If you’re using a different vendor and don’t get the support for any major browser or platform, you can get in touch with us. Our Customer Success team will help you migrate to PushEngage right away.
Full Disclosure: Browser push notifications are not allowed for certain visitors. For instance, a browser that opens in the Facebook app or any browser that doesn’t support Javascript can’t use push notifications.
But the vast majority of your site visitors will be from popular browsers that do support Javascript. So, this isn’t a major issue.
Step #3: Check SSL Certificate
You don’t need to have an HTTPS website to use PushEngage’s push notifications. But we highly recommend installing an SSL certificate on your website if you haven’t already.
Either way, you can still install web push notifications on your website. Check out our installation guides if you haven’t completed your installation process. The process is slightly different for HTTP and HTTPS sites.
You can add the installation code using Google Tag Manager as well.
But before you test your push notifications, you’ll need to complete the installation process.
Step #4: Enable Welcome Push Notifications
Once you’ve installed push notifications on your site, you should set up welcome push notifications next.
Head over to your PushEngage dashboard and go to Settings » Site Settings » Installation Settings and enable welcome notifications for new subscribers:
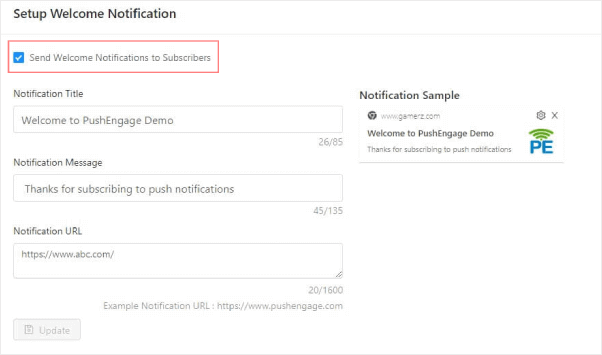
This is a practical step as it helps us validate if a subscription has been completed.
And that’s all you need to do before you dive into testing.
How To Test Web Push Notifications for Your Site
We’re finally going to start testing push notifications for your site.
NOTE: Please don’t jump straight into testing before you complete all the prerequisites for testing. Trust us when we say it; you’ll hate yourself later for skipping it!
Are you done with all the prerequisites?
Very cool.
Let’s get started with the testing now.
Test #1: Using Different Profiles in Chrome
By now, you’ve already created different user profiles on Chrome and set up a welcome notification using PushEngage. So, you should get an opt-in when you visit your site from a new user profile like this one:
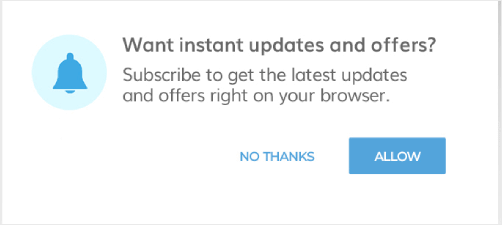
Depending on the type of opt-in you set up, you’ll get either a single-step opt-in or a two-step opt-in. Follow through with the opt-in and if it’s a two-step opt-in, click ‘Allow’ for both opt-ins.
If your push notifications were installed correctly, you should see the welcome notification now.

Try this out for at least five different user profiles, to be sure. You could also ask a few of your employees or friends to opt in and test things out.
Test #2: Test To See If Segmentation Is Working
Customer segmentation can play a huge role in your push notification strategy.
PushEngage 最好的功能之一是您可以在用户选择接收通知时对其进行细分。这是一个很好的测试,因为它可以一次性测试您的选择加入、细分功能以及您的推送通知。
太棒了!
第一步是转到您的 PushEngage 仪表板并创建两个细分。如果您不确定如何创建细分或使用哪种类型的细分,可以尝试根据博客类别或功能创建细分。
如果您是细分创建新手,您应该查看这篇关于如何创建推送通知细分的文章。
一旦您在网站上添加了代码以标记选择接收通知的用户所属的细分,您就可以继续测试选择加入功能了。
与一群人分享链接,并请他们订阅您的通知。
一旦他们订阅,您就可以向特定细分的用户发送推送通知。如果他们收到了通知,则表示您的推送通知已正确安装,一切正常。
测试 #3:HTTP 网站故障排除
正如我们之前所说,您不必在网站上安装 SSL 证书即可发送推送通知。如果您按照安装说明操作并将代码片段添加到您的网站,当您使用新的 Chrome 配置文件访问您的网站时,应该会看到一个选择加入提示:

本文的这一部分是针对不显示选择加入提示的 HTTP 网站的故障排除。
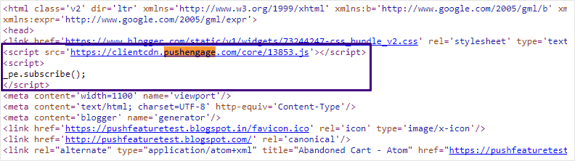
按 Ctrl + U 查看网站源代码,并查找 PushEngage Javascript 代码片段。这与您在安装过程中从 PushEngage 仪表板获取并粘贴到网站上的代码片段相同。
代码应位于网站的 head 部分,因为它可能在您将其添加到 <footer> 或 <body> HTML 标签内时不起作用。如果您在 head 部分看不到代码,那就是您的问题所在。请让您的开发人员将其添加到 head 部分。
但是,如果它在 head 部分,而您在使用新的 Chrome 配置文件访问网站时仍然看不到选择加入提示,请确保您没有使用任何 defer 标签。
您的代码看起来应该像这样:
如果代码显示:
<script src=”demo_defer.js” defer></script>
或者,<script defer> _pe.subscribe(); </script>
请让您的开发人员从代码中删除此 defer 标签,它应该可以正常工作。
测试 #4:HTTPS 网站故障排除
如果您运行的是 HTTPS 网站,则故障排除的第一步与 HTTP 网站相同。集成 PushEngage 的代码应存在于网站的 head 部分。

如果此代码不存在于 head 部分,您需要将其删除并添加到 <head> 标签内。如果问题不在于此,则可能是您在安装过程中添加的 service-worker.js 文件。
转到此 URL(将 your-site-name 替换为您实际的网站名称):
https://www.example.com/service-worker.js
并检查它是否返回了 404 错误。404 错误意味着在获取此文件时存在某些问题,这就是您无法发送推送通知的原因。此时,您应立即联系我们的客户成功团队。
我们将仔细检查问题并帮助您解决。
但如果问题也不是这个,您需要检查您的 JSON manifest。请访问此 URL(将 your-site-name 替换为您实际的网站名称):
https://www.example.com/manifest.json
如果链接可访问,您将获得类似这样的结果:
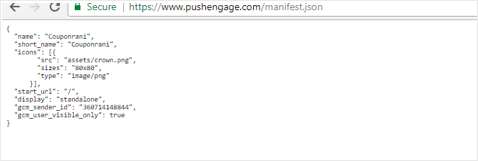
如果您没有收到此响应,很可能是因为您未能将必要的文件添加到您网站的根文件夹中。
别担心,有一个称为“快速安装”的解决方法。
登录您的 PushEngage 帐户,然后转到设置 » 订阅设置 » 订阅对话框:
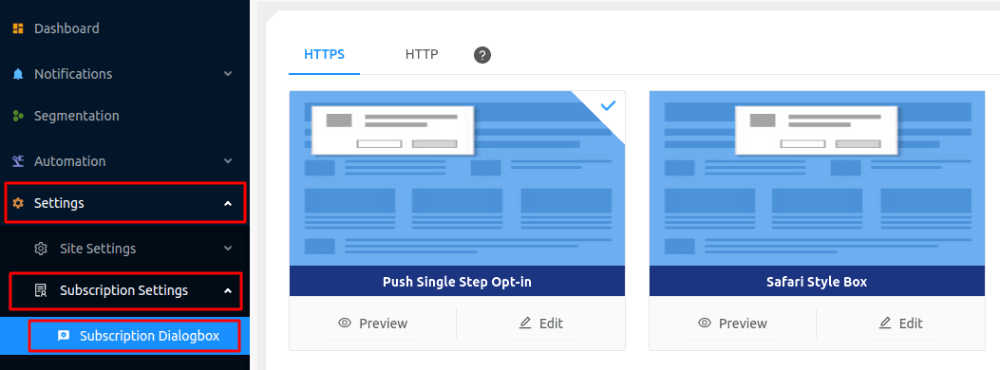
然后转到Safari 样式框 » 编辑:
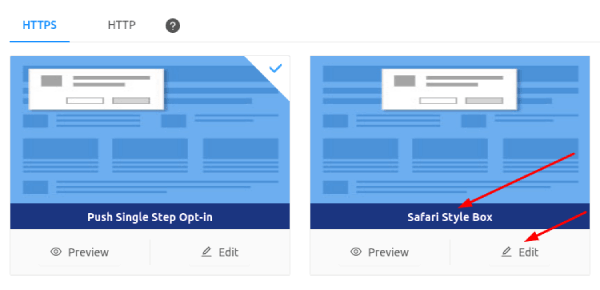
最后,转到选项并启用快速安装:
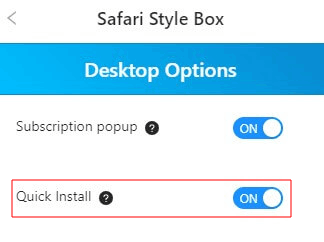
然后您就大功告成了。
测试 #5:使用控制台调试问题
警告:此测试仅适用于开发人员,并且仅在所有其他测试都失败时才使用。如果您自己不是开发人员,请立即与我们联系。
使用新配置文件访问您的网站,然后按 Ctrl + Shift + l(检查元素)并单击控制台,然后在控制台窗口中键入 _pe.subscribe();:
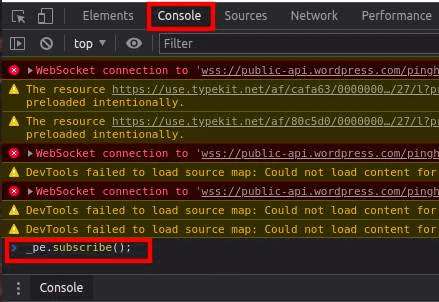
现在按 Enter。
现在您应该会看到阻止推送通知正常工作的确切错误消息。您现在要做的就是调试它。
总结
好了,各位,本次分享就到这里!
如果您觉得本指南有帮助,您还应该查看我们关于高转化率选择加入示例的文章。这是在测试推送通知后正确设置广告系列的完美方式。
PushEngage 提供了许多非常强大的广告系列,您也应该了解一下。毕竟,PushEngage 是全球排名第一的推送通知软件。大多数高级广告系列都是完全自动化的推送通知。
即使在您睡觉时,您也可以自动赚钱。
所以,如果您还没有,请立即开始使用 PushEngage。


