Still struggling to re-engage your Android app users once they close your app? You’re not alone. Most users abandon apps within days, and without the right tools to bring them back, they’re gone for good. That’s where Android push messages shine.
These small, timely alerts can re-engage users, boost repeat sessions, and drive conversions — even when they’re not actively using your app.
In this guide, we’ll break down:
- What Android push messages are
- How they work (with visuals)
- Why they matter for app growth
- And how to start using them effectively
Let’s dive in and turn your app into a retention engine.
立即发送移动应用推送通知!
推送通知是一种超级有效、低成本的营销工具,可帮助您自动增加重复流量、互动和销售。
- What Are Android Push Messages?
- Which Android Push Messages Service Should You Choose?
- How to Install Android Push Messages On Your Website
- How to Send App Push Messages on Android
- How Do Android Web Push Messages Work?
- How do Mobile Android Push Messages Work?
- What Are the Different Parts of Android Push Messages?
- 推送通知选择加入的不同类型
- How to Personalize Your Android Push Messages
- How to Create Targeted Android Push Messages
- How to Send Targeted Android Push Messages
- How to Create Android Push Messages Popup Modals
- What to Do Before You Send Targeted Android Push Messages
- What to Do After You Send Android Push Messages
What Are Android Push Messages?
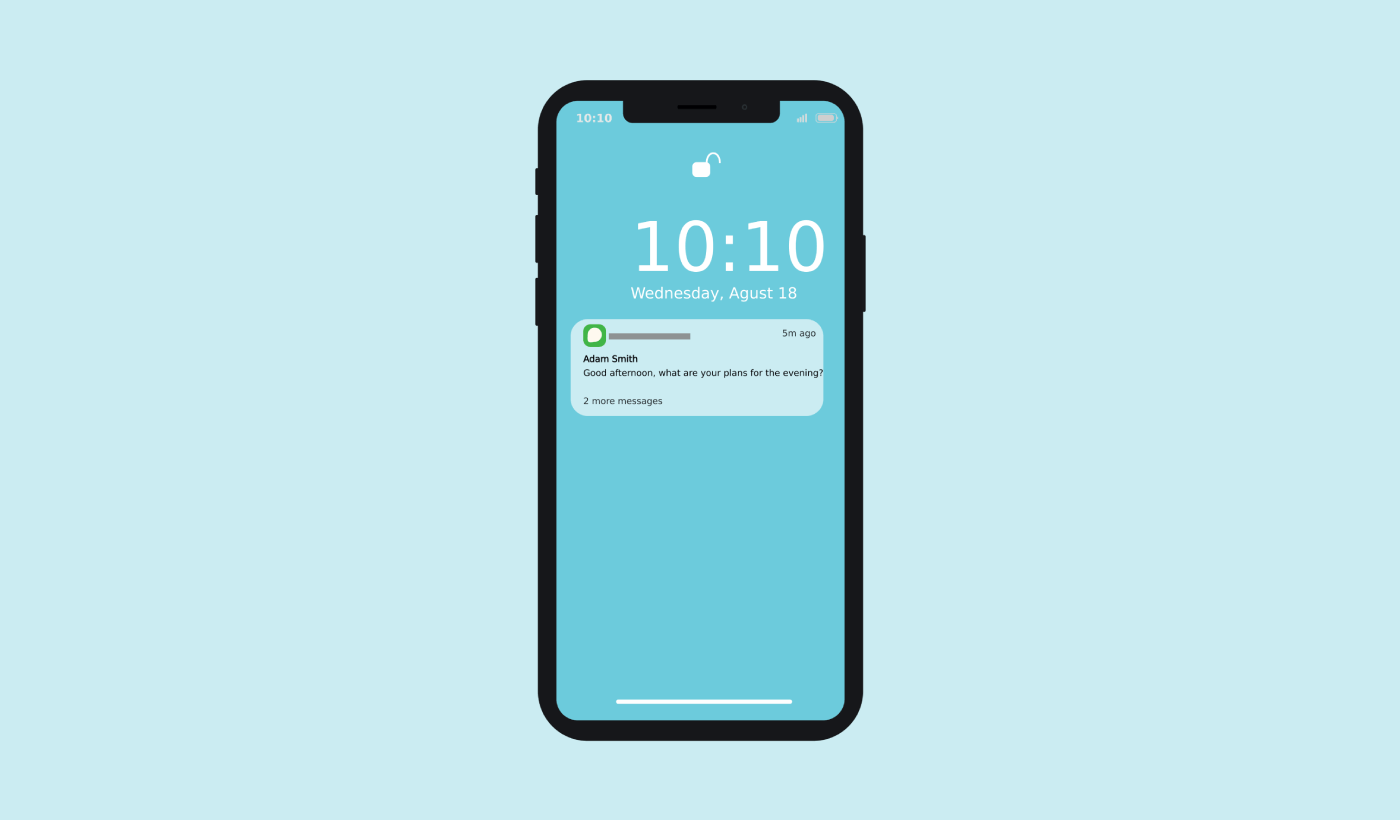
An Android push message is a short, clickable pop-up message that appears on a subscriber’s device and redirects the subscriber to your content with one click.
Broadly speaking, you can send two types of Android push messages:
- Android web push messages: Browser push messages that get delivered to the subscriber’s browser. As long as your push notification service is compatible with multiple browsers, you can target subscribers on an Android device.
- Android mobile push messages: Push messages that get delivered via your Android mobile app using Google’s Firebase Cloud Messaging (FCM).
So, you can send Android push messages with an app or a simple website. If you’re running a Progressive Web App (PWA), you can send push messages to both audiences at the same time.
If you choose to send a web push notification, then the push message pops up even if the subscriber isn’t using a browser. It’s like an email blast, but with a web push notification; your subscribers don’t need to be using an app to see your message.
But if you’re running an app business and you want to send Android push messages to your app users, you can do that as well.
In short: An Android push message is a simple way to send out a clickable deep link or a clickable URL to your content to anyone who opted in.
通过推送通知序列,您的受众现在没有任何借口可以忽略您。与社交媒体网站不同,没有算法会限制您的覆盖范围以迫使您付费投放广告。
IMPORTANT: Web and app push messages work in fundamentally different ways for any device. Web push requires a manual optin from your site visitors before you can send a push message. App push doesn’t need any optin as such. If someone downloads your app, you can send them a message as long as they have notifications enabled on their device.
Which Android Push Messages Service Should You Choose?
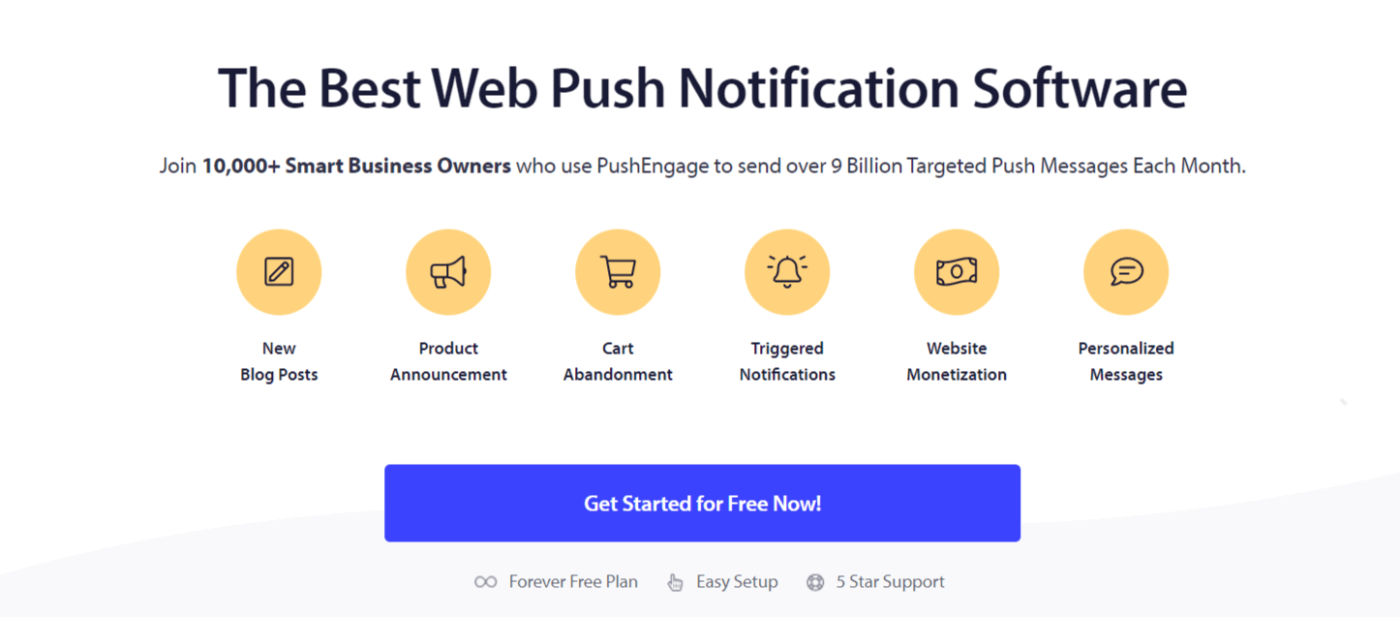
I highly recommend using PushEngage to send Android push messages.
Let’s start things off by saying that most of the free push messaging services out there are actually free trials. Some of the providers out there offer a trial software, while others have a forever-free plan that you can opt for. But before you do, you should check out our article on push notification cost analysis.
I spent a lot of time comparing the best push notification apps and breaking down what they actually offer.
For now, I’ll just quickly recap why you should choose PushEngage.
Get a Low-Code Solution for Android Push Messages
到目前为止,您必须使用骨架 SDK 来发送应用推送通知。使用这些 SDK 的问题在于它们非常基础。
理论上,您可以使用它们发送任何类型的移动应用推送广告系列。但是,您还必须构建:
- 管理您广告活动的界面
- 用于跟踪广告活动效果的分析套件
- 更好地支持富媒体和应用内重定向链接(或深度链接)
- Processes to liaise between marketing and development teams
这一切都是为了引入单一的增长渠道。使用旧工具发送移动应用推送通知既繁琐、昂贵、耗费资源,又耗时。当然,这需要您的团队具备深厚的编码技能来开发和管理您构建的一切。
With the new PushEngage Android and iOS SDKs, you can send mobile app push using the same reliable software for great delivery rates. But we’ve built several layers on top that make it super easy to build custom integrations with your app. And PushEngage manages the entire SDK. So, you don’t even have to spend a ton of time and money to manage your integrations.
您要做的就是构建!
You can send broadcast notifications directly from your PushEngage dashboard once you’ve set up your app to send mobile app push notifications using PushEngage’s SDK. Yes, you still have to add code to your app and develop the connectors between your app and the PushEngage API. But once that’s done, you can easily create mobile app push campaigns from a pre-built software interface that also comes with:
- 高度吸引人的推送广告系列类型
- 经过验证的营销活动模板,转化率高
- 自动化营销活动,在您发布内容时推广您的内容
- 多种定位和营销活动调度选项
- 网络推送营销活动,作为补充增长渠道
- 通过基于数据的个性化提高受众留存率
- 目标跟踪和高级分析
- 智能 A/B 测试
- 专属客户成功经理
And so much more. We just took the pain out of developing Android and iOS mobile push campaigns for your app.
Establish Your Brand Identity
You can easily set an icon for Android mobile app push:
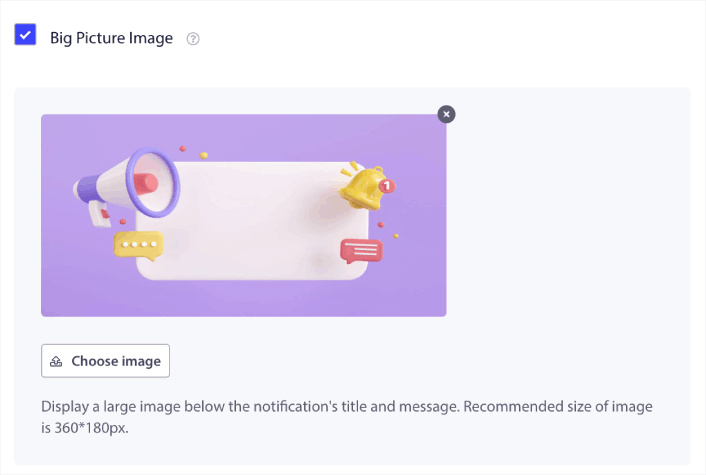
As well as a display image to make your mobile app push notifications more clickable:
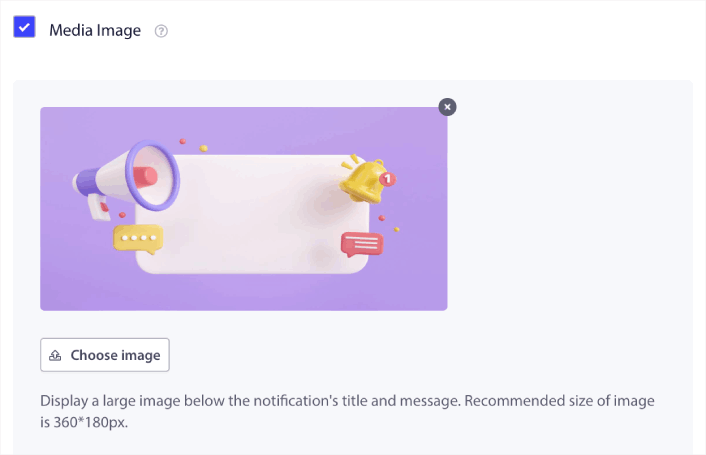
You can do the same for iOS mobile app push as well. Set a media image for your iOS app push notification to make your campaign more eye-catching:
In other words, you can preserve your brand design guidelines pretty easily when you send mobile push notifications. And all that, from an easy-to-use interface that you’ll never have to manage!
发送更具针对性和个性化的消息
对于安卓应用推送,您可以创建群组和频道来精确自定义通知的外观、感觉和声音。
组是具有通用名称的通知类型的集合。
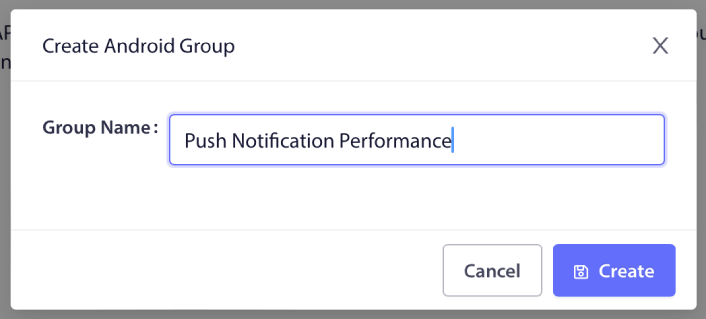
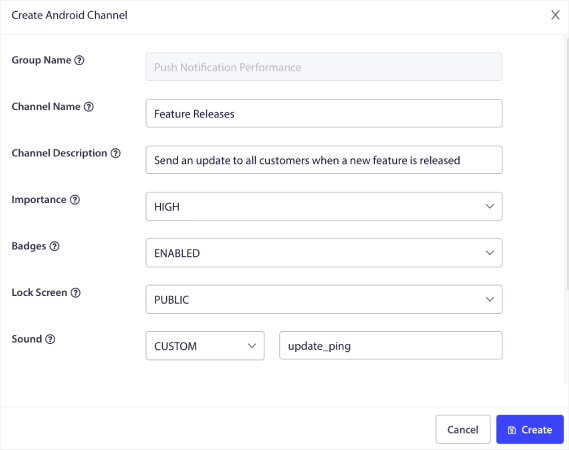
可以将其视为博客中的类别。在每个组内,您可以添加频道:

频道描述了当用户收到通知时您的应用通知将如何表现。它会显示在锁屏界面上吗?它应该显示应用图标作为徽章吗?它对您的用户有什么优先级?您希望在用户收到通知时播放自定义通知声音吗?
所有这些设置都可以在频道内配置。
对于 iOS 移动应用通知,没有组和频道的概念。但是,您可以使用其他设置创建个性化通知。您可以设置通知声音、通知类别以及用于将它们捆绑在一起的通用线程 ID。
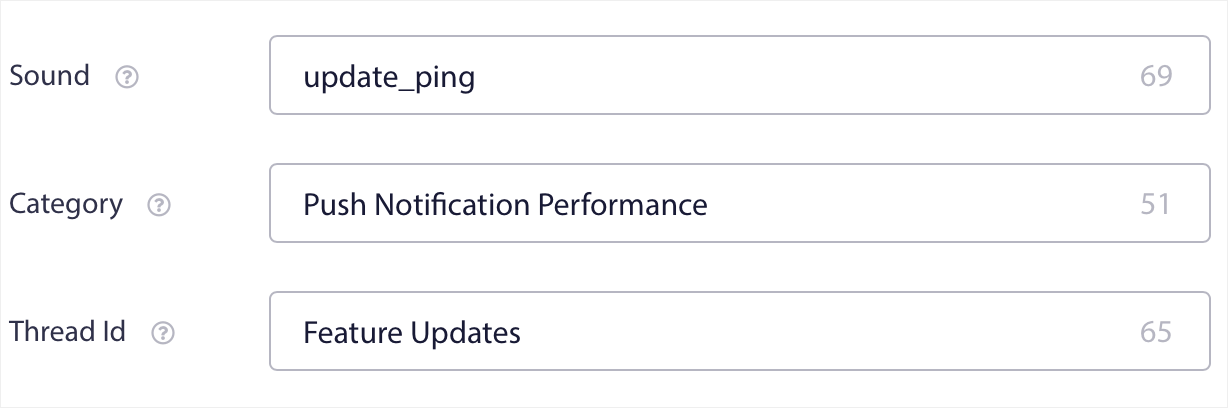
您甚至可以为该通知设置自定义徽章,显示用户收到了多少来自您应用的未读通知。
将用户重定向到您应用内或应用外的任何链接
移动应用推送具有一项称为深度链接的独特功能。深度链接就像 URL,但它们指向您应用内的某个屏幕。您可以使用来自 PushEngage 仪表板的深度链接将用户发送到您想要的任何屏幕,或者您可以将他们发送到网络上的任何常规 URL。
这意味着您可以让用户在您想要的时候打开您的应用。
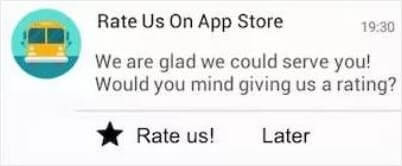
或者,甚至将他们重定向到应用商店或您的网站以留下对您应用的评价。
当然,这些只是基本想法。您可以使用这些链接来运行复杂的多步参与广告系列,无论是在您的应用内部还是外部!
How to Install Android Push Messages On Your Website
We recommend using PushEngage to get started with Android web push messages for free. Every time you publish a blog post, PushEngage will automatically send out a push notification to all your subscribers.
Let’s start growing your audience with Android push messages for free.
第 1 步:创建免费的 PushEngage 账户
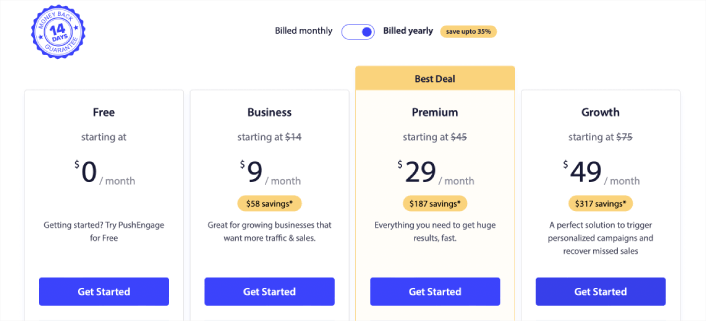
前往PushEngage并点击免费开始:
选择免费套餐或最适合你需求的套餐:
第 2 步:注册 PushEngage
使用你的用户详细信息或 Gmail ID 注册插件:
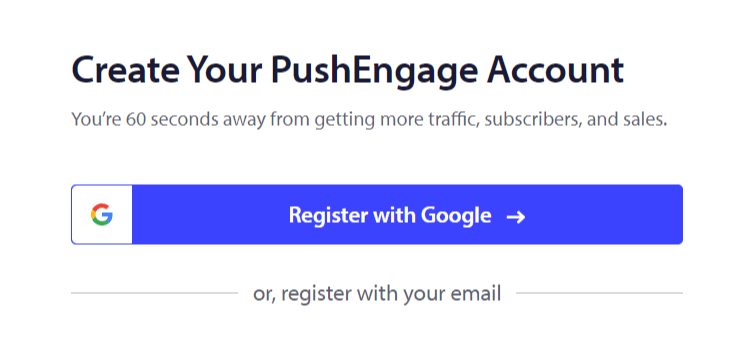
只需按照说明完成账户设置即可。
Step #3: Install the WordPress Plugin
NOTE: If your website isn’t built using WordPress, you can install Android push messages using other methods. We don’t cover those methods in this article but check out our installation guide if you’re interested.
注册后,您将进入PushEngage仪表板:

前往网站设置 » 网站详细信息:

点击 点击此处获取设置说明 按钮:

然后,点击安装 WordPress 插件按钮:

如果你已经设置了网站的 URL,PushEngage 将自动安装在你的网站上。
第 4 步:将您的 WordPress 网站与 PushEngage 连接
安装并激活 PushEngage WordPress 插件后,您将看到 PushEngage 设置向导:

该向导相当直接。如果您是新用户,请点击 新用户?认领您的免费帐户。如果您已经注册,请点击 连接您现有的帐户。
接下来,您可以在 连接已注册的网站 下的 选择网站 下拉菜单中选择您的网站,如果您在注册过程中已注册了网站:

或者,您可以点击 注册新网站 来添加新网站,如果您有 高级定价计划或更高版本。在下一步中,入门向导将提示您安装其他 必备的 WordPress 插件。

如果您正确遵循了每个步骤,您将从向导中看到此成功消息:

You are now ready to create campaigns and push notification popup modals. The best place to start is to install a web notifications WordPress plugin.
How to Send App Push Messages on Android
现在,您可以通过 PushEngage 为您的 Android 应用程序实现推送通知。只需集成一次 SDK,即可让您的营销团队能够向您的 Android 应用用户发送情境化和个性化的消息。您需要开发人员的帮助才能为您运行此程序。
Set Up a Firebase Project
Before you get started with app push notifications, you need to ensure that you have an existing Firebase account. Log in to your Firebase console, using your Google account, and click Add Project or select an existing project.

Enter a project name and click Continue. On the next screen, click Create project with your project name.

Then, click on Continue. Once Firebase is done configuring your account, you can click on Create Project.

Finally, click on the Android icon to add an Android app to the project.

Next, enter your Android app’s package name. I recommend using the name of the Android App you are trying to integrate, and click register.

Download the google-services.json file and place it into your Android app module root directory.

In the Firebase console, click the Settings icon next to Project Overview in the top left and select Project Settings.
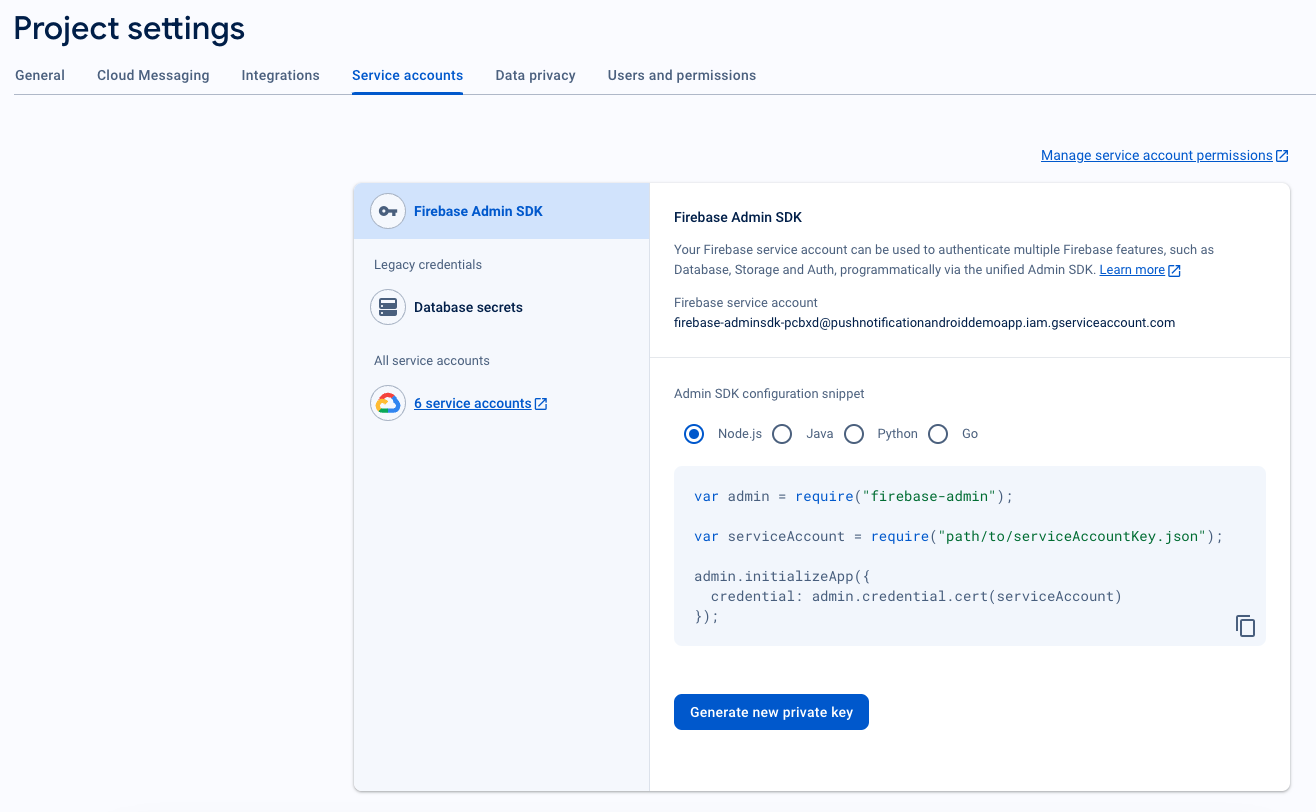
Click on Generate new private key.
IMPORTANT: Store the .json file downloaded from the previous step somewhere safe. You’ll need it to set up in the PushEngage dashboard.
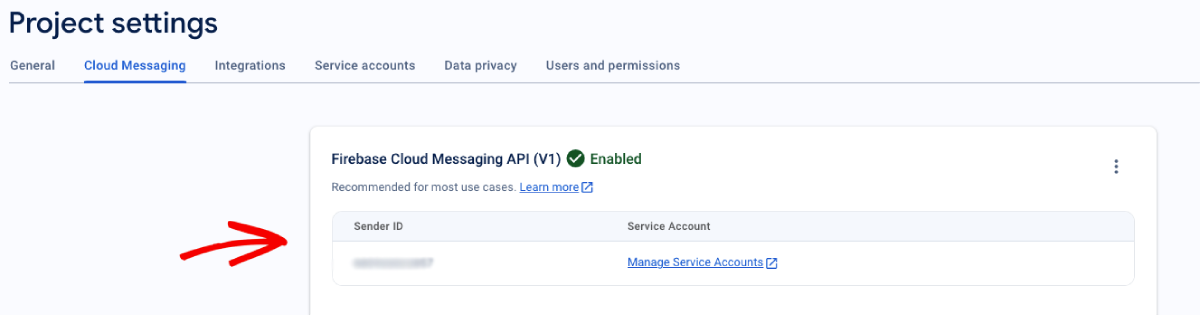
In the Firebase console, click the Settings icon next to Project Overview in the top left and select “Project settings.” Go to the Cloud Messaging tab, and find your Sender ID.
将 FCM 与 PushEngage 信息中心集成
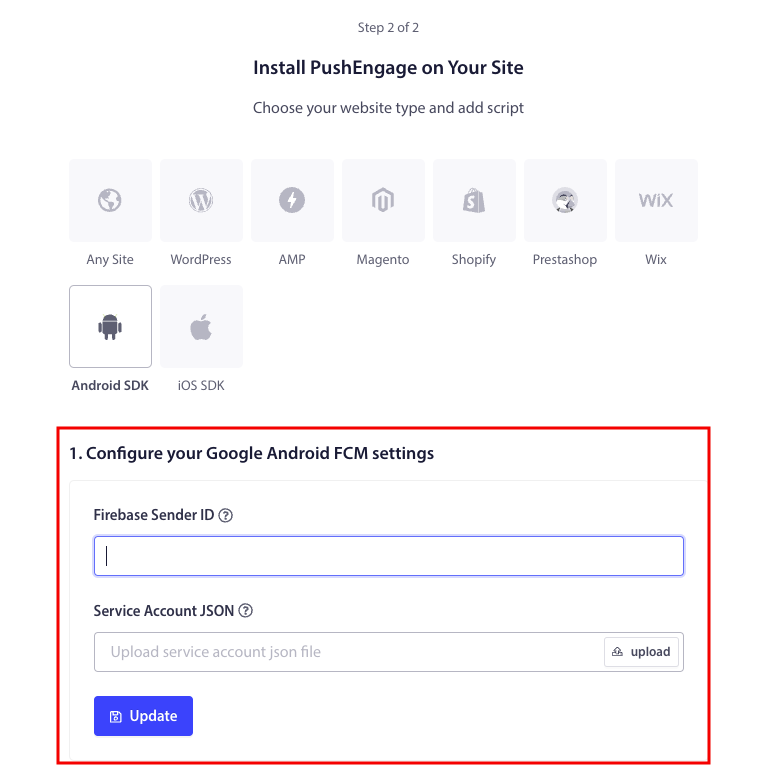
Once you have created the project in Firebase, you can then integrate the sender ID in the PushEngage dashboard. In your PushEngage account, navigate to Site Settings » Installation and select the Android SDK Tab.
Here, you can configure your Sender ID and Service Account JSON:
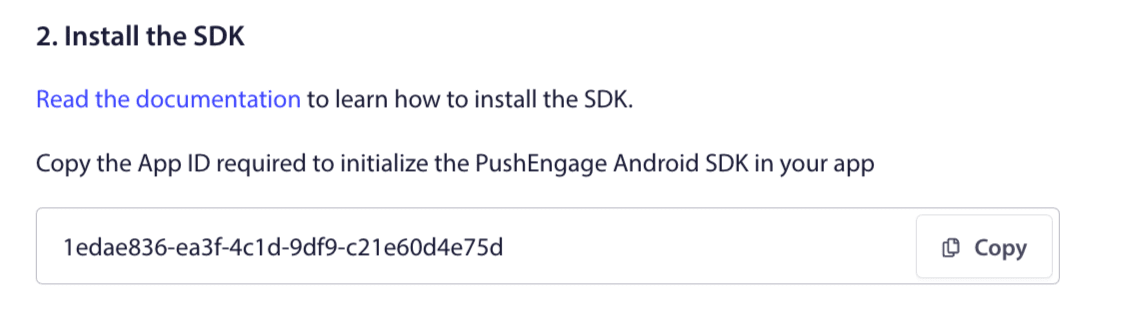
Copy the App ID required to initialize the PushEngage Android SDK in your application.
Add SDK Dependencies
Now is the time to add SDK Dependencies. We add the following line to your root build.gradle.
1. If your project is not using a centralized repository declaration, then at the project-level build.gradle file, add the following lines. Otherwise, you can skip to the second section.
// Project level build file where you can add configuration options common to all sub-projects/modules.
buildscript {
   repositories {
       google()
       jcenter()
   }
   dependencies {
       // ...
       // Add this line
       classpath "com.google.gms:google-services:4.3.10"

   }
}

allprojects {
   repositories {
      // ...
      // Check that you have the following line (if not, add it):
      google()
      maven {url 'https://jitpack.io' }
   }
}
如果您的项目使用集中式存储库声明,请将以下内容添加到您的 settings.gradle 文件中。
dependencyResolutionManagement {
    repositoriesMode.set(RepositoriesMode.FAIL_ON_PROJECT_REPOS)
    repositories {
        //add this line
        maven { url 'https://jitpack.io' }
    }
Next, in the application-level “build.gradle” file add the following:
plugins {
   id 'com.android.application'
   // Add this line
   id 'com.google.gms.google-services'
}

dependencies {
   // ...
   // Add the following lines
   implementation 'com.github.awesomemotive:pushengage-android-sdk:0.0.5'
   implementation platform('com.google.firebase:firebase-bom:26.1.1')
}
Initialize the Android Push Messages SDK
将 PushEngage SDK 初始化代码块添加到 Application 类中的 onCreate 方法。PUSHENGAGE_APP_ID 应替换为您从 PushEngage 仪表板获取的应用 ID。
Note: If your mobile application does not have a custom class extending the Application class for PushEngage, you need to create a class which extends the Application class.
Here is an example in Java:
public class PEApplication extends Application {
@Override
public void onCreate() {
super.onCreate();

// PushEngage SDK Initialization code
PushEngage pushEngage = new PushEngage.Builder()
.addContext(getApplicationContext())
.setAppId("PUSHENGAGE_APP_ID")
.build();
// The small icon is displayed on the top status bar and in the notification.
// By default PushEngage displays a bell icon, however It is recommended to
// customize this so users easily recognize notifications from your app.
PushEngage.setSmallIconResource("your_icon_name");
}
}
Here is an example in Kotlin:
class PEApplication : Application() {
   override fun onCreate() {
       super.onCreate()
       // PushEngage SDK Initialization code
       val pushEngage = PushEngage.Builder()
           .addContext(applicationContext)
           .setAppId("PUSHENGAGE_APP_ID")
           .build()
        // The small icon is displayed on the top status bar and in the notification.
       // By default PushEngage displays a bell icon, however It is recommended to
       // customize this so users easily recognize notifications from your app.
       PushEngage.setSmallIconResource("your_icon_name");
   }
}
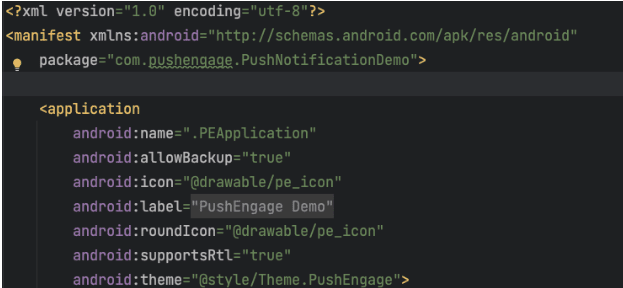
To register your custom class name, which extends the Application class, navigate into your application’s Manifest.xml file. Find the line that says “android:name=.”PEApplication”,” and swap out “PEApplication” with the name of your custom class. This is how it should look:
Once you have configured all the above steps, you can send push notifications to your Android application. Build and run the application on a physical device and send test push notifications from the PushEngage dashboard.
Handle Notification Permissions for Android 13 and Above
The Android 13 requires permission for some devices before sending them any notifications. So, if you’re running on Android 13 or above, here’s the code you need for permissions:
 @RequiresApi(api = Build.VERSION_CODES.TIRAMISU)
    private void requestNotificationPermissionIfNeeded() {
        int permissionState = ContextCompat.checkSelfPermission(this, android.Manifest.permission.POST_NOTIFICATIONS);

        if (permissionState == PackageManager.PERMISSION_DENIED) {
            ActivityCompat.requestPermissions(this, new String[]{android.Manifest.permission.POST_NOTIFICATIONS}, 100);
        }
    }
You can handle the result of the notification permission prompt:
@Override
    public void onRequestPermissionsResult(int requestCode, String[] permissions, int[] grantResults) {
        super.onRequestPermissionsResult(requestCode, permissions, grantResults);
        if (requestCode == 100) {
            if (grantResults.length > 0 && grantResults[0] == PackageManager.PERMISSION_GRANTED) {
                PushEngage.subscribe();
            } else {
                Log.d("MainActivity", "onRequestPermissionsResult: Permission denied");
            }
        }
    }
And that’s it! You’re done. You can now head back to the PushEngage dashboard and send Android push messages directly from the same dashboard.
If you want to explore our Android SDK a little bit more, you can go through our detailed API documentation.
How Do Android Web Push Messages Work?
Let’s get a little bit technical now and explore how Android web push messages work.
The simplified version is that every time a new visitor enters your website, they get prompted to become a push notification subscriber.
Next, you use a web push notification service like PushEngage to create and schedule the Android push messages you want to send out to your subscribers. You can choose to either send it to every subscriber on your list or to specific segments of your subscribers.
您需要先创建一个滴灌自动回复器:
Finally, your subscribers receive your push messsges when their device comes online and take the suggested action.

这一切都是完全正确的,但这只是后台发生的一部分。所以,让我们来看看技术细节。但首先,如果您还没有,请立即开始使用 PushEngage。
First off, PushEngage has servers that connect to your subscriber’s devices and send them your Android push messages. Now, these servers don’t store any personal information such as the name or email address of any subscriber.
那么,这些服务器存储了什么?
对于 PushEngage 和我们的服务器来说,您的订阅者是基于订阅者的设备和浏览器生成的唯一哈希号。此外,服务器还可以存储订阅者的地理位置。
现在,您将无法直接访问这些服务器。您只能使用 PushEngage 仪表板来创建、优化和管理推送通知广告系列。
In other words, PushEngage is your service provider. This means that you don’t need to know anything about coding or how to maintain the original servers. We take care of all that for you. All you have to worry about is setting up your campaigns and making a profit!
By now, you’re probably wondering how personalized push notifications work if the servers only store a hash number and no personal details. This is where the service provider API comes into play. For you, that would be the PushEngage Javascript API.
You can use this API and connect it to any other CRM or database you might have. This allows you to use the personal details of your subscribers to send them personalized Android push messages.
您还可以使用 PushEngage API 发送高级广告系列,例如 购物车放弃广告系列。
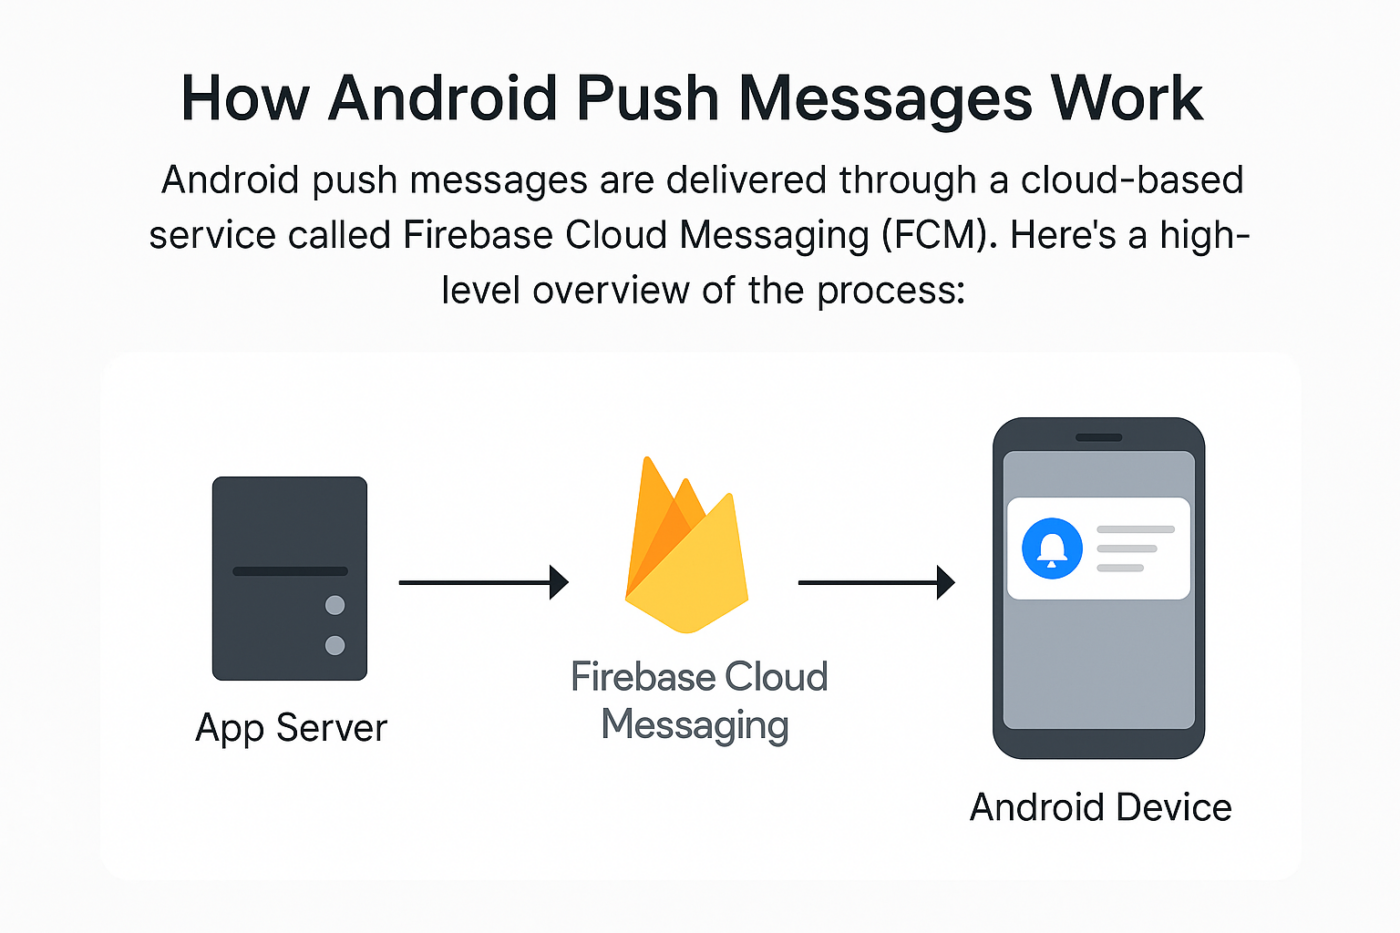
How do Mobile Android Push Messages Work?
Android push messages are delivered to users via a service called Firebase Cloud Messaging (FCM). Here’s what happens behind the scenes when your app sends a push notification:
Step #1: User Installs Your App
When a user downloads and opens your app, the app registers with Firebase Cloud Messaging (FCM) and gets a unique device token.
Step #2: Your Server Prepares a Notification
Your backend (or notification provider like PushEngage) creates a message along with rich media and selects the user(s) to receive it. It also sets up full-scale automation processes for each push message.
Step #3: PushEngage Sends It to FCM
The notification is sent to Firebase Cloud Messaging, which acts as a middleman between your server and the user’s phone.
Step #4: FCM Delivers to Android Device
FCM securely routes the push message to the user’s Android device—even if the app is closed.
Step #5: User Sees the Notification
The Android OS displays the push notification in the status bar, lock screen, or as a banner, depending on the device settings.
What Are the Different Parts of Android Push Messages?
Now that we understand how Android push messages work, let’s a look at the different parts of a push notification that you can customize (or can’t):
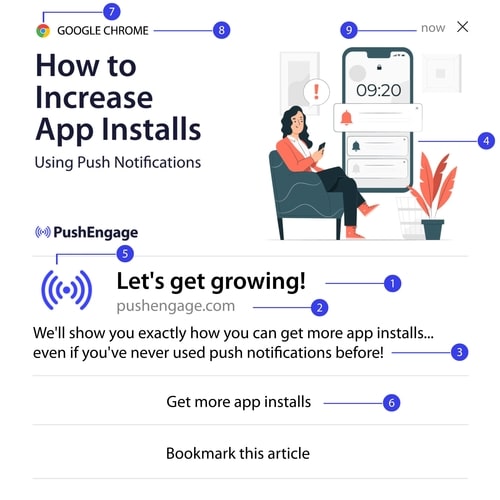
1. 推送通知标题
标题是推送通知中最突出的文本。为了清晰可见,它限制在 60-80 个字符。此标题的目的是吸引订阅者的注意力。因此,让整个标题清晰可见非常重要。
查看我们的 推送通知文案指南,创建您的订阅者会喜欢的杀手级标题。
2. 域名
The domain of a push notification is just the URL of your website. You can’t change this either. But unlike the browser icon, your domain needs to be clearly visible as it adds to your brand recognition.
现在,您可以选择将推送通知数据存储在 PushEngage 的子域上。如果您使用子域,那么此推送通知部分将显示 PushEngage 子域的 URL,而不是您的品牌。
我们不建议使用此选项,因为它会降低您的品牌价值。
3. 推送通知内容
通知内容包含整个通知中最大部分的文本。为了可见性,它像标题一样限制在 120-150 个字符。虽然您可以输入更多字符,但我们建议保持简洁。
Typically, this part serves as a way to offer more context about the title or to complete an offer. Don’t bother using a call to action in the text itself. With push notifications, you can add call-to-action buttons.
专业提示:您可以使用当地语言使您的推送通知感觉更个性化。阅读这篇关于 Phooto 如何在推送通知中使用当地语言 来提高参与度的案例研究。
4. 通知大图
大图是万众瞩目的焦点,也是您在任何通知中首先看到的东西。它通常是一张 360×180 的图片,是推送通知中最具吸引力的部分。
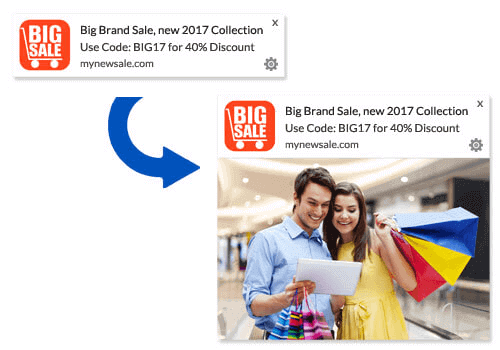
通知图片也是完全可选的。如果您愿意,可以选择不使用。使用通知图片会让您的推送通知感觉像广告。这可能导致许多订阅者忽略该通知。
但如果做得好,图片可以将点击率(CTR)提高高达 62%。查看我们关于 图片在推送通知中的行业影响 的研究。
如果您不确定是否应使用大图像,我们建议您对通知进行A/B测试,分别测试有无图像的效果。
#5. 推送通知图标
The push notification icon is like the site icon on your website, but for your push campaigns. It’s an image that’s 192×192 or larger to represent your business. Typically, this will be your site icon and you can only set this one time for all your Android push messages.
专业提示:如果您在任何时候进行品牌重塑,请记住也要在PushEngage中更改推送通知图标。另外,请记住您不能为图标使用动画图像。因此,GIF在这里不起作用。
#6. 行动号召按钮
每个推送通知最多支持2个按钮。我们建议为您的广告系列使用自定义的行动号召按钮。您甚至可以为每个CTA添加单独的URL和按钮图标。
查看此网络推送通知技巧列表,以获取一些不错的CTA创意。
#7. 浏览器图标
推送通知中最小的部分是浏览器图标,它表示订阅者当前正在使用的浏览器。这是最容易被忽略的部分之一,因为您无法以任何方式更改它,而且在大多数情况下,订阅者也不会注意到浏览器图标。
#8. 浏览器标签
浏览器标签只是浏览器图标的文本版本。与图标一样,您无法更改浏览器名称标签。
#9. 时间戳
时间戳是一种简单的方式,供您的订阅者了解消息何时收到。它是系统生成的,您也无法更改。
推送通知选择加入的不同类型
Every web push notification campaign begins with consent. It’s an extension of Seth Godin’s idea of permission marketing. The idea is very simple: before you send your web visitors any content that they may or may not want to see, ask for permission.
The process of getting permission to send any push notification is called “opting in”. So, before you can send out a push notification campaign, you first need your website visitors to opt-in and subscribe to your notifications.
如果您是YouTube的内容创作者,那么您已经熟悉订阅者如何工作。唯一的区别是,您不拥有YouTube订阅者列表,也无法控制发送给他们的通知。
With PushEngage, you do own that list because that information is stored on your domain. Now, there are two types of opt-ins you can use for your website:
- 单次选择加入
- 双重选择加入
The primary difference between them is very clear. Single opt-ins ask for permission to send push messages only once. Double opt-ins ask each subscriber to confirm their decision.
So, which one should you choose?
We’ve observed that single opt-ins can get up to 150% more subscribers than double opt-ins. Check out our article on how to increase your opt-in rate if you’re struggling with this.
从法律角度来看,GDPR 要求您只能使用单次确认。但通过双重确认,您可以获得更好的参与度,因为您的订阅者实际上想要更多您的内容。不过,就纯粹的确认数量而言,单次确认更有效。
另一个需要考虑的点是,您需要在网站上安装 SSL 证书才能使用单次确认。但即使没有安全网站,您也可以安装双重确认。
因此,如果您安装了 SSL 证书,请使用单次确认。如果没有,请查看这篇关于如何在 WordPress 网站上安装 SSL 证书的文章。
NOTE: You don’t need an opt-in for app push notifications unless you’re using Android 13 or above.
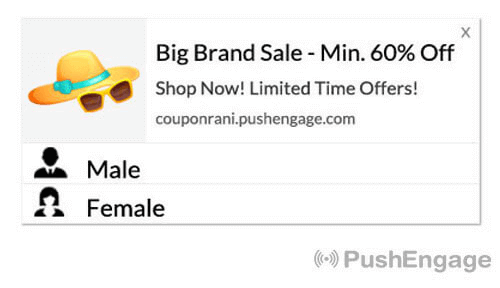
How to Personalize Your Android Push Messages
在创建广告系列之前,您应该设置细分和受众群体,以发送个性化的推送消息。
通过为您的推送通知订阅者创建细分和受众群组,您可以获得无与伦比的个性化体验。前往 PushEngage » 受众 并立即开始创建细分和受众群组。
在 Segments 选项卡下,您可以创建新细分或编辑现有细分:

如果您需要更深入的个性化设置,请在 Audience Groups 选项卡中创建一个受众群体:

如果您是首次接触推送通知细分和 个性化推送通知,建议您阅读我们的文章 如何创建细分 以及关于 高级受众分组 的公告。
How to Create Targeted Android Push Messages
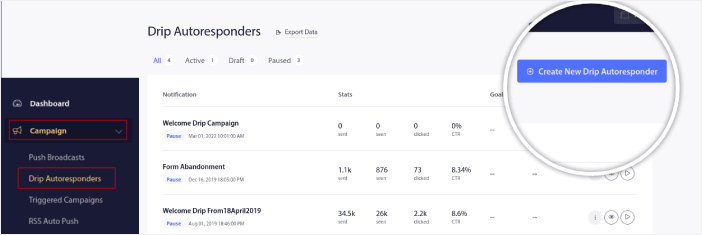
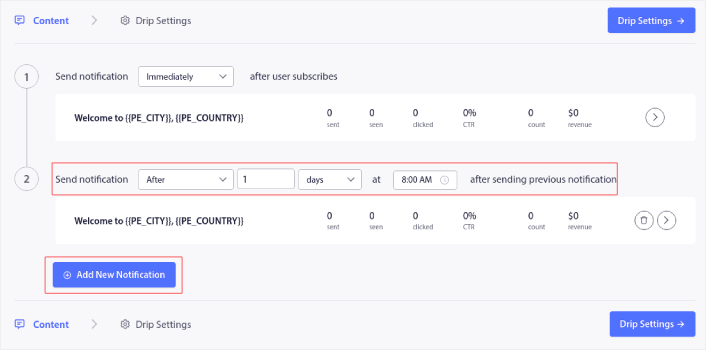
转到PushEngage仪表板,然后导航到广告系列 » 滴灌自动回复器,然后点击创建新的滴灌自动回复器:

然后,为您的广告系列命名(我们建议使用类似“欢迎滴灌”的名称),然后在内容下,选择显示“用户订阅后立即发送通知”的选项):

此时,您可以点击通知旁边的箭头来编辑通知内容。
如果您拥有 PushEngage 的高级或企业版套餐,您将能够添加多个通知来创建一系列自动欢迎消息。只需点击添加新通知并编辑内容。
完成后,点击邮件序列设置并选择将您的欢迎广告系列发送给所有订阅者的选项:

然后,向下滚动以设置您自己的 UTM 参数以跟踪推送通知:

完成后,滚动回顶部并点击激活自动回复器按钮:

您就完成了!
How to Send Targeted Android Push Messages
Head over to your PushEngage dashboard, go to Campaign » Push Broadcasts, and click on the Create a New Push Broadcast button:

在 **Content** 选项卡下,添加您的推送通知内容:

您还可以设置 A/B 测试以提高您的点击率,或者您可以安排您的推送广播以获得更多浏览量。无论哪种情况,您都应该查看我们的推送通知最佳实践以获得最佳效果。
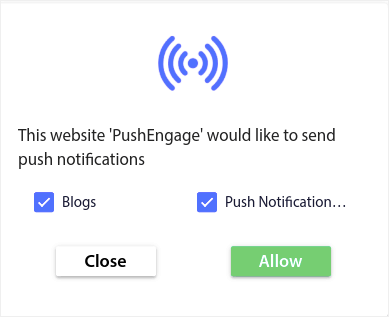
How to Create Android Push Messages Popup Modals
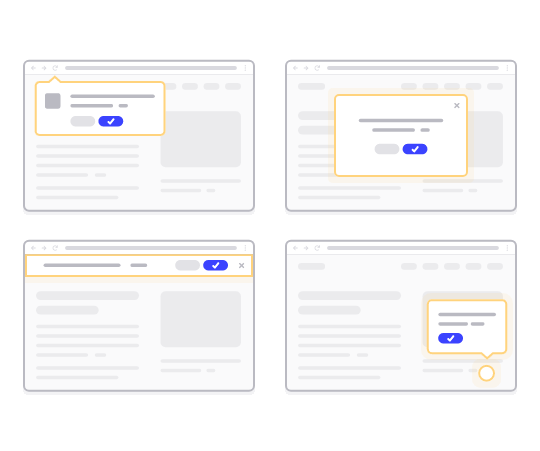
A push notification pop-up modal is a small window that appears on top of a website or mobile app interface to display a message or notification to the website visitor.
弹出窗口可以由各种事件触发。您可以设置在访问页面、滚动深度甚至自定义操作(例如 点击按钮)时触发的弹出窗口。
Usually, you’ll see a call to action on the pop-up modal, such as “Subscribe” or “Allow” to get consent from visitors to send Android push messages. If you follow this tutorial, you can create a popup like this one:
您可以创建可以直接细分订阅者的弹出窗口,或者创建仅收集具有地理位置和浏览器等默认属性的订阅者的常规弹出窗口。
返回您的 WordPress 仪表板。转到 PushEngage » 设计:
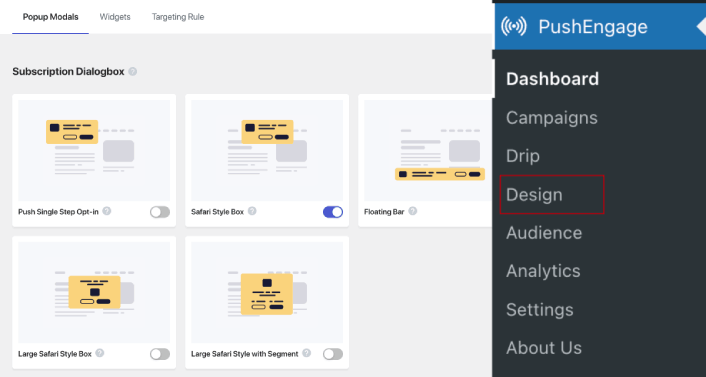
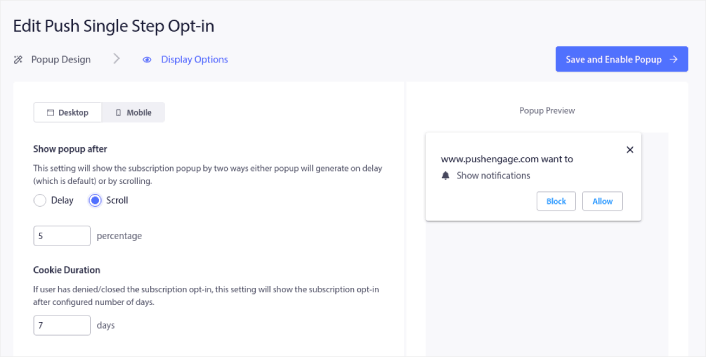
And you can set up as many pop-up modals as you please. Of course, you can make sure that they get triggered at different times under Display Options for each popup modal.
这里的想法是为您的访问者提供订阅的充分理由。如果您需要这方面的帮助,请查看我们关于 如何创建自定义推送通知选择加入的文章。
And if you want to create more targeted pop-up modals, you can use the targeting rules under the Targeting Rule tab:
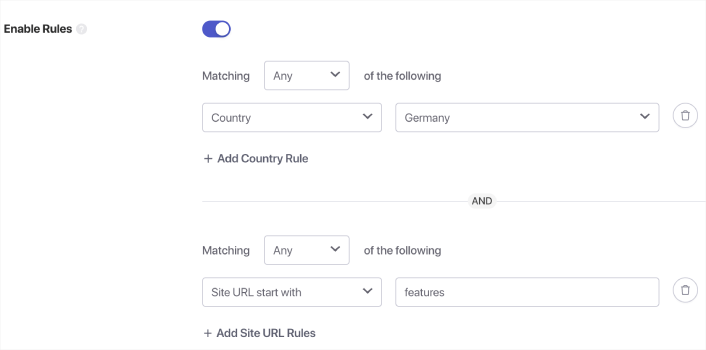
这些是全局目标规则,将优先于单个弹出窗口的目标规则。但是,如果您愿意,可以通过编辑它们为每个弹出窗口创建强大的目标规则。
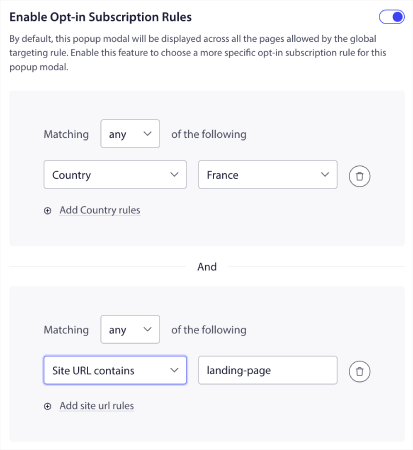
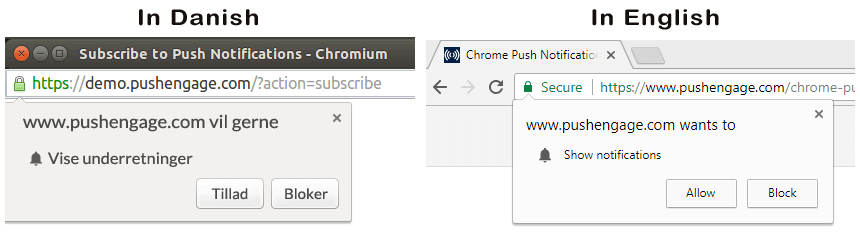
例如,您可以创建不同语言的弹出窗口,以定位来自不同国家的访问者。
如果您想要一些点击率高的模板来开始,您应该查看这篇关于 高转化率的推送通知选择加入的文章。
What to Do Before You Send Targeted Android Push Messages
您已接近完成。
在开始发送推送通知之前,您需要为您的网站设置订阅选择加入。您的选择加入将把网站访问者转化为推送通知订阅者。因此,这是一个关键要素。
如果您需要一些灵感,可以查看这篇关于高转化率的推送通知选择加入的文章。设置好选择加入后,您的网站就可以收集订阅者了。但您怎么知道您的选择加入是否正常工作呢?
因此,明智的做法是设置欢迎推送通知。
专业提示:您应该花一些时间对推送通知进行全面测试。这将解决最常见的问题,并且您不必浪费时间以后再解决问题。
What to Do After You Send Android Push Messages
好了,各位,本次分享就到这里!
如果您觉得这篇文章有帮助,请务必在下方留言。
Getting started with Android push messages can seem intimidating. But if you keep an eye on goal tracking and analytics, you should be fine. More importantly, you’ll make a lot more profit with the help of push notification campaigns. Here are a few cool resources to get you started:
- 如何使用重定向推送通知将收入翻倍
- 如何对推送通知进行排序并找到成功的营销活动
- 如何清理推送通知订阅者列表(简单方法)
- 如何自动发送 RSS 推送通知
- 如何使用推送通知推广新闻网站
- 如何使用交叉销售推送通知将您的销售额提高一倍
- 如何使用浏览放弃推送通知(4 个步骤)
如果您是推送通知的新手,您应该尝试 PushEngage。PushEngage 是市场上排名第一的推送通知软件。您的营销活动将得到妥善处理。
所以,如果您还没有,请立即开始使用 PushEngage!


