
If you’re selling to a global audience, there’s one silent revenue leak you’re probably not tracking: customers reaching out when no one is available to reply.
- Miss a question from a shopper in New York while your team is asleep in Bangalore? Lose a sale.
- Miss a lead from Sydney because your agents are offline? Lose a booking.
- Miss a support request from London while your team is at lunch? Lose trust.
PushEngage’s new Agent Availability Schedules for WordPress and WooCommerce solve this by giving you a simple way to ensure someone— from any time zone — is always “available” in the chat widget.
In this guide, we’ll walk through:
- Why agent scheduling is critical when selling internationally
- How PushEngage’s availability features work
- A practical system to cover global time zones with a small team
- A full tutorial on how to set up agent schedules inside WordPress
- Tips to maximize conversions and customer satisfaction
让我们开始吧。
立即发送多渠道消息!
推送和 WhatsApp 消息是非常有效且低成本的营销工具,可帮助您自动增加重复流量、参与度和销售额。
Why Agent Scheduling Matters for Global Stores
Visitors make decisions quickly—especially on mobile. When they see “Agent Online”, they’re far more likely to ask pre-purchase questions, request support, or book a demo.
But when they see “All Agents Offline”, two things happen:
- Drop-offs increase — users don’t want to wait.
- Support tickets increase — you get more emails instead of live chat questions.
Proper scheduling solves all of that by:
- Matching agent availability with customer behavior
- Ensuring coverage across multiple time zones
- Eliminating silent gaps in your support cycle
- Improving the perception of 24/7 service
- Routing questions to the right person at the right time
Even if you only have 2–3 agents, a smart schedule can create the effect of 24/7 availability.
How PushEngage’s Agent Schedules Work
With PushEngage’s new WordPress & WooCommerce chat widgets, each agent can set:
- Workdays (e.g., Mon–Fri, or custom days)
- Work hours (with timezone settings)
- Time zone (critical if you have a distributed team)
- Role-based profiles (Sales, Billing, Support, etc.)
- Automatic offline handling (show an offline message when no one is available)
Once schedules are configured:
- The widget automatically displays whichever agent is currently “Online”
- If multiple agents are online, visitors can choose
- If no one is online, your offline fallback message appears
This makes your chat widget feel dynamic, intelligent, and always ready.
简单的时区覆盖计划(即使是小型团队)
Here’s an example schedule for a team of three agents in different time zones:
| 客服 | 地点 | 工作时间(当地) | 近似全球覆盖范围 |
|---|---|---|---|
| A | 印度(IST) | 上午 9 点 – 下午 5 点 | 亚太地区 + 欧洲早期 |
| B | 欧洲(CET) | 上午 8 点 – 下午 4 点 | 欧洲 + 美国早期 |
| C | 美国(EST) | 上午 9 点 – 下午 5 点 | 覆盖整个美国 + 欧洲晚期 |
有了这个结构:
- 欧洲几乎全天都有覆盖
- 美国上午的覆盖时间与欧洲晚上的覆盖时间重叠
- 亚太地区上午的覆盖时间与欧洲上午的覆盖时间重叠
- 您将自动获得约 18-20 小时的每日实时覆盖
小团队 → 大范围覆盖。
现在,让我们在您的网站上进行设置。
如何在 PushEngage 中设置座席日程(WordPress 教程)
本节将引导您逐步完成 PushEngage 内部的实际设置。
步骤 1:打开您的 WordPress Dashboard 并转到 PushEngage
- 登录 WordPress
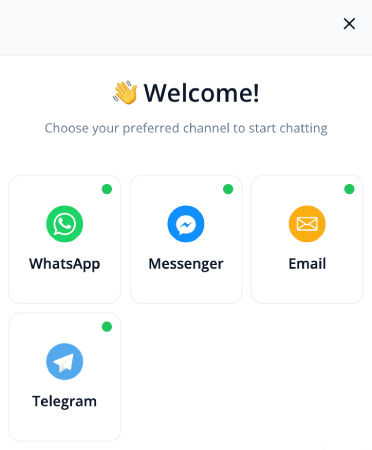
- 导航至:PushEngage » Chat Widgets,然后点击 创建新的聊天小部件
- 将渠道添加到您的聊天小部件,然后向下滚动到 已启用渠道
- 点击渠道旁边的编辑图标以更新客服详细信息
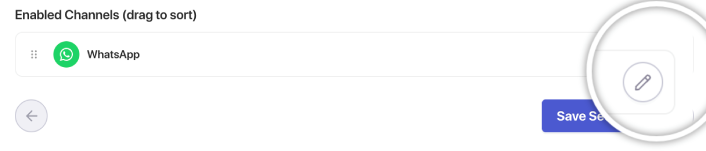
这是您的客服列表所在的位置。
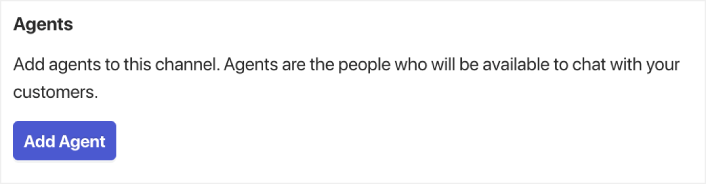
步骤 2:添加或编辑座席
点击添加客服或选择现有客服进行编辑。
每个客服档案都包含:
- 客服姓名
- 客服照片
- 职位(销售、支持、账单等)
- 联系偏好(实时聊天、WhatsApp、电子邮件等)
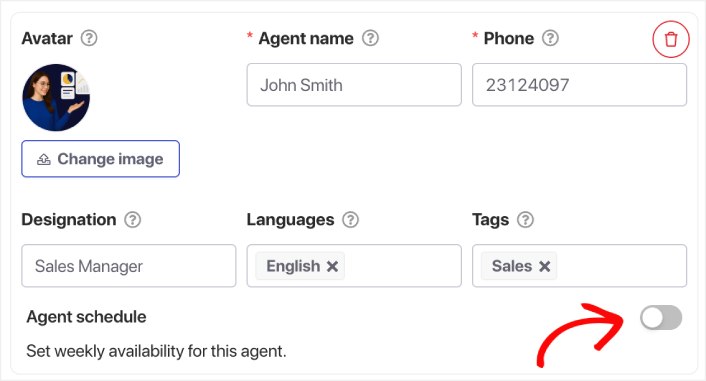
向下滚动到客服日程部分,然后打开切换按钮。
PRO TIP: You can select languages for each agent as well. So, if you need to offer multilingual chat support, the option’s right there and it’s super easy to set up.
Step 3: Choose the Agent’s Time Zone
This is critical for global coverage.
选择客服的当前时区,而不是您自己的时区。
示例:
- IST 代表印度
- EST 或 CST 代表美国团队
- GMT 或 CET 代表欧洲团队
这可确保他们的日程在正确的时间激活。
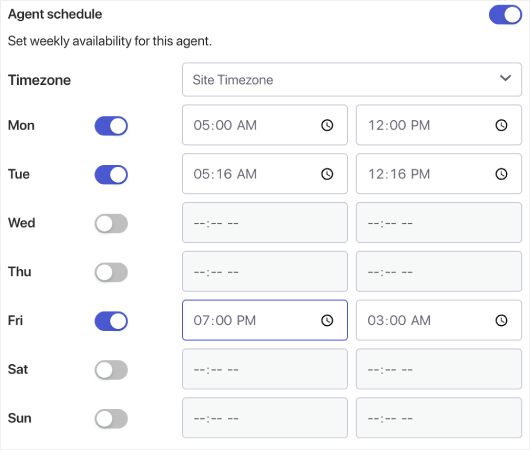
Step 4: Set the Days They Work
Select the days the agent should be shown as “Online”:
- Monday–Friday
- Weekends only
- Custom combinations
- Split shifts
PushEngage allows full flexibility.
Step 5: Add Working Hours
Under the Work Hours section:
- Enter start time (e.g., 9:00 AM)
- Enter end time (e.g., 5:00 PM)
You can also:
- Create multiple time blocks (e.g., split shift: 9–1 and 4–9)
- Adjust for seasonal hours
- Add exceptions for special dates
PushEngage converts these into your widget’s availability in real time.
Step 6: Save and Repeat for All Agents
设置好日程后,点击保存客服。为每个时区的每个客服重复此操作,以完成覆盖图。
Step 7: Test the Widget
Important step.
- Open your site in an incognito window
- Change your device/system time zone
- Observe which agent shows up
This confirms your schedules are firing correctly.
最大化全球覆盖的最佳实践
✔ 创建重叠的窗口
至少有 1-2 小时是两名客服的日程重叠。这可以实现更顺畅的交接,并减少离线时间。
✔ 添加离线备用消息
这可以是一个潜在客户表单、电子邮件捕获或 WhatsApp 聊天选项。
✔ 根据时区分配角色
- 亚太地区客服负责早期时段的销售
- 欧盟客服负责一般支持
- 美国客服负责账单 + 晚间支持
✔ 不要尝试手动实现 24/7 全天候服务
智能日程安排看起来自然;强制安排会破坏信任。
✔ 查看聊天模式
检查访客最常发起聊天的时段,并据此调整排班。
一次设置,自动覆盖所有时区
With PushEngage’s Agent Availability Schedules, you can simulate near-24/7 coverage without hiring a massive team.
- 客户始终能看到有人在线
- 响应时间缩短
- 售前转化率上升
- 支持感觉更快、更可靠
- 您的商店感觉已准备好面向全球
一旦设置好时间表,您的团队就可以更高效地运作,您的客户也能获得他们期望的体验。
如果您还没有在 PushEngage 中设置客服资料和排班,现在就是时候了。
不信?查看这些关于推送通知活动的精彩资源:


