
Looking for a tutorial on how to create an expense approval form in WordPress?
An expense approval form is a superb tool to streamline and monitor company expenditures. But, you might wonder, how do you craft one? Is it worth designing an expense form from the ground up?
The straightforward scoop? Probably not. You can whip up a WordPress expense approval form with a form plugin in significantly less time than starting from zero. And if you’re no tech whiz, leaning on a plugin is will likely be much kinder on your wallet too.
But hold on! The plugin universe is vast. So, which one should you choose?
In this article, we’re going to show you step by step how to create your own expense approval form in WordPress. The best part? You’ll be done in 10 minutes and you don’t need to write a single line of code.
Hadi başlayalım.
Why You Need an Expense Approval Form in WordPress
Incorporating an expense approval form into your WordPress website streamlines the way you manage, monitor, and authorize company expenditures. It becomes an essential tool for maintaining financial discipline and transparency in your organization.
PushEngage, dünyada 1 numaralı anlık bildirim eklentisidir. Ücretsiz alın!
Through a clear format like, “What’s the purpose of this expense?” or “Attach your expense receipt here”, you can maintain a consistent record of every penny spent. Expense forms can categorize expenses based on their nature like travel, supplies, or entertainment, ensuring clarity in documentation.
Often, expense approval forms also allow a section for notes or clarifications. This section provides valuable context to approvers, making sure there are no ambiguities when it’s decision time.
By routinely processing expenses through this system, you’re creating a clear financial trail. This periodic review ensures that expenses align with company policies and budgets. Plus, it’s a quick way to spot any irregularities or misuse.
The insights you gather can lead to tangible policy improvements. Over time, you might spot patterns – maybe your team frequently overspends in one area or there are recurrent unjustified expenses. This can guide policy updates or staff training.
To integrate an expense approval form into your WordPress platform, you can use specific plugins or incorporate forms from external finance tools. Ensure your form is straightforward, intuitive, and easily accessible to those who need it.
In essence, expense approval forms in WordPress help synchronize company spending with financial guidelines, ensuring budget adherence and fiscal responsibility.
How to Create an Expense Approval Form in WordPress
Now that you know why you should be creating your expense approval form, it’s time to start building one for your site. To create your expense approval form, we’re going to use a super popular form builder plugin for WordPress called WPForms.
Başlayalım.
Adım #1: Yeni Bir WordPress Formu Oluşturun
Yapmanız gereken ilk şey WPForms'u kurmak ve etkinleştirmektir.

WPForms, dünyanın 1 numaralı WordPress form oluşturucu eklentisidir. WPForms'u nasıl kuracağınızdan emin değilseniz, WordPress'e eklenti nasıl kurulur hakkındaki bu adım adım kılavuza göz atmalısınız.
Ardından, WPForms kontrol panelinize gidin ve eklentinizi almak için İndirilenler bölümüne gidin:
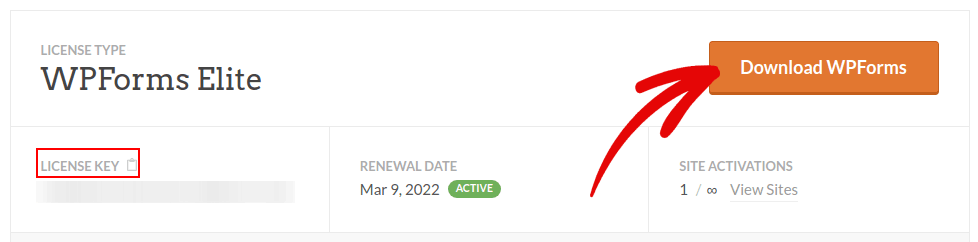
Ardından, eklentiyi sitenize kurun ve etkinleştirin. Lisans anahtarınızı aynı sekmeden kopyalayın.
Son olarak, WordPress kontrol panelinize gidin ve WPForms » Ayarlar bölümüne gidin ve Lisans Anahtarınızı buraya yapıştırın:
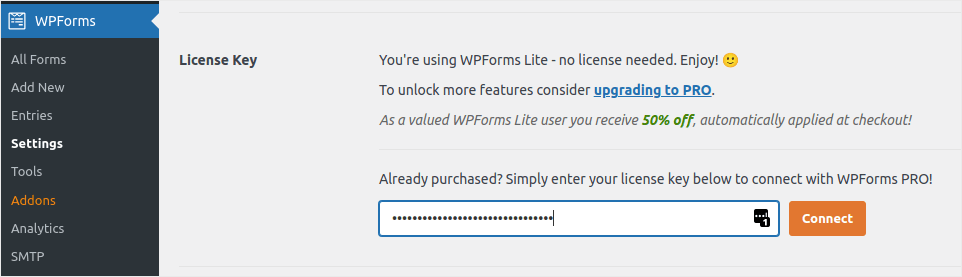
İşiniz bittiğinde Bağlan'a tıklayın.
Step #2: Add the Right WPForms Addons
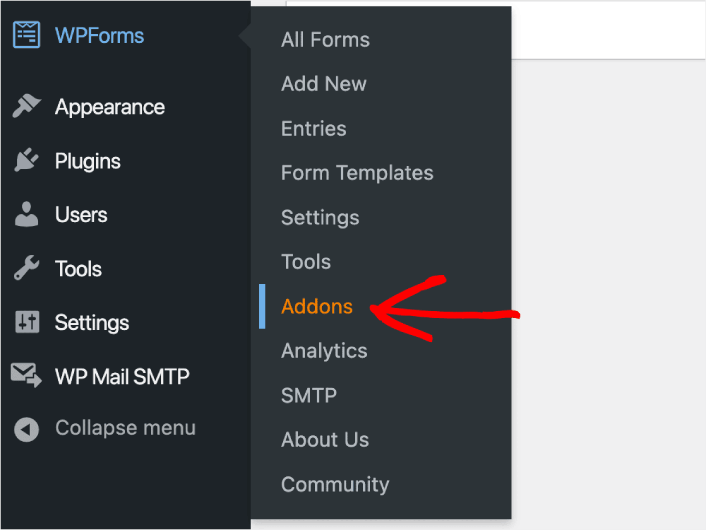
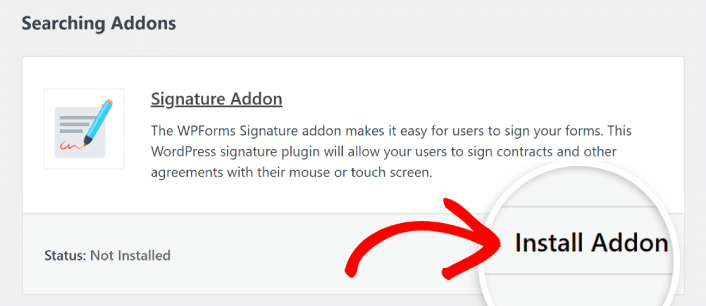
WordPress kontrol panelinizden WPForms » Eklentiler bölümüne gidin.
Now, search for the Save and Resume Addon by typing its name in the Search Addons field. Next, click on Install Addon.
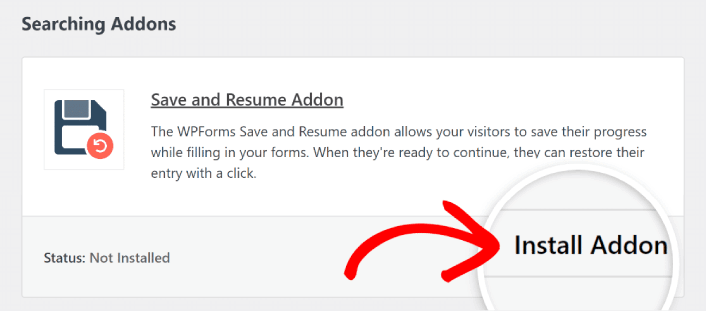
After the addon has been installed successfully, press the same button again to Activate it. And do the same thing for the Signature Addon.
WPForms yüklendi ve etkinleştirildiğine göre, ilk formunuzu oluşturma zamanı. WPForms » Yeni Ekle bölümüne gidin:

Bu, WPForms sürükle ve bırak form oluşturucusunu açacaktır.
Step #3: Select Expense Approval Form Template
Yeni bir form oluşturmak için ona bir ad verin ve form şablonunuzu seçin:
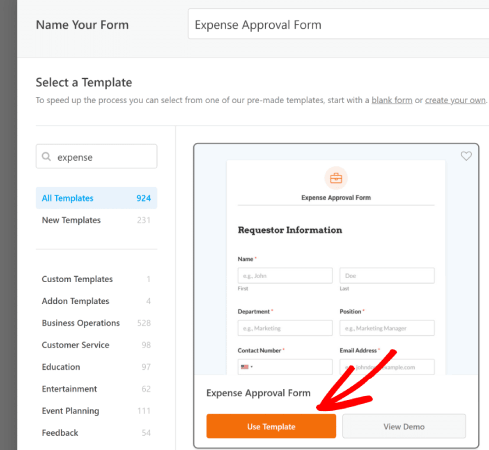
WPForms ile, tek bir tıklamayla içe aktarabileceğiniz ve ardından istediğiniz gibi özelleştirebileceğiniz çok sayıda önceden tasarlanmış form şablonu elde edersiniz. Tüm özellikler listesine daha yakından bakmak için WPForms incelemize göz atmalısınız.
Step #4: Customize Your Expense Form
Ardından, şablonunuz yüklenmiş olarak form oluşturucuya yönlendirileceksiniz.
Müşterilerinizden geri bildirim toplamak için şablonu olduğu gibi kullanabilirsiniz. Ancak, müşterilerinizden daha fazla ayrıntı ve içgörü toplamak için ek alanlar eklemek isterseniz bu şablonda değişiklik yapmaktan çekinmeyin.
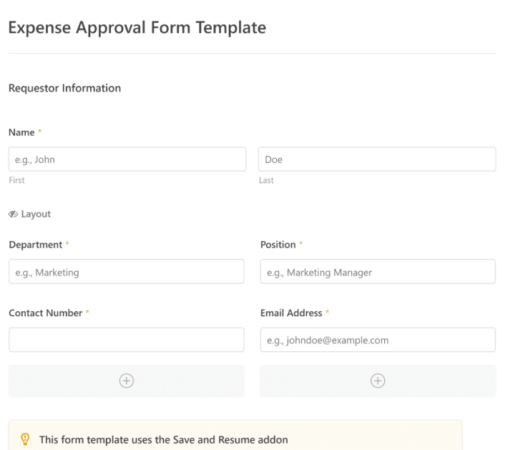
You’ll notice that this template is built with fields that automate capturing the requestor’s information, expense details, and approval via Signature.
If required, you can use WPForms’ intuitive form builder to easily add, modify, and arrange fields to tailor the form to your liking.
Ayrıca WordPress'te çok adımlı bir formun nasıl oluşturulacağına dair gönderimizdeki adımları izleyerek formların harika görünmesini sağlayabilirsiniz. Kullanıcı deneyimini iyileştirmenin ve sepeti terk etme oranlarını azaltmanın harika bir yoludur. Ancak bu eğitim için tek bir sayfayla devam edeceğiz.
Step #4: Enable Save and Resume Settings
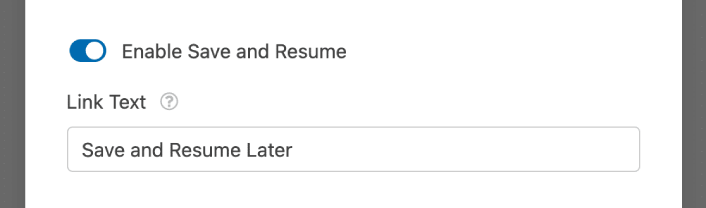
First, you’ll want to add the Save and Resume feature to your expense approval form. Go to Settings » Save and Resume from the form builder. To turn on save and resume functionality, toggle on the Enable Save and Resume option.
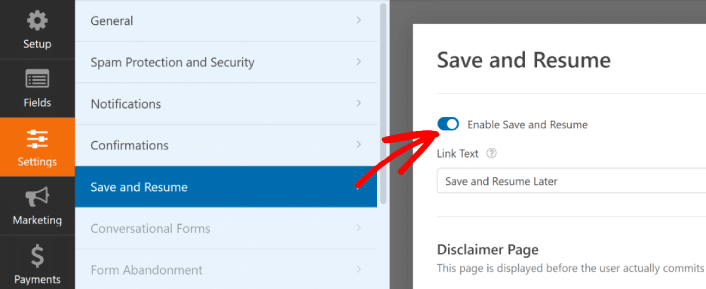
To begin, you can personalize the wording on the link that users will click to save their progress in your form.
You can change the text in the supplied field. By default, it says Save and Resume Later, but you can change it to anything you like.
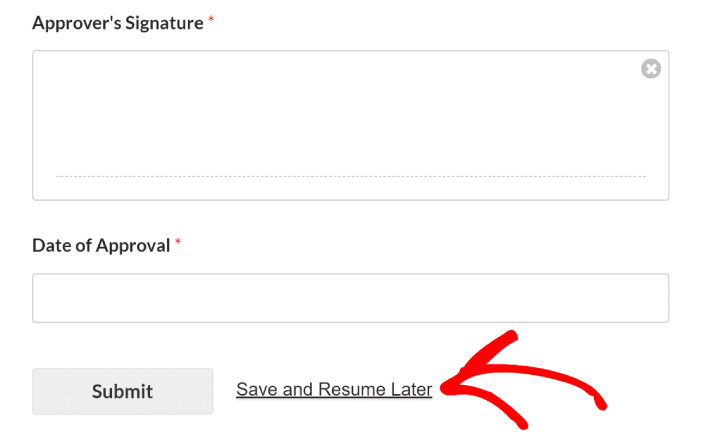
This link will show up at the bottom of your form, next to the button labeled Submit.
NOTE: The resume URLs will stop working after 30 days. So, make sure to add a disclaimer on your form that mentions this fact.
Step #5: Configure Your WordPress Expense Approval Form Settings
Ardından, bildirimleri ve onayları ayarlamak isteyeceksiniz.
Bildirimler, biri formu doldurduğunda aldığınız e-postalardır. Onaylar, kullanıcıyı formu başarıyla doldurdukları konusunda uyarmak içindir. Genellikle bu bir "Teşekkürler" mesajıdır, ancak kullanıcılarınızı özel bir sayfaya da yönlendirebilirsiniz.
Onay ayarlarını yapılandırmak için Ayarlar » Onaylar bölümüne gidin:

Ardından, aynı menüde bildirim iletilerinizi yapılandırmak için Bildirimler'e gidin:

Varsayılan olarak, bildirimler WordPress yönetici e-postasına gönderilir. Bu nedenle, e-postaların Satış Direktörünüzün e-posta kimliği gibi başka bir yere gönderilmesini istiyorsanız, bunu buradan yapabilirsiniz.
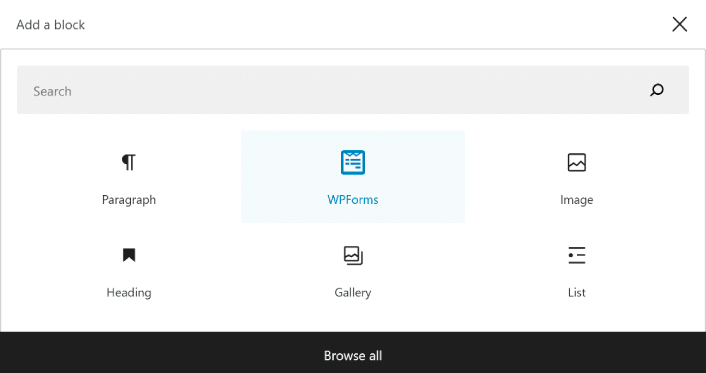
Step #6: Add the Expense Approval Form to Your Site
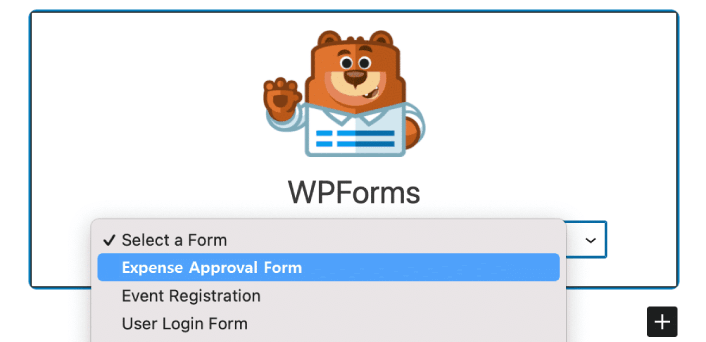
You can add the expense approval form on your site using the WPForms Gutenberg block:
All you need to do is select your expense approval form.
If you’re satisfied with the way your form looks, hit the Update or Publish button, and your form will go live.

Ve işte bu kadar!
How to Promote Your Expense Approval Form
Bu kadar, millet!
By now, you’ve learned how to create expense approval form in WordPress. Next, you should set up form abandonment tracking to reduce your form abandonment rates.
Bundan sonra tek yapmanız gereken, formunuzun çalışmaya başlayıp dönüşüm sağlaması için sitenize trafik çekmektir. Bunu yapmanın basit bir yolu, anlık bildirimleri kullanmaya başlamaktır. Anlık bildirim göndermek, siteniz için tekrar eden trafik oluşturmanın harika bir yoludur. Eğer ilgilendiğiniz şey buysa, bu makalelere de göz atmalısınız:
- Anlık Bildirim Maliyeti: Gerçekten Ücretsiz mi? (Fiyat Analizi)
- WordPress Blogunuza Nasıl Daha Fazla Trafik Çekilir (9 Kolay Yol)
- Web Anlık Bildirim Opt-In Oranınızı Nasıl Artırırsınız (7 Yol)
- Sitenize Bir Web Bildirimleri WordPress Eklentisi Nasıl Eklenir
Anlık bildirimlerinizi göndermek için PushEngage'ı kullanmanızı öneririz. PushEngage, dünyadaki 1 numaralı anlık bildirim yazılımıdır. Bu nedenle, henüz yapmadıysanız, bugün PushEngage ile başlayın.


