
Are you looking for an easy way to add a Twitter feed to your WordPress site?
If you have a great Twitter feed, it makes a lot of sense to embed it in your WordPress website and borrow some of that engagement. But how do you do it? Do you need a plugin? If yes, what plugin should you use? And if not, do you have to get your hands dirty with coding?
In this article, we’re going to answer all these questions and more.
Let’s check out how to embed a Twitter feed in WordPress the easy way.
Should You Add a Twitter Feed in WordPress Using a Plugin?
You should use a plugin to add a Twitter feed in WordPress. The trick is finding the right plugin for the job. You don’t want a poorly coded plugin slowing down your site. So, it’s best to use a professionally made plugin to add a Twitter feed to your WordPress site.
The best WordPress plugins are tested and optimized for speed. And it’s important to use a good plugin because your can embed a Twitter feed in a landing page to act as social proof and get more conversions.
Of course, this doesn’t mean that you can’t embed a Twitter feed in WordPress without a plugin. But it’s difficult to customize the look and feel of your feed without knowing HTML and CSS. You could also lose your embed code if you switch your WordPress theme. The same problem happens if you’re not using a child theme and your theme gets a major update.
It’s also really annoying to embed multiple Twitter feeds in different posts and pages through code.
We recommend using Smash Balloon’s Twitter Feed Pro to embed your Twitter feeds in WordPress.

Smash Balloon is a simple WordPress plugin that allows you to display your social media feeds on your site without using any code at all.
Du kan använda Smash Balloon för att skapa anpassade sociala medieflöden för din WordPress-webbplats med några få klick. Det krävs ingen kodning och ingen anledning att anlita en utvecklare. Och du kan integrera Instagram-, Facebook-, Twitter- och YouTube-flöden tillsammans eller separat som du vill.
Ett riktigt coolt sätt att använda ett plugin som Smash Balloon är att använda sociala medieflöden för att skapa en vägg med kundrecensioner.

The best part? It’s incredibly easy to use.
Smash Balloon tar knappt 5 minuter att installera. Och det finns ingen inlärningskurva alls.
Över 2 miljoner användare litar på Smash Balloon för att visa sina sociala flöden på sina webbplatser. Dessutom har Smash Balloon ett genomsnittligt betyg på 4,8 av 5 stjärnor på WordPress.
Let’s check out how to create a Twitter feed embed for your site using Smash Balloon.
How to Add a Twitter Feed in WordPress
Go ahead and install and activate the Twitter Feed Pro plugin. If you’re not sure how to do it, check out this article on how to install a WordPress plugin. Then, follow the steps in this guide to set up and embed a Twitter feed in WordPress.
Step #1: Create a Twitter Feed
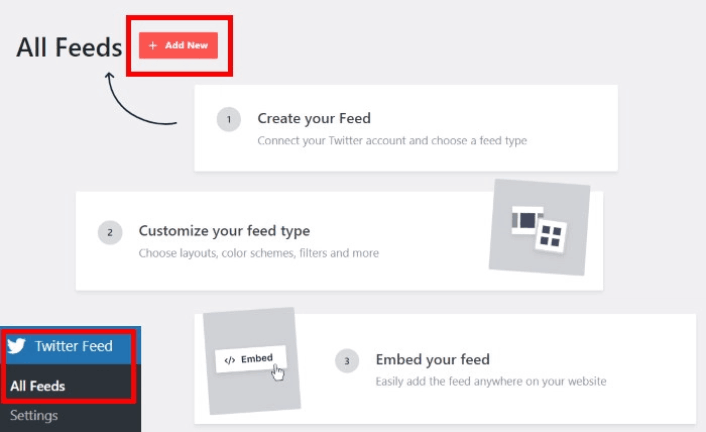
To get started, go to the Twitter Feed » All Feeds menu from your WordPress dashboard and click on the Add New button:
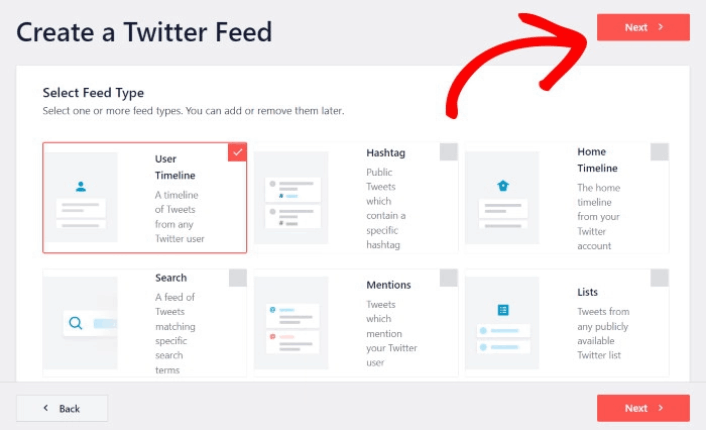
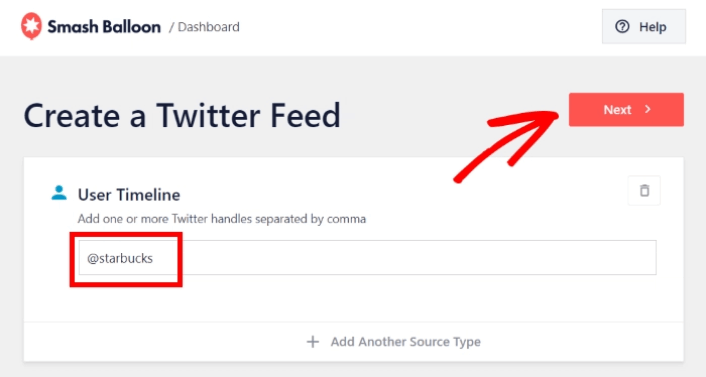
Next, choose the type of Twitter feed that you want to show on your website. There are 7 types of Twitter feeds you can create:
- User Timeline: All tweets from your Twitter account
- Hashtag: A feed of public hashtags from Twitter
- Home Timeline: Tweets from your Twitter timeline and the people you follow
- Search: A feed to display the results from an advanced Twitter search
- Mentions: All the tweets where other Twitter users have tagged you
- Lists: A feed with tweets from users on specific Twitter lists
Click the feed type you’d like to create, then click the Next button.
For this tutorial, we’re going with a User Timeline feed:
But we also recommend creating a Mentions feed to create a testimonial wall on your site.
Step #2: Link Your Twitter Account
For your Twitter feed to show on your site dynamically, you need to verify your Twitter feed. This way, the feed on your site will get automatically updated whenever you tweet something new.
To get started, click on the Connect button:
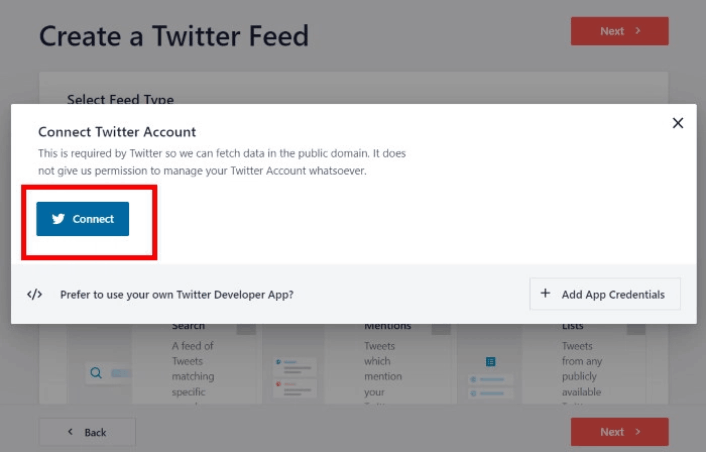
Now, the plugin will open Twitter and ask for read-only access to your Twitter account. Read-only access means that Twitter Feed Pro will only view information on Twitter and won’t be able to make changes to your account at all.
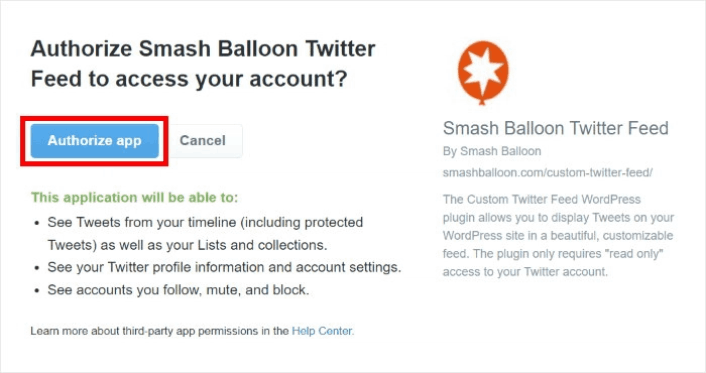
Click on the Authorize app button:
Enter the Twitter handle, hashtag, search term, Twitter list, and more that you want to embed and click the Next button:
Next, you can customize how your Twitter feed looks and feels.
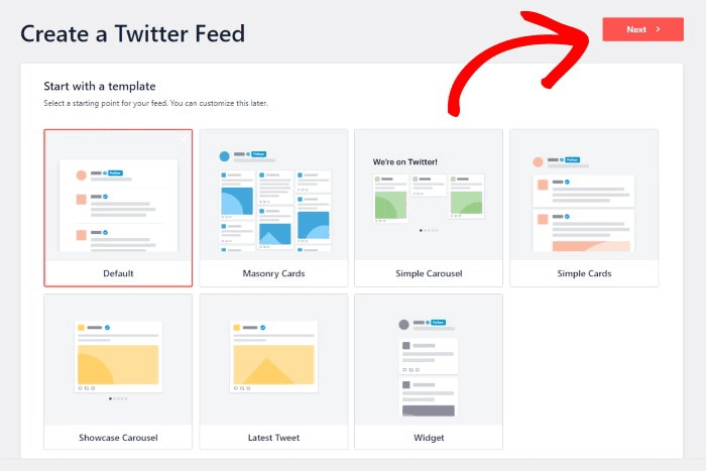
Step #3: Customize Your Twitter Feed in WordPress
Twitter Feeds Pro comes with responsive designs for your Twitter feeds. So, no matter what WordPress theme you’re using, it’s going to look awesome. Select a feed template that you prefer and click on the Next button:
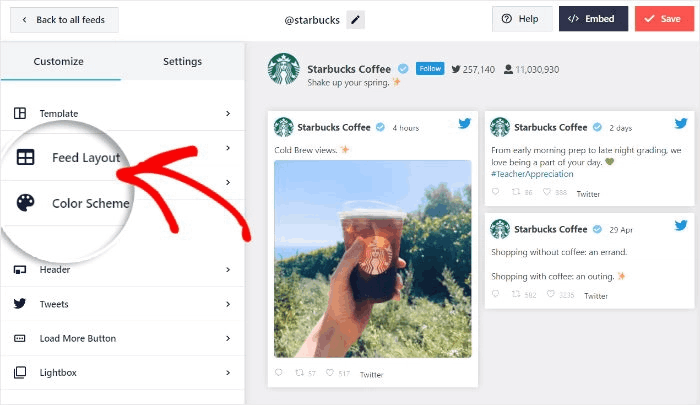
You can change your feed’s color scheme, layout, header style, load more button, and more on the left.

Click on the Feed Layout option on the left panel:
With Twitter Feed Pro, you can pick from 3 options: List, Masonry, and Carousel.
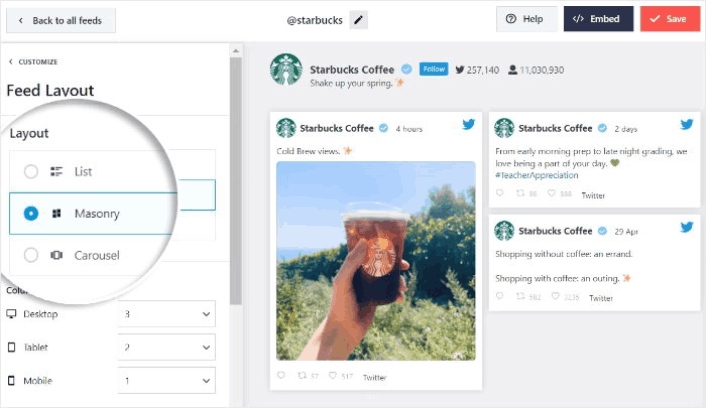
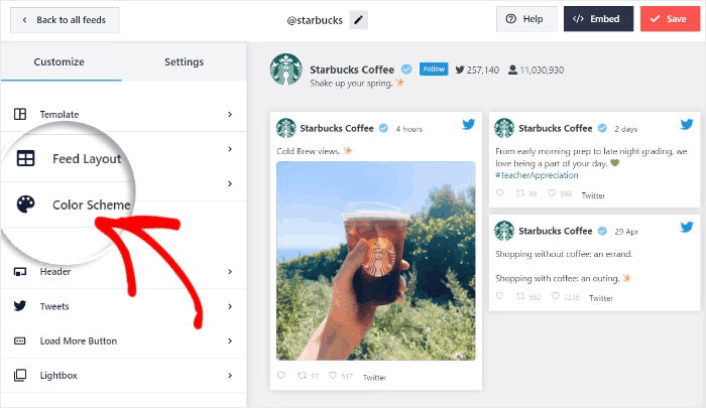
Play around with the different layouts until you find the right fit for your site. Just click on the Color Scheme option on the left to get started:
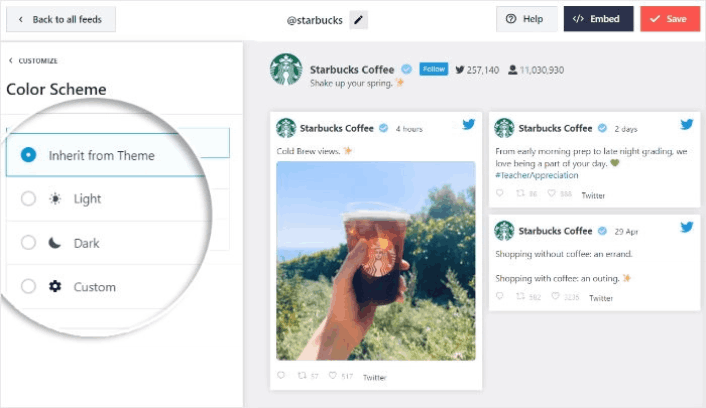
You get 4 color schemes that you can use to quickly change the colors of your Twitter feed:
And like before, click on the Save button to confirm your changes.
Step #4: Publish Your Twitter Feed in WordPress
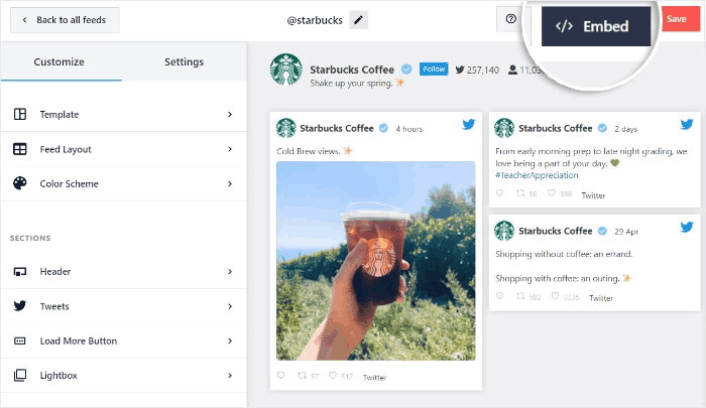
Click on the Embed button at the top to get started.
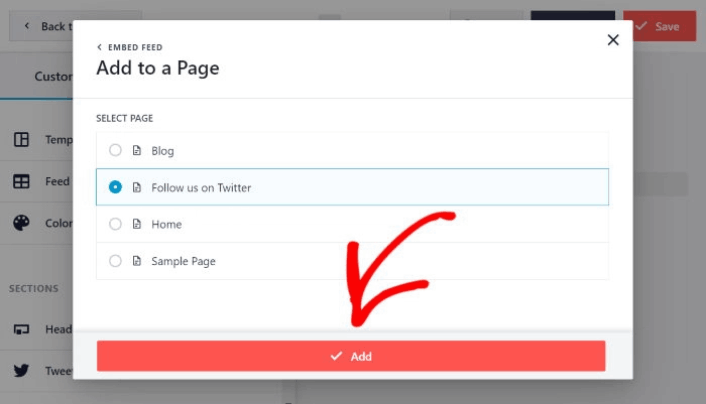
To embed it on a WordPress page, click on the Add to a Page button:
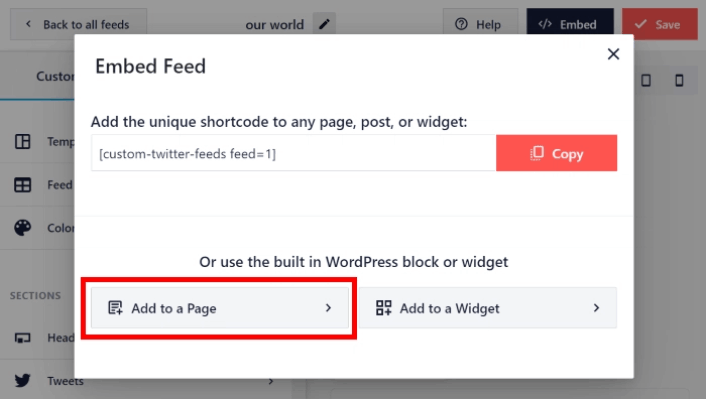
Just select the page where you want to embed the feed and click on the Add button:
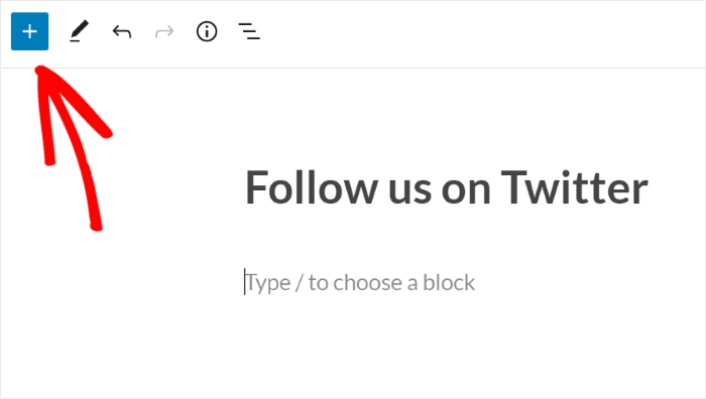
This will open the WordPress page in the block editor. Click the plus (+) icon to add a new WordPress block.
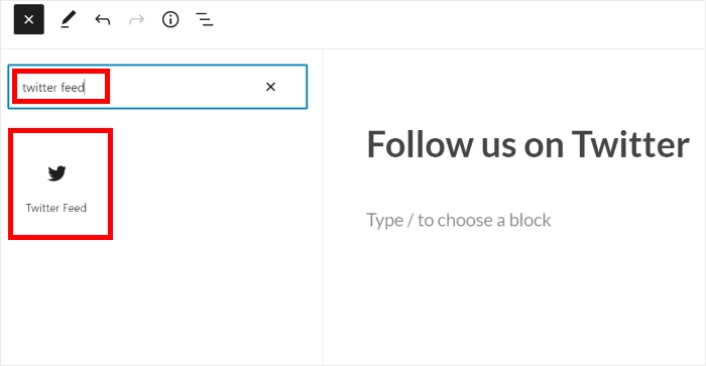
Click the Twitter Feed WordPress block to add it to your page:
Finally, click on the Publish or Update button, and your Twitter feed will be published on your WordPress site like this:

Och det är allt! Du är klar.
What to do After You Add a Twitter Feed in WordPress
That’s all for this one, folks! By now, you’ve managed to embed a Twitter feed in WordPress. You should also check out how to embed Instagram photos in WordPress. And how to set up a viral giveaway to supercharge your social media following.
Därefter återstår bara att generera trafik till din webbplats så att dina kontaktformulär kan börja fungera. Ett enkelt sätt att göra det är att börja använda push-meddelanden. Att skicka push-meddelanden är ett utmärkt sätt att generera återkommande trafik till din webbplats. Om det är något du är intresserad av bör du även titta på dessa artiklar:
- Kostnad för pushmeddelanden: Är det verkligen gratis? (Prisanalys)
- Hur man lägger till ett WordPress-plugin för webbnotiser på din webbplats
- Hur du får mer trafik till din WordPress-blogg (9 enkla sätt)
- Hur du ökar din webbpush-notis opt-in-frekvens (7 sätt)
Vi rekommenderar att använda PushEngage för att skicka dina pushmeddelanden. PushEngage är den främsta pushmeddelandemjukvaran i världen. Så om du inte redan har gjort det, kom igång med PushEngage idag.


