
Looking for a quick and easy way to create a contact form in WordPress?
WordPress has a lot of plugins and themes that you can use. The biggest challenge in creating a contact form in WordPress is actually compatibility. How do you create a contact form that doesn’t break because of plugin conflicts or your theme’s default settings?
What’s even the point of using WordPress if you have to site and code contact forms in HTML and CSS? On top of that, you’d have to manually code a way to connect your form to an email service provider.
And then, you’d have to resolve any email delivery issues.
Don’t worry. There’s a much simpler way that works with any theme and there’s zero coding involved.
In this article, we’re going to give you a WordPress contact form plugin that resolves all these issues right out of the box. We’ll even show you how to create your very first contact form using that plugin. And it will take you less than 10 minutes to create a form.
Låt oss dyka in.
Why You Should Create a Contact Form on Your WordPress Site
Before we get started with building your contact form, let’s talk about why you would want a contact form on your WordPress site in the first place. Isn’t it much easier to have a button that opens up Outlook and allows your web visitors to email you directly?
Short answer: NO!
But this is a perfectly reasonable question to ask. You’re probably thinking that it takes way too long to code a contact form and then put it up manually across all your money-making pages.
And you’re right. It does take a long time to create a contact form manually using code. But we’re not going to use any code in this article.
Besides, a contact form is way better than displaying your email in public. A well-designed contact form:
- Protects your inbox from spam: Spam bots scrape “mailto” tags on your site to automatically collect email addresses to spam. Having a contact form with Captcha protection can prevent that.
- Gathers data in a consistent, readable pattern: When you leave it up to your prospects to email you, they will often leave out crucial information that you may need. So, there’s no consistency in the data you gather. But you can design your contact form to gather all the important data you need and then email the response to you in a structured, readable way.
- Automates onboarding processes: You can actually create contact forms that redirect to a different page when someone submits their form. This is a great way to inform your leads and prospects about the next steps in their onboarding journey.
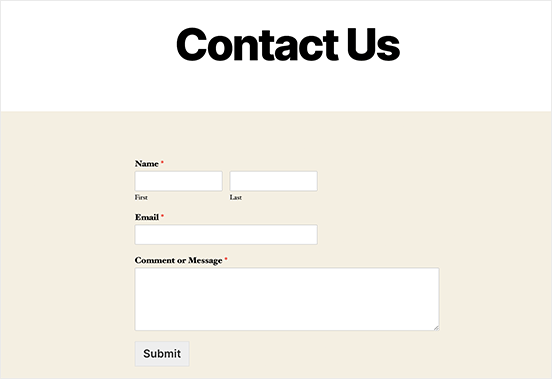
Here’s a quick look at the form that we’re going to create in this article:
We’re going to do it all using one of the best WordPress form plugins in the world.
Låt oss börja.
How to Add Contact Form in WordPress
The first thing you need to do is choose a WordPress contact form plugin.
Of course, a quick Google search will show you that there are way too many contact form plugins to choose from. So, we went ahead and found the best plugin for you.
Vi rekommenderar att använda WPForms för att skapa kontaktformulär på din WordPress-webbplats.
WPForms är den främsta WordPress-pluginen för formulärbyggare med över 3 miljoner användare. Du får en dra-och-släpp-formulärbyggare, vilket innebär att du kan skapa WordPress-formulär med otroliga funktioner på bara några minuter.
Du kan också använda WPForms Lite, som är gratisversionen av WPForms. Så om du letar efter en gratis formulärbyggare att komma igång med kan du använda Lite-versionen. Senare, när du behöver kraftfullare funktioner för dina formulär, kan du uppgradera till betalplanerna.
Step 1: Install WPForms on Your Site
Let’s start by installing WPForms on your site. Head over to the site and click on Get Started to sign up for the plugin. Then, head over to your WPForms dashboard and go to Downloads to get your plugin:
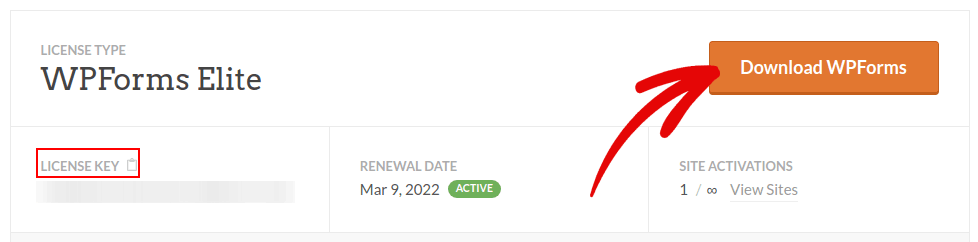
Installera och aktivera sedan tillägget på din webbplats. Och kopiera din licensnyckel i samma flik.
NOTE: If you need more step-by-step instructions, you should check out this article on how to install WordPress plugins.
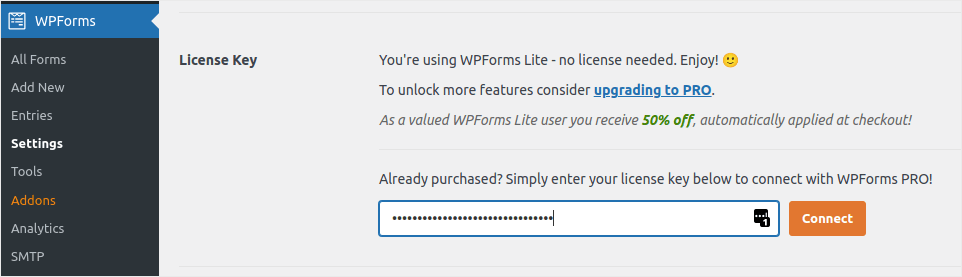
Gå slutligen till din WordPress-instrumentpanel och gå till WPForms » Inställningar och klistra in din licensnyckel:
When you’re done, click Connect. And you’re done!
Step 2: Create a Contact Form in WordPress
Nu när WPForms är installerat och aktiverat är det dags att skapa ditt första formulär. Gå till WPForms » Lägg till nytt:

Detta öppnar WPForms dra-och-släpp-formulärbyggare.
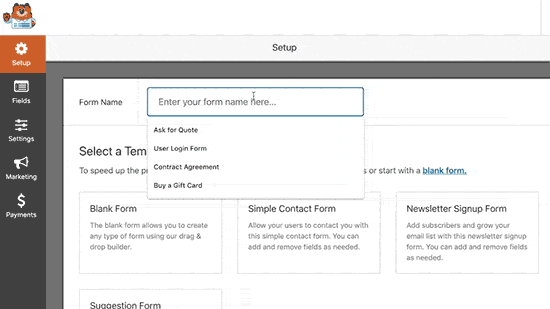
För att skapa ett nytt formulär, ge det ett namn och välj din formulärmall:
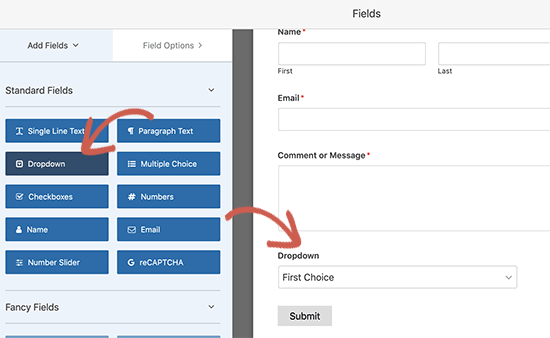
Och det är allt! Om du vill lägga till eller redigera fälten i ditt kontaktformulär kan du göra det från sidofältet. Dra och släpp formulärfält för att lägga till nya och klicka på befintliga fält för att redigera dem:
När du är klar, tryck på Spara.
Step 3: Configure Notifications and Confirmations
Därefter vill du ställa in aviseringar och bekräftelser.
Aviseringar är e-postmeddelanden som du får när någon fyller i formuläret. Bekräftelser är avsedda att meddela användaren att de har fyllt i formuläret framgångsrikt. Vanligtvis är detta ett "Tack"-meddelande, men du kan också omdirigera dina användare till en dedikerad sida.
Gå till Inställningar » Bekräftelser för att konfigurera bekräftelseinställningar:

Och sedan i samma meny, gå till Aviseringar för att konfigurera dina meddelanden:

Som standard skickas aviseringarna till WordPress admin-e-postadressen. Så om du vill att e-postmeddelandena ska skickas någon annanstans, till exempel till e-postadressen för din försäljningschef, kan du göra det här.
Step 4: Add Your WordPress Contact Form
Du är klar med att konfigurera ditt WordPress-kontaktformulär vid det här laget. Så, låt oss gå vidare och lägga till det på en sida. Det finns 3 grundläggande metoder för att lägga till ett WPForms-kontaktformulär på din WordPress-webbplats. Vi kommer att titta på var och en.
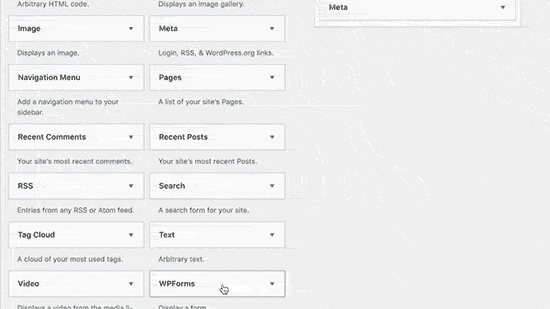
Metod #1: Lägg till formuläret med blockredigeraren
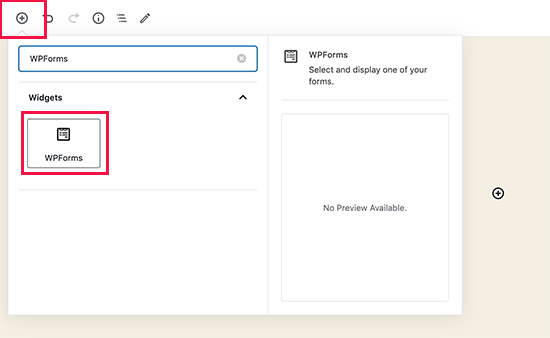
Gå till den sida där du vill lägga till ditt kontaktformulär och lägg till ett nytt WPForms-block:
Välj sedan ditt nyskapade formulär med hjälp av rullgardinsmenyn:
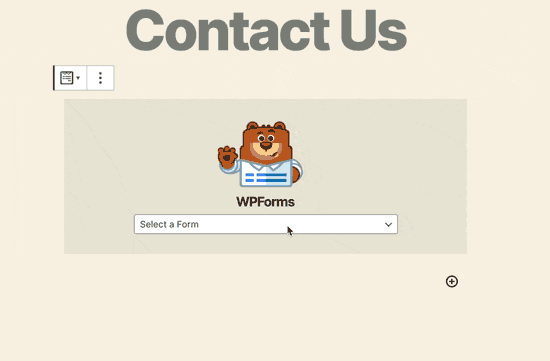
Och du bör se ditt kontaktformulär infogas automatiskt på din sida.
Tryck bara på Spara och Publicera för att se ditt WordPress-formulär i aktion.
Metod #2: Lägg till ditt kontaktformulär med WPForms kortkoder
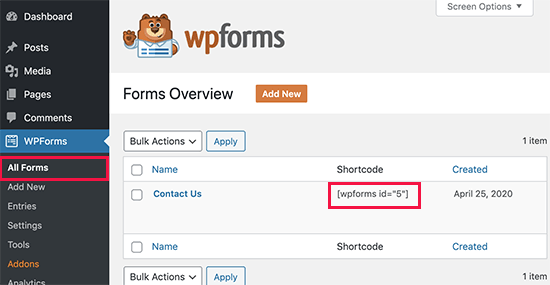
WPForms genererar också en kortkod för varje WordPress-kontaktformulär. Du kan kopiera kortkoden för kontaktformuläret genom att besöka WPForms » Alla formulär:
And then, paste the shortcode in any post or page you want. It’s that simple.
Om du är nybörjare på kortkoder bör du läsa den här artikeln om hur du lägger till en kortkod på WordPress-webbplatser.
Method #3: Add Your Contact Form in the Sidebars
Sidofältet är en av de mest underutnyttjade funktionerna på de flesta WordPress-webbplatser. Vi rekommenderar starkt att du infogar ett kontaktformulär i din webbplats sidofält. Gå till Utseende » Widgets i din WordPress-instrumentpanel och lägg till WPForms-widgeten i ditt sidofält:
Och du är klar!
How to Track Your WordPress Form Conversions
Once you’re done creating your form and adding it to different pages, you should also set up a good way to track and measure conversions. We recommend using MonsterInsights to track your form analytics.

MonsterInsights is the #1 Google Analytics plugin and we love the software.
The plugin is super easy to set up and you can track your form conversion analytics using MonsterInsights reports:
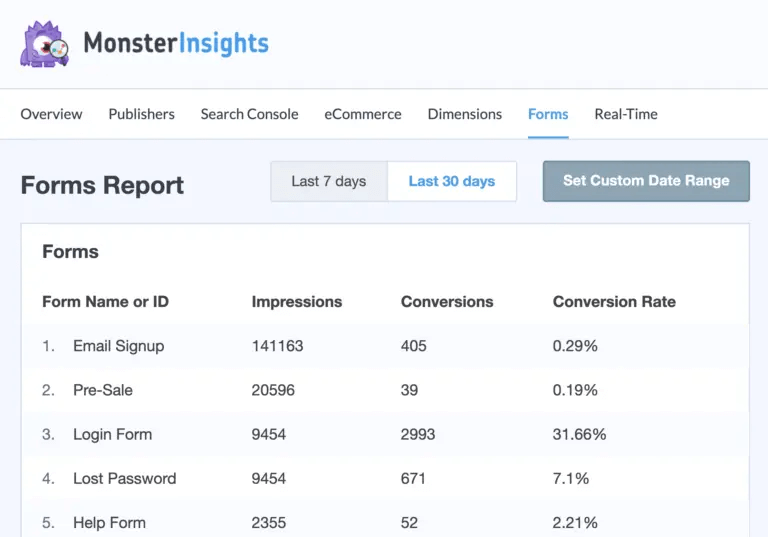
And it integrates seamlessly with WPForms.
Avslutning
Det var allt för den här gången, gott folk!
By now, you’ve created your first WordPress contact form and set up conversion analytics for it.
Now, all that’s left is generating traffic to your site so that your contact forms can get to work. A simple way to do that is to start using push notifications. Sending push notifications is a great way to generate repeat traffic for your site. If that’s something you’re interested in, you should check out these articles as well:
- Kostnad för pushmeddelanden: Är det verkligen gratis? (Prisanalys)
- Hur du får mer trafik till din WordPress-blogg (9 enkla sätt)
- Hur du ökar din webbpush-notis opt-in-frekvens (7 sätt)
Vi rekommenderar att använda PushEngage för att skicka dina push-meddelanden. PushEngage är den främsta programvaran för push-meddelanden i världen. Så om du inte redan har gjort det, kom igång med PushEngage idag.


