Aviso: Não existe documentação legada disponível para este item, pelo que está a ver a documentação atual.
Os utilizadores de iOS só podem receber notificações push web quando um website foi adicionado ao seu ecrã principal e aberto como uma aplicação web. Visitantes que navegam no seu site diretamente no Safari ou em qualquer outro navegador no seu iPhone ou iPad não verão um pedido de adesão a notificações push e não poderão subscrever.
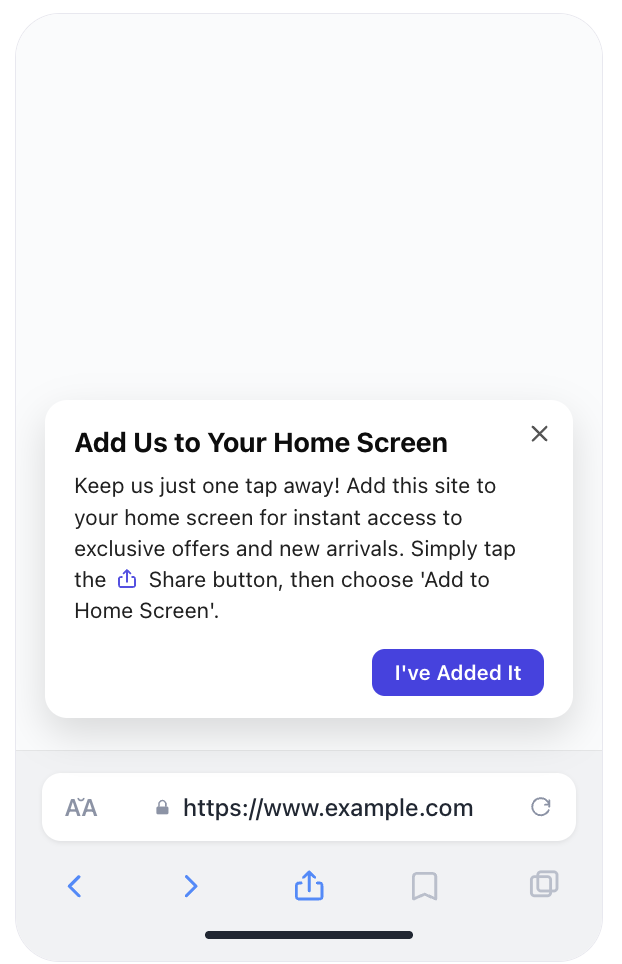
O widget Adicionar ao Ecrã Principal resolve isto. Quando um visitante iOS acede ao seu site num navegador, o PushEngage deteta que o site não está a ser executado no modo de ecrã principal e mostra um popup que o orienta através do processo: toque no botão Partilhar, escolha Adicionar ao Ecrã Principal, depois abra o site a partir do ícone no seu ecrã principal. Assim que o fizerem, o pedido padrão de adesão a notificações push aparece e eles podem subscrever como qualquer outro visitante.
Esta é uma funcionalidade que o PushEngage adicionou com base em pedidos diretos de clientes, e ativá-la é o passo mais importante que pode dar para aumentar a sua base de subscritores de push iOS.
Requisitos
Antes de ativar o widget, certifique-se de que a sua configuração cumpre o seguinte:
- iOS 16.4 ou posterior. O widget só é exibido no iOS 16.4 e superior. Visitantes em versões mais antigas do iOS não o verão, e as notificações push web não são suportadas nessas versões, independentemente.
- Manifesto de aplicação web. Para versões do iOS inferiores à 26, o seu site deve incluir um manifesto de aplicação web ligado no
<head>da página (<link rel="manifest" href="/manifest.json">). Sem ele, o iOS não exibirá o ícone e o nome do site corretos quando o visitante o adicionar ao seu ecrã principal. No iOS 26 e superior, um manifesto é recomendado, mas não obrigatório.
Se estiver a usar um plugin WordPress ou um construtor de sites alojado, o seu tema pode já incluir um manifesto. Pode confirmar visualizando o código fonte da sua página e procurando por rel="manifest".
Encontrar o Widget
No seu painel PushEngage, vá a Design » Widgets. Role até ao fundo da página para encontrar a secção Adicionar ao Ecrã Principal.
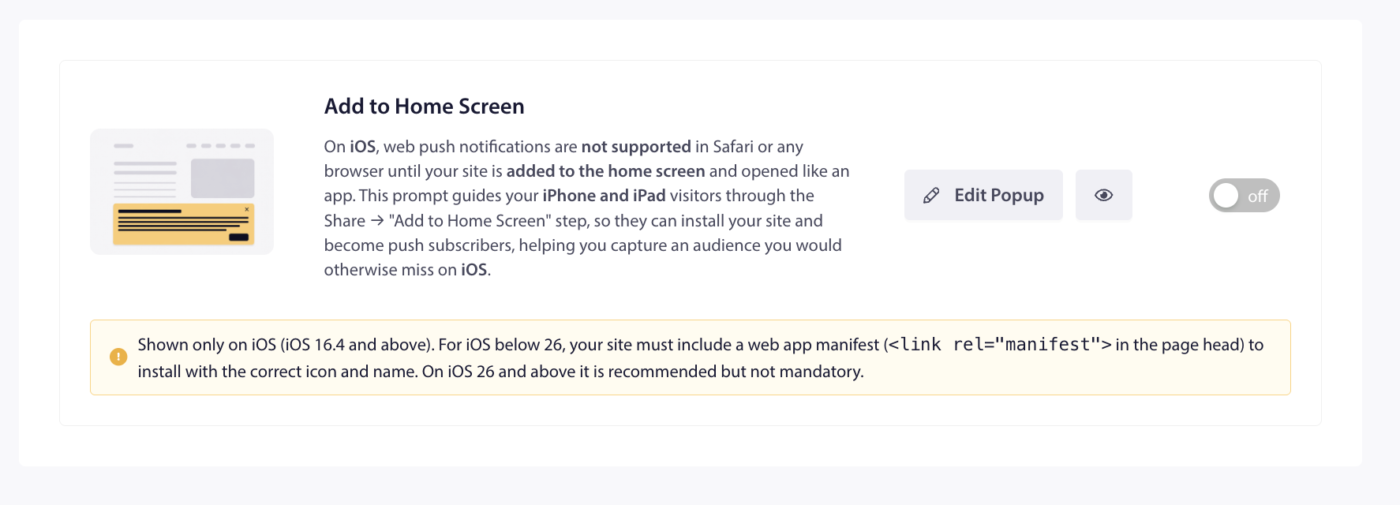
Clique no interruptor para ativar o widget. Uma vez ativado, aparecerá automaticamente aos visitantes iOS qualificados que abram o seu site num navegador em vez de a partir de um ícone do ecrã principal.
Para personalizar o texto e a aparência, clique em Editar Popup.
Editar o Widget
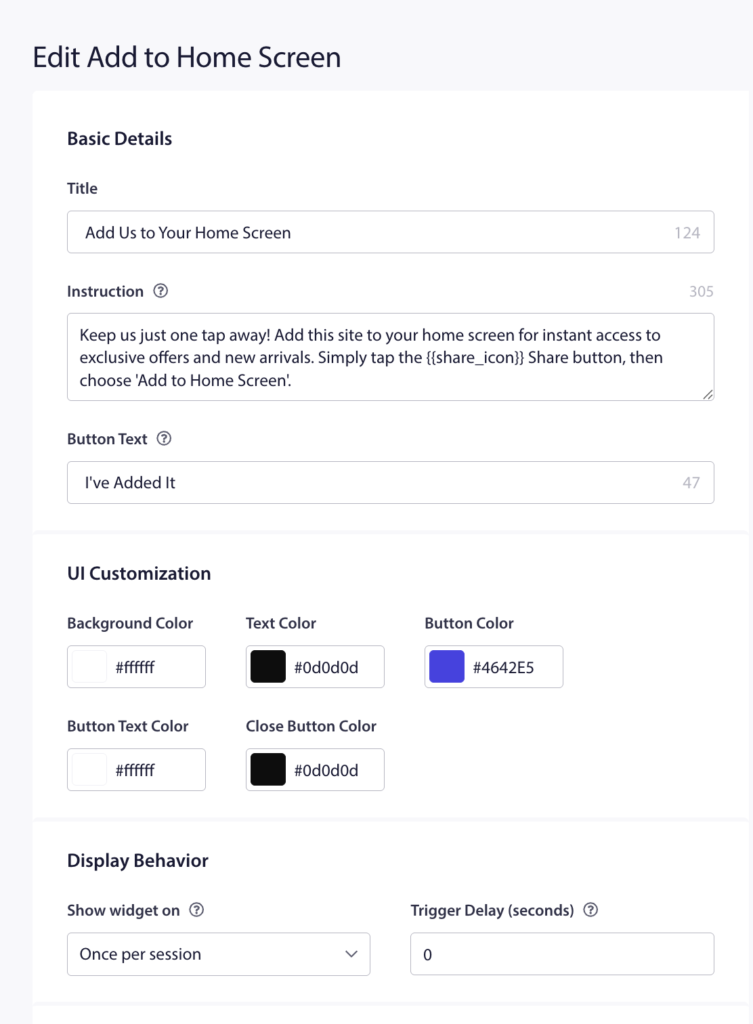
A página Editar Adicionar ao Ecrã Principal está dividida em quatro secções: Detalhes Básicos, Personalização da UI, Comportamento de Exibição e Segmentação de URL. Um painel de pré-visualização em tempo real à direita atualiza-se à medida que faz alterações, para que possa ver exatamente como o popup ficará antes de guardar.
Detalhes Básicos
Esta secção controla o conteúdo de texto do popup.
Título
O título do popup. O padrão é “Adicionar-nos ao seu Ecrã Principal”. O limite de caracteres é 124. Mantenha isto curto e direto — uma instrução clara funciona melhor do que múltiplas ideias.
O limite de caracteres é 305. O marcador {{share_icon}} é renderizado como o ícone do botão Partilhar do iOS em linha dentro do texto da instrução, tornando fácil para os visitantes identificarem o botão correto sem qualquer adivinhação. Pode colocar {{share_icon}} em qualquer lugar na sua cópia de instrução e o PushEngage substituirá a imagem do ícone quando o popup for renderizado.
Texto do Botão
O rótulo no botão de confirmação. O padrão é “Já Adicionei”. O limite de caracteres é 47. Isto é o que os visitantes tocam após completarem os passos — tocar nisto diz ao PushEngage que adicionaram o site ao seu ecrã principal e fecha o popup.
Personalização da UI
Cinco definições de cor controlam a aparência do popup:
- Cor de Fundo : o fundo do cartão do popup (padrão: branco,
#ffffff) - Cor do Texto : a cor do título e do texto da instrução (padrão: quase preto,
#0d0d0d) - Cor do Botão : o fundo do botão de confirmação (padrão: roxo PushEngage,
#4642E5) - Cor do Texto do Botão : a cor do texto no botão de confirmação (padrão: branco,
#ffffff) - Cor do Botão de Fechar : a cor do botão X no canto superior direito do cartão (padrão: quase preto,
#0d0d0d)
Clique em qualquer amostra de cor para abrir o seletor de cores e introduzir um valor hexadecimal ou selecionar uma cor. A pré-visualização em tempo real atualiza-se.
Comportamento de Exibição
Mostrar widget em controla a frequência com que o popup aparece para o mesmo visitante. O padrão é “Uma vez por sessão”, o que significa que o popup aparece uma vez por sessão do navegador e pode reaparecer na próxima visita se o visitante ainda não adicionou o site ao seu ecrã principal.
Atraso do Gatilho (segundos) define quantos segundos esperar após o carregamento da página antes de mostrar o popup. O padrão é 0. Adicionar um pequeno atraso de 3 a 5 segundos pode reduzir o atrito para visitantes que acabaram de chegar à página.
Segmentação de URL
Por padrão, o widget aparece em todas as páginas do seu site. Pode usar a segmentação de URL para restringi-lo a páginas específicas ou suprimi-lo noutras.
Incluir URLs : quando ativado, o popup aparece apenas em páginas cujo URL corresponde às regras que define. Isto é útil se quiser que o prompt apareça apenas em páginas de alta intenção, como uma página de produto, uma página de destino ou a página inicial.
Excluir URLs : quando ativado, o popup é suprimido em páginas cujo URL corresponde às suas regras. Use isto para impedir que o popup apareça em páginas onde seria disruptivo, como páginas de checkout ou de gestão de conta.
Ative qualquer uma das opções para revelar o campo de entrada de URL, selecione uma regra de correspondência (Contém, Começa com ou Exato), introduza parte de um URL e clique em Adicionar URL.
Depois de todas as definições estarem configuradas, clique em Guardar Alterações no topo da página.
Como o Widget Funciona para Visitantes iOS
Quando um visitante iOS qualificado abre o seu site num navegador e o site ainda não está a ser executado em modo de ecrã principal, o popup do widget aparece após o atraso configurado. O visitante lê a instrução, toca no botão Partilhar no seu navegador, seleciona Adicionar ao Ecrã Principal e adiciona o ícone do site ao seu ecrã principal.
Na próxima vez que o visitante abrir o seu site tocando no ícone do ecrã principal, o site carrega como uma aplicação web. O PushEngage deteta isto e mostra o pedido padrão de opt-in para notificações push. O visitante pode então tocar em Permitir e subscrever.
Tocar no botão de confirmação (“Eu Adicionei”) no widget fecha o popup mas não subscreve o visitante. A subscrição acontece quando eles abrem o site a partir do seu ecrã principal e respondem ao pedido de opt-in.
Perguntas Frequentes
O widget será exibido a visitantes Android ou desktop? Não. O widget Adicionar ao Ecrã Principal é exibido apenas a utilizadores iOS em iOS 16.4 e superior que estão a visitar o site num navegador em vez de a partir de um ícone do ecrã principal. Visitantes Android e desktop não são afetados.
E se um visitante tocar no botão de confirmação sem realmente adicionar o site ao seu ecrã principal? O botão fecha o popup e o PushEngage regista a interação como completa. Dependendo da sua configuração “Mostrar widget em”, o popup pode reaparecer numa sessão futura se o visitante regressar através de um navegador e ainda não tiver adicionado o site ao seu ecrã principal.
O widget funciona em todos os navegadores no iPhone? Sim. No iOS, todos os navegadores, incluindo Safari, Chrome, Firefox e Edge, usam o mesmo motor WebKit e partilham a mesma limitação em torno de web push. O widget aparece independentemente do navegador que o visitante está a usar, desde que estejam no iOS 16.4 ou posterior e o site não esteja aberto em modo de ecrã principal.
Porquê é que um manifesto de aplicação web é necessário para iOS abaixo de 26? Quando um utilizador adiciona um site ao seu ecrã principal, o iOS lê o manifesto da aplicação web para determinar o nome a exibir sob o ícone e qual a imagem do ícone a usar. Sem um manifesto, o iOS recorre ao título da página e a uma captura de ecrã, o que pode parecer inconsistente ou confuso. No iOS 26 e superior, esta informação também pode ser inferida de outros sinais da página, razão pela qual um manifesto é recomendado mas já não é estritamente necessário nessa versão.
O meu site já tem notificações push a funcionar para outras plataformas. Preciso de fazer mais alguma coisa para suportar iOS? Os únicos passos adicionais para iOS são ativar o widget Adicionar ao Ecrã Principal e garantir que o seu site inclui um manifesto de aplicação web. O PushEngage trata da entrega de notificações assim que os subscritores optarem por participar. Nenhuma configuração separada específica para iOS é necessária além do que é abordado neste artigo.
Se tiver questões sobre o widget Adicionar ao Ecrã Principal ou precisar de ajuda com a sua configuração de web push para iOS, por favor, sinta-se à vontade para nos contactar. A nossa equipa de suporte terá todo o gosto em ajudar.


