Remarque : Il n'y a pas de documentation héritée disponible pour cet élément, vous voyez donc la documentation actuelle.
Vous pouvez désormais implémenter les notifications push pour votre application iOS en utilisant notre SDK d'application iOS. Vous aurez besoin de l'aide de votre développeur car il s'agira d'une intégration unique avant que vous puissiez leur envoyer des notifications push à l'aide du tableau de bord PushEngage.
Avant de commencer
- Vous aurez besoin d'Xcode installé sur votre système.
- Un compte développeur valide et un identifiant d'application sont configurés sur le portail développeur Apple.
Nous suivrons ces étapes pour activer les notifications push pour votre application iOS.
- Configuration de votre application
- Intégration du SDK iOS PushEngage
- Initialisation du SDK iOS PushEngage
- Création de l'extension de service de notification
- Initialisation du SDK PushEngage pour Notification Service Extension
- Création de Notification Content Extension
- Initialisation du SDK PushEngage pour Notification Content Extension
- Ajouter des groupes d'applications
- Lien profond
- Gestion des notifications au premier plan
- Dépannage
Configuration de votre application
Activer les notifications push
1. Ouvrez votre projet Xcode et sélectionnez le projet racine dans le navigateur de projet. Choisissez votre cible d'application principale.
2. Accédez à Signature et fonctionnalités. Assurez-vous que la fonctionnalité Modes d'arrière-plan est ajoutée. Sinon, ajoutez-la en cliquant sur le bouton « + Fonctionnalité ».
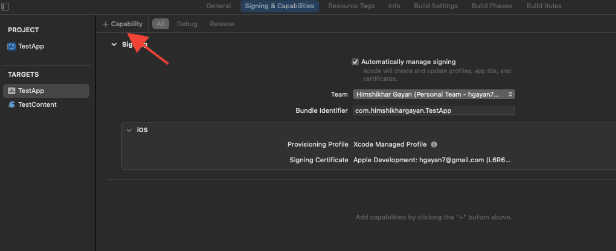
3. De même, assurez-vous que la fonctionnalité Notifications push est ajoutée. Sinon, ajoutez-la en utilisant le bouton « + Fonctionnalité ».

Si la fonctionnalité Notifications push n'est pas visible dans Xcode. Vous devez suivre les étapes ci-dessous :
1. Accédez à votre compte développeur Apple.
2. Accédez à Certificats, identifiants et profils.
3. Sélectionnez votre identifiant d'application. Modifiez la configuration de votre identifiant d'application et assurez-vous que Notifications push est activé.
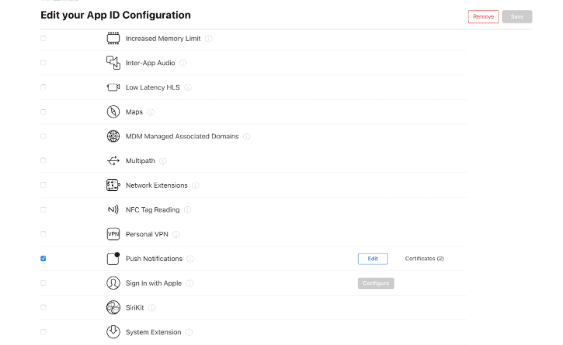
4. Revenez à Xcode et essayez d'ajouter à nouveau la fonctionnalité « Notifications push ».
Activer les modes d'arrière-plan
1. Dans votre projet Xcode, accédez à Signature et fonctionnalités.
2. Dans Modes d'arrière-plan, activez Notifications push et Récupération en arrière-plan.
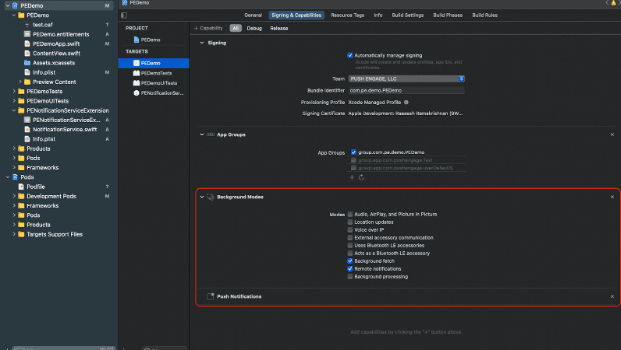
Cette étape garantit que votre application peut gérer efficacement les notifications push et les récupérations en arrière-plan.
Voici le guide pour créer votre certificat APNs.
Intégration du SDK iOS PushEngage
Le SDK iOS PushEngage est disponible en tant que package Swift et pod CocoaPods. Nous vous demandons de consulter les deux méthodes, mais de n'en utiliser qu'une seule lors de la finalisation de votre configuration.
Intégration du SDK iOS PushEngage avec SPM
Pour intégrer le SDK iOS PushEngage à l'aide de Swift Package Manager, suivez ces étapes :
- Ouvrez XCode et accédez à votre projet. Sélectionnez l'onglet des dépendances de package. Cliquez sur le bouton +.
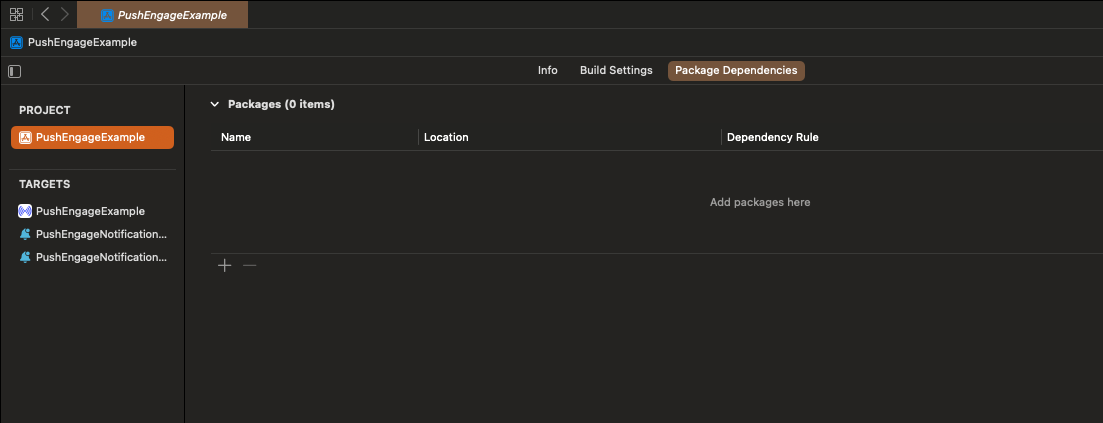
- Collez l'URL
https://github.com/awesomemotive/pushengage-ios-sdkdans la barre de recherche. Cliquez sur « Ajouter un package ».
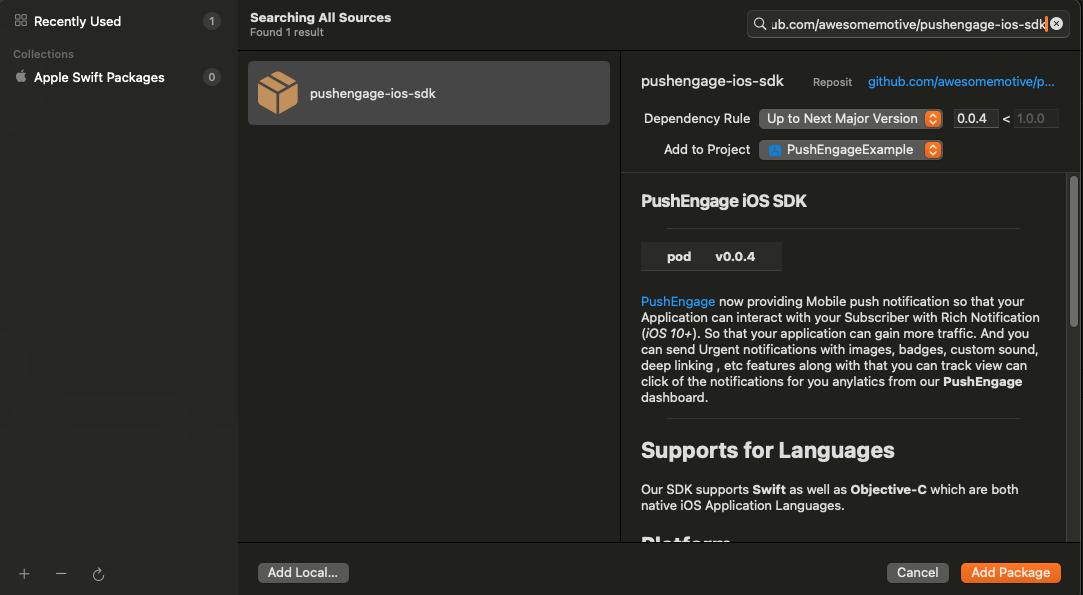
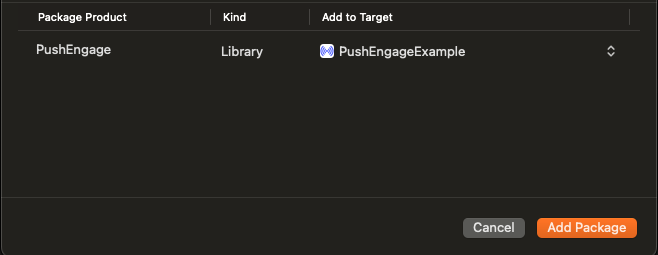
- Sélectionnez votre cible d'application principale sous « Ajouter à la cible » et cliquez sur « Ajouter un package ».
Intégration du SDK iOS PushEngage avec CocoaPods
Pour intégrer le SDK iOS de PushEngage à l'aide de CocoaPods, vous devez suivre ces étapes :
Si CocoaPods n'est pas installé, fermez votre projet Xcode actuel et exécutez la commande suivante dans le répertoire racine de votre projet
sudo gem install cocoapods
Exécutez la commande suivante pour initialiser un Podfile dans votre projet
pod initOuvrez le Podfile nouvellement créé à l'aide d'un éditeur de texte ou en suivant la commande dans votre terminal dans le répertoire racine du projet.
open PodfileAjoutez la dépendance PushEngage sous la cible de votre projet. Assurez-vous que votre Podfile ressemble à l'exemple ci-dessous
# Uncomment the next line to define a global platform for your project
# platform :ios, '9.0'

target 'YourProjectName' do
  # Add PushEngage SDK dependency
  pod 'PushEngage'
  post_install do |installer|
    installer.pods_project.targets.each do |target|
      target.build_configurations.each do |config|
        config.build_settings['APPLICATION_EXTENSION_API_ONLY'] = 'NO'
      end
    end
  end
end
Enregistrez le Podfile et exécutez les commandes suivantes dans le terminal.
pod repo update
pod install
Ouvrez le fichier <project-name>.xcworkspace nouvellement créé dans Xcode.
Initialisation du SDK iOS PushEngage
Une fois le SDK intégré, nous devrons initialiser le SDK iOS dans votre AppDelegate.
En utilisant le langage Swift, voici comment vous pouvez le faire
import PushEngage
class AppDelegate: UIResponder, UIApplicationDelegate {
    var window: UIWindow?
    override init() {
        super.init()
        PushEngage.swizzleInjection(isEnabled: true)
    }

    func application(_ application: UIApplication, didFinishLaunchingWithOptions launchOptions: [UIApplication.LaunchOptionsKey: Any]?) -> Bool {
       // Set your PushEngage App ID (replace       "APP_ID_FROM_PUSH_ENGAGE_DASHBOARD" with your actual App ID)
        PushEngage.setAppId(key: "APP_ID_FROM_PUSH_ENGAGE_DASHBOARD")
        // Start PushEngage initial info
        PushEngage.setInitialInfo(for: application, with: launchOptions)
        // Enable logs for debugging (optional)
        PushEngage.enableLogs = true
        return true
    }
}
En utilisant le langage Objective-C, voici comment vous pouvez le faire
#import "AppDelegate.h"
@import PushEngage;
@implementation AppDelegate

- (instancetype)init {
    self = [super init];
    if (self) {
       [PushEngage swizzleInjectionWithIsEnabled:YES];
    }
    return self;
}

- (BOOL)application:(UIApplication *)application didFinishLaunchingWithOptions:(NSDictionary *)launchOptions {
// Set your PushEngage App ID (replace "APP_ID_FROM_PUSH_ENGAGE_DASHBOARD" with your actual App ID)
    [PushEngage setAppIdWithKey:@"APP_ID_FROM_PUSH_ENGAGE_DASHBOARD"];
    // Set initial info
    [PushEngage setInitialInfoFor:application with:launchOptions];
    // Enable logs for debugging (optional)
    [PushEngage setEnableLogs:YES];
    return YES;
}

@end
Parfois, lors de l'utilisation de SwiftUI, l'AppDelegate peut ne pas être disponible par défaut. Dans de tels cas, vous pouvez initialiser le SDK PushEngage dans votre fichier App principal. Voici un exemple en SwiftUI
import SwiftUI
import PushEngage

@main
struct PEDemoApp: App {
    @UIApplicationDelegateAdaptor(AppDelegate.self) var appDelegate
    var body: some Scene {
        WindowGroup {
            ContentView()
        }
    }
}

class AppDelegate: NSObject, UIApplicationDelegate {

    override init() {
        super.init()
        PushEngage.swizzleInjection(isEnabled: true)
    }

    func application(_ application: UIApplication, didFinishLaunchingWithOptions launchOptions: [UIApplication.LaunchOptionsKey : Any]? = nil) -> Bool {
        PushEngage.setAppId(key: "APP_ID_FROM_PUSH_ENGAGE_DASHBOARD")
        PushEngage.setIntialInfo(for: application,
                                             with: launchOptions)

        PushEngage.enableLogs = true
        return true
    }
}
Remarque : Lors du développement de votre application, vous pourriez trouver utile d'activer les journaux du SDK PushEngage à des fins de débogage. Cependant, il est essentiel de désactiver les journaux dans la version de production pour éviter d'exposer des informations sensibles.
Création de l'extension de service de notification
L'extension Notification Service améliore la capacité de votre application iOS à recevoir des notifications. Elle est utilisée pour modifier le contenu de la notification ou pour récupérer/traiter des données lors de la réception de la notification. Vous pouvez suivre les étapes ci-dessous pour créer une extension Notification Service :
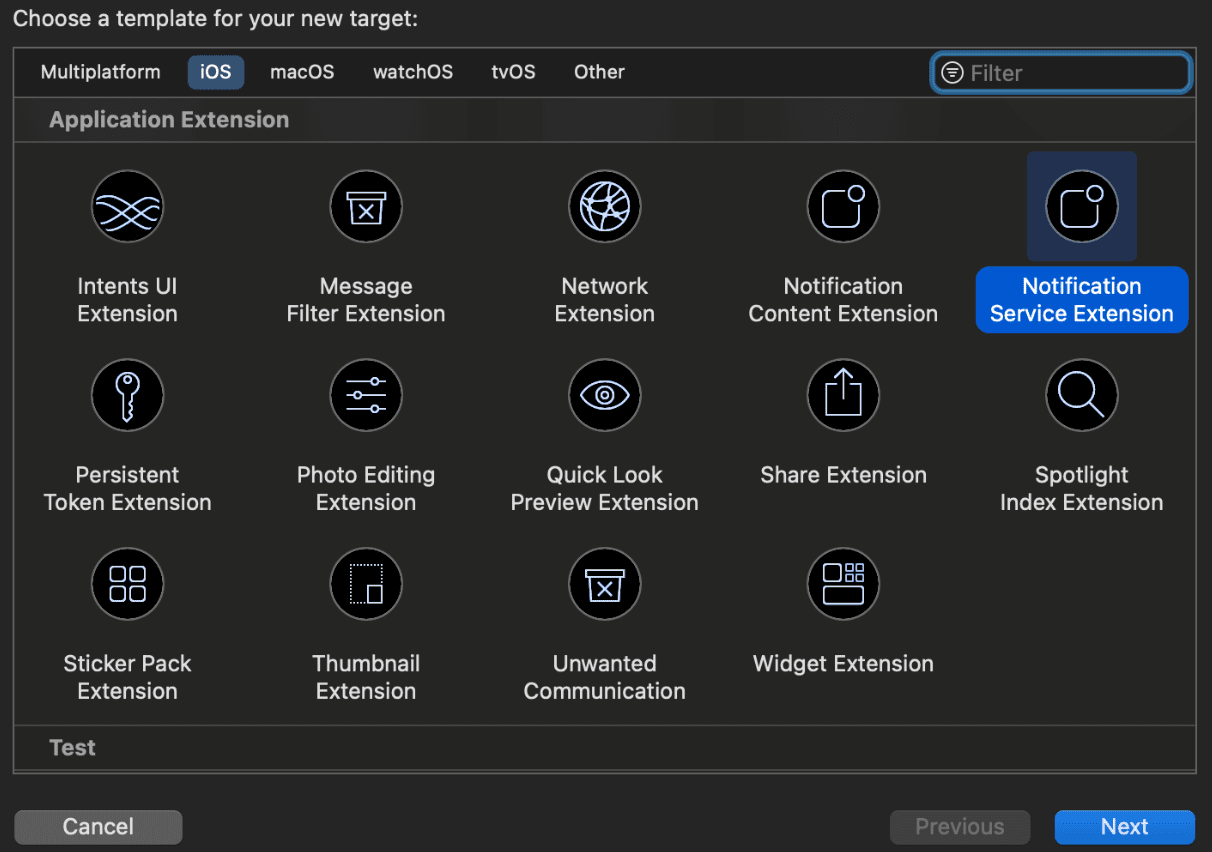
1. Ouvrez Xcode et accédez à votre projet. Choisissez Fichier » Nouveau » Cible dans le menu.
2. Dans la fenêtre de sélection du modèle, choisissez Notification Service Extension et cliquez sur Suivant.
3. Fournissez un nom pour votre extension, par exemple, PushEngageNotificationServiceExtension, et cliquez sur Terminer.
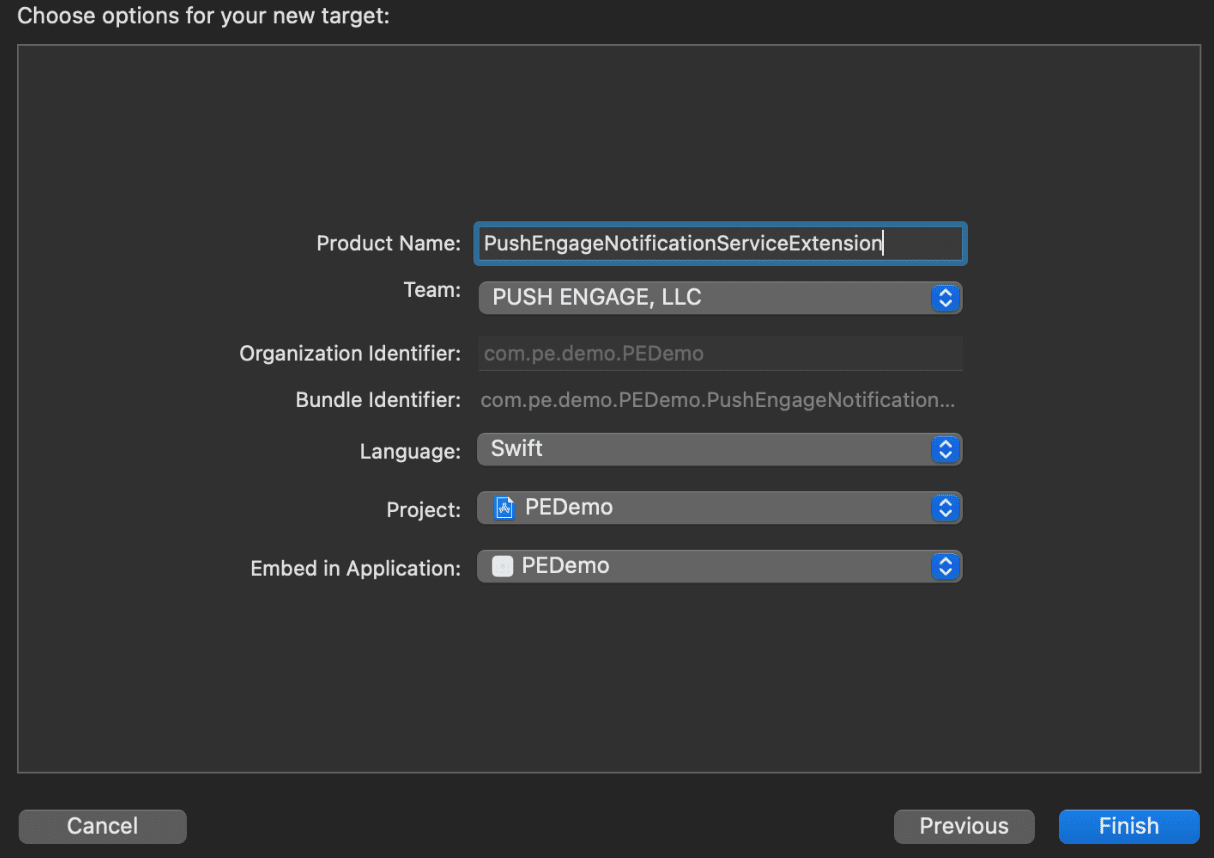
4. Lorsque vous avez terminé de créer l'extension Notification Service, il se peut qu'on vous demande de l'activer. Ne l'activez pas immédiatement.
L'activation de l'extension déplacerait le focus de débogage d'Xcode de votre application vers l'extension. Si vous l'activez par accident, ne vous inquiétez pas ; vous pouvez revenir au débogage de votre application dans Xcode.
Initialisation du SDK PushEngage pour Notification Service Extension
Pour assurer le bon fonctionnement du SDK PushEngage dans votre extension Notification Service iOS, vous devez suivre ces étapes :
1. Ouvrez le Podfile associé à votre projet.
2. Ensuite, vous devez ajouter la dépendance. Insérez l'extrait de code suivant dans votre Podfile :
target 'Your_Main_Application_Target' do
      pod 'PushEngage'
      post_install do |installer|
          installer.pods_project.targets.each do |target|
            target.build_configurations.each do |config|
              config.build_settings['APPLICATION_EXTENSION_API_ONLY'] = 'NO'
          end
        end
      end

      target 'Your_Notification_Service_Extension_Target' do
              pod 'PushEngage'
      end
end
3. Exécutez les commandes suivantes dans votre terminal, dans le répertoire racine de votre projet :
pod repo update
pod install
4. Dans votre cible d'extension Notification Service, importez le framework PushEngage et ajoutez le code d'initialisation nécessaire. Voici comment vous pouvez le faire.
Utilisation de Swift
import UserNotifications
import PushEngage

@available(iOSApplicationExtension 10.0, *)
class PushEngageNotificationServiceExtension: UNNotificationServiceExtension {

    var contentHandler: ((UNNotificationContent) -> Void)?
    var bestAttemptContent: UNMutableNotificationContent?
    var request : UNNotificationRequest?

    override func didReceive(_ request: UNNotificationRequest, withContentHandler contentHandler: @escaping (UNNotificationContent) -> Void) {
        self.request = request
        self.contentHandler = contentHandler
        self.bestAttemptContent = (request.content.mutableCopy() as? UNMutableNotificationContent)

        if let bestContent = bestAttemptContent {
            PushEngage.didReceiveNotificationExtensionRequest(request, bestContentHandler: bestContent)
            contentHandler(bestContent)
        }
    }

    override func serviceExtensionTimeWillExpire() {
        // Called just before the extension will be terminated by the system.
        // Use this as an opportunity to deliver your "best attempt" at modified content, otherwise the original push payload will be used.
        if let contentHandler = contentHandler, let request = request ,let bestAttemptContent =  bestAttemptContent {
            guard let content = PushEngage.serviceExtensionTimeWillExpire(request, content: bestAttemptContent) else {
                contentHandler(bestAttemptContent)
                return
            }
            contentHandler(content)
        }
    }

}
Utilisation d'Objective-C
#import "NotificationService.h"
@import PushEngage;

@interface NotificationService ()

@property (nonatomic, strong) void (^contentHandler)(UNNotificationContent *contentToDeliver);
@property (nonatomic, strong) UNMutableNotificationContent *bestAttemptContent;
@property (nonatomic, strong) UNNotificationRequest *request;

@end

@implementation NotificationService

- (void)didReceiveNotificationRequest:(UNNotificationRequest *)request withContentHandler:(void (^)(UNNotificationContent * _Nonnull))contentHandler {
    self.request = request;
    self.contentHandler = contentHandler;
    self.bestAttemptContent = [request.content mutableCopy];

    if (self.bestAttemptContent) {
        [PushEngage didReceiveNotificationExtensionRequest:request bestContentHandler:self.bestAttemptContent];
        contentHandler(self.bestAttemptContent);
    }
}

- (void)serviceExtensionTimeWillExpire {

    if (self.contentHandler && self.request && self.bestAttemptContent) {
        UNNotificationContent *content = [PushEngage serviceExtensionTimeWillExpire:self.request content:self.bestAttemptContent];
        if (content) {
            self.contentHandler(self.bestAttemptContent);
            return;
        }
    }
    self.contentHandler(self.bestAttemptContent);
}

@end
Création de Notification Content Extension
Pour améliorer la façon dont vous ajoutez une interface utilisateur personnalisée, vous devrez créer une Notification Content Extension. Suivez les étapes ci-dessous pour configurer l'extension :
1. Dans Xcode, allez à Fichier » Nouveau » Cible.
2. Sélectionnez Notification Content Extension et cliquez sur Suivant.
3. Ne sélectionnez pas « Activer » dans la boîte de dialogue qui apparaît après avoir cliqué sur Terminer. L'annulation permet à Xcode de déboguer votre application au lieu de l'extension. Si vous l'activez accidentellement, revenez au débogage de votre application dans Xcode (à côté du bouton d'exécution).
4. Dans le navigateur de projet, sélectionnez le répertoire de projet de niveau supérieur et sélectionnez la cible NotificationContentExtension dans le projet à partir de la liste des cibles créée à l'étape n° 2.
5. Définissez la Cible de déploiement sur iOS 10 ou supérieur, qui est la version d'iOS pour laquelle Apple a publié la prise en charge de cette extension.
Initialisation du SDK PushEngage pour Notification Content Extension
Pour assurer le bon fonctionnement du SDK PushEngage dans votre extension Notification Content iOS, vous devez suivre ces étapes :
1. Ouvrez le Podfile associé à votre projet.
2. Add Dependency, insert the following code snippet into your Podfile:
target 'Your_Main_Application_Target' do
  pod 'PushEngage'
  target 'Your_Notification_Content_Extension' do
    pod 'PushEngage'
  end
end
3. Exécutez les commandes suivantes dans votre terminal, dans le répertoire racine de votre projet :
pod repo update

pod install
4. In your Notification Content Extension target, import the PushEngage framework and add the necessary initialization code. Here’s how you can do it with some examples of UI elements:
Utilisation de Swift
import UIKit
import UserNotifications
import UserNotificationsUI
import PushEngage

@available(iOSApplicationExtension 10.0, *)
class NotificationViewController: UIViewController, UNNotificationContentExtension {

    fileprivate var hostingView: UIHostingController<ContentView>?

    override func viewDidLoad() {
        super.viewDidLoad()
        self.view.backgroundColor = .white
    }

    func didReceive(_ notification: UNNotification) {
        if(notification.request.content.categoryIdentifier == "your_identifier"){
            let payLoad = PushEngage.getCustomUIPayLoad(for: notification.request)
  //pass the payload to your custom View
            let view = CustomView(payLoadInfo: payLoad)
            hostingView = UIHostingController(rootView: view)
If let customView = self.hostingView {
            addChild(hostingView!)
}
        }
    }

}
Objective-C:
#import "NotificationViewController.h"
#import <UserNotifications/UserNotifications.h>
#import <UserNotificationsUI/UserNotificationsUI.h>

@import PushEngage;
@import UIKit;

@interface NotificationViewController () <UNNotificationContentExtension>

@property IBOutlet UILabel *label;
@property (weak, nonatomic) IBOutlet UIImageView *imageView;
@property (weak, nonatomic) IBOutlet UIButton *firstButton;
@property (weak, nonatomic) IBOutlet UIButton *secondButton;

@end

@implementation NotificationViewController

- (IBAction)firstbuttonAction:(id)sender {
    // do what action you want to perform.
}

- (void)viewDidLoad {
    [super viewDidLoad];
    // Do any required interface initialization here.
}

- (void)didReceiveNotification:(UNNotification *)notification {

    NotificationViewController * __block blockSelf = self;
    CustomUIModel *object = [PushEngage getCustomUIPayLoadFor:notification.request];
    dispatch_async(dispatch_get_main_queue(), ^{
        blockSelf.label.text = object.title;
        blockSelf.imageView.image = object.image;
        [blockSelf.firstButton setTitle:object.buttons.firstObject.text forState:UIControlStateNormal];
        [blockSelf.secondButton setTitle:object.buttons.lastObject.text forState:UIControlStateNormal];
        blockSelf = NULL;
    });
}

@end
Ajouter des groupes d'applications
App Groups are essential for communication between the main app, notification service extension, and content extension. You can follow these steps to add App Groups to your iOS project :
If you have an existing app group and want to use that only, skip to step no. 5.
1. In your Xcode project, in the project navigator, select the top-level project directory and select the main target of the app.
2. Navigate to the Signing & Capabilities tab.
3. Click the “+ Capability” button and select App Groups from the list.
4. Click on the + button to add an App Group. Add a unique name to your App Group and click on OK.

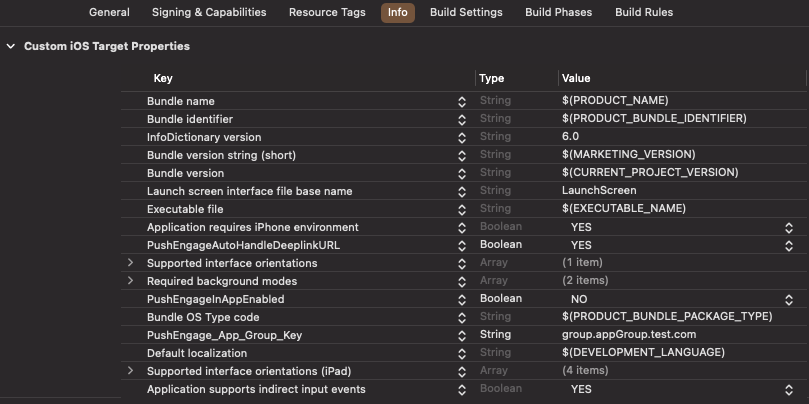
5. In the main editor area, select the main target of your app and create an app group. Please provide the name of the group in your application Info.plist with the key PushEngage_App_Group_Key.
6. Add the same key and value in the Notification Service Extension’s Info.plist file.
7. Select the same app group in the Main Application Target and the YourNotificationServiceExtension.
Do ensure that you are choosing your notification service extension in the above step.
Lien profond
Deep linking enables your subscribers to navigate directly to a specific screen within the application or a designated webpage when interacting with push notifications. By default, if you provide a valid URL, the subscriber will be redirected to that webpage.
Handling Web URLs:
- Provide the
PushEngageInAppEnabledto YES in Info.plist, then the URL will load within the application using WKWebview. - Provide the
PushEngageInAppEnabledto NO in Info.plist, if you want your subscriber to redirect to safari to load the URL. - Provide the
PushEngageAutoHandleDeeplinkURLto YES in Info.plist, then the SDK will handle the deep link according toPushEngageInAppEnabledconfiguration. - Provide the
PushEngageAutoHandleDeeplinkURLto NO in Info.plist, then the control of handling the deep link will be given to the client app from the SDK. - If the deeplink is not a valid URL, you need to configure navigation by using
setNotificationOpenHandlerin theAppDelegatewithin thedidFinishLaunchingWithOptionsmethod. This allows you to navigate to a specific screen based on the provided string, as shown below. If not configured, the SDK will simply open the application.
Using Swift:
class AppDelegate: UIResponder, UIApplicationDelegate {

    var window: UIWindow?


    override init() {
        super.init()
        // method Swizzling enabled for the application.
        PushEngage.swizzleInjection(isEnabled: true)
    }

   func application(_ application: UIApplication, didFinishLaunchingWithOptions launchOptions: [UIApplication.LaunchOptionsKey: Any]?) -> Bool {

     PushEngage.setAppId(key: "APP_ID_FROM_PUSH_ENGAGE_DASHBOARD")
     PushEngage.setInitialInfo(for: application,with: launchOptions)


     // Notification open handler.
     // deep linking screen
     // here ShoesScreen and pepay are example deep link texts
     PushEngage.setNotificationOpenHandler { (result) in
            //replace this block with your own handling
            let additionData = result.notification.additionalData
            if result.notificationAction.actionID == "ShoesScreen" {
                print(additionData ?? [])
                let storyBoard = UIStoryboard(name: "Main", bundle: .main)
                let viewController = storyBoard.instantiateViewController(withIdentifier: "SportViewController")
                let navcontroller = application.windows.first?.rootViewController as? UINavigationController
                navcontroller?.popToRootViewController(animated: true)
                navcontroller?.pushViewController(viewController, animated: true)
            } else if result.notificationAction.actionID == "SalesScreen" {
                let storyBoard = UIStoryboard(name: "Main", bundle: .main)
                let viewController = storyBoard.instantiateViewController(withIdentifier: "NotificationApiTestViewconttoller")
                let navcontroller = application.windows.first?.rootViewController as? UINavigationController
                navcontroller?.popToRootViewController(animated: true)
                navcontroller?.pushViewController(viewController, animated: true)
            } else if result.notificationAction.actionID == "pepay" {
                let storyBoard = UIStoryboard(name: "Main", bundle: .main)
                let viewController = storyBoard.instantiateViewController(withIdentifier: "PEPay")
                let navcontroller = application.windows.first?.rootViewController as? UINavigationController
                navcontroller?.popToRootViewController(animated: true)
                navcontroller?.pushViewController(viewController, animated: true)
            }
        }

        PushEngage.enableLogs = true

        return true
    }
}
Using Objective-C :
@implementation AppDelegate


- (instancetype)init
{
    self = [super init];
    if (self) {
       [PushEngage swizzleInjectionWithIsEnabled: YES];
    }
    return self;
}

typedef void (^PEnotificationOpenHandler)(PENotificationOpenResult * nonnull);

- (BOOL)application:(UIApplication *)application didFinishLaunchingWithOptions:(NSDictionary *)launchOptions {
    UNUserNotificationCenter.currentNotificationCenter.delegate = self;
    PEnotificationOpenHandler actionHandler = ^void(PENotificationOpenResult *result) {
       //replace this block with your own handling
        if ([result.notificationAction.actionID isEqualToString: @"ShoesScreen"]) {
            AddToCart *controller = [AddToCart new];
            UINavigationController *navigationController = (UINavigationController *) application.windows.firstObject.rootViewController;
            [navigationController popToRootViewControllerAnimated:YES];
            [navigationController pushViewController:controller animated:YES];
        } else if ([result.notificationAction.actionID isEqualToString: @"SalesScreen"]) {
            SportsViewcontroller *controller = [SportsViewcontroller new];
            UINavigationController *navigationController = (UINavigationController *) application.windows.firstObject.rootViewController;
            [navigationController popToRootViewControllerAnimated:YES];
            [navigationController pushViewController:controller animated:YES];
        }
    };
    application.applicationIconBadgeNumber = 0;
    [PushEngage setAppIdWithKey:@"APP_ID_FROM_PUSH_ENGAGE_DASHBOARD"];
    [PushEngage setInitialInfoFor:application with:launchOptions];
    [PushEngage setNotificationOpenHandlerWithBlock:actionHandler];
    [PushEngage setEnableLogs:true];
    return YES;
}
@end
Gestion des notifications au premier plan
When notifications come in the foreground you have to make a decision whether or not to show the notification alert to the device.To handle notifications in foreground use the setNotificationWillShowInForgroundHandler
Si le bloc de complétion n'est pas appelé par vous, le SDK appellera le bloc de complétion après 29 secondes. Dans tous les cas, notification silencieuse ou alerte lorsque l'application est en premier plan.
Utilisation de Swift
class AppDelegate: UIResponder, UIApplicationDelegate {

    var window: UIWindow?


    override init() {
        super.init()
        // method Swizzling enabled for the application.
       PushEngage.swizzleInjection(isEnabled: true)
    }

    func application(_ application: UIApplication, didFinishLaunchingWithOptions launchOptions: [UIApplication.LaunchOptionsKey: Any]?) -> Bool {

        PushEngage.setAppId(key: "APP_ID_FROM_PUSH_ENGAGE_DASHBOARD")
        PushEngage.setInitialInfo(for: application, with: launchOptions)

        // Notification handler when notification deliver's and app is in foreground.

        PushEngage.setNotificationWillShowInForgroundHandler { notification, completion in
            if notification.contentAvailable == 1 {
                // in case the developer failed to set the completion handler. After 29 sec the handler will call from the SDK after 29 sec.
                completion(nil)
            } else {
                completion(notification)
            }
        }

        PushEngage.enableLogs = true

        return true
    }
}
Utilisation d'Objective-C
@implementation AppDelegate


- (instancetype)init
{
    self = [super init];
    if (self) {
       [PushEngage swizzleInjectionWithIsEnabled: YES];
    }
    return self;
}
// please create this handlers
typedef void (^ _Nonnull PENotificationDisplayHandler)(PENotification * _Nullable);

-(BOOL)application:(UIApplication*)application didFinishLaunchingWithOptions:(NSDictionary *)launchOptions {
    UNUserNotificationCenter.currentNotificationCenter.delegate = self;

    [PushEngage setNotificationWillShowInForgroundHandlerWithBlock:^(PENotification * _Nonnull notification, PENotificationDisplayHandler completion) {
        if (notification.contentAvailable == 1) {
            completion(nil);
        } else {
            completion(notification);
        }
    }];
    [PushEngage setAppIdWithKey:@"APP_ID_FROM_PUSH_ENGAGE_DASHBOARD"];
    [PushEngage setInitialInfoFor:application with:launchOptions];
    [PushEngage setEnableLogs:true];
    return YES;
}
@end
Dépannage
Problème :
Vous rencontrez des problèmes de build liés au sandboxing.
Solution :
- Ouvrez votre projet dans Xcode.
- Accédez aux Build Settings.
- Localisez l'option User Script Sandboxing.
- Réglez-la sur No.
Problème :
Vous utilisez à la fois le SDK Firebase et le SDK PushEngage avec le méthode swizzling activé pour les deux, et cela cause des problèmes.
Solution :
Désactivez le méthode swizzling pour le SDK PushEngage et suivez les étapes manuelles pour gérer les méthodes PushEngage. Vous trouverez des instructions détaillées ici :
Documentation du SDK iOS PushEngage
Si vous souhaitez explorer davantage les capacités du SDK iOS, vous pouvez consulter notre documentation API détaillée.
Si vous rencontrez des problèmes, veuillez nous contacter en cliquant ici. Notre équipe de support pourra vous aider.


