Aviso: Não há documentação legada disponível para este item, portanto, você está vendo a documentação atual.
Agora você pode implementar notificações push para seu aplicativo iOS usando nosso SDK de App iOS. Você precisará da ajuda do seu desenvolvedor, pois será uma integração única antes que você possa enviar notificações push para eles usando o painel do PushEngage.
Antes de Começar
- Você precisará do Xcode instalado em seu sistema.
- Uma conta de desenvolvedor válida e um ID de App configurados no Portal de Desenvolvedor da Apple.
Seguiremos estas etapas para habilitar notificações push para seu Aplicativo iOS.
- Configurando Seu App
- Integrando o SDK iOS do PushEngage
- Inicializando o SDK iOS do PushEngage
- Criando a Extensão de Serviço de Notificação
- Inicializando o SDK do PushEngage para a Extensão de Serviço de Notificação
- Criando a Extensão de Conteúdo de Notificação
- Inicializando o SDK do PushEngage para a Extensão de Conteúdo de Notificação
- Adicionar Grupos de Apps
- Vinculação profunda
- Lidando com Notificações em Primeiro Plano
- Solução de Problemas
Configurando Seu App
Habilitar Notificações Remotas
1. Abra seu projeto Xcode e selecione o projeto raiz no Navegador de Projetos. Escolha seu principal destino de app.
2. Navegue até Assinatura e Recursos. Certifique-se de que o recurso Modos de Segundo Plano esteja adicionado. Se não estiver, adicione-o clicando no botão “+ Recurso”.
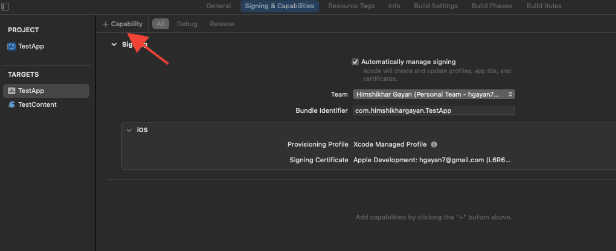
3. Da mesma forma, certifique-se de que o recurso Notificações Push esteja adicionado. Se não estiver, adicione-o usando o botão “+ Recurso”.
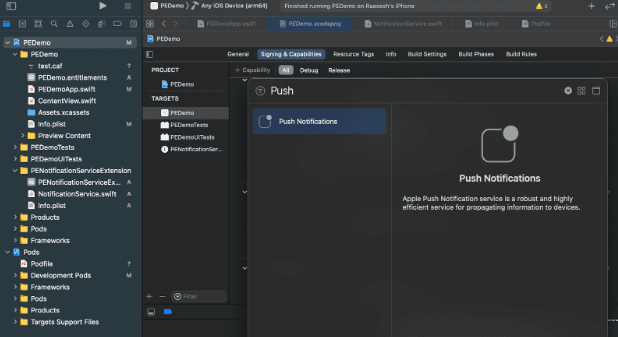
Se o recurso Notificações Push não estiver visível no Xcode. Você precisa seguir as etapas abaixo:
1. Vá para sua conta de Desenvolvedor Apple.
2. Navegue até Certificates, Identifiers & Profiles.
3. Selecione o identificador do seu App. Edite a configuração do seu App ID e certifique-se de que Push Notifications esteja ativado.
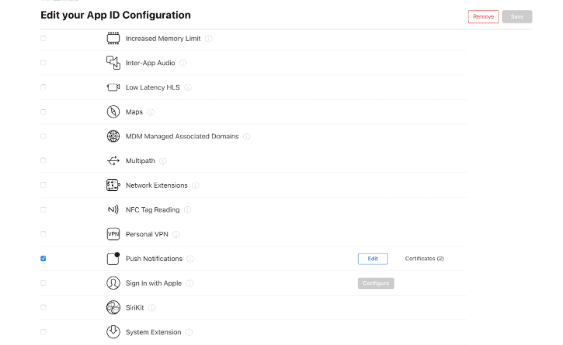
4. Retorne ao Xcode e tente adicionar a capacidade de “Push Notifications” novamente.
Habilitar Modos de Segundo Plano
1. No seu projeto Xcode, navegue até Signing & Capabilities.
2. Dentro de Background Modes, ative tanto Remote notifications quanto Background Fetch.
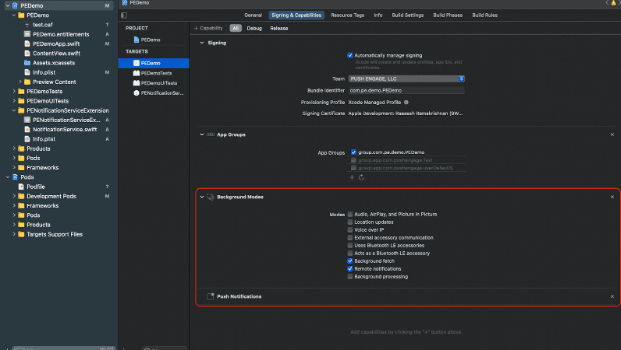
Esta etapa garante que seu aplicativo possa lidar eficientemente com notificações remotas e buscas em segundo plano.
Aqui está o guia para criar seu certificado APNs.
Integrando o SDK iOS do PushEngage
O SDK iOS do PushEngage está disponível como um pacote Swift e um pod CocoaPods. Solicitamos que você revise ambos os métodos, mas use apenas um deles ao concluir sua configuração.
Integrando o SDK iOS do PushEngage com SPM
Para integrar o SDK iOS do PushEngage usando o Swift Package Manager, siga estas etapas:
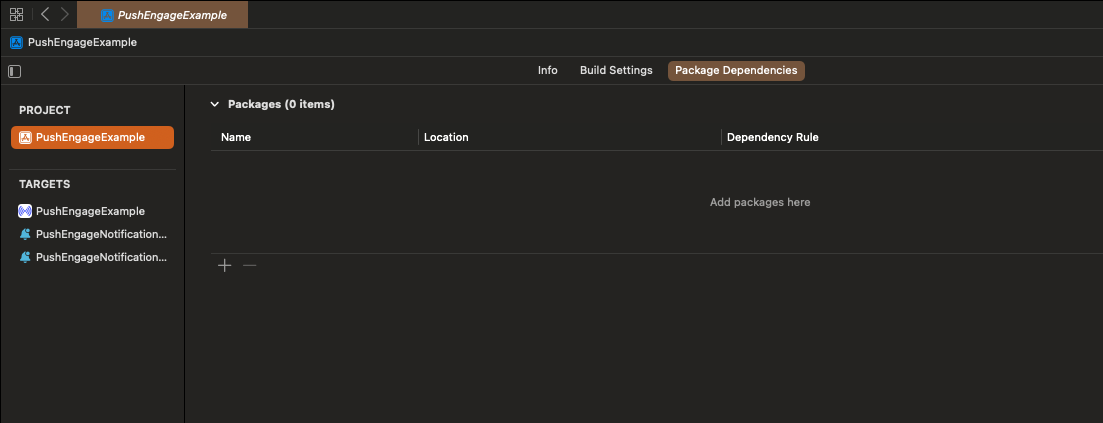
- Abra o Xcode e navegue até seu projeto. Selecione a aba de dependências do pacote. Clique no botão +.
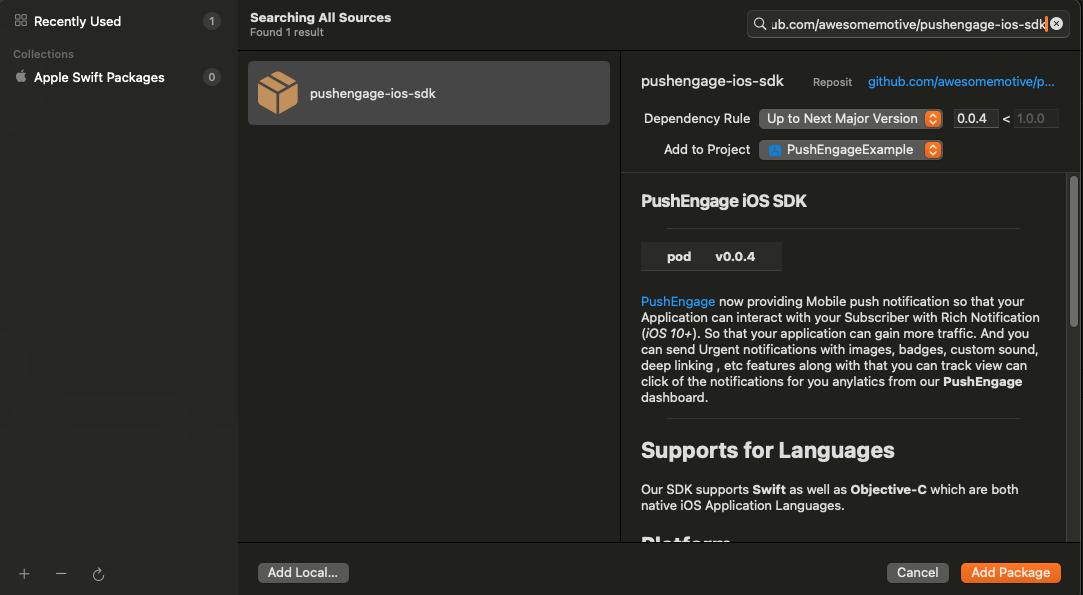
- Cole a URL
https://github.com/awesomemotive/pushengage-ios-sdkna barra de pesquisa. Clique em “Add Package”.
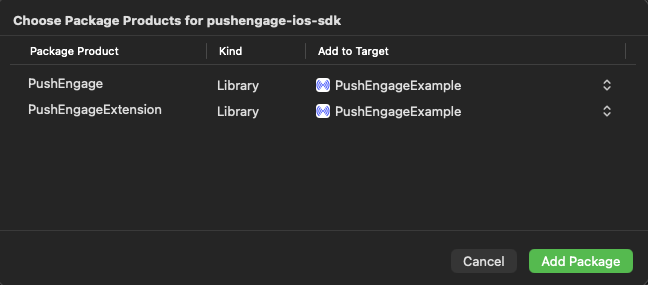
- Selecione o destino principal do seu app em “Add to Target” e clique em “Add Package”.
Integrando o SDK iOS do PushEngage com CocoaPods
Para integrar o SDK iOS do PushEngage usando CocoaPods, você precisa seguir estas etapas:
Se o CocoaPods não estiver instalado, feche seu projeto Xcode atual e execute o seguinte comando no diretório raiz do seu projeto
sudo gem install cocoapods
Execute o seguinte comando para inicializar um Podfile em seu projeto
pod initAbra o Podfile recém-criado usando um editor de texto ou seguindo o comando no seu terminal no diretório raiz do projeto.
open PodfileAdicione a dependência PushEngage sob o destino do seu projeto. Certifique-se de que seu Podfile se pareça com o exemplo abaixo
# Uncomment the next line to define a global platform for your project
# platform :ios, '9.0'

target 'YourProjectName' do
  # Add PushEngage SDK dependency
  pod 'PushEngage'
end
Salve o Podfile e execute os seguintes comandos no terminal.
pod repo update
pod install
Abra o arquivo <project-name>.xcworkspace recém-criado no Xcode.
Inicializando o SDK iOS do PushEngage
Depois de integrar o SDK, precisaremos inicializar o SDK iOS em seu AppDelegate.
Usando a linguagem Swift, veja como você pode fazer isso
import PushEngage
class AppDelegate: UIResponder, UIApplicationDelegate {
    var window: UIWindow?
    override init() {
        super.init()
        PushEngage.swizzleInjection(isEnabled: true)
    }

    func application(_ application: UIApplication, didFinishLaunchingWithOptions launchOptions: [UIApplication.LaunchOptionsKey: Any]?) -> Bool {
       // Set your PushEngage App ID (replace       "APP_ID_FROM_PUSH_ENGAGE_DASHBOARD" with your actual App ID)
        PushEngage.setAppId(id: "APP_ID_FROM_PUSH_ENGAGE_DASHBOARD")
        // Start PushEngage initial info
        PushEngage.setInitialInfo(for: application, with: launchOptions)
        // Enable logs for debugging (optional)
        PushEngage.enableLogs = true
        return true
    }
}
Usando a linguagem Objective-C, veja como você pode fazer isso
#import "AppDelegate.h"
@import PushEngage;
@implementation AppDelegate

- (instancetype)init {
    self = [super init];
    if (self) {
       [PushEngage swizzleInjectionWithIsEnabled:YES];
    }
    return self;
}

- (BOOL)application:(UIApplication *)application didFinishLaunchingWithOptions:(NSDictionary *)launchOptions {
// Set your PushEngage App ID (replace "APP_ID_FROM_PUSH_ENGAGE_DASHBOARD" with your actual App ID)
    [PushEngage setAppIDWithId:@"APP_ID_FROM_PUSH_ENGAGE_DASHBOARD"];
    // Set initial info
    [PushEngage setInitialInfoFor:application with:launchOptions];
    // Enable logs for debugging (optional)
    [PushEngage setEnableLogs:YES];
    return YES;
}

@end
Às vezes, ao usar SwiftUI, o AppDelegate pode não estar disponível por padrão. Nesses casos, você pode inicializar o SDK PushEngage no seu arquivo App principal. Aqui está um exemplo em SwiftUI
import SwiftUI
import PushEngage

@main
struct PEDemoApp: App {
    @UIApplicationDelegateAdaptor(AppDelegate.self) var appDelegate
    var body: some Scene {
        WindowGroup {
            ContentView()
        }
    }
}

class AppDelegate: NSObject, UIApplicationDelegate {

    override init() {
        super.init()
        PushEngage.swizzleInjection(isEnabled: true)
    }

    func application(_ application: UIApplication, didFinishLaunchingWithOptions launchOptions: [UIApplication.LaunchOptionsKey : Any]? = nil) -> Bool {
        PushEngage.setAppID(id: "APP_ID_FROM_PUSH_ENGAGE_DASHBOARD")
        PushEngage.setIntialInfo(for: application,
                                             with: launchOptions)

        PushEngage.enableLogs = true
        return true
    }
}
Nota: Ao desenvolver seu aplicativo, pode ser útil ativar os logs do SDK PushEngage para fins de depuração. No entanto, é essencial desativar os logs na compilação de produção para evitar a exposição de informações confidenciais.
Criando a Extensão de Serviço de Notificação
A Extensão de Serviço de Notificação aprimora a capacidade do seu aplicativo iOS de receber notificações. Isso é usado para modificar o conteúdo da notificação ou buscar/processar quaisquer dados ao receber a notificação. Você pode seguir as etapas abaixo para criar uma Extensão de Serviço de Notificação:
1. Abra o Xcode e navegue até seu projeto. Escolha File » New » Target no menu.
2. Na janela de seleção de modelo, escolha Notification Service Extension e clique em Next.
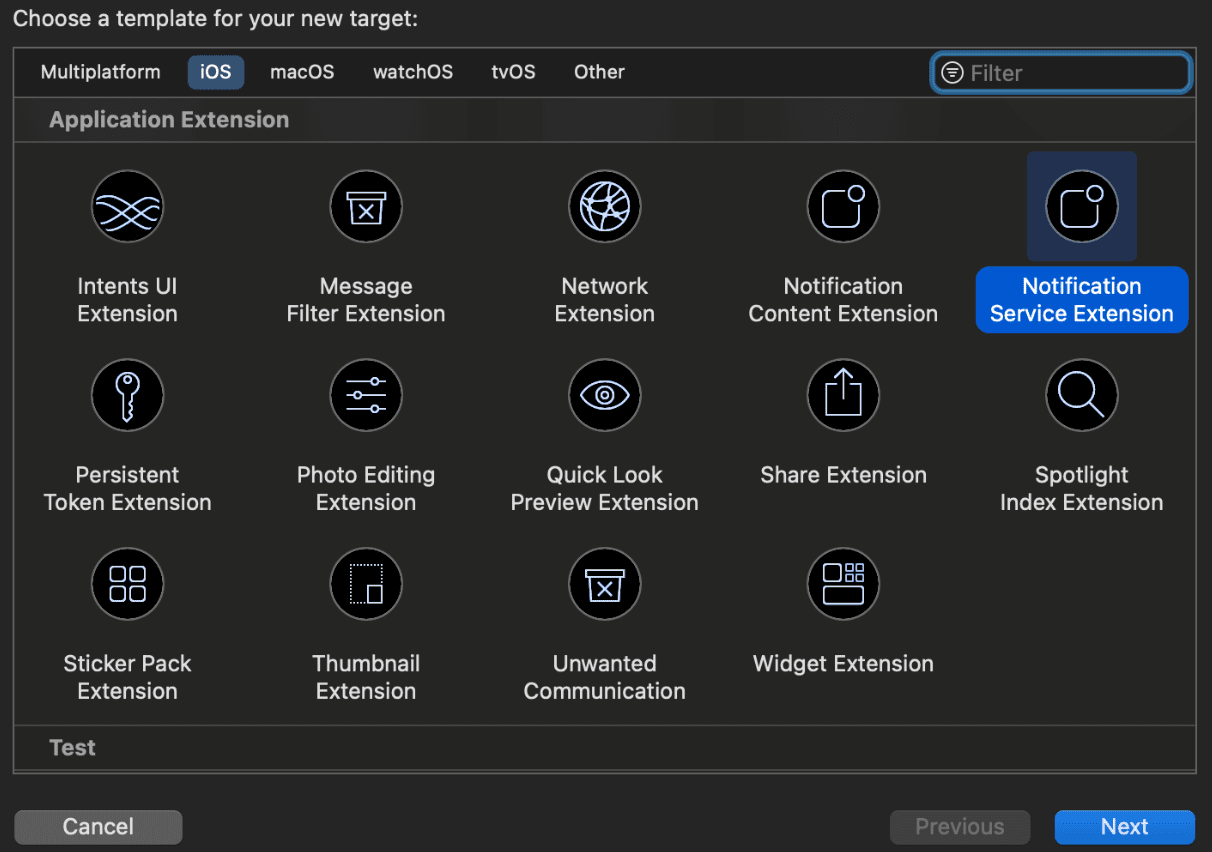
3. Forneça um nome para sua extensão, por exemplo, PushEngageNotificationServiceExtension, e clique em Concluir.
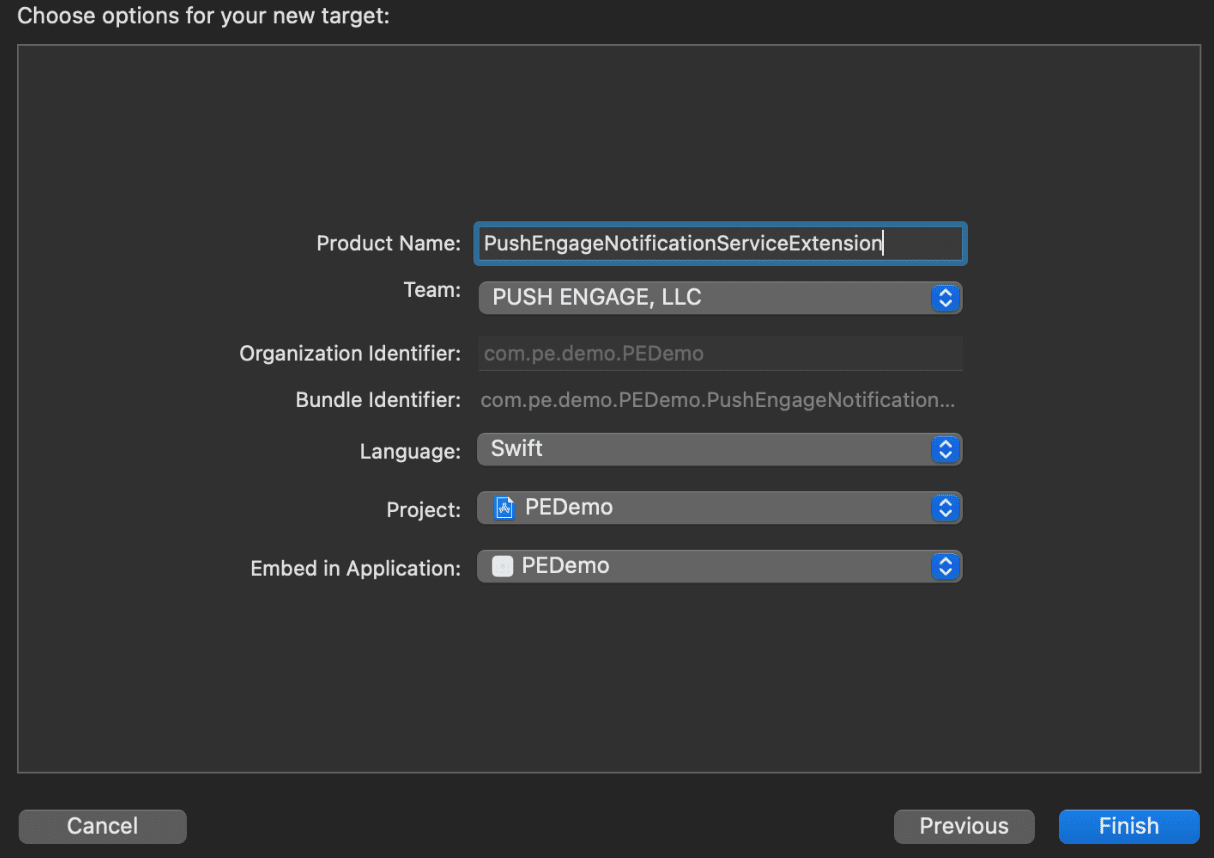
4. Ao terminar de criar a Extensão de Serviço de Notificação, você pode ser solicitado a ativá-la. Não a ative imediatamente.
Ativar a extensão mudaria o foco de depuração do Xcode de seu aplicativo para a extensão. Se você a ativar por acidente, não se preocupe; você pode voltar a depurar seu aplicativo dentro do Xcode.
Inicializando o SDK do PushEngage para a Extensão de Serviço de Notificação
Para garantir o funcionamento correto do SDK PushEngage em sua Extensão de Serviço de Notificação do iOS, você precisa seguir estas etapas:
1. Abra o Podfile associado ao seu projeto.
2. Em seguida, você precisa adicionar a Dependência. Insira o seguinte trecho de código em seu Podfile:
target 'Your_Main_Application_Target' do
  use_frameworks!
  pod 'PushEngage'
end

target 'Your_Notification_Service_Extension_Target' do
  use_frameworks!
  pod 'PushEngageExtension'
end
3. Execute os seguintes comandos em seu terminal dentro do diretório raiz do seu projeto:
pod repo update
pod install
4. Em seu destino de Extensão de Serviço de Notificação, importe o framework PushEngage e adicione o código de inicialização necessário. Veja como você pode fazer isso.
Usando Swift
import UserNotifications
import PushEngageExtension

class NotificationService: UNNotificationServiceExtension {

    var contentHandler: ((UNNotificationContent) -> Void)?
    var bestAttemptContent: UNMutableNotificationContent?
    var request: UNNotificationRequest?

    override func didReceive(_ request: UNNotificationRequest,
                             withContentHandler contentHandler: @escaping (UNNotificationContent) -> Void) {
        self.request = request
        self.contentHandler = contentHandler
        self.bestAttemptContent = (request.content.mutableCopy() as? UNMutableNotificationContent)

        if let bestContent = bestAttemptContent {
            PushEngageExtension.didReceiveNotificationExtensionRequest(request, bestContentHandler: bestContent)
            contentHandler(bestContent)
        }
    }

    override func serviceExtensionTimeWillExpire() {
        // Called just before the extension will be terminated by the system.
        // Use this as an opportunity to deliver your "best attempt" at modified
        // content, otherwise the original push payload will be used.
        if let contentHandler = contentHandler, let request = request, let bestAttemptContent = bestAttemptContent {
            guard let content = PushEngageExtension.serviceExtensionTimeWillExpire(request, content: bestAttemptContent) else {
                contentHandler(bestAttemptContent)
                return
            }
            contentHandler(content)
        }
    }
}
Usando Objective-C
#import "NotificationService.h"
@import PushEngageExtension;

@interface NotificationService ()

@property (nonatomic, strong) void (^contentHandler)(UNNotificationContent *contentToDeliver);
@property (nonatomic, strong) UNMutableNotificationContent *bestAttemptContent;
@property (nonatomic, strong) UNNotificationRequest *request;

@end

@implementation NotificationService

- (void)didReceiveNotificationRequest:(UNNotificationRequest *)request
                   withContentHandler:(void (^)(UNNotificationContent * _Nonnull))contentHandler {
    self.request = request;
    self.contentHandler = contentHandler;
    self.bestAttemptContent = [request.content mutableCopy];

    if (self.bestAttemptContent) {
        [PushEngageExtension didReceiveNotificationExtensionRequest:request
                                                 bestContentHandler:self.bestAttemptContent];
        contentHandler(self.bestAttemptContent);
    }
}

- (void)serviceExtensionTimeWillExpire {
    if (self.contentHandler && self.request && self.bestAttemptContent) {
        UNNotificationContent *content = [PushEngageExtension serviceExtensionTimeWillExpire:self.request
                                                                                     content:self.bestAttemptContent];
        if (content) {
            self.contentHandler(content);
            return;
        }
    }
    self.contentHandler(self.bestAttemptContent);
}

@end
Criando a Extensão de Conteúdo de Notificação
Para melhorar a forma como você adiciona uma interface personalizada, você precisará criar uma Extensão de Conteúdo de Notificação. Siga as etapas abaixo para configurar a extensão:
1. No Xcode, vá em Arquivo » Novo » Destino.
2. Selecione Extensão de Conteúdo de Notificação e clique em Avançar.
3. Não selecione “Ativar” na caixa de diálogo que aparece após clicar em Concluir. Cancelar mantém o Xcode depurando seu aplicativo em vez da extensão. Se você ativá-la acidentalmente, volte a depurar seu aplicativo dentro do Xcode (ao lado do botão de execução).
4. No navegador do projeto, selecione o diretório raiz do projeto e selecione o destino NotificationContentExtension na lista de destinos criada na etapa nº 2.
5. Defina o Alvo de Implantação para iOS 10 ou superior, que é a versão do iOS que a Apple lançou o suporte para esta extensão.
Inicializando o SDK do PushEngage para a Extensão de Conteúdo de Notificação
Para garantir o funcionamento correto do SDK PushEngage em sua Extensão de Conteúdo de Notificação do iOS, você precisa seguir estas etapas:
1. Abra o Podfile associado ao seu projeto.
2. Adicione Dependência, insira o seguinte trecho de código em seu Podfile:
target 'PushEngageNotificationContentExtension' do
  use_frameworks!
  pod 'PushEngageExtension'
end
3. Execute os seguintes comandos em seu terminal dentro do diretório raiz do seu projeto:
pod repo update

pod install
4. Em seu destino de Extensão de Conteúdo de Notificação, importe o framework PushEngage e adicione o código de inicialização necessário. Veja como você pode fazer isso com alguns exemplos de elementos de interface do usuário:
Usando Swift
import UIKit
import UserNotifications
import UserNotificationsUI
import SwiftUI
import PushEngageExtension

@available(iOSApplicationExtension 13.0, *)
class NotificationViewController: UIViewController, UNNotificationContentExtension {

    fileprivate var hostingView: UIHostingController<ContentView>?

    override func viewDidLoad() {
        super.viewDidLoad()
        self.view.backgroundColor = .white
    }

    func didReceive(_ notification: UNNotification) {
        if notification.request.content.categoryIdentifier == "your_identifier" {
            let payLoad = PushEngageExtension.getCustomUIPayLoad(for: notification.request)
            // Pass the payload to your custom SwiftUI view
            let view = ContentView(payLoadInfo: payLoad)
            hostingView = UIHostingController(rootView: view)
            if let hostingView = hostingView {
                addChild(hostingView)
                hostingView.view.translatesAutoresizingMaskIntoConstraints = false
                self.view.addSubview(hostingView.view)
                NSLayoutConstraint.activate([
                    hostingView.view.leadingAnchor.constraint(equalTo: self.view.leadingAnchor),
                    hostingView.view.trailingAnchor.constraint(equalTo: self.view.trailingAnchor),
                    hostingView.view.topAnchor.constraint(equalTo: self.view.topAnchor),
                    hostingView.view.bottomAnchor.constraint(equalTo: self.view.bottomAnchor)
                ])
            }
        }
    }
}
Objective-C:
#import "NotificationViewController.h"
#import <UserNotifications/UserNotifications.h>
#import <UserNotificationsUI/UserNotificationsUI.h>

@import PushEngageExtension;
@import UIKit;

@interface NotificationViewController () <UNNotificationContentExtension>

@property IBOutlet UILabel *label;
@property (weak, nonatomic) IBOutlet UIImageView *imageView;
@property (weak, nonatomic) IBOutlet UIButton *firstButton;
@property (weak, nonatomic) IBOutlet UIButton *secondButton;

@end

@implementation NotificationViewController

- (IBAction)firstbuttonAction:(id)sender {
    // do what action you want to perform.
}

- (void)viewDidLoad {
    [super viewDidLoad];
    // Do any required interface initialization here.
}

- (void)didReceiveNotification:(UNNotification *)notification {

    NotificationViewController * __block blockSelf = self;
    CustomUIModel *object = [PushEngageExtension getCustomUIPayLoadFor:notification.request];
    dispatch_async(dispatch_get_main_queue(), ^{
        blockSelf.label.text = object.title;
        blockSelf.imageView.image = object.image;
        [blockSelf.firstButton setTitle:object.buttons.firstObject.text forState:UIControlStateNormal];
        [blockSelf.secondButton setTitle:object.buttons.lastObject.text forState:UIControlStateNormal];
        blockSelf = NULL;
    });
}

@end
Adicionar Grupos de Apps
Grupos de Aplicativos são essenciais para a comunicação entre o aplicativo principal, a extensão de serviço de notificação e a extensão de conteúdo. Você pode seguir estas etapas para adicionar Grupos de Aplicativos ao seu projeto iOS:
Se você tem um grupo de aplicativos existente e deseja usá-lo apenas, pule para a etapa nº 5.
1. Em seu projeto Xcode, no navegador do projeto, selecione o diretório raiz do projeto e selecione o destino principal do aplicativo.
2. Navegue até a aba Assinatura e Recursos (& Capabilities).
3. Clique no botão “+ Recurso” (+ Capability) e selecione Grupos de Aplicativos (App Groups) na lista.
4. Clique no botão + para adicionar um Grupo de Aplicativos. Adicione um nome exclusivo ao seu Grupo de Aplicativos e clique em OK.
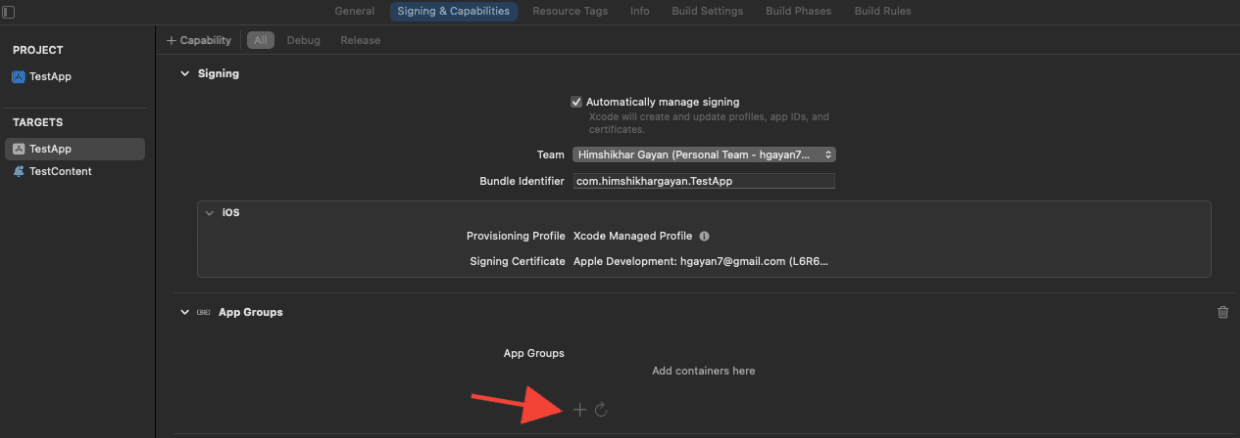
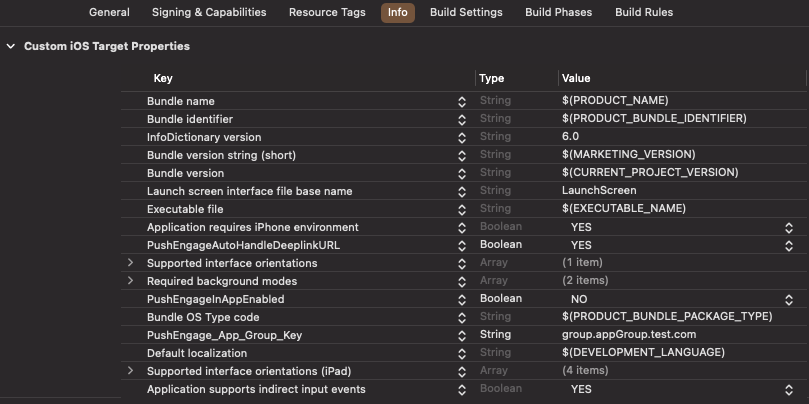
5. Na área do editor principal, selecione o destino principal do seu aplicativo e crie um grupo de aplicativos. Por favor, forneça o nome do grupo em seu Info.plist do aplicativo com a chave PushEngage_App_Group_Key.
6. Adicione a mesma chave e valor no arquivo Info.plist da Notification Service Extension.
7. Selecione o mesmo grupo de aplicativos no Target do Aplicativo Principal e na sua NotificationServiceExtension.
Certifique-se de que você está escolhendo sua extensão de serviço de notificação na etapa acima.
Vinculação profunda
A vinculação profunda permite que seus assinantes naveguem diretamente para uma tela específica dentro do aplicativo ou para uma página da web designada ao interagir com notificações push. Por padrão, se você fornecer um URL válido, o assinante será redirecionado para essa página da web.
Tratamento de URLs da Web:
- Forneça
PushEngageInAppEnabledcomo YES no Info.plist, então o URL será carregado dentro do aplicativo usando WKWebview. - Forneça
PushEngageInAppEnabledcomo NO no Info.plist, se você quiser que seu assinante seja redirecionado para o Safari para carregar o URL. - Forneça
PushEngageAutoHandleDeeplinkURLcomo YES no Info.plist, então o SDK lidará com o deep link de acordo com a configuraçãoPushEngageInAppEnabled. - Forneça
PushEngageAutoHandleDeeplinkURLcomo NO no Info.plist, então o controle de tratamento do deep link será dado ao aplicativo cliente a partir do SDK. - Se o deeplink não for um URL válido, você precisará configurar a navegação usando
setNotificationOpenHandlernoAppDelegatedentro do métododidFinishLaunchingWithOptions. Isso permite que você navegue para uma tela específica com base na string fornecida, como mostrado abaixo. Se não for configurado, o SDK simplesmente abrirá o aplicativo.
Usando Swift:
class AppDelegate: UIResponder, UIApplicationDelegate {

    var window: UIWindow?


    override init() {
        super.init()
        // method Swizzling enabled for the application.
        PushEngage.swizzleInjection(isEnabled: true)
    }

   func application(_ application: UIApplication, didFinishLaunchingWithOptions launchOptions: [UIApplication.LaunchOptionsKey: Any]?) -> Bool {

     PushEngage.setAppID(id: "APP_ID_FROM_PUSH_ENGAGE_DASHBOARD")
     PushEngage.setInitialInfo(for: application,with: launchOptions)


     // Notification open handler.
     // deep linking screen
     // here ShoesScreen and pepay are example deep link texts
     PushEngage.setNotificationOpenHandler { (result) in
            //replace this block with your own handling
            let additionData = result.notification.additionalData
            if result.notificationAction.actionID == "ShoesScreen" {
                print(additionData ?? [])
                let storyBoard = UIStoryboard(name: "Main", bundle: .main)
                let viewController = storyBoard.instantiateViewController(withIdentifier: "SportViewController")
                let navcontroller = application.windows.first?.rootViewController as? UINavigationController
                navcontroller?.popToRootViewController(animated: true)
                navcontroller?.pushViewController(viewController, animated: true)
            } else if result.notificationAction.actionID == "SalesScreen" {
                let storyBoard = UIStoryboard(name: "Main", bundle: .main)
                let viewController = storyBoard.instantiateViewController(withIdentifier: "NotificationApiTestViewconttoller")
                let navcontroller = application.windows.first?.rootViewController as? UINavigationController
                navcontroller?.popToRootViewController(animated: true)
                navcontroller?.pushViewController(viewController, animated: true)
            } else if result.notificationAction.actionID == "pepay" {
                let storyBoard = UIStoryboard(name: "Main", bundle: .main)
                let viewController = storyBoard.instantiateViewController(withIdentifier: "PEPay")
                let navcontroller = application.windows.first?.rootViewController as? UINavigationController
                navcontroller?.popToRootViewController(animated: true)
                navcontroller?.pushViewController(viewController, animated: true)
            }
        }

        PushEngage.enableLogs = true

        return true
    }
}
Usando Objective-C :
@implementation AppDelegate


- (instancetype)init
{
    self = [super init];
    if (self) {
       [PushEngage swizzleInjectionWithIsEnabled: YES];
    }
    return self;
}

typedef void (^PEnotificationOpenHandler)(PENotificationOpenResult * nonnull);

- (BOOL)application:(UIApplication *)application didFinishLaunchingWithOptions:(NSDictionary *)launchOptions {
    UNUserNotificationCenter.currentNotificationCenter.delegate = self;
    PEnotificationOpenHandler actionHandler = ^void(PENotificationOpenResult *result) {
       //replace this block with your own handling
        if ([result.notificationAction.actionID isEqualToString: @"ShoesScreen"]) {
            AddToCart *controller = [AddToCart new];
            UINavigationController *navigationController = (UINavigationController *) application.windows.firstObject.rootViewController;
            [navigationController popToRootViewControllerAnimated:YES];
            [navigationController pushViewController:controller animated:YES];
        } else if ([result.notificationAction.actionID isEqualToString: @"SalesScreen"]) {
            SportsViewcontroller *controller = [SportsViewcontroller new];
            UINavigationController *navigationController = (UINavigationController *) application.windows.firstObject.rootViewController;
            [navigationController popToRootViewControllerAnimated:YES];
            [navigationController pushViewController:controller animated:YES];
        }
    };
    application.applicationIconBadgeNumber = 0;
    [PushEngage setAppIDWithId:@"APP_ID_FROM_PUSH_ENGAGE_DASHBOARD"];
    [PushEngage setInitialInfoFor:application with:launchOptions];
    [PushEngage setNotificationOpenHandlerWithBlock:actionHandler];
    [PushEngage setEnableLogs:true];
    return YES;
}
@end
Lidando com Notificações em Primeiro Plano
Quando as notificações chegam em primeiro plano, você precisa decidir se deseja ou não mostrar o alerta de notificação para o dispositivo. Para lidar com notificações em primeiro plano, use setNotificationWillShowInForgroundHandler
Se o bloco de conclusão não for chamado por você, o SDK chamará o bloco de conclusão após 29 segundos. Em qualquer caso, notificação silenciosa ou de alerta quando o aplicativo estiver em primeiro plano.
Usando Swift
class AppDelegate: UIResponder, UIApplicationDelegate {

    var window: UIWindow?


    override init() {
        super.init()
        // method Swizzling enabled for the application.
       PushEngage.swizzleInjection(isEnabled: true)
    }

    func application(_ application: UIApplication, didFinishLaunchingWithOptions launchOptions: [UIApplication.LaunchOptionsKey: Any]?) -> Bool {

        PushEngage.setAppID(id: "APP_ID_FROM_PUSH_ENGAGE_DASHBOARD")
        PushEngage.setInitialInfo(for: application, with: launchOptions)

        // Notification handler when notification deliver's and app is in foreground.

        PushEngage.setNotificationWillShowInForgroundHandler { notification, completion in
            if notification.contentAvailable == 1 {
                // in case the developer failed to set the completion handler. After 29 sec the handler will call from the SDK after 29 sec.
                completion(nil)
            } else {
                completion(notification)
            }
        }

        PushEngage.enableLogs = true

        return true
    }
}
Usando Objective-C
@implementation AppDelegate


- (instancetype)init
{
    self = [super init];
    if (self) {
       [PushEngage swizzleInjectionWithIsEnabled: YES];
    }
    return self;
}
// please create this handlers
typedef void (^ _Nonnull PENotificationDisplayHandler)(PENotification * _Nullable);

-(BOOL)application:(UIApplication*)application didFinishLaunchingWithOptions:(NSDictionary *)launchOptions {
    UNUserNotificationCenter.currentNotificationCenter.delegate = self;

    [PushEngage setNotificationWillShowInForgroundHandlerWithBlock:^(PENotification * _Nonnull notification, PENotificationDisplayHandler completion) {
        if (notification.contentAvailable == 1) {
            completion(nil);
        } else {
            completion(notification);
        }
    }];
    [PushEngage setAppIDWithId:@"APP_ID_FROM_PUSH_ENGAGE_DASHBOARD"];
    [PushEngage setInitialInfoFor:application with:launchOptions];
    [PushEngage setEnableLogs:true];
    return YES;
}
@end
Solução de Problemas
Problema:
Você está enfrentando problemas de compilação relacionados a sandboxing.
Solução:
- Abra seu projeto no Xcode.
- Navegue até Build Settings.
- Localize a opção User Script Sandboxing.
- Defina como No.
Problema:
Você está usando tanto o SDK do Firebase quanto o SDK do PushEngage com o method swizzling habilitado para ambos, e isso está causando problemas.
Solução:
Desabilite o method swizzling para o SDK do PushEngage e siga as etapas manuais para lidar com os métodos do PushEngage. Você pode encontrar instruções detalhadas em:
Documentação do SDK iOS do PushEngage
Se você quiser explorar mais as capacidades do SDK iOS, pode consultar nossa documentação detalhada da API.
Se você encontrar algum problema, por favor entre em contato conosco clicando aqui. Nossa equipe de suporte poderá ajudá-lo.


