تنبيه: لا تتوفر وثائق قديمة لهذا العنصر، لذا فإنك ترى الوثائق الحالية.
The PushEngage React Native SDK simplifies the integration of push notifications in your React Native apps, offering seamless support for Android and iOS. We offer three frameworks for implementing app push notifications: React, Native, and Flutter. You can find guides for Native Android, iOS and Flutter app push notifications for further assistance.
In this guide, we will walk through setting up the PushEngage React Native SDK to enable push notifications on both Android and iOS.
قبل البدء
هذه قائمة بالأشياء التي ستحتاجها
- A React Native project & turbo module support. If you do not have an account, you can sign up here.
- حساب Firebase مع إعداد Firebase Cloud Messaging (FCM) لنظام Android.
- حساب مطور Apple لتكوين خدمات Apple Push Notification (APN) لنظام iOS.
Installing the PushEngage React Native SDK
You can install the PushEngage React Native SDK using either npm or yarn
npm install @pushengage/pushengage-react-nativeFor React Native 0.77.0 or Earlier
If you are using React Native version 0.77.0 or earlier, use the version 0.0.1 of the SDK as shown below:
npm install @pushengage/[email protected]إعداد Android
إعداد Firebase Cloud Messaging (FCM)
To enable push notifications for Android, you’ll need to configure Firebase Cloud Messaging (FCM)
1. قم بالوصول إلى وحدة تحكم Firebase باستخدام حساب Google الخاص بك.
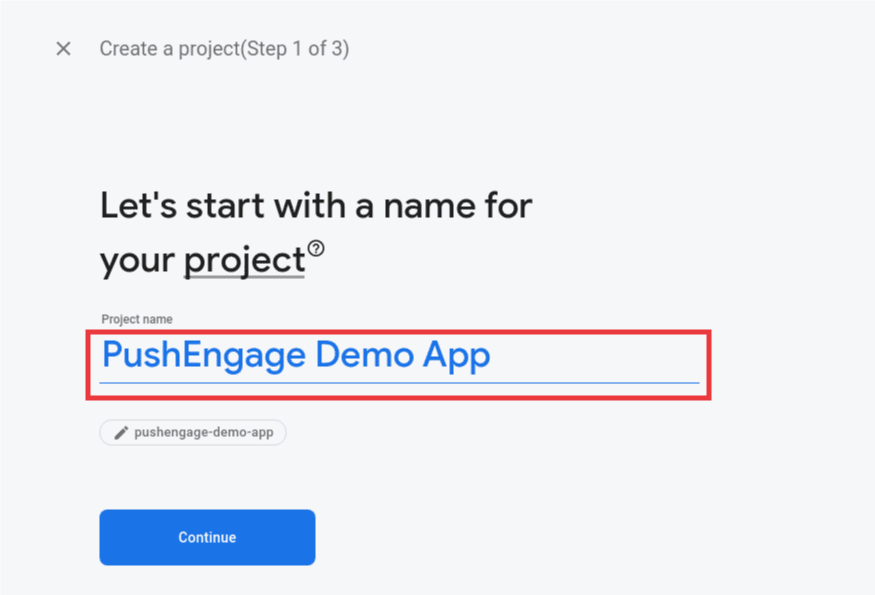
2. Click on “Add Project” to create a new project, or select an existing project from your list. If you’re using an existing project, proceed directly to step 4.

3. Enter a name for your project and click Continue. Complete the setup process by clicking “Create project” on the final screen.
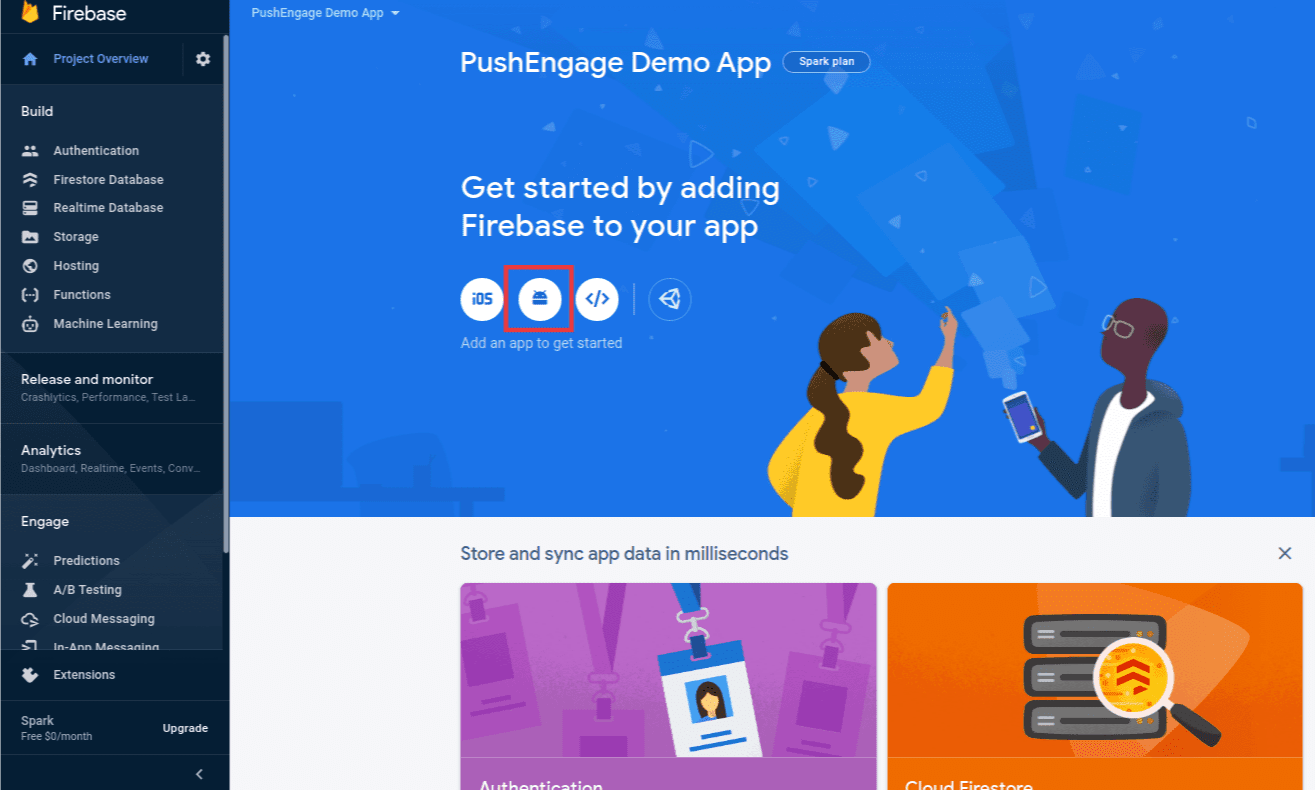
4. In your Firebase project dashboard, click on the Android icon to add an Android app.
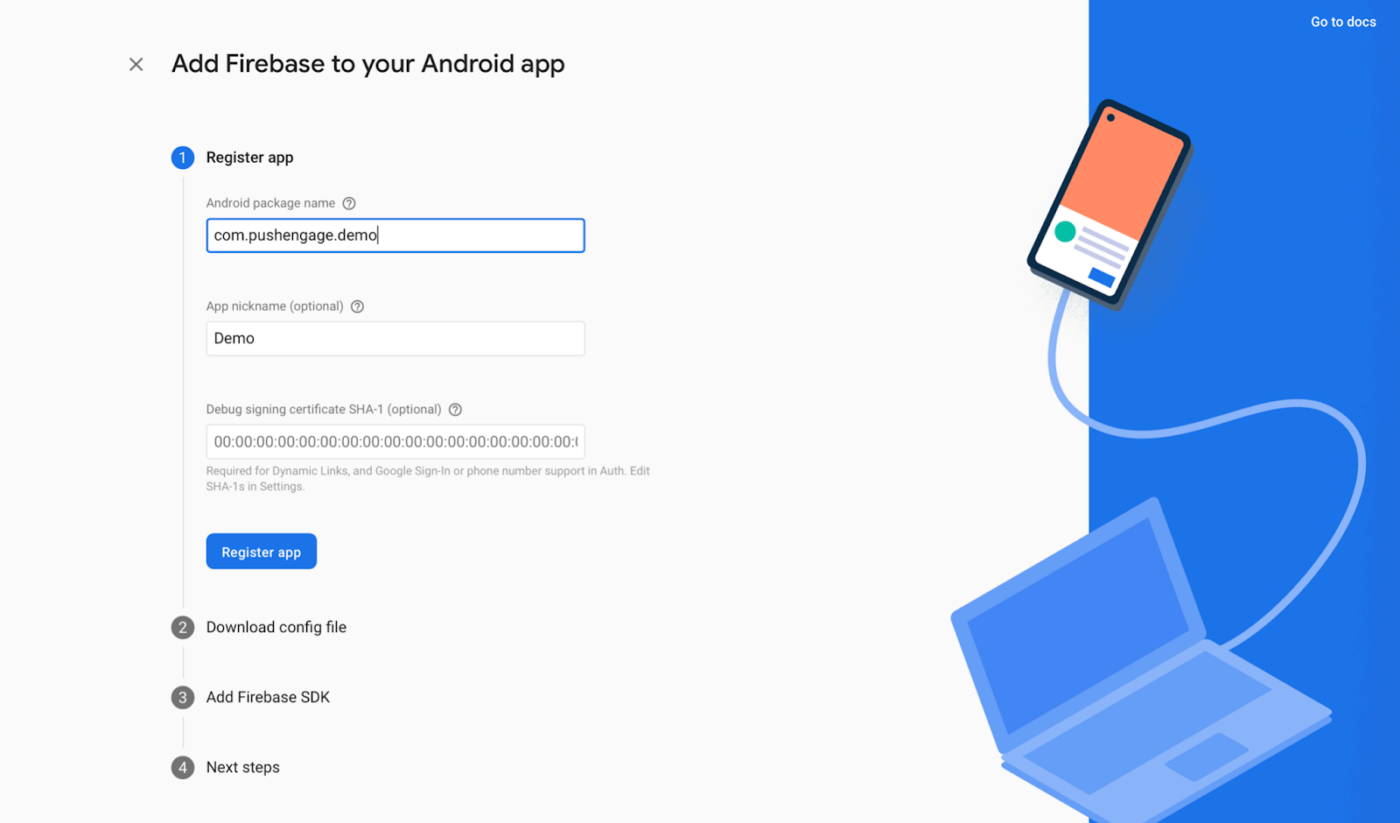
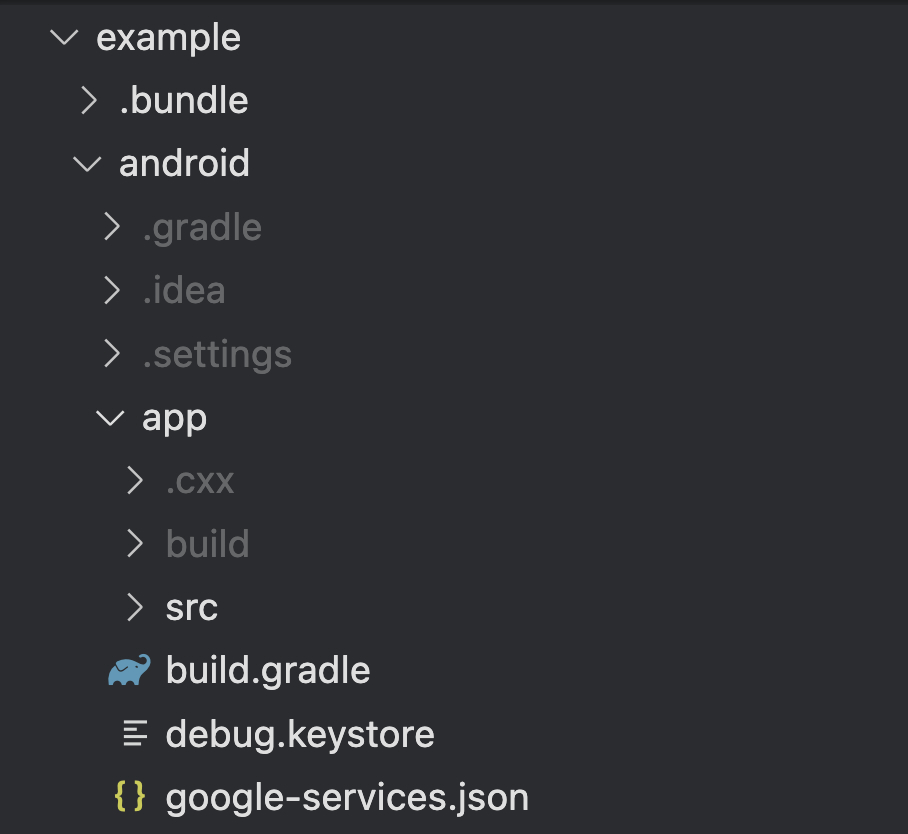
5. Enter your Android app’s package name (found in android/app/build.gradle under the android block) and provide an app name. Click Register when done.
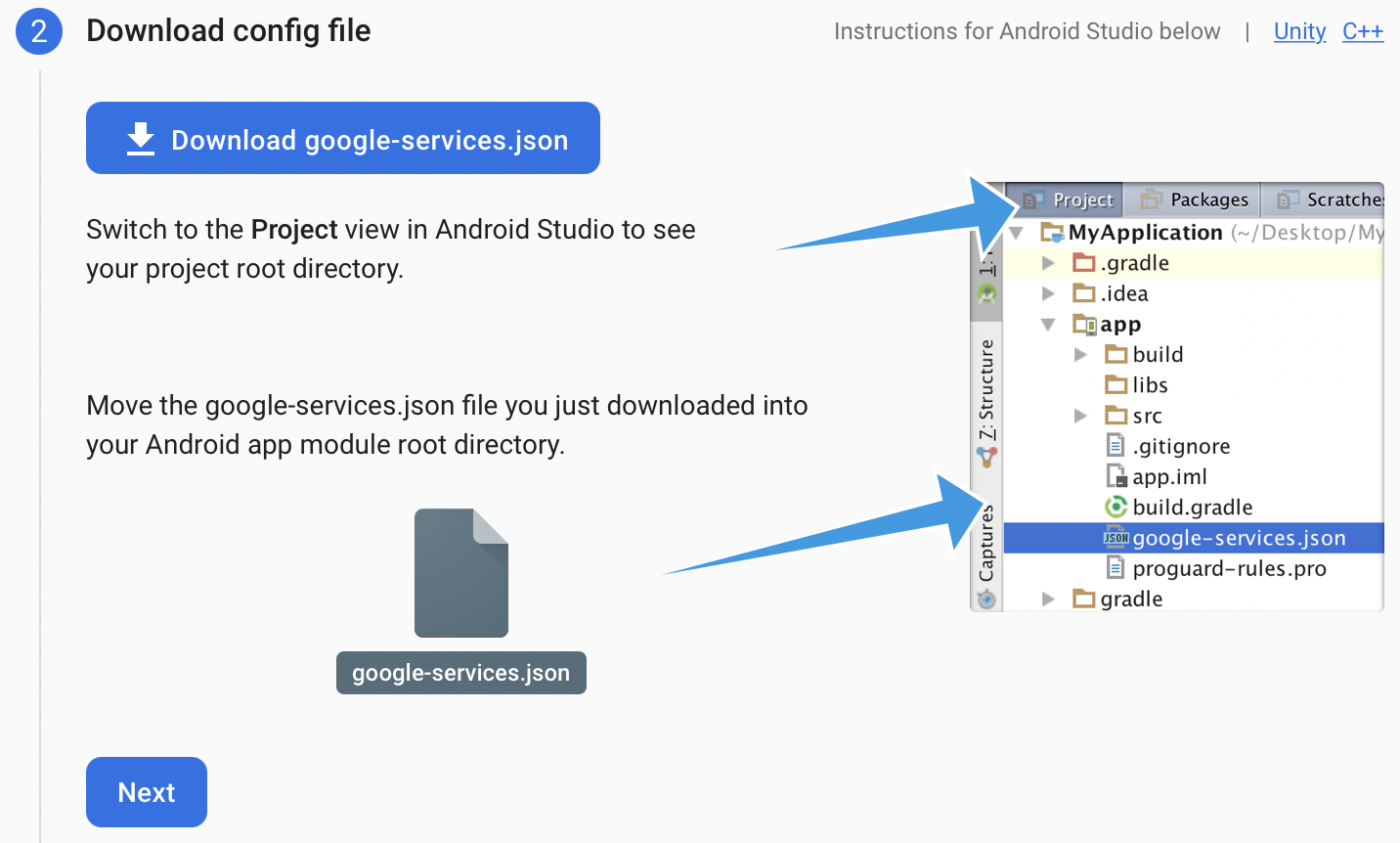
6. Download the google-services.json file and place it in the root of your Android app module at android/app/.
7. إنشاء مفتاح حساب الخدمة بصيغة JSON
- في وحدة تحكم Firebase، انقر فوق أيقونة الإعدادات بجوار "نظرة عامة على المشروع" في أعلى اليسار، ثم حدد إعدادات المشروع.
- انتقل إلى علامة التبويب حسابات الخدمة.
- انقر فوق إنشاء مفتاح خاص جديد، وقم بتنزيل ملف .json.
- احتفظ بهذا الملف بأمان حيث ستحتاجه لإعداد لوحة تحكم PushEngage.

8. Retrieve Sender ID
- في وحدة تحكم Firebase، انقر فوق أيقونة الإعدادات بجوار نظرة عامة على المشروع في أعلى اليسار وحدد "إعدادات المشروع".
- حدد علامة التبويب Cloud Messaging، هنا ستجد معرّف المرسل، وهو مطلوب لتهيئة PushEngage SDK.

Integrate FCM with PushEngage
To seamlessly integrate FCM details with the PushEngage Dashboard, you can follow below steps.
1. Access your PushEngage account by logging in
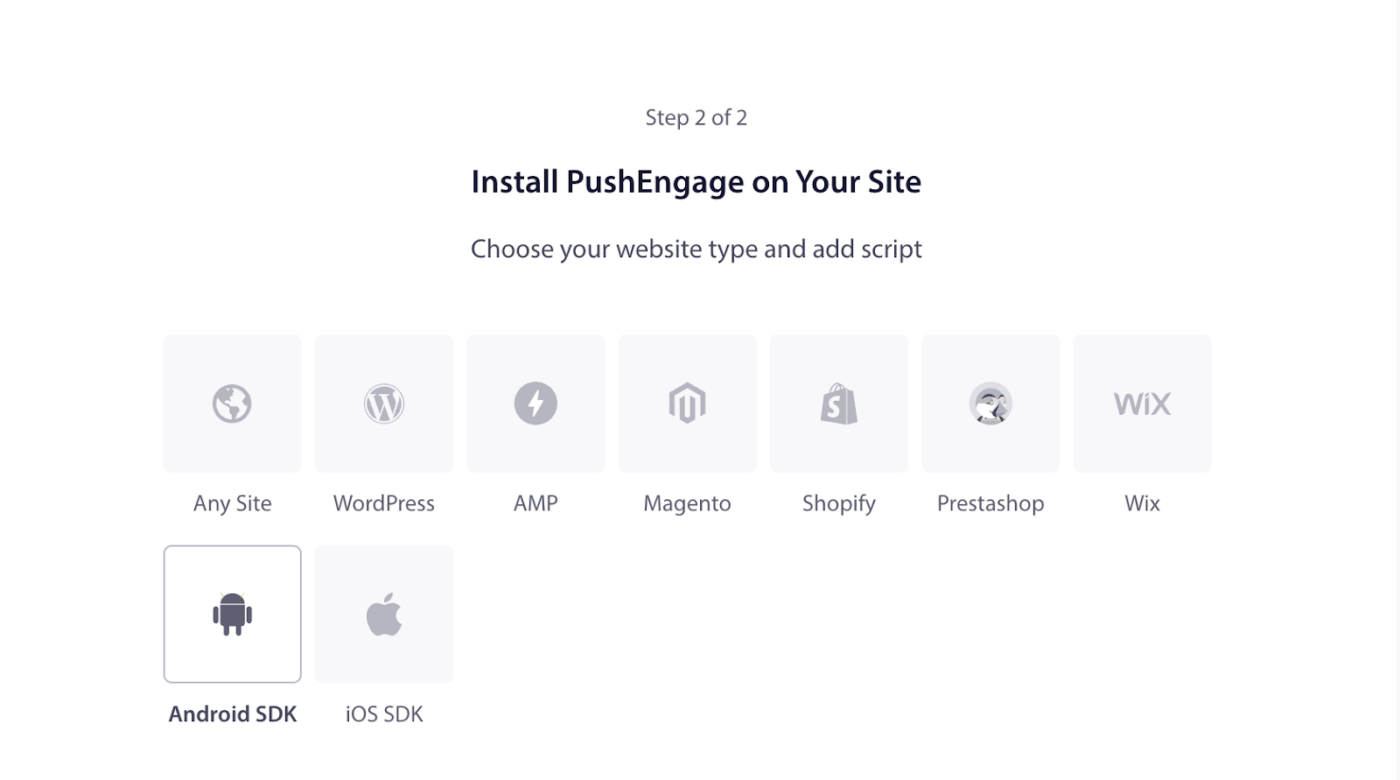
2. In the left navigation, go to Settings » Installation. Choose Android SDK
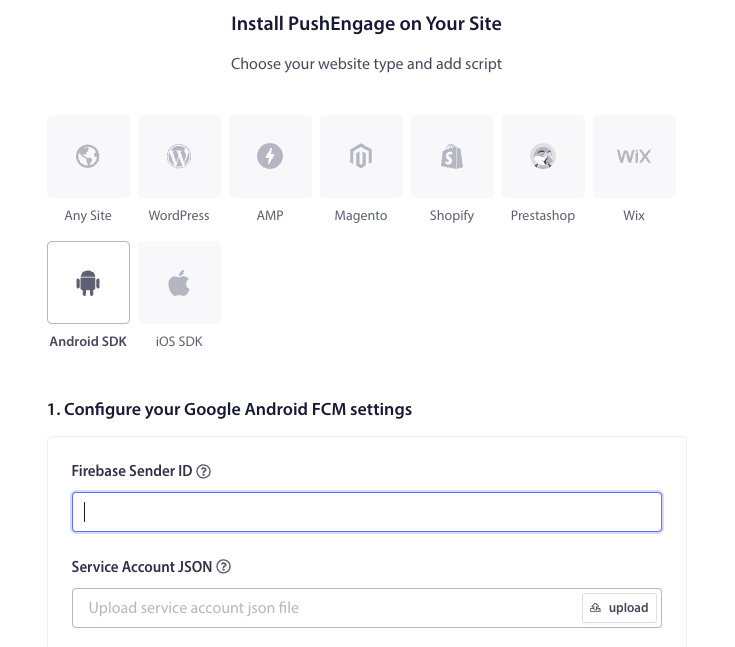
3. From the list of available platforms, choose the Android SDK option to configure push notifications for Android.
4. Configure FCM Settings – Enter your Firebase Sender ID (retrieved from the Firebase Console). Upload the Service Account JSON file (downloaded from Firebase). Click the Update button to save these settings.
5. After configuring the FCM settings, you’ll be provided with an App ID. Copy this App ID as it is required to initialize the PushEngage Android SDK in your Flutter app.
إعداد iOS
You can follow the steps after opening your_project_name » iOS » your_project_name.xcworkspace.
Step 1: Enable Remote Notifications
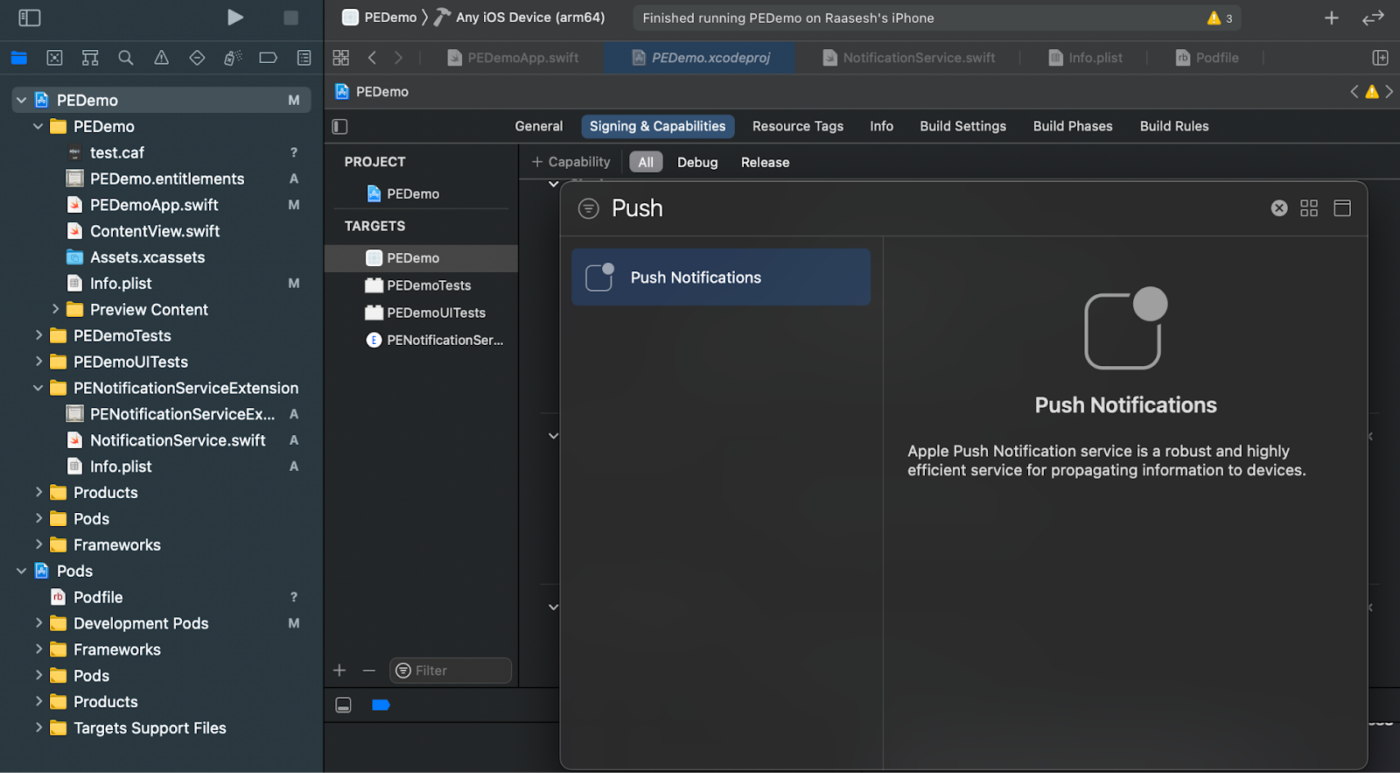
1. Open your Xcode project and select the root project in the Project Navigator.
2. اختر هدف التطبيق الرئيسي الخاص بك.
3. انتقل إلى "التوقيع & الإمكانيات."
4. تأكد من إضافة إمكانية الوضع الخلفي. إذا لم يكن الأمر كذلك، فأضفه بالنقر فوق الزر "+ إمكانية".

5. وبالمثل، تأكد من إضافة إمكانية الإشعارات الفورية. إذا لم يكن الأمر كذلك، فأضفه باستخدام الزر "+ إمكانية".
إذا لم تكن إمكانية "الإشعارات" مرئية في Xcode:
1. انتقل إلى حساب مطور Apple الخاص بك.
2. انتقل إلى "الشهادات والمعرفات & الملفات."
3. حدد معرف التطبيق الخاص بك.
4. قم بتحرير تكوين معرف التطبيق الخاص بك وتأكد من تمكين الإشعارات الفورية.
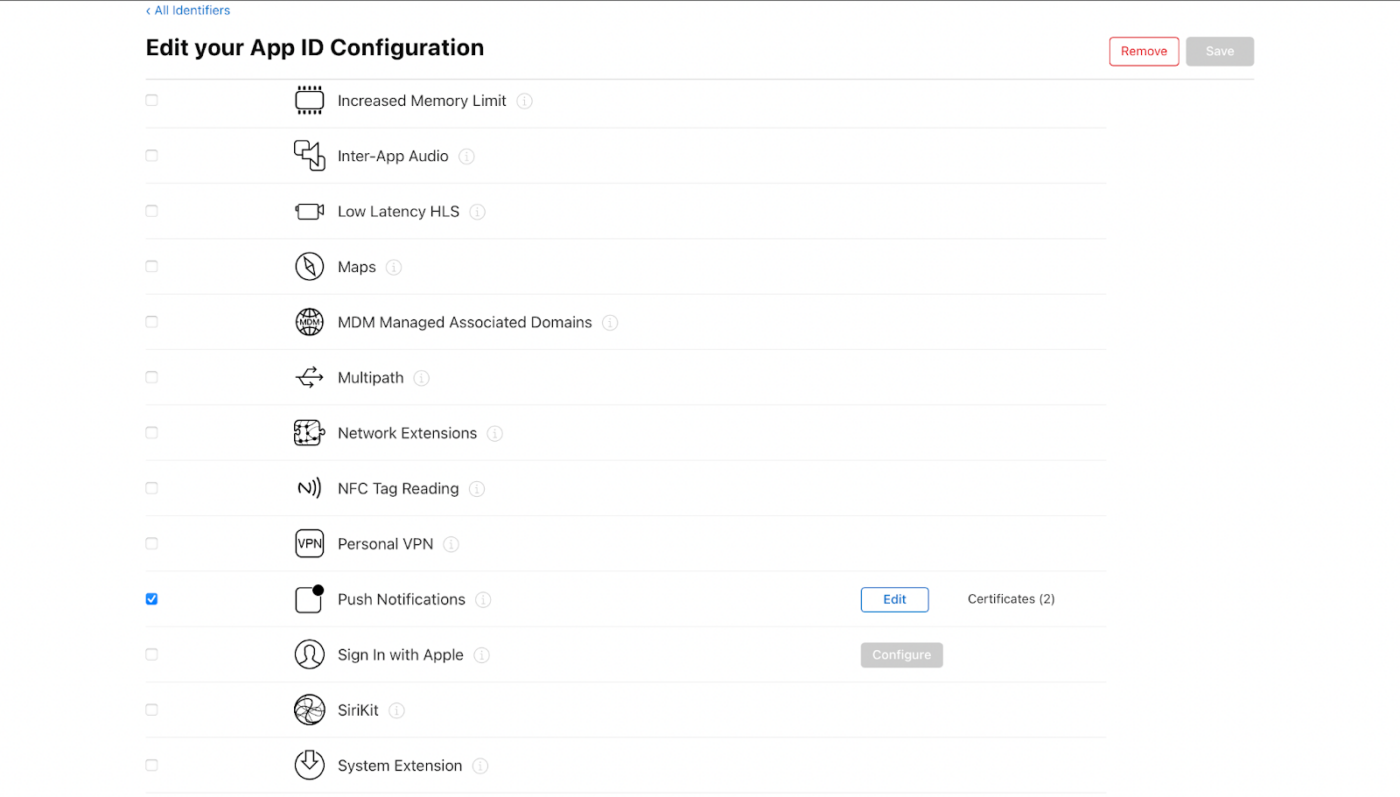
5. ارجع إلى Xcode وحاول إضافة إمكانية الإشعارات الفورية مرة أخرى.
الخطوة 2: تمكين الأوضاع الخلفية
1. في مشروع Xcode الخاص بك، انتقل إلى "التوقيع & الإمكانيات."
2. داخل "الأوضاع الخلفية"، قم بتمكين كل من "الإشعارات عن بُعد" و "جلب الخلفية."
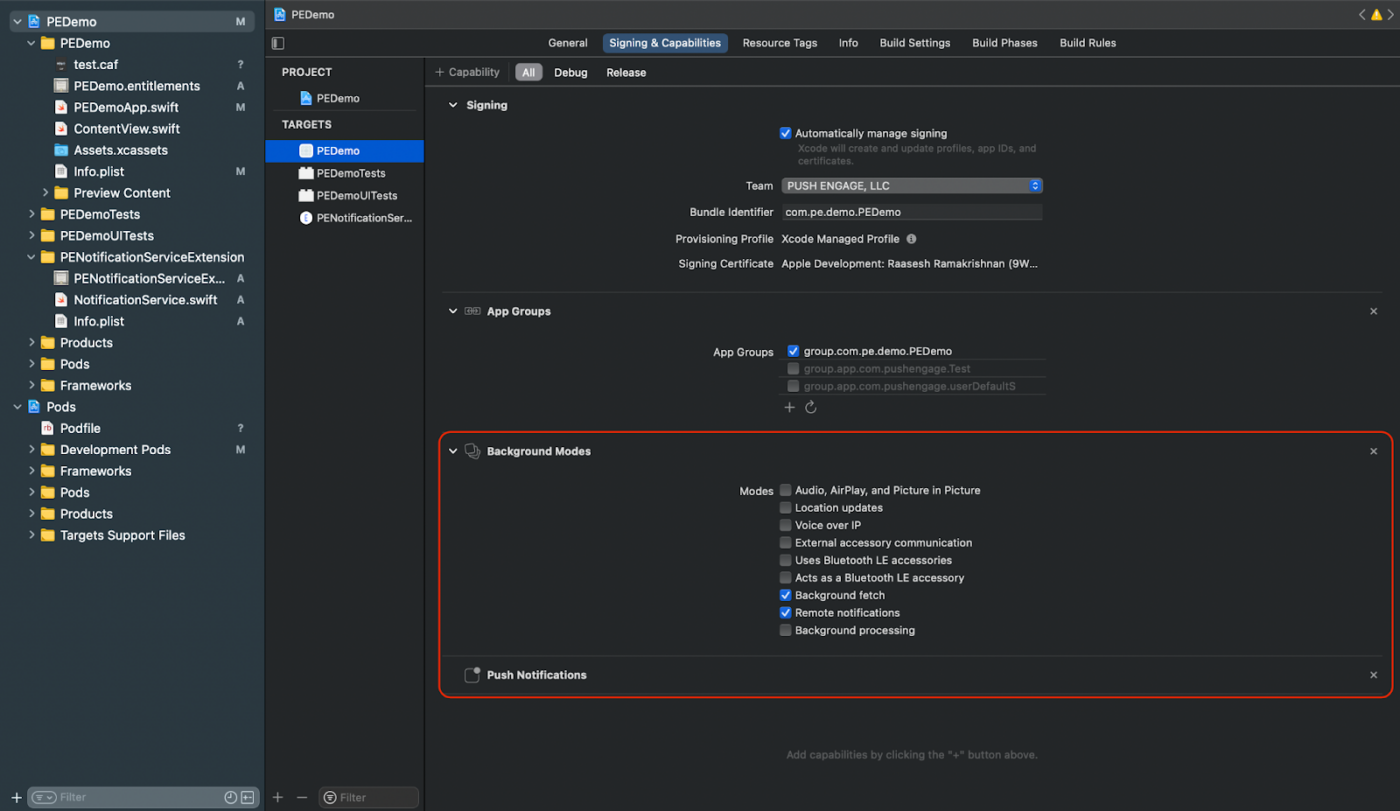
تضمن هذه الخطوة أن تطبيقك يمكنه التعامل مع الإشعارات عن بُعد وجلب الخلفية بكفاءة.
إنشاء شهادة APNs لنظام iOS
يمكنك الرجوع إلى الدليل هنا لإنشاء شهادة APNs لنظام iOS إذا لم يكن لديك واحدة بالفعل.
إضافة امتداد خدمة الإشعارات وامتداد محتوى الإشعارات
هذا ينطبق فقط على أجهزة iOS.
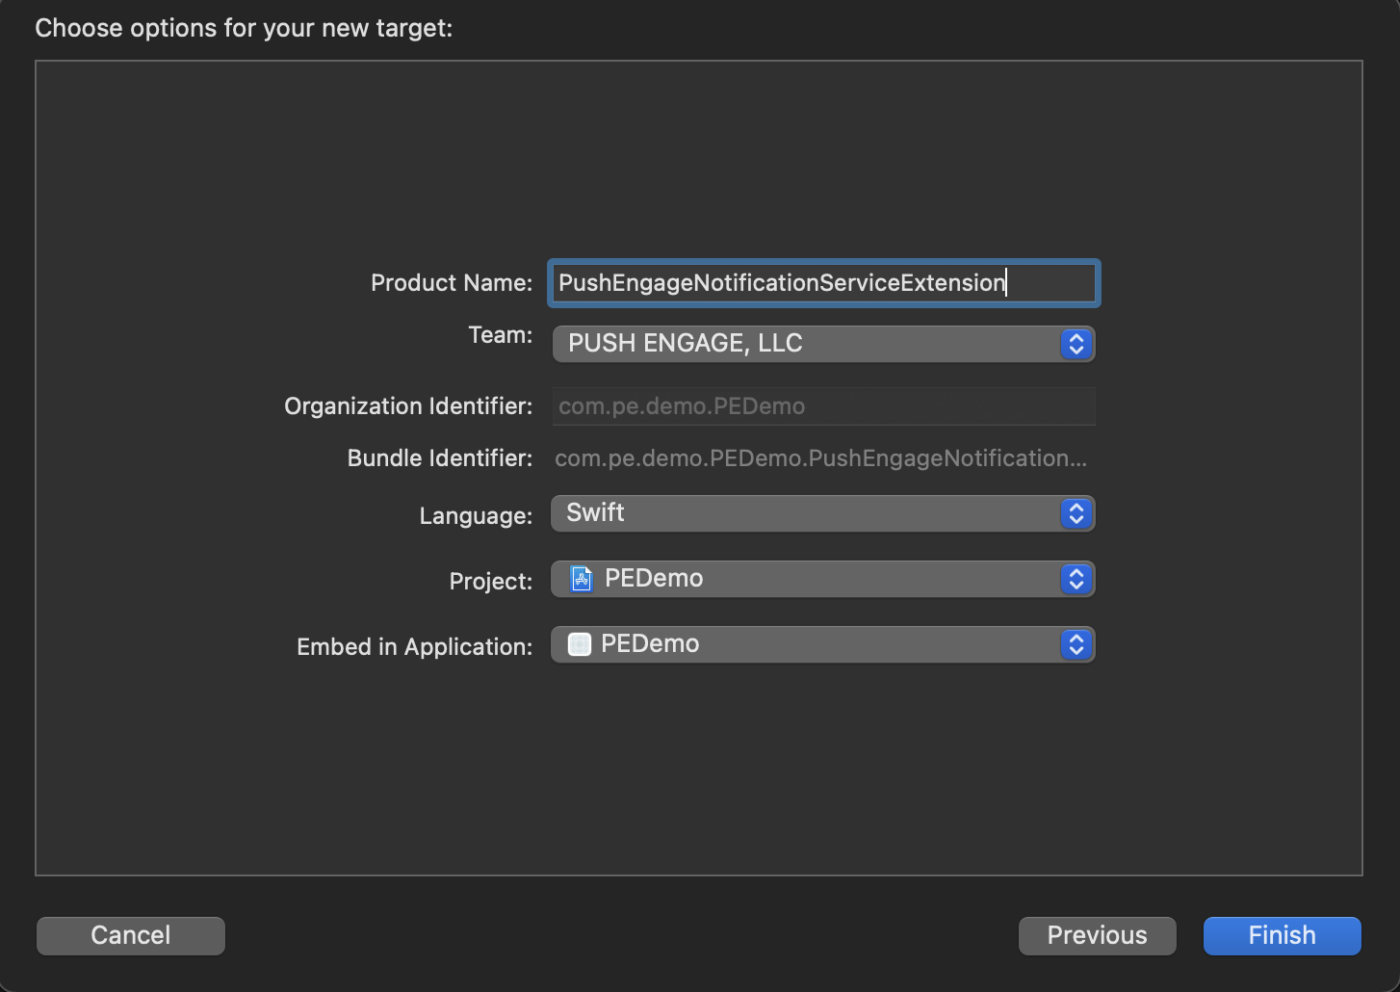
إنشاء امتداد خدمة الإشعارات
يعزز امتداد خدمة الإشعارات قدرة تطبيق iOS الخاص بك على تلقي الإشعارات. يُستخدم هذا لتعديل محتوى الإشعار أو جلب/معالجة أي بيانات عند تلقي الإشعار. اتبع هذه الخطوات لإنشاء امتداد خدمة الإشعارات:
1. افتح Xcode وانتقل إلى مشروعك.
2. حدد ملف » جديد » هدف من القائمة.
3. في نافذة تحديد القالب، اختر امتداد خدمة الإشعارات وانقر فوق التالي.
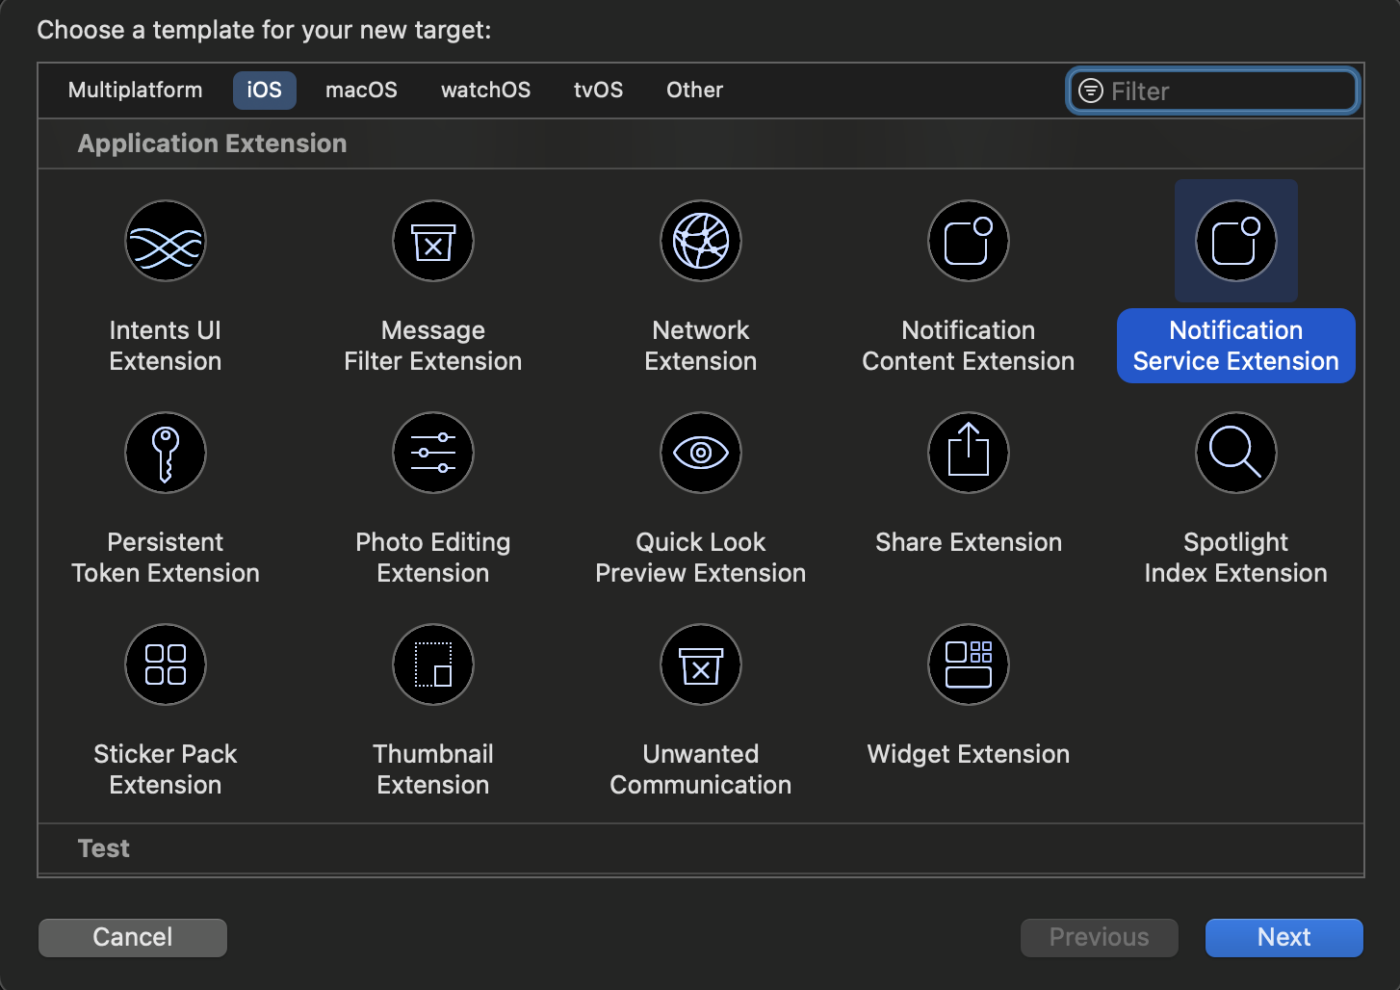
4. قم بتوفير اسم لامتدادك، على سبيل المثال، PushEngageNotificationServiceExtension، وانقر فوق إنهاء.

بمجرد الانتهاء من إنشاء امتداد خدمة الإشعارات، قد تتم مطالبتك بتفعيله. لا تقم بتفعيله على الفور.
سيؤدي تنشيط الملحق إلى تحويل تركيز تصحيح Xcode من تطبيقك إلى الملحق. إذا قمت بتنشيطه عن طريق الخطأ، فلا تقلق؛ يمكنك التبديل مرة أخرى إلى تصحيح تطبيقك داخل Xcode.
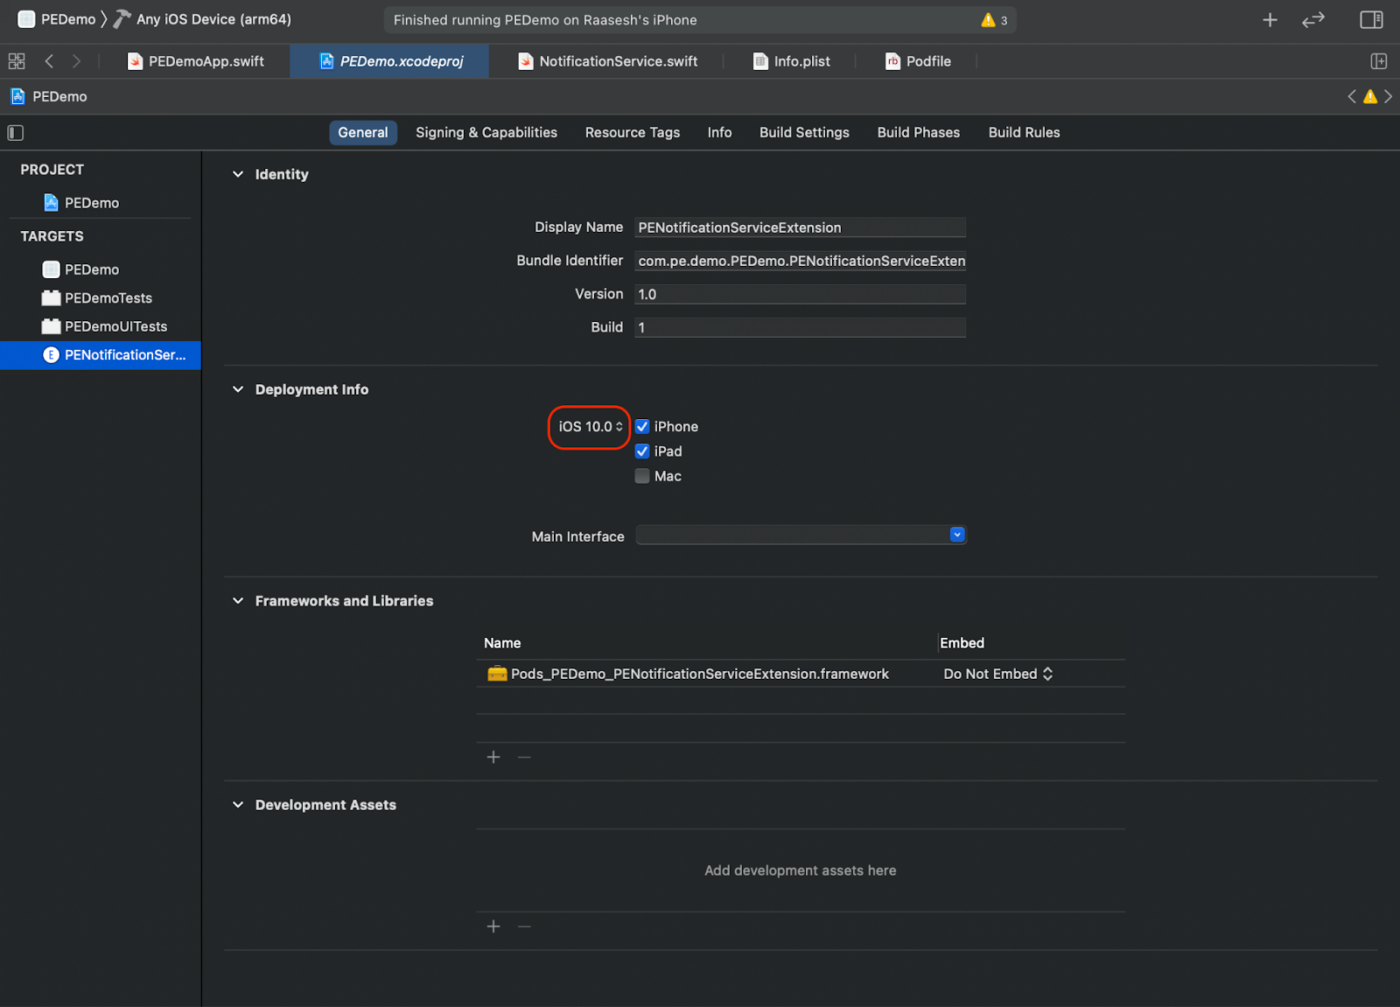
5. في مستكشف المشروع، حدد دليل المشروع الأعلى مستوى وحدد هدف NotificationServiceExtension في المشروع من قائمة الأهداف التي تم إنشاؤها في الخطوة رقم 4.
6. اضبط هدف النشر ليكون على iOS 10 أو أعلى، وهو إصدار iOS الذي أصدرت فيه Apple الدعم لهذا الامتداد.
تهيئة حزمة تطوير البرامج PushEngage لملحق خدمة الإشعارات
لضمان الأداء السليم لحزمة SDK الخاصة بـ PushEngage في امتداد خدمة الإشعارات لنظام iOS الخاص بك، اتبع هذه الخطوات:
1. افتح اسم_مشروعك » ios » Podfile.
2. أضف ما يلي إلى كتلة post_install لهدف التطبيق الرئيسي
 post_install do |installer|
    # https://github.com/facebook/react-native/blob/main/packages/react-native/scripts/react_native_pods.rb#L197-L202
    react_native_post_install(
      installer,
      config[:reactNativePath],
      :mac_catalyst_enabled => false,
      # :ccache_enabled => true
    )
      installer.pods_project.targets.each do |target|
        target.build_configurations.each do |config|
          config.build_settings['APPLICATION_EXTENSION_API_ONLY'] = 'No'
         end
      end
  end
3. أضف إلى أسفل الملف
target 'Your_Notification_Service_Extension_Name' do
  pod 'PushEngage', '~>0.0.5'
end
4. قم بتثبيت التبعية
pod repo update
pod install
5. في هدف امتداد خدمة الإشعارات الخاص بك، تأكد من استيراد إطار عمل PushEngage وإضافة كود التهيئة الضروري.
سويفت
import UserNotifications
import PushEngage

@available(iOSApplicationExtension 10.0, *)
class PushEngageNotificationServiceExtension: UNNotificationServiceExtension {

    var contentHandler: ((UNNotificationContent) -> Void)?
    var bestAttemptContent: UNMutableNotificationContent?
    var request : UNNotificationRequest?

    override func didReceive(_ request: UNNotificationRequest, withContentHandler contentHandler: @escaping (UNNotificationContent) -> Void) {
        self.request = request
        self.contentHandler = contentHandler
        self.bestAttemptContent = (request.content.mutableCopy() as? UNMutableNotificationContent)

        if let bestContent = bestAttemptContent {
            PushEngage.didReceiveNotificationExtensionRequest(request, bestContentHandler: bestContent)
            contentHandler(bestContent)
        }
    }

    override func serviceExtensionTimeWillExpire() {
        // Called just before the extension will be terminated by the system.
        // Use this as an opportunity to deliver your "best attempt" at modified content, otherwise the original push payload will be used.
        if let contentHandler = contentHandler, let request = request ,let bestAttemptContent =  bestAttemptContent {
            guard let content = PushEngage.serviceExtensionTimeWillExpire(request, content: bestAttemptContent) else {
                contentHandler(bestAttemptContent)
                return
            }
            contentHandler(content)
        }
    }

}
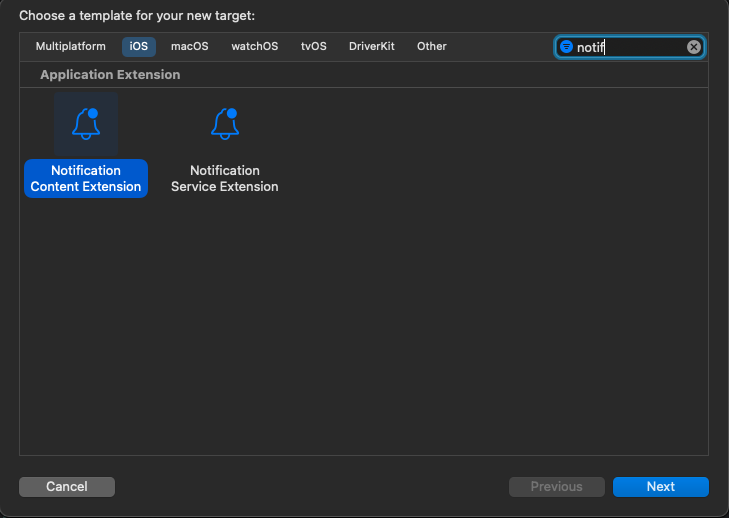
إنشاء ملحق محتوى الإشعارات
لتحسين الطريقة عن طريق إضافة واجهة مستخدم مخصصة، ستحتاج إلى إنشاء ملحق محتوى الإشعارات. اتبع الخطوات التالية لإعداد الملحق:
1. في Xcode، انتقل إلى ملف » جديد » هدف.
2. حدد Notification Content Extension وانقر فوق Next.
3. لا تحدد "Activate" في مربع الحوار الذي يظهر بعد النقر فوق Finish. يؤدي الإلغاء إلى استمرار Xcode في تصحيح تطبيقك بدلاً من الملحق. إذا قمت بتفعيله عن طريق الخطأ، فارجع إلى تصحيح تطبيقك داخل Xcode (بجانب زر التشغيل).
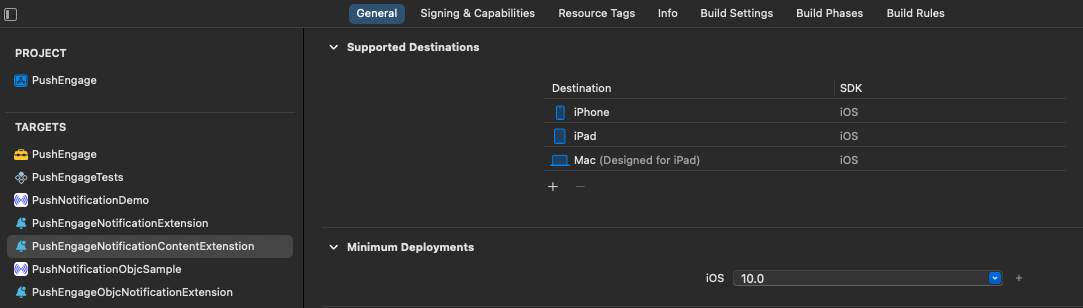
4. في مستكشف المشروع، حدد دليل المشروع الرئيسي وحدد هدف NotificationContentExtension في المشروع من قائمة الأهداف التي تم إنشاؤها في الخطوة رقم 2.
5. اضبط Deployment Target على iOS 10 أو أعلى، وهو إصدار iOS الذي أصدرت فيه Apple الدعم لهذا الملحق.
تهيئة حزمة تطوير البرامج PushEngage لملحق محتوى الإشعارات
لضمان الأداء السليم لحزمة PushEngage SDK في ملحق محتوى إشعارات iOS الخاص بك، اتبع هذه الخطوات:
1. افتح your_project_name » iOS » Podfile.
2. أضف ما يلي في أسفل ملف Podfile الخاص بك:
target 'Your_Notification_Content_Extension_Name' do
  pod 'PushEngage', '0.0.5'
end
3. قم بتثبيت التبعية:
cd إلى دليل iOS الخاص بمشروعك وقم بتشغيل الأمر أدناه
pod repo update
pod install
4. في هدف امتداد محتوى الإشعارات الخاص بك، تأكد من استيراد إطار عمل PushEngage وإضافة رمز التهيئة اللازم. إليك كيف يمكنك القيام بذلك مع بعض الأمثلة على عناصر واجهة المستخدم:
سويفت
import UIKit
import UserNotifications
import UserNotificationsUI
import PushEngage

@available(iOSApplicationExtension 10.0, *)
class NotificationViewController: UIViewController, UNNotificationContentExtension {

    fileprivate var hostingView: UIHostingController<ContentView>?

    override func viewDidLoad() {
        super.viewDidLoad()
        self.view.backgroundColor = .white
    }

    func didReceive(_ notification: UNNotification) {
        if(notification.request.content.categoryIdentifier == "your_identifier"){
            let payLoad = PushEngage.getCustomUIPayLoad(for: notification.request)
  //pass the payload to your custom View
            let view = CustomView(payLoadInfo: payLoad)
            hostingView = UIHostingController(rootView: view)
If let customView = self.hostingView {
            addChild(hostingView!)
}
        }
    }

}
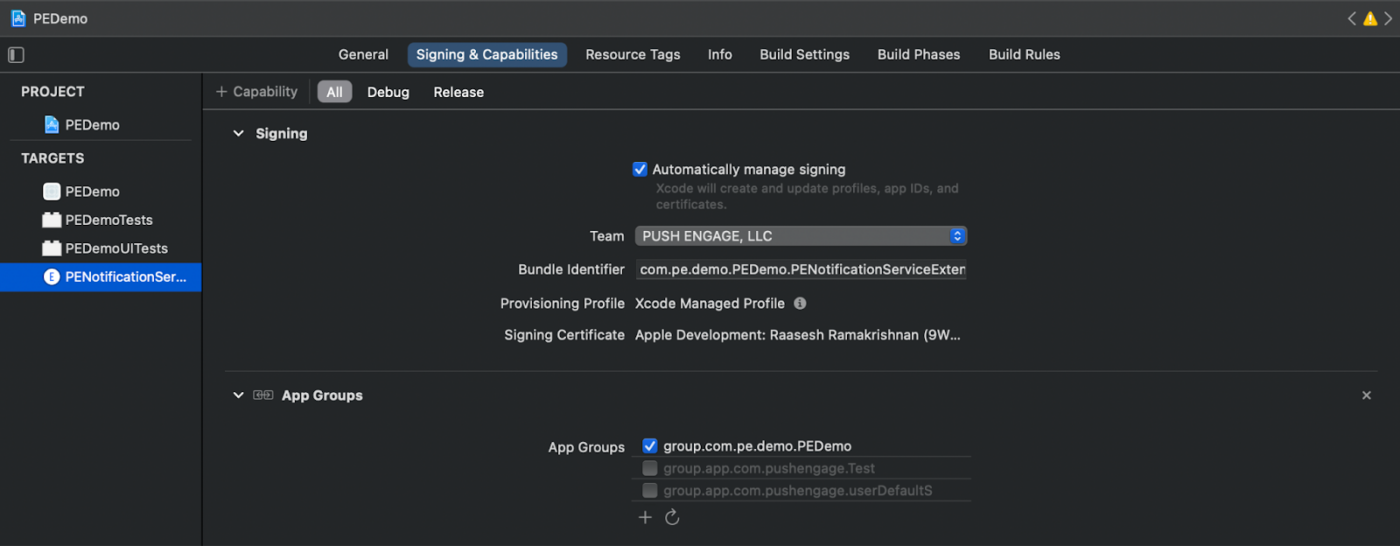
إضافة مجموعات التطبيقات
تعد مجموعات التطبيقات ضرورية لتمكين الاتصال بين التطبيق الرئيسي، وامتداد خدمة الإشعارات، وامتداد محتوى الإشعارات. اتبع هذه الخطوات لإضافة مجموعات التطبيقات إلى مشروع iOS الخاص بك:
إذا كان لديك مجموعة تطبيقات موجودة وترغب في استخدامها، يمكنك الانتقال إلى الخطوة رقم 4.
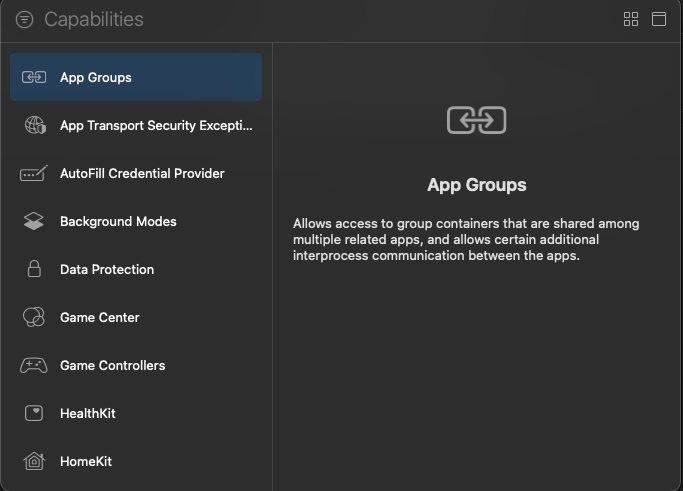
1. في مشروع Xcode الخاص بك، في مستكشف المشروع، حدد دليل المشروع الرئيسي وحدد الهدف الرئيسي للتطبيق.
2. انتقل إلى علامة التبويب Signing & Capabilities.
3. انقر فوق الزر “+ Capability” وحدد App Groups من القائمة.

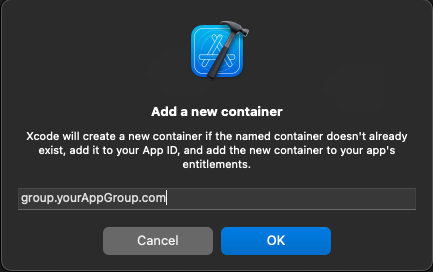
4. انقر فوق الزر + لإضافة مجموعة تطبيقات.
5. أضف اسمًا فريدًا لمجموعة التطبيقات الخاصة بك وانقر فوق موافق.
6. في منطقة المحرر الرئيسية، حدد الهدف الرئيسي لتطبيقك. إذا قمت بإنشاء مجموعة تطبيقات، فيرجى تقديم اسم المجموعة في ملف Info.plist الخاص بتطبيقك باستخدام المفتاح PushEngage_App_Group_Key.
7. أضف نفس المفتاح والقيمة في ملف Info.plist الخاص بامتداد خدمة الإشعارات.
8. تأكد من تحديد نفس مجموعة التطبيقات في كل من هدف التطبيق الرئيسي وامتداد خدمة الإشعارات الخاص بك.
تهيئة PushEngage SDK
في ملف index.js الخاص بك، قم بتهيئة PushEngage SDK.
import PushEngage from 'pushengage-react-native';
PushEngage.setAppId('your-app-id');
في ملف AppDelegate.mm الخاص بتطبيق iOS
@import PushEngage;

@implementation AppDelegate

- (instancetype)init
{
    self = [super init];
    if (self) {
        [PushEngage swizzleInjectionWithIsEnabled: YES];
    }
    return self;
}

- (BOOL)application:(UIApplication *)application didFinishLaunchingWithOptions:(NSDictionary *)launchOptions
{
  self.moduleName = @"PushengageReactNativeExample";
  // You can add your custom initial props in the dictionary below.
  // They will be passed down to the ViewController used by React Native.
  self.initialProps = @{};
  [PushEngage setInitialInfoFor:application with:launchOptions];
  return [super application:application didFinishLaunchingWithOptions:launchOptions];
}

- (void)application:(UIApplication *)application didReceiveRemoteNotification:(NSDictionary *)userInfo fetchCompletionHandler:(void (^)(UIBackgroundFetchResult))completionHandler {
    completionHandler(UIBackgroundFetchResultNewData);
}
معالجة الرابط العميق
استمع لأحداث الروابط العميقة وتعامل معها في تطبيقك
const listenerSubscription = React.useRef<null | EventSubscription>(null);

  React.useEffect(() => {
    listenerSubscription.current = PushEngage.onValueChanged((data) => {
      Alert.alert(`Deeplink: ${data.deepLink}`);
      console.log('Data:', data.data);
    });

    return () => {
      listenerSubscription.current?.remove();
      listenerSubscription.current = null;
    };
  }, []);
استكشاف الأخطاء وإصلاحها
أضف -fcxx-modules في Other C++ flags للخطأ: استخدام '@import' عندما تكون وحدات c++ معطلة، فكر في استخدام -fmodules و -fcxx-modules ضمن إعدادات بناء مشروع iOS.
إذا كنت ترغب في استكشاف المزيد من إمكانيات SDK لنظام iOS، يمكنك الاطلاع على وثائق واجهة برمجة التطبيقات (API) التفصيلية الخاصة بنا.
إذا واجهت أي مشكلات، يرجى الاتصال بنا بالنقر هنا. سيكون فريق الدعم لدينا قادرًا على مساعدتك.


