تنبيه: لا تتوفر وثائق قديمة لهذا العنصر، لذا فإنك ترى الوثائق الحالية.
يتيح لك PushEngage Flutter SDK بسهولة دمج الإشعارات الفورية في تطبيقات Flutter الخاصة بك، مما يوفر توافقًا سلسًا مع كل من منصتي Android و iOS.
سيرشدك هذا الدليل خلال خطوات إعداد PushEngage Flutter SDK وتمكين الإشعارات الفورية على تطبيقات Android و iOS الخاصة بك.
قبل البدء
هذه قائمة بالأشياء التي ستحتاجها
- مشروع Flutter وحساب PushEngage. إذا لم يكن لديك حساب، يمكنك التسجيل هنا.
- حساب Firebase مع إعداد Firebase Cloud Messaging (FCM) لنظام Android.
- حساب مطور Apple لتكوين خدمات Apple Push Notification (APN) لنظام iOS.
التثبيت
1. افتح مشروع Flutter الخاص بك في محرر الأكواد الخاص بك.
2. أضف التبعية التالية في ملف pubspec.yaml الخاص بك:
dependencies:
	pushengage_flutter_sdk: ^0.0.1
3. قم بتشغيل الأمر التالي لتثبيت الحزمة.
dependencies:
flutter pub get
إعداد Android
إعداد Firebase Cloud Messaging (FCM)
لتمكين الإشعارات الفورية لنظام Android، ستحتاج إلى تكوين Firebase Cloud Messaging (FCM):
1. قم بالوصول إلى وحدة تحكم Firebase باستخدام حساب Google الخاص بك.
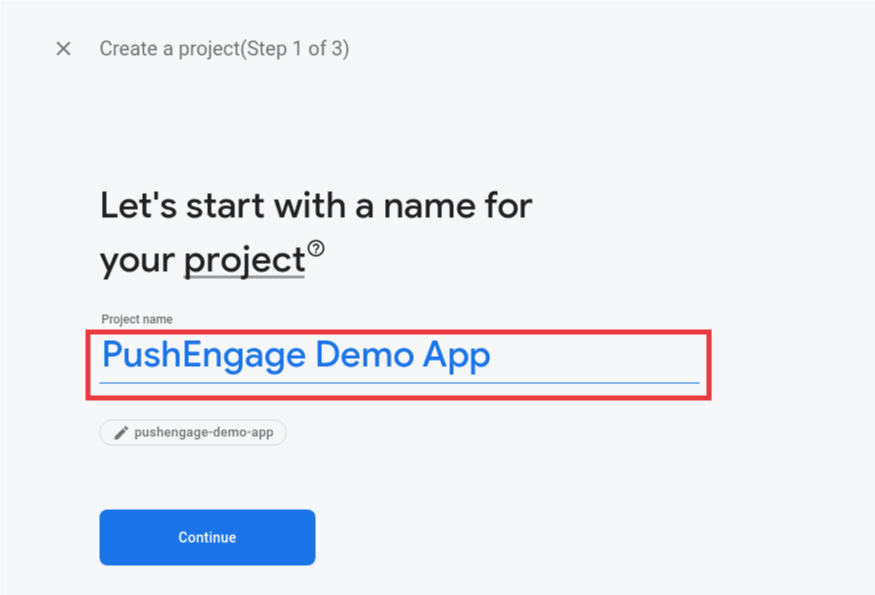
2. إنشاء مشروع جديد أو تحديد مشروع موجود: انقر فوق "إضافة مشروع" لإنشاء مشروع جديد، أو حدد مشروعًا موجودًا من قائمتك. إذا كنت تستخدم مشروعًا موجودًا، فانتقل مباشرة إلى الخطوة 4.

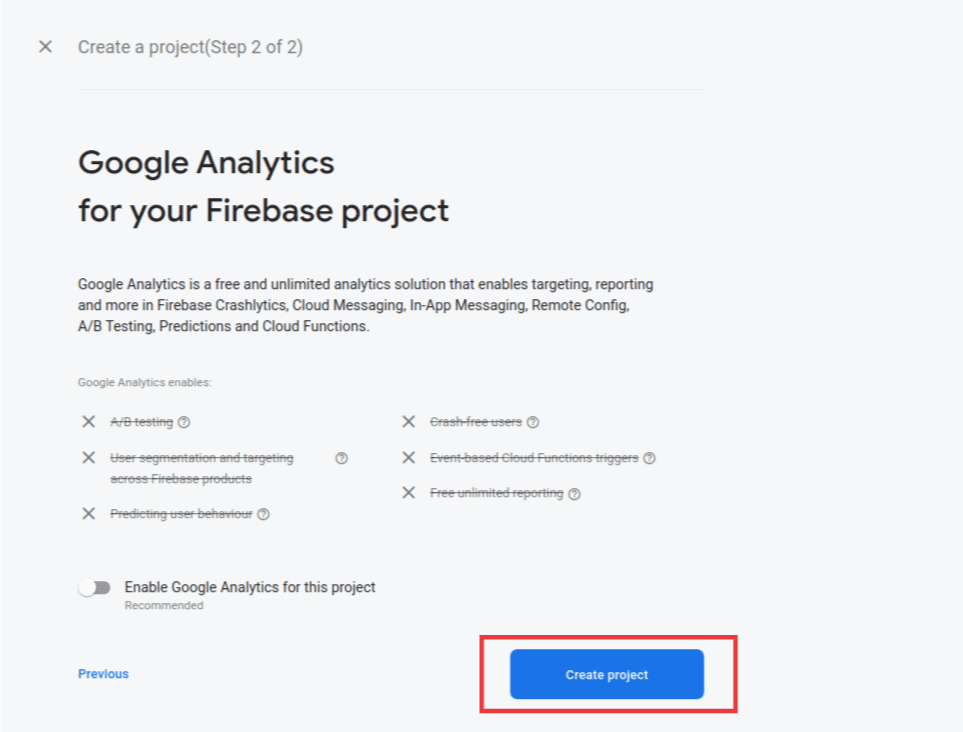
3. إدخال تفاصيل المشروع: أضف اسمًا لمشروعك وانقر فوق متابعة. أكمل عملية الإعداد بالنقر فوق "إنشاء مشروع" في الشاشة النهائية.
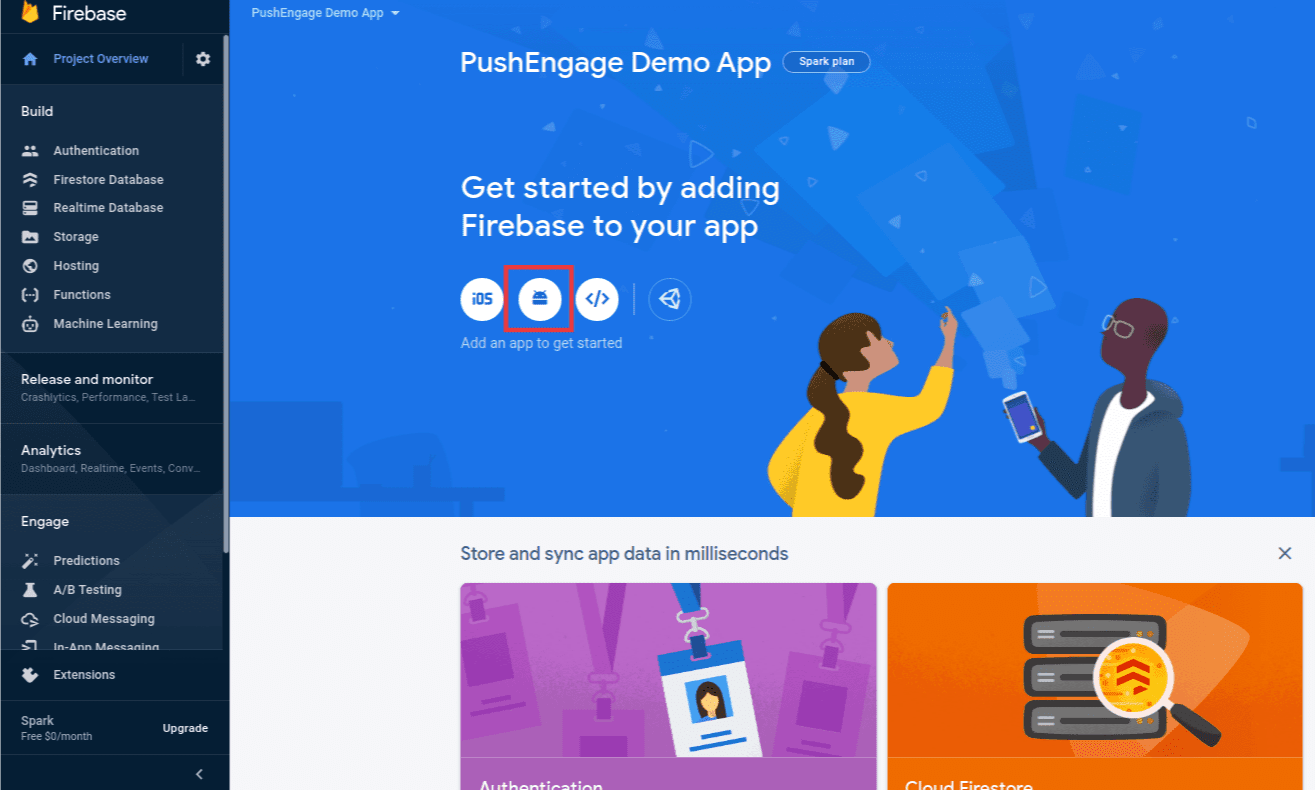
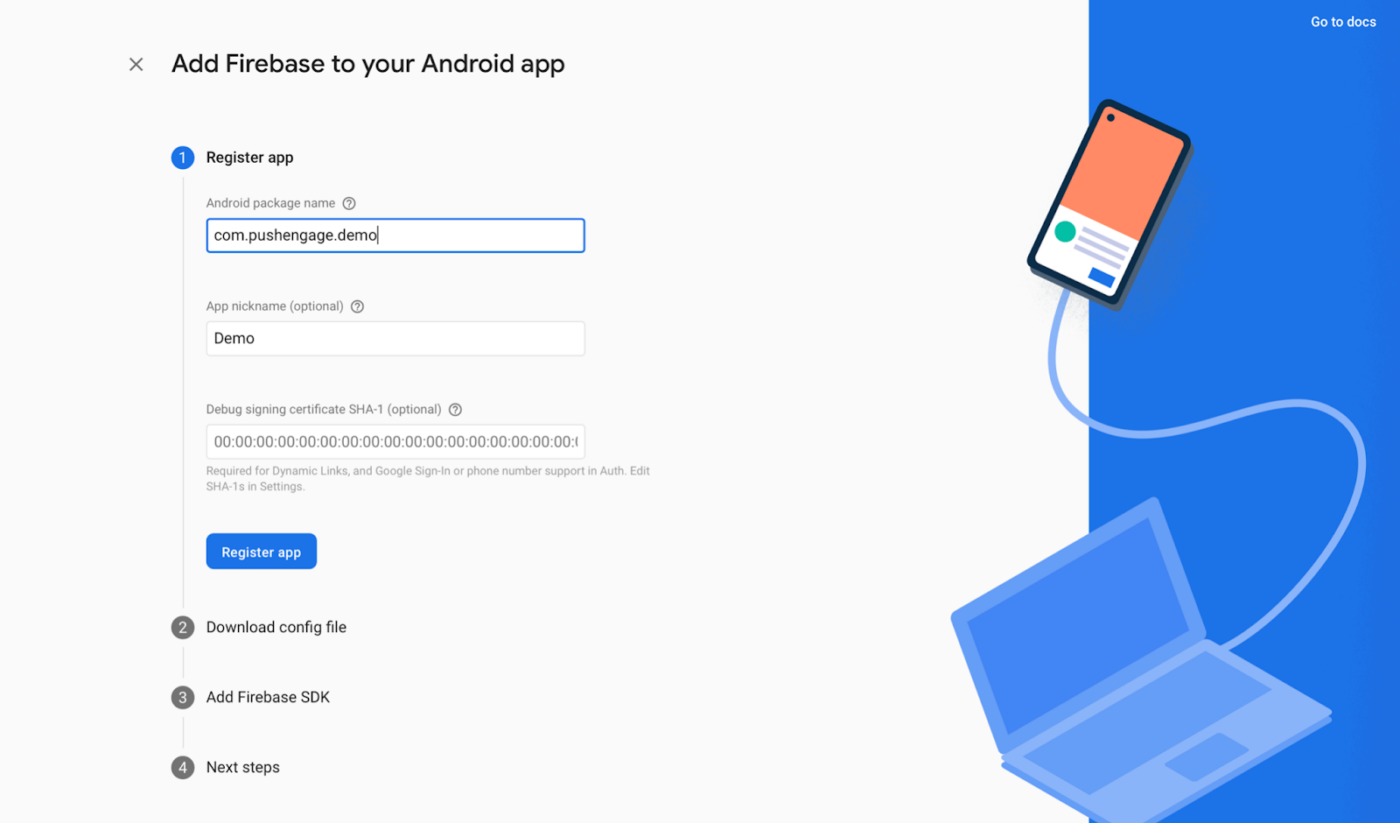
4. إضافة تطبيق Android إلى المشروع: في لوحة تحكم مشروع Firebase الخاص بك، انقر فوق أيقونة Android لإضافة تطبيق Android.
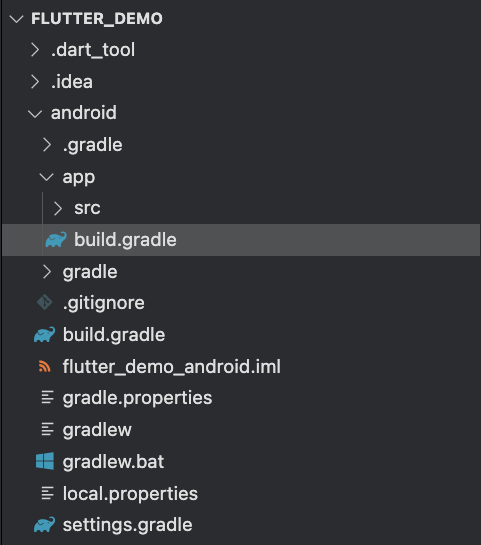
5. تكوين تطبيق Android: أدخل اسم الحزمة لتطبيق Android الخاص بك (الموجود في android/app/build.gradle ضمن كتلة android) وقدم اسمًا للتطبيق. انقر فوق تسجيل عند الانتهاء.
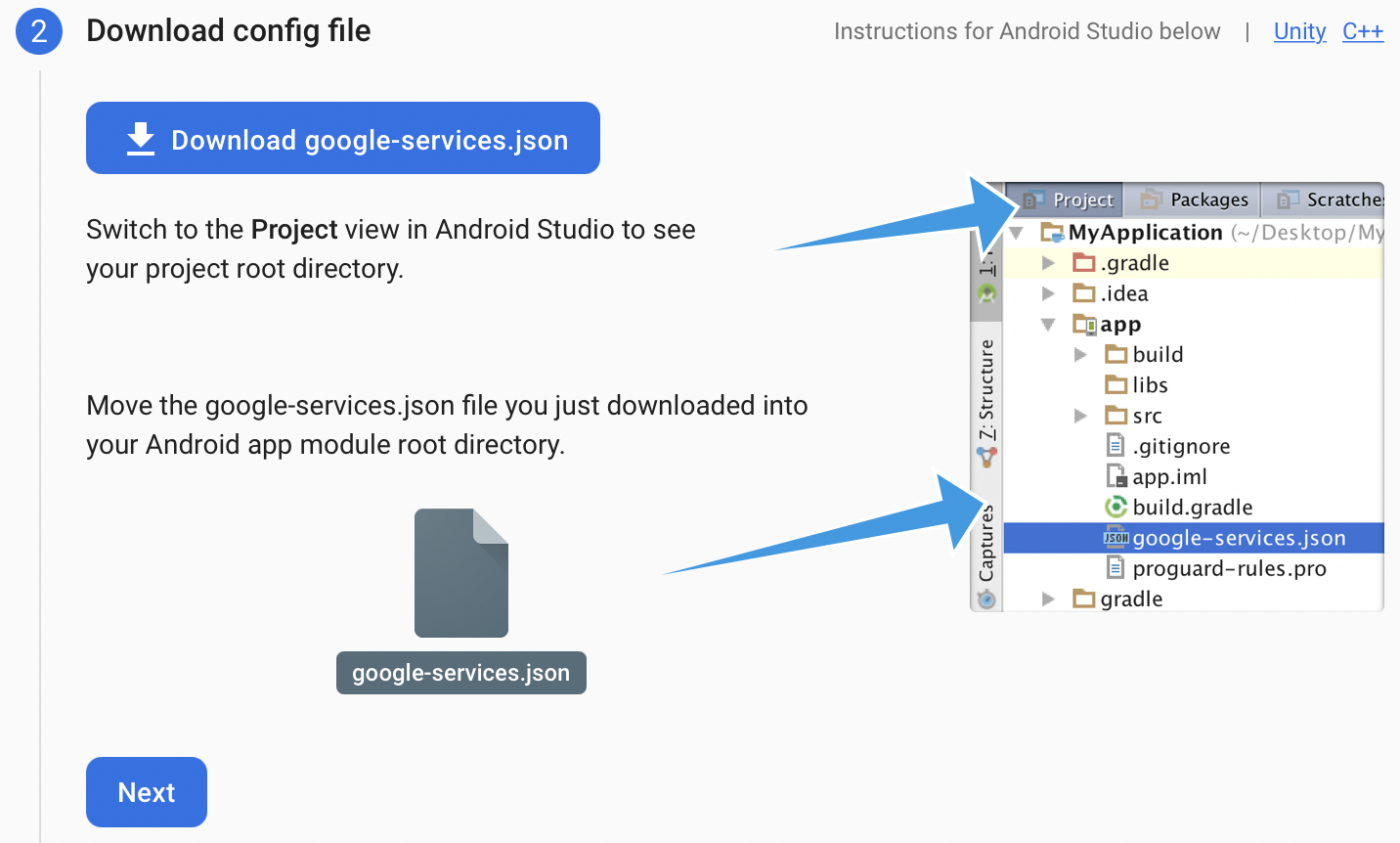
6. تنزيل ملف التكوين: قم بتنزيل ملف google-services.json وضعه في جذر وحدة تطبيق Android الخاصة بك في android/app/
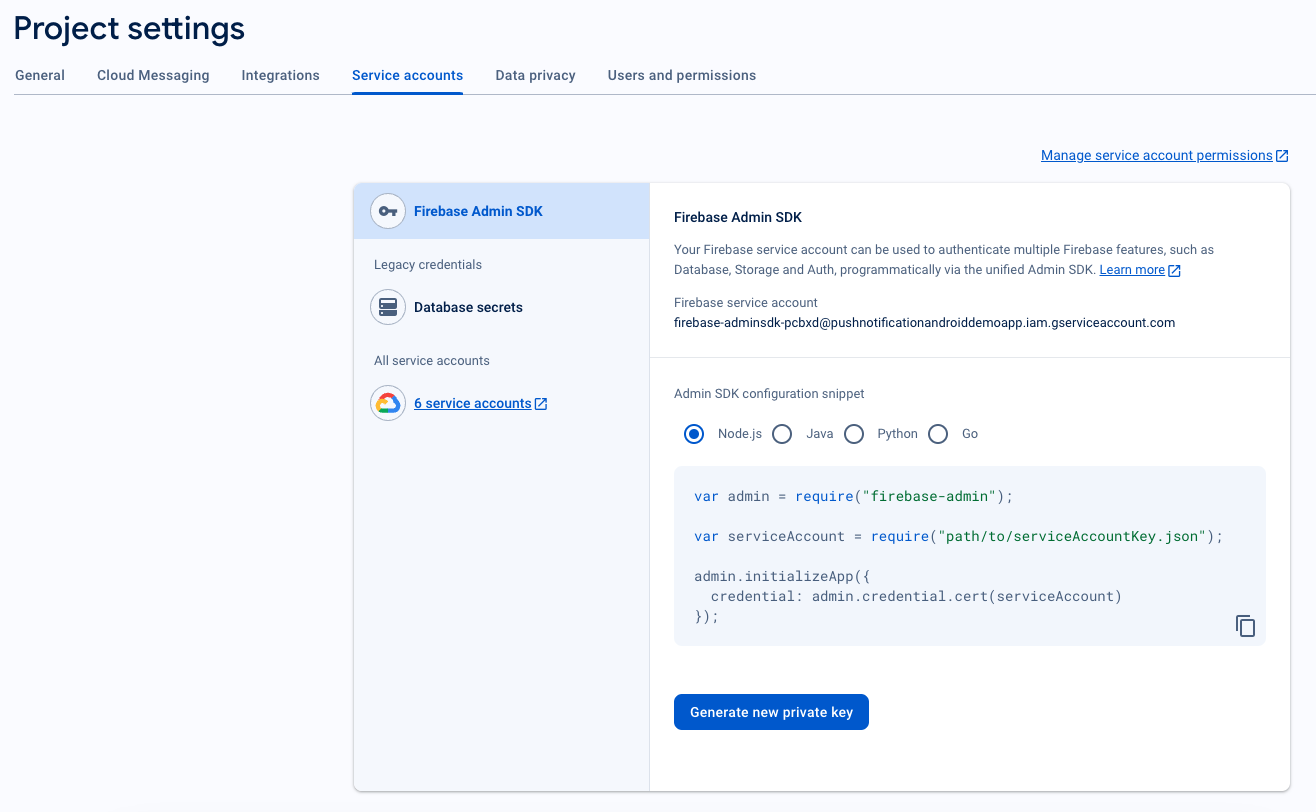
7. إنشاء مفتاح حساب الخدمة بصيغة JSON
- في وحدة تحكم Firebase، انقر فوق أيقونة الإعدادات بجوار "نظرة عامة على المشروع" في أعلى اليسار، ثم حدد إعدادات المشروع.
- انتقل إلى علامة التبويب حسابات الخدمة.
- انقر فوق إنشاء مفتاح خاص جديد، وقم بتنزيل ملف .json.
- احتفظ بهذا الملف بأمان حيث ستحتاجه لإعداد لوحة تحكم PushEngage.
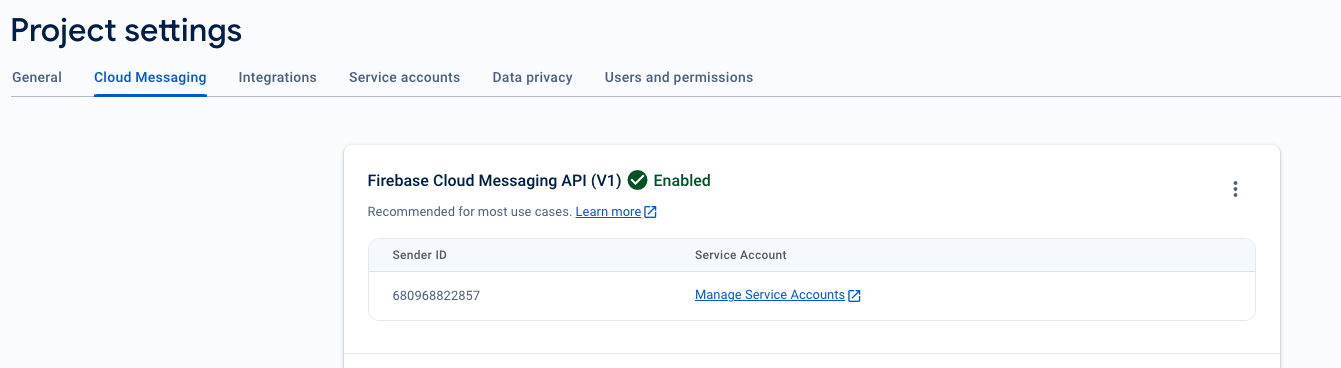
8. استرداد معرّف المرسل
- في وحدة تحكم Firebase، انقر فوق أيقونة الإعدادات بجوار نظرة عامة على المشروع في أعلى اليسار وحدد "إعدادات المشروع".
- حدد علامة التبويب Cloud Messaging، هنا ستجد معرّف المرسل، وهو مطلوب لتهيئة PushEngage SDK.
دمج FCM مع لوحة تحكم PushEngage
لدمج تفاصيل FCM بسلاسة مع لوحة تحكم PushEngage، اتبع الخطوات الموضحة أدناه:
- قم بالوصول إلى حساب PushEngage الخاص بك عن طريق تسجيل الدخول باستخدام بيانات الاعتماد الخاصة بك.
- انتقل إلى الإعدادات » التثبيت ثم اختر علامة التبويب Android SDK
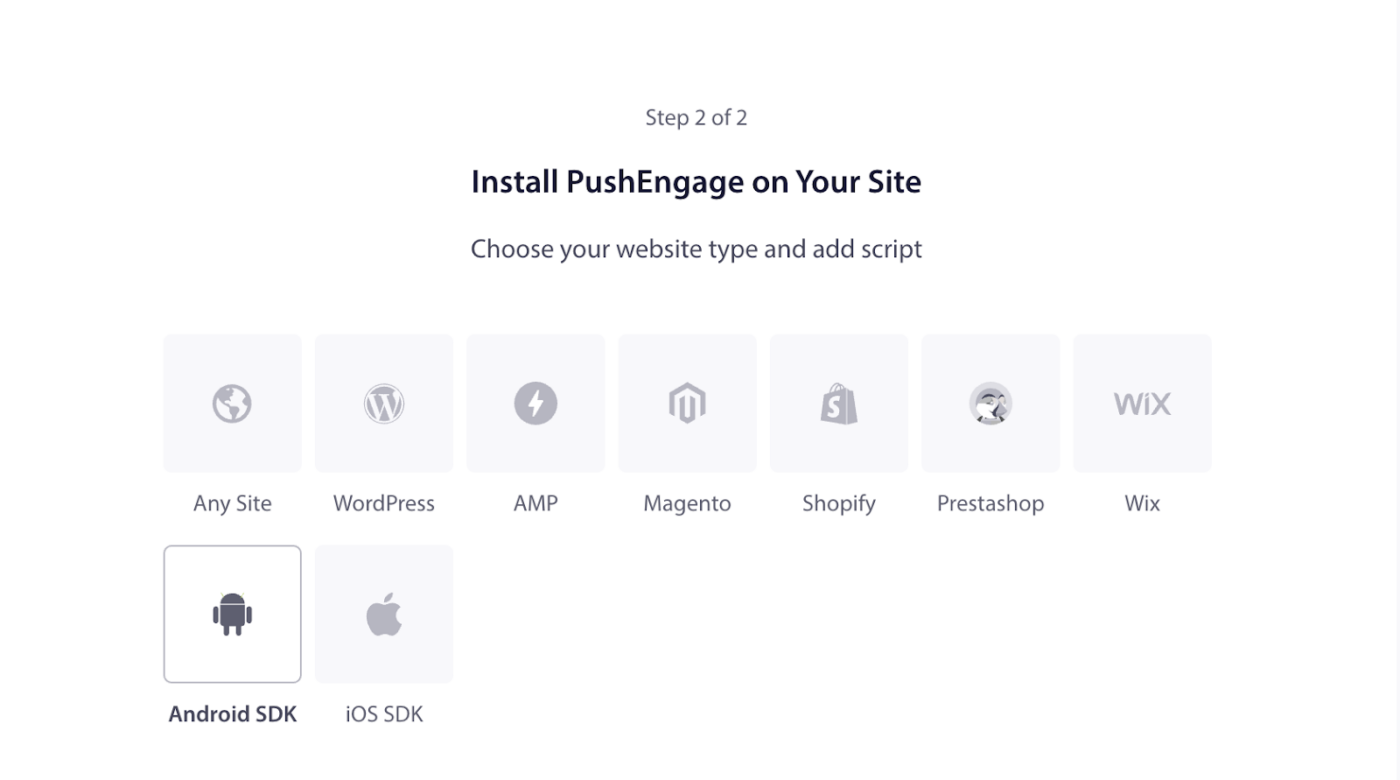
- الآن، قم بتكوين إعدادات FCM
- أدخل معرف مرسل Firebase الخاص بك (تم استرداده من وحدة تحكم Firebase).
- قم بتحميل ملف حساب الخدمة JSON (تم تنزيله من Firebase).
- انقر فوق الزر تحديث لحفظ هذه الإعدادات.
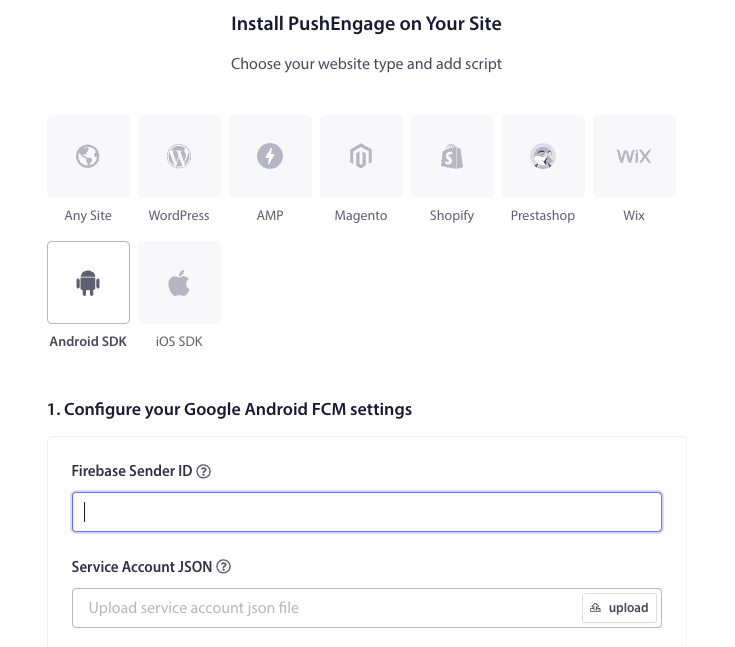
5. انسخ معرف التطبيق: بعد تكوين إعدادات FCM، سيتم تزويدك بـ معرف التطبيق. انسخ معرف التطبيق هذا لأنه مطلوب لتهيئة PushEngage Android SDK في تطبيق Flutter الخاص بك.
إعداد iOS
إعداد المشروع
نطلب منك اتباع الخطوات أدناه بعد فتح مشروعك.
إليك كيفية فتح مشروع: your_project_name » iOS » Runner.xcworkspace.
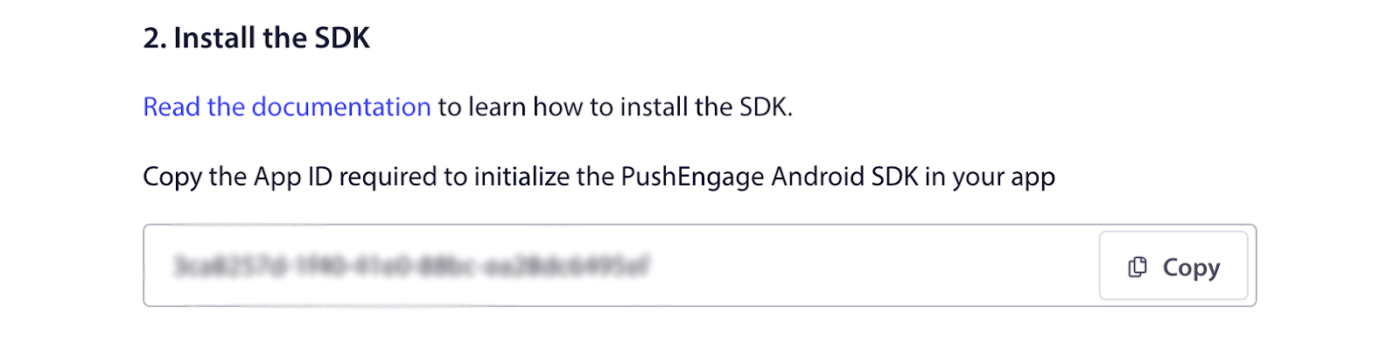
1. تمكين الإشعارات عن بُعد
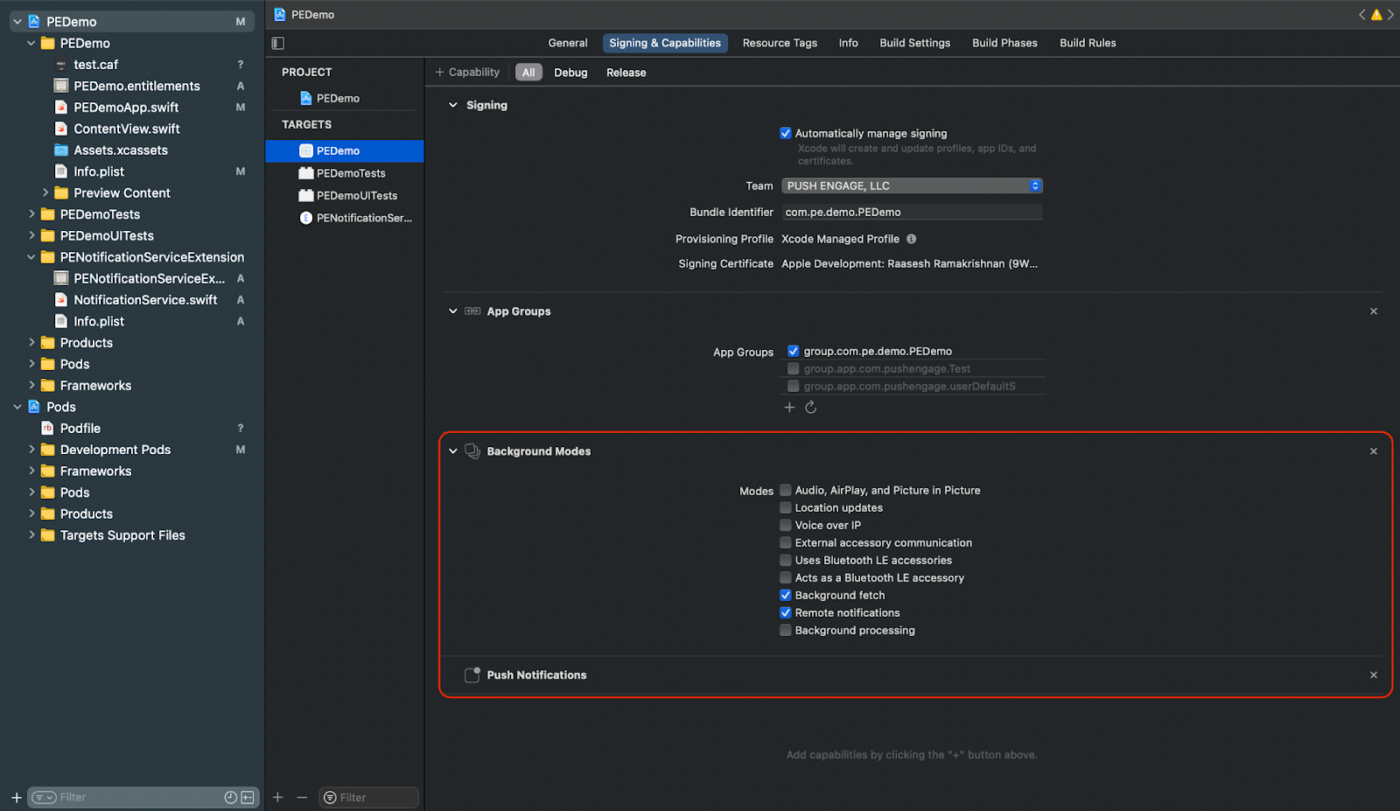
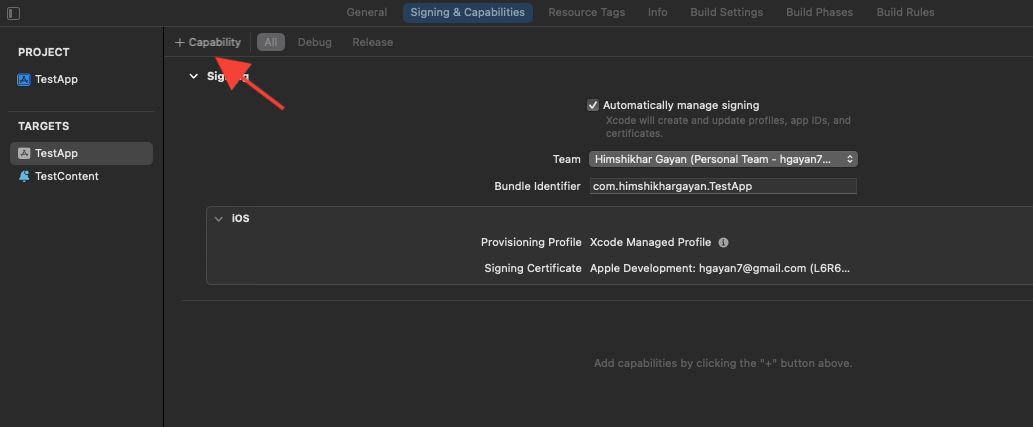
- افتح مشروع Xcode الخاص بك وحدد المشروع الجذر في مستكشف المشروع.
- اختر هدف التطبيق الرئيسي الخاص بك.
- انتقل إلى "التوقيع والإمكانيات".
- تأكد من إضافة إمكانية أوضاع الخلفية. إذا لم يكن الأمر كذلك، فقم بإضافتها بالنقر فوق الزر "+ إمكانية".
- بالمثل، تأكد من إضافة إمكانية الإشعارات. إذا لم يكن الأمر كذلك، فقم بإضافتها باستخدام الزر "+ إمكانية".

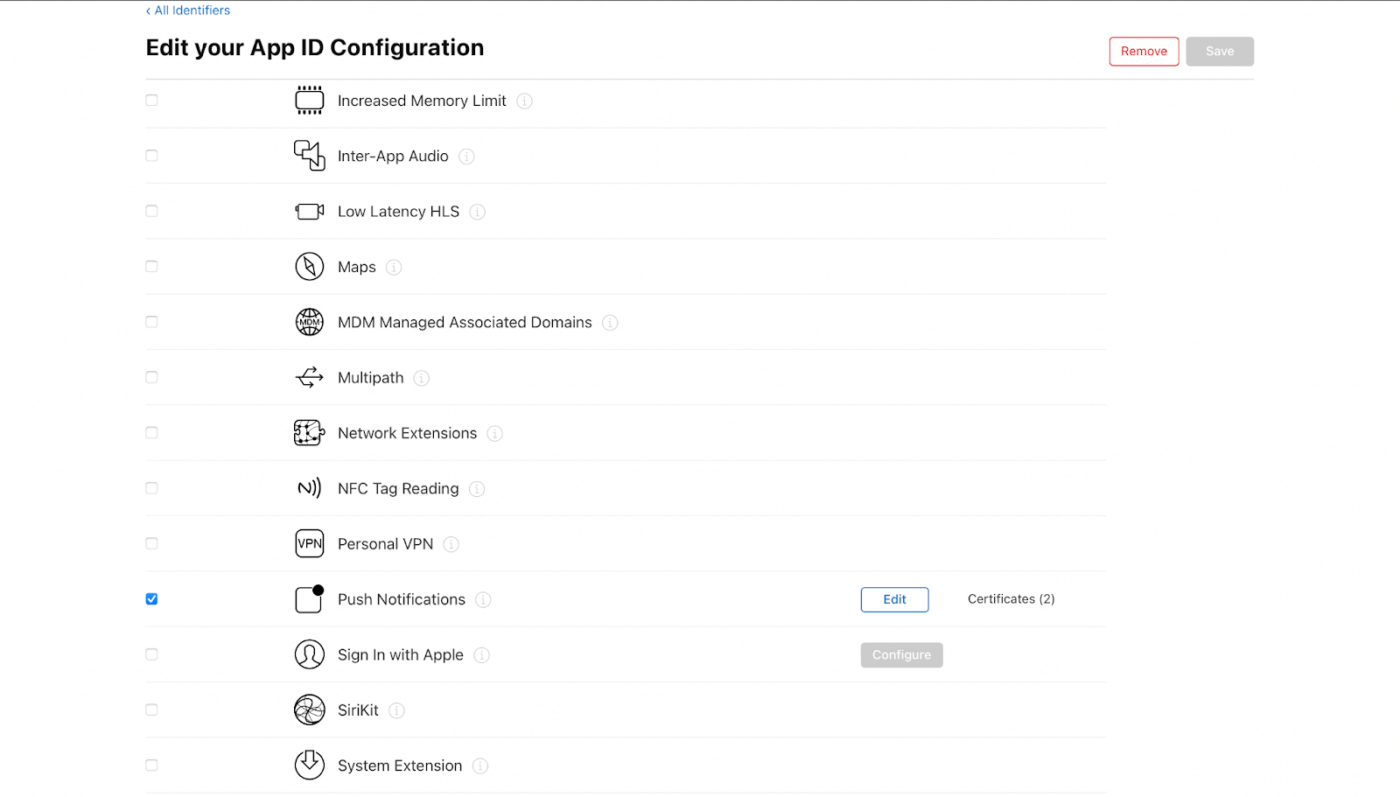
إذا لم تكن إمكانية "الإشعارات" مرئية في Xcode:
- انتقل إلى حساب مطور Apple الخاص بك.
- انتقل إلى "الشهادات والمعرفات والملفات الشخصية". حدد معرف التطبيق الخاص بك.
- قم بتحرير تكوين معرف التطبيق الخاص بك وتأكد من تمكين الإشعارات.
- ارجع إلى Xcode وحاول إضافة إمكانية الإشعارات مرة أخرى.
2. تمكين أوضاع الخلفية
- في مشروع Xcode الخاص بك، انتقل إلى "التوقيع والإمكانيات".
- داخل "أوضاع الخلفية"، قم بتمكين كل من "الإشعارات عن بُعد" و "جلب الخلفية".
- تضمن هذه الخطوة أن تطبيقك يمكنه التعامل مع الإشعارات عن بُعد وجلب الخلفية بكفاءة.
إذا لم يكن لديك شهادة APN لنظام iOS، يمكنك إنشاء واحدة باستخدام الدليل هنا.
بعد ذلك، تحتاج إلى إضافة امتداد خدمة الإشعارات وامتداد محتوى الإشعارات لنظام iOS فقط.
إنشاء امتداد خدمة الإشعارات
يعزز امتداد خدمة الإشعارات قدرة تطبيق iOS الخاص بك على تلقي الإشعارات. يُستخدم هذا لتعديل محتوى الإشعار أو جلب/معالجة أي بيانات عند تلقي الإشعار. اتبع هذه الخطوات لإنشاء امتداد خدمة الإشعارات:
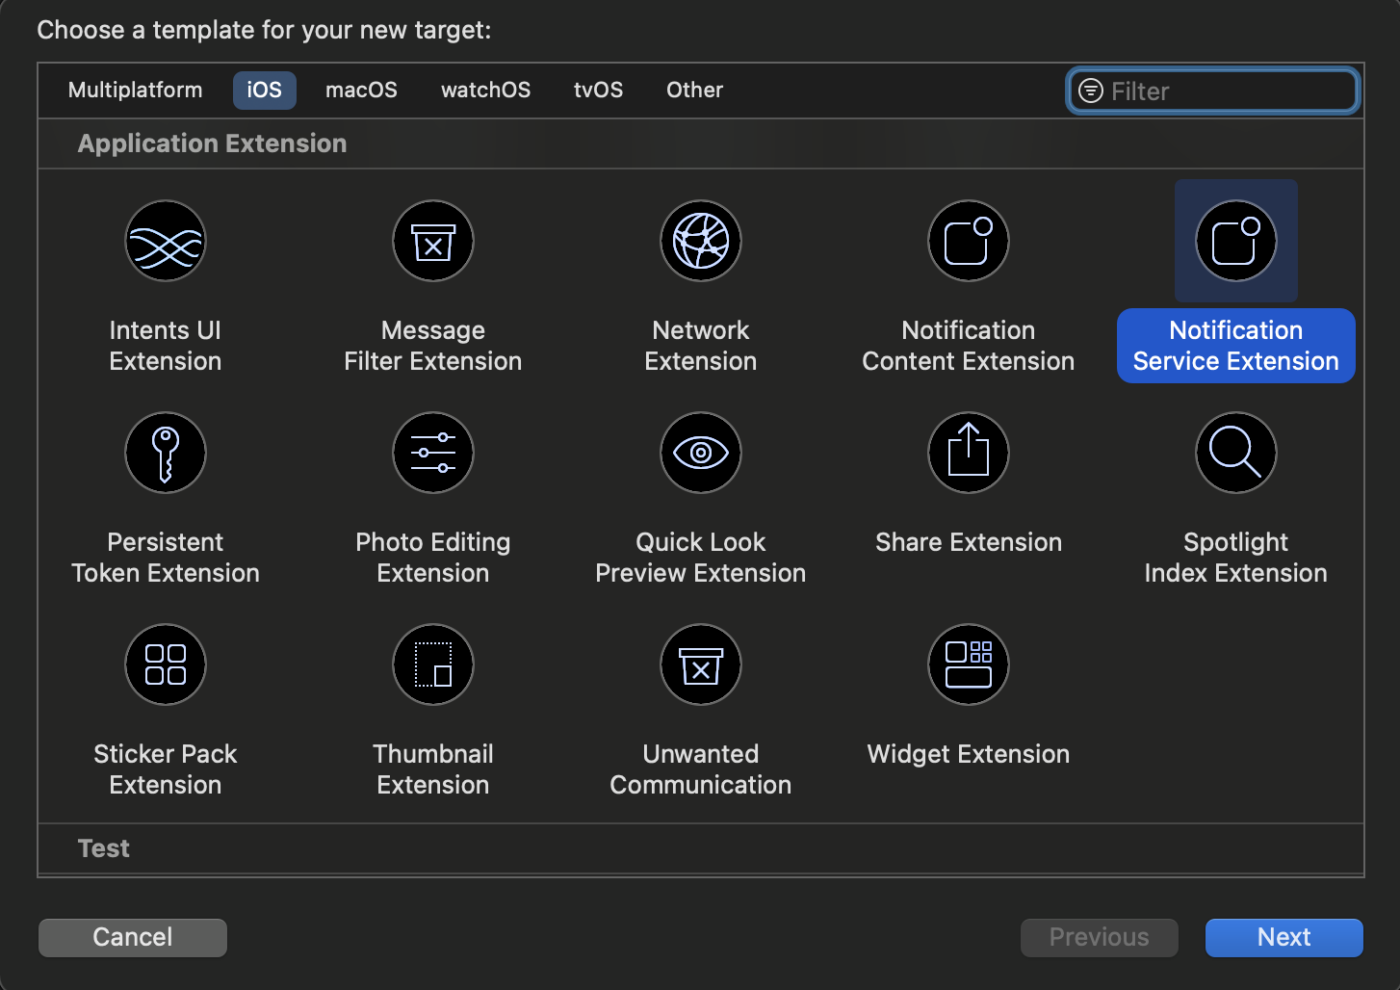
- افتح Xcode وانتقل إلى مشروعك.
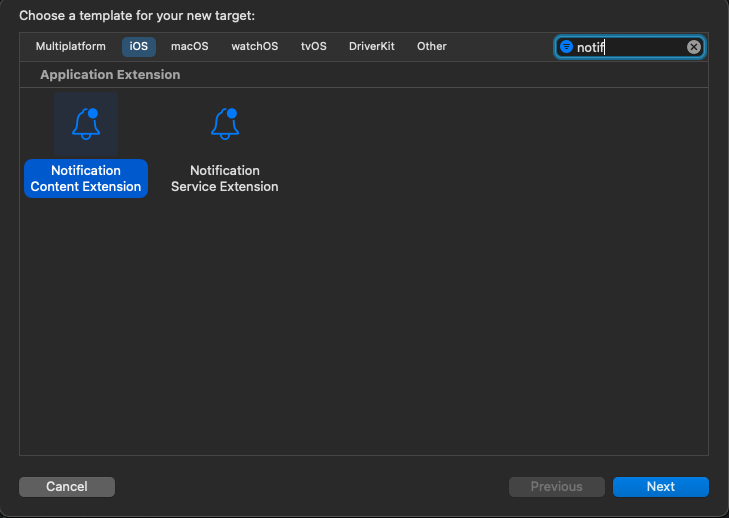
- Select File » New » Target from the menu.
- In the template selection window, choose Notification Service Extension and click Next.
4. Provide a name for your extension, for example, PushEngageNotificationServiceExtension, and click Finish.
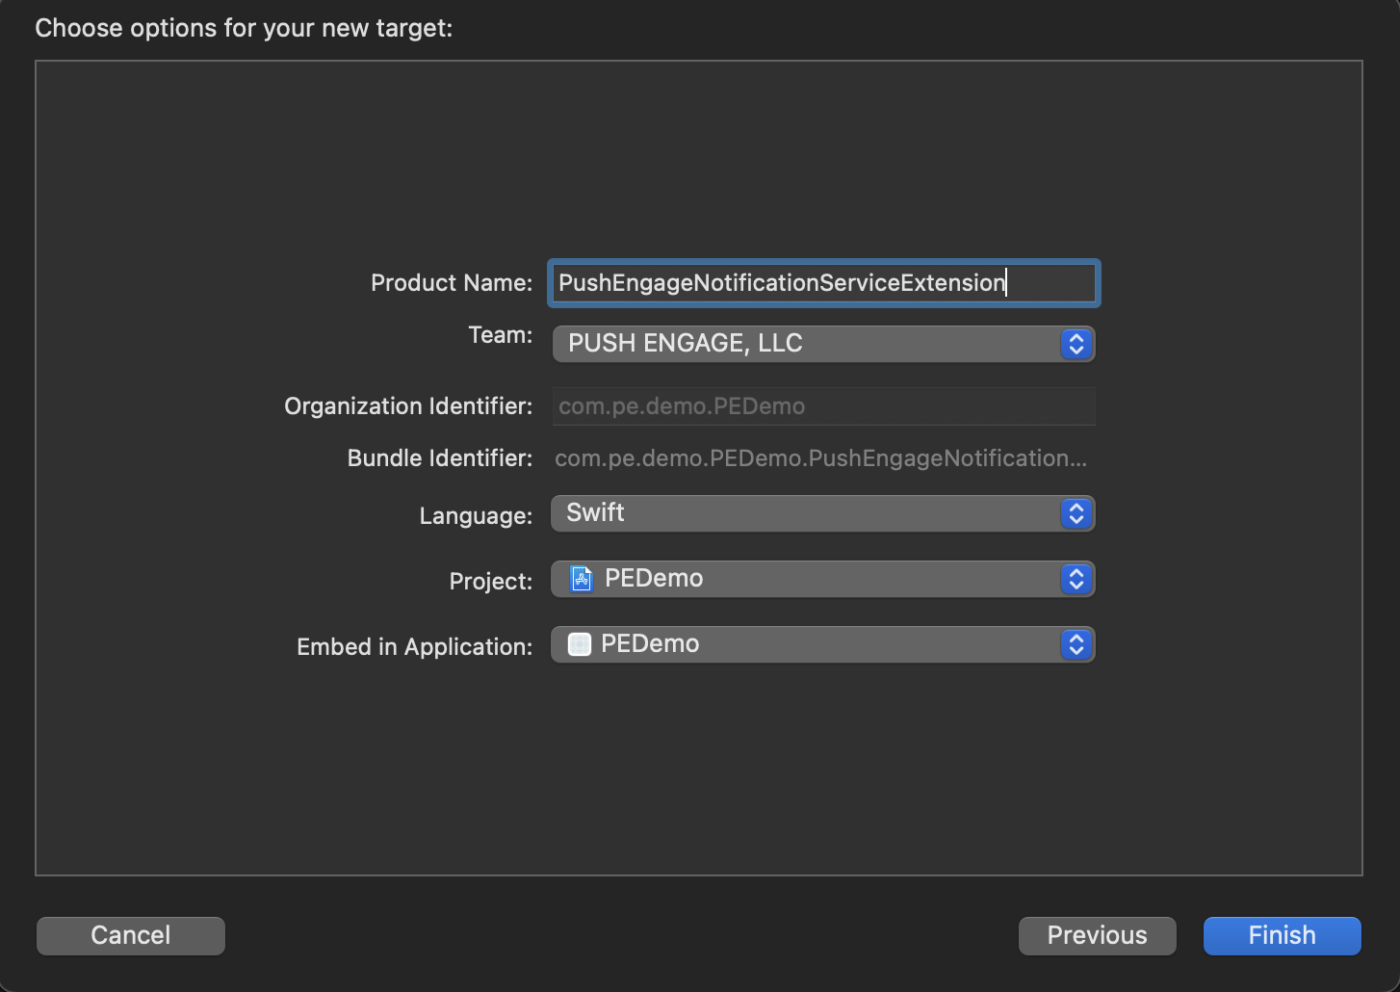
4. Provide a name for your extension, for example, PushEngageNotificationServiceExtension, and click Finish.
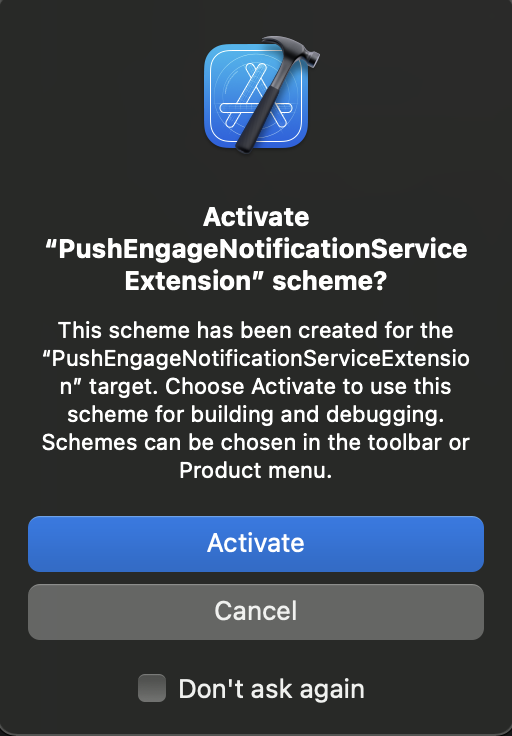
5. When you finish creating the Notification Service Extension, you might be prompted to activate it. Do not activate it immediately. As activating the extension would shift Xcode’s debugging focus from your app to the extension. If you activate it by accident, don’t worry; you can switch back to debugging your app within Xcode.
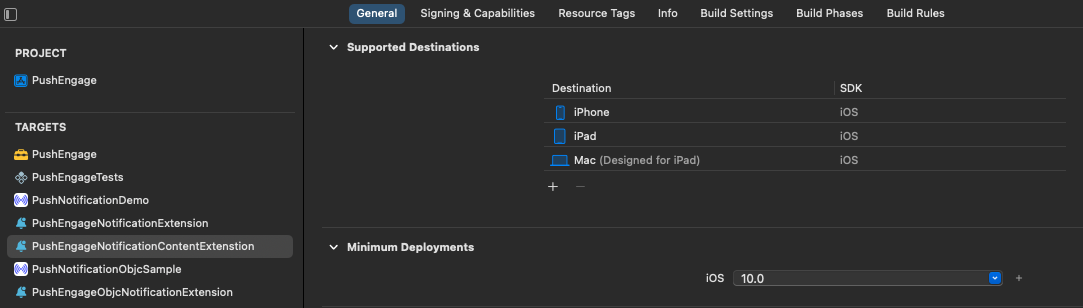
6. In the project navigator, select the top-level project directory and select the NotificationServiceExtension target in the project from the targets list created in step no. 4.
7. Set the Deployment Target to be at iOS 10 or above, which is the version of iOS that Apple released the support for this extension.

Initializing PushEngage SDK for Notification Service Extension
To ensure the proper functioning of PushEngage SDK in your iOS Notification Service Extension, please go through below steps
- Open your_project_name » ios » Podfile.
- Add the following to the bottom of your Podfile:
post_install do |installer|

  installer.pods_project.targets.each do |target|

    flutter_additional_ios_build_settings(target)

    target.build_configurations.each do |config|

      config.build_settings['APPLICATION_EXTENSION_API_ONLY'] = 'No'

     end

  end

end

target 'Your_Notification_Service_Extension_Name' do

  use_frameworks!

  pod 'PushEngage', '~>0.0.4'

end
- Install the dependency:
Now you need to give command into the iOS directory of your project and execute the following command:
pod repo update

pod install
- In your Notification Service Extension target, make sure to import the PushEngage framework and add the necessary initialization code. Here’s how you can do it using Swift.
import UserNotifications
import PushEngage

@available(iOSApplicationExtension 10.0, *)
class PushEngageNotificationServiceExtension: UNNotificationServiceExtension {

    var contentHandler: ((UNNotificationContent) -> Void)?
    var bestAttemptContent: UNMutableNotificationContent?
    var request : UNNotificationRequest?

    override func didReceive(_ request: UNNotificationRequest, withContentHandler contentHandler: @escaping (UNNotificationContent) -> Void) {
        self.request = request
        self.contentHandler = contentHandler
        self.bestAttemptContent = (request.content.mutableCopy() as? UNMutableNotificationContent)

        if let bestContent = bestAttemptContent {
            PushEngage.didReceiveNotificationExtensionRequest(request, bestContentHandler: bestContent)
            contentHandler(bestContent)
        }
    }

    override func serviceExtensionTimeWillExpire() {
        // Called just before the extension will be terminated by the system.
        // Use this as an opportunity to deliver your "best attempt" at modified content, otherwise the original push payload will be used.
        if let contentHandler = contentHandler, let request = request ,let bestAttemptContent =  bestAttemptContent {
            guard let content = PushEngage.serviceExtensionTimeWillExpire(request, content: bestAttemptContent) else {
                contentHandler(bestAttemptContent)
                return
            }
            contentHandler(content)
        }
    }

}
Creating Notification Content Extension
To improve the way by adding custom UI, you’ll need to create a Notification Content Extension. Follow the steps below to set up the extension:
- In Xcode, go to File » New » Target.
- Select Notification Content Extension and click Next.
3. Do not select “Activate” on the dialog that appears after clicking Finish. Canceling keeps Xcode debugging your app instead of the extension. If you accidentally activate it, switch back to debugging your app within Xcode (next to the run button).
4. In the project navigator, select the top-level project directory and select the NotificationContentExtension target in the project from the targets list created in step no. 2.
5. Set the Deployment Target to iOS 10 or above, which is the version of iOS that Apple released the support for this extension.
Initializing PushEngage SDK for Notification Content Extension
To ensure the proper functioning of PushEngage SDK in your iOS Notification Content Extension, follow these steps:
Open your_project_name » iOS » Podfile.
Add the following to the bottom of your Podfile:
target 'Your_Notification_Content_Extension_Name' do
  use_frameworks!
  pod 'PushEngage', '0.0.4'
end
- Install the dependency: Here is the code you need to run in your command line.
e
pod repo update
pod install
- في هدف محتوى الإشعارات الخاص بك، تأكد من استيراد إطار عمل PushEngage وإضافة رمز التهيئة الضروري. إليك كيف يمكنك القيام بذلك مع بعض الأمثلة لعناصر واجهة المستخدم باستخدام Swift.
import UIKit
import UserNotifications
import UserNotificationsUI
import PushEngage

@available(iOSApplicationExtension 10.0, *)

class NotificationViewController: UIViewController, UNNotificationContentExtension {
    fileprivate var hostingView: UIHostingController<ContentView>?
    override func viewDidLoad() {
        super.viewDidLoad()
        self.view.backgroundColor = .white
    }

    func didReceive(_ notification: UNNotification) {
        if(notification.request.content.categoryIdentifier == "your_identifier"){
            let payLoad = PushEngage.getCustomUIPayLoad(for: notification.request)
  //pass the payload to your custom View
            let view = CustomView(payLoadInfo: payLoad)
            hostingView = UIHostingController(rootView: view)
If let customView = self.hostingView {
            addChild(hostingView!)
}
        }
    }
}
إضافة مجموعات التطبيقات
تعد مجموعات التطبيقات ضرورية لتمكين الاتصال بين التطبيق الرئيسي، وامتداد خدمة الإشعارات، وامتداد محتوى الإشعارات. اتبع هذه الخطوات لإضافة مجموعات التطبيقات إلى مشروع iOS الخاص بك:
إذا كان لديك مجموعة تطبيقات موجودة وترغب في استخدامها فقط، فانتقل إلى الخطوة رقم 4.
- في مشروع Xcode الخاص بك، في مستكشف المشروع، حدد دليل المشروع ذي المستوى الأعلى وحدد الهدف الرئيسي للتطبيق.
- انتقل إلى علامة التبويب التوقيع والإمكانيات.
- انقر فوق الزر “+ إمكانية” وحدد مجموعات التطبيقات من القائمة.
4. انقر فوق الزر + لإضافة مجموعة تطبيقات.
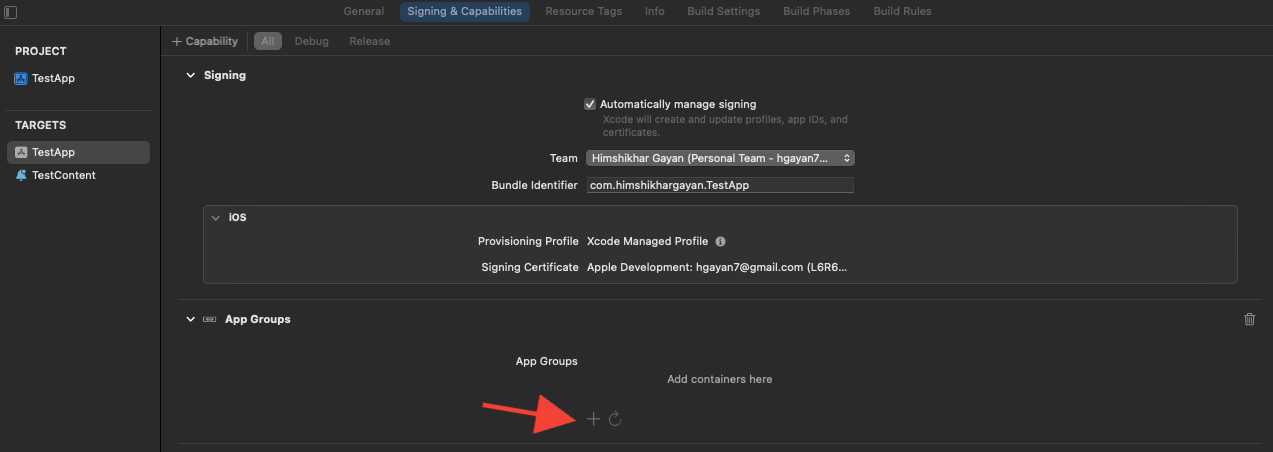
5. أضف اسمًا فريدًا لمجموعة التطبيقات الخاصة بك وانقر فوق موافق.
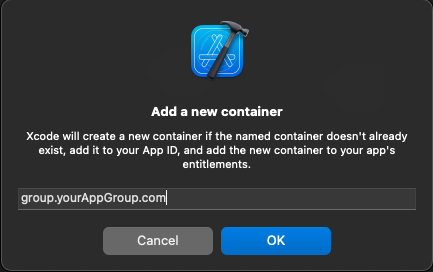
6. في منطقة المحرر الرئيسية، حدد الهدف الرئيسي لتطبيقك. تم إنشاء مجموعة تطبيقات، يرجى تقديم اسم المجموعة في ملف Info.plist الخاص بتطبيقك باستخدام المفتاح PushEngage_App_Group_Key.
7. أضف نفس المفتاح والقيمة في ملف Info.plist الخاص بامتداد خدمة الإشعارات.
8. تأكد من تحديد نفس مجموعة التطبيقات في كل من هدف التطبيق الرئيسي وامتداد خدمة الإشعارات الخاص بك.
تهيئة PushEngage SDK
في ملف main.dart الخاص بك، قم بتهيئة PushEngage SDK.
void main() {
  runApp(const MyApp());
}

class MyApp extends StatefulWidget {
  const MyApp({super.key});
  @override
  State<MyApp> createState() => _MyAppState();
}

class _MyAppState extends State<MyApp> {
  @override
  void initState() {
    super.initState();
    initPlatformState();
  }

  Future<void> initPlatformState() async {
    PushEngage.setAppId("your_pushengage_app_id");
  }
  @override
  Widget build(BuildContext context) {
    return const MaterialApp(
      title: 'PushEngage',
      debugShowCheckedModeBanner: false,
      home: Home(),
    );
  }
}
في ملف AppDelegate.swift الخاص بتطبيق iOS
import Flutter
import UIKit
import PushEngage

@UIApplicationMain
@objc class AppDelegate: FlutterAppDelegate {

    override init() {
        super.init()
        PushEngage.swizzleInjection(isEnabled: true)
    }

    override func application(
        _ application: UIApplication,
        didFinishLaunchingWithOptions launchOptions: [UIApplication.LaunchOptionsKey: Any]?
    ) -> Bool {
        if #available(iOSApplicationExtension 10.0, *) {
            UNUserNotificationCenter.current().delegate = self
        }
        GeneratedPluginRegistrant.register(with: self)
        PushEngage.setBadgeCount(count: 0)
        PushEngage.setNotificationWillShowInForegroundHandler { notification, completion in
            if notification.contentAvailable == 1 {
                // in case developer failed to set completion handler. After 25 sec handler will call.
                completion(nil)
            } else {
                completion(notification)
            }
        }
        return super.application(application, didFinishLaunchingWithOptions: launchOptions)
    }
}
معالجة الرابط العميق
الرابط العميق هو شيء يصدر بيانات الرابط العميق.
class Home extends StatefulWidget {
  const Home({super.key});

  @override
  _HomeState createState() => _HomeState();
}

class _HomeState extends State<Home> {
  late StreamSubscription _deepLinkSubscription;

  @override
  void initState() {
    super.initState();
    PushEngage.deepLinkStream.listen((data) {
      _handleDeepLink(data);
    });
  }

  void _handleDeepLink(Map<String, dynamic>? data) {
    // Parse the deep link and navigate accordingly
    Uri uri = Uri.parse(data?['deepLink']);
    print('Path: ${uri.path}');
    updateResponseText(data.toString());
    switch (uri.path) {
      case 'trigger':
      case '/trigger':
        print(‘your_implementation’)
        break;
    }
  }
c
i
هذا كل شيء، لقد قمت الآن بدمج Flutter SDK بنجاح لتطبيقات Android و iOS.
إذا واجهت أي مشاكل، يرجى الاتصال بنا بالنقر هنا. سيكون فريق الدعم لدينا قادرًا على مساعدتك.


